
Table of Contents
This tutorial was written by Kevin Kimani, a passionate developer and technical writer who enjoys explaining complicated concepts in a simple way. Connect with him on his GitHub or X to see more of his work!
This is the second installment of a two-part series on building a retrieval-augmented generation (RAG) app using Descope, Supabase, and pgvector. In part one, you set up the backend by scraping data from the Descope website, defined access permissions for developers and the marketing team, generated embeddings for the scraped data, and stored both the data and embeddings in Supabase. You also learned how to store and query embeddings from the Supabase Postgres database using the pgvector extension.
In this part of the series, you’ll integrate Descope as a Security Assertion Markup Language (SAML) provider to enable authentication, add row-level security (RLS) to ensure that users can access only embeddings they are allowed to, and set up a UI for the project.
RAG app overview
Here’s an overview of what you will do in this part of the series:
Create a Descope SAML application.
Add a SAML 2.0 application to the Supabase project you created in the previous part of this series.
Create roles in Descope.
Implement single sign-on (SSO) group mapping to share Descope roles with Supabase.
Create a Supabase custom access token hook to modify the JSON Web Token (JWT) issued to the user.
Enable RLS on the
documentstable you created in the previous part and create a policy to ensure users can access only the documents/embeddings they are authorized to.Create a frontend for the project.
Prerequisites
To follow this guide, you need to have the following:
First part of this series completed
Adding authentication with Descope
Descope simplifies secure access to your applications by providing features such as passwordless login, multifactor authentication (MFA), and SSO support through SAML, a standard for enterprise authentication. As a custom SAML provider, Descope ensures compliance with industry standards while abstracting the complexities of SAML implementation. This offers seamless integrations and a streamlined login experience for your users.
To use Descope to handle authentication in your RAG application, you first need to set it up.
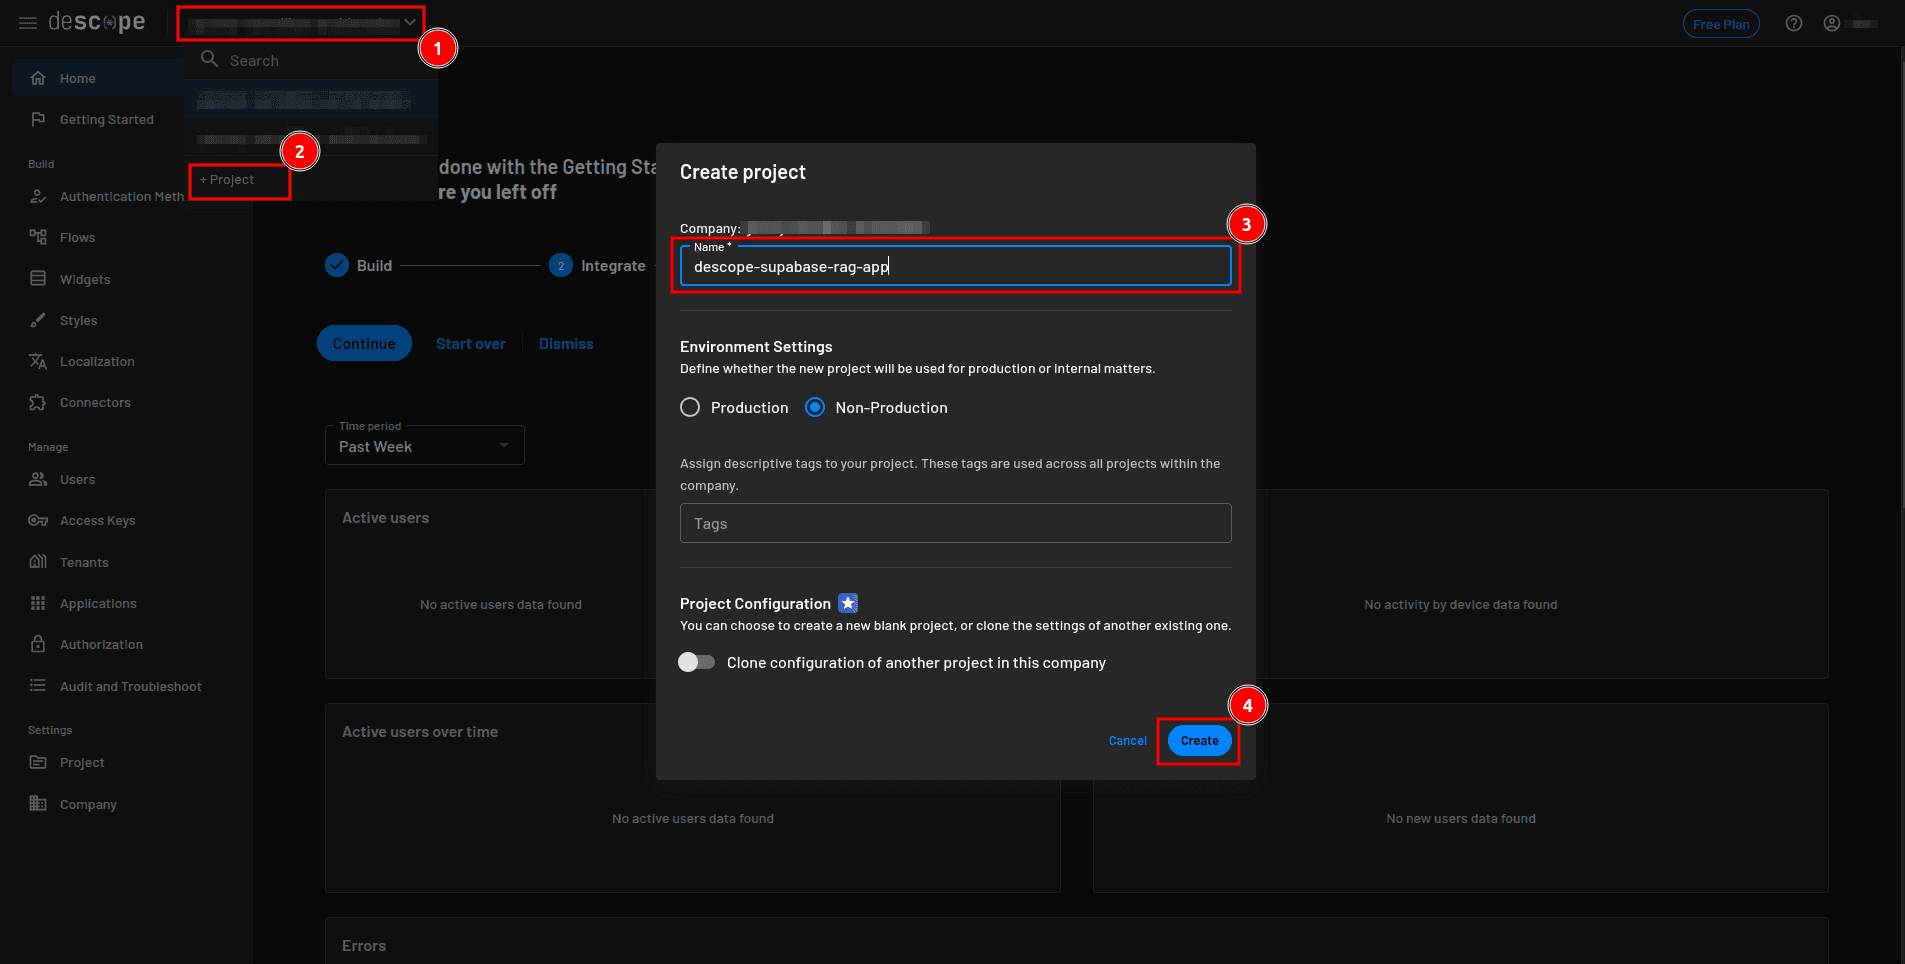
To start, you need to create a Descope project. To do this, go to your Descope console, click the current project drop-down in the top navigation bar, and select + Project from the drop-down. In the Create project drop-down, provide the project name and click Create:
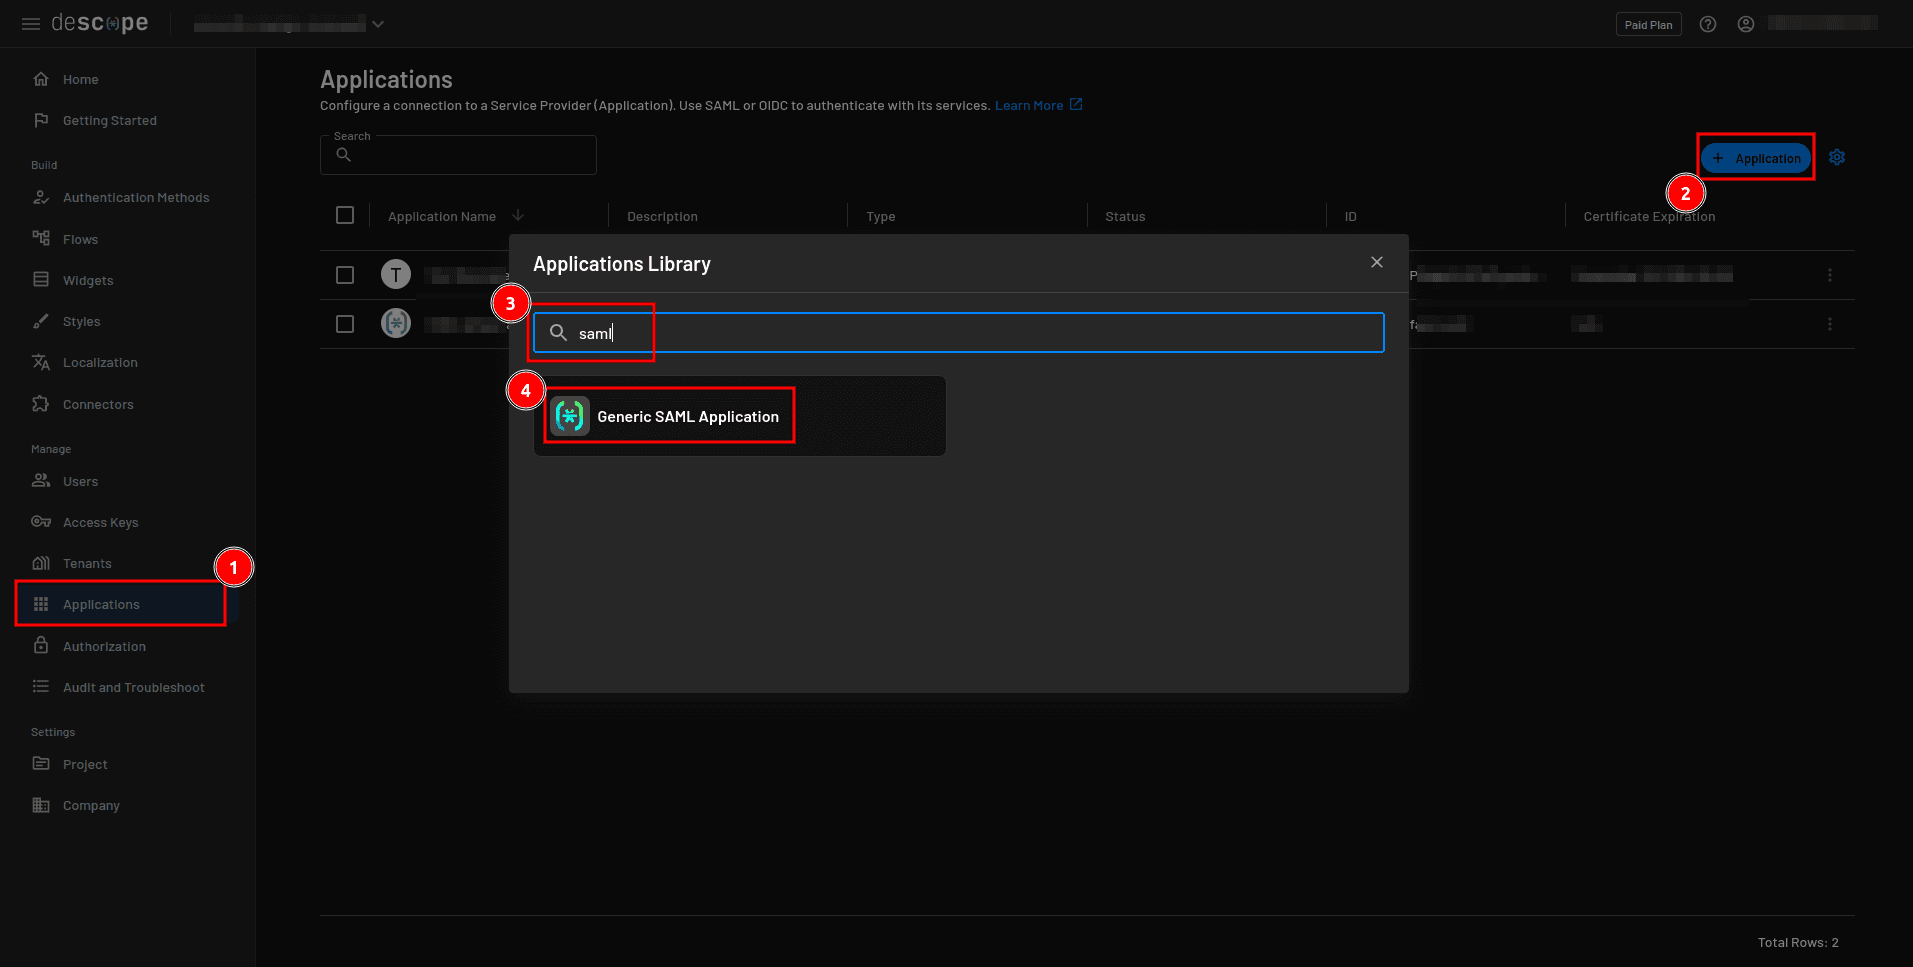
You also have to configure Descope as the identity provider (IdP) for your users. You do this by creating a SAML application. To create a SAML application, select Applications from the sidebar, click the + Application button, and in the Applications Library modal, search for “saml” and click Generic SAML Application from the search results:
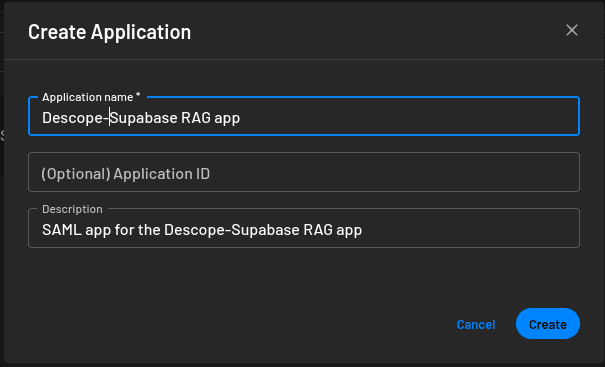
In the Create Application modal, provide a name and a description for the application and click Create:
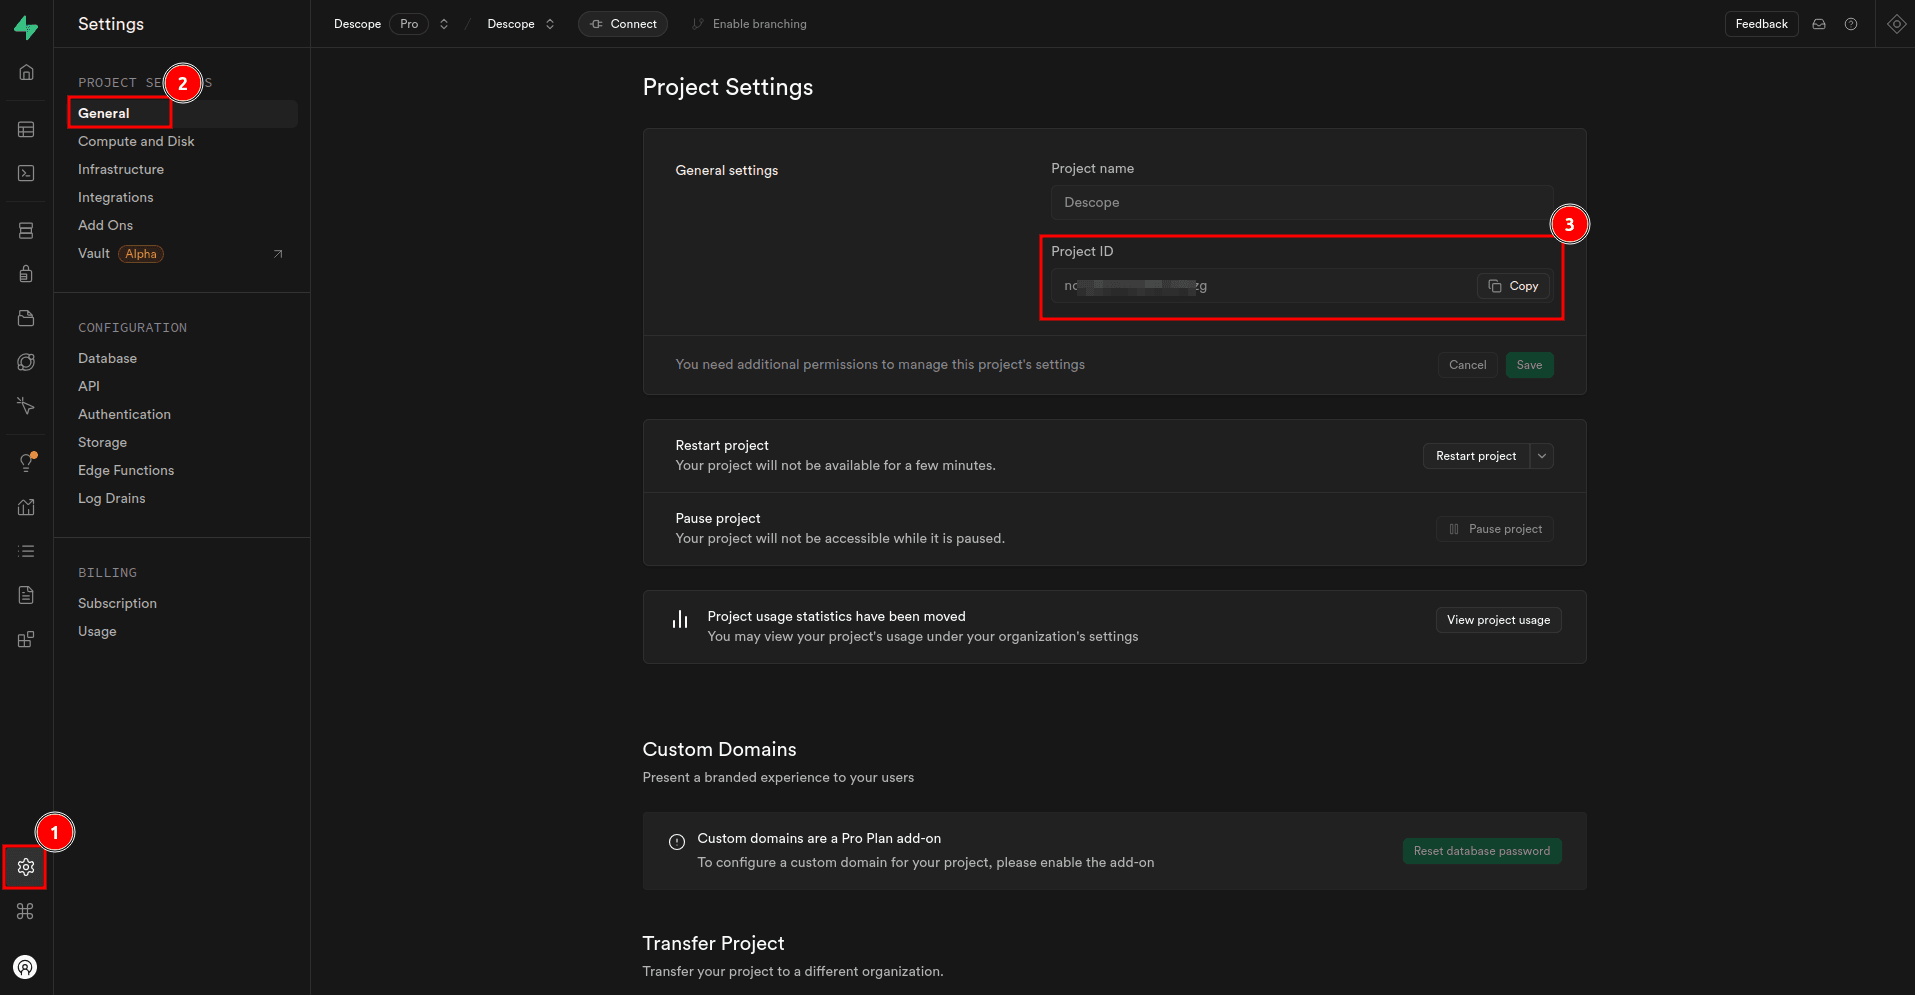
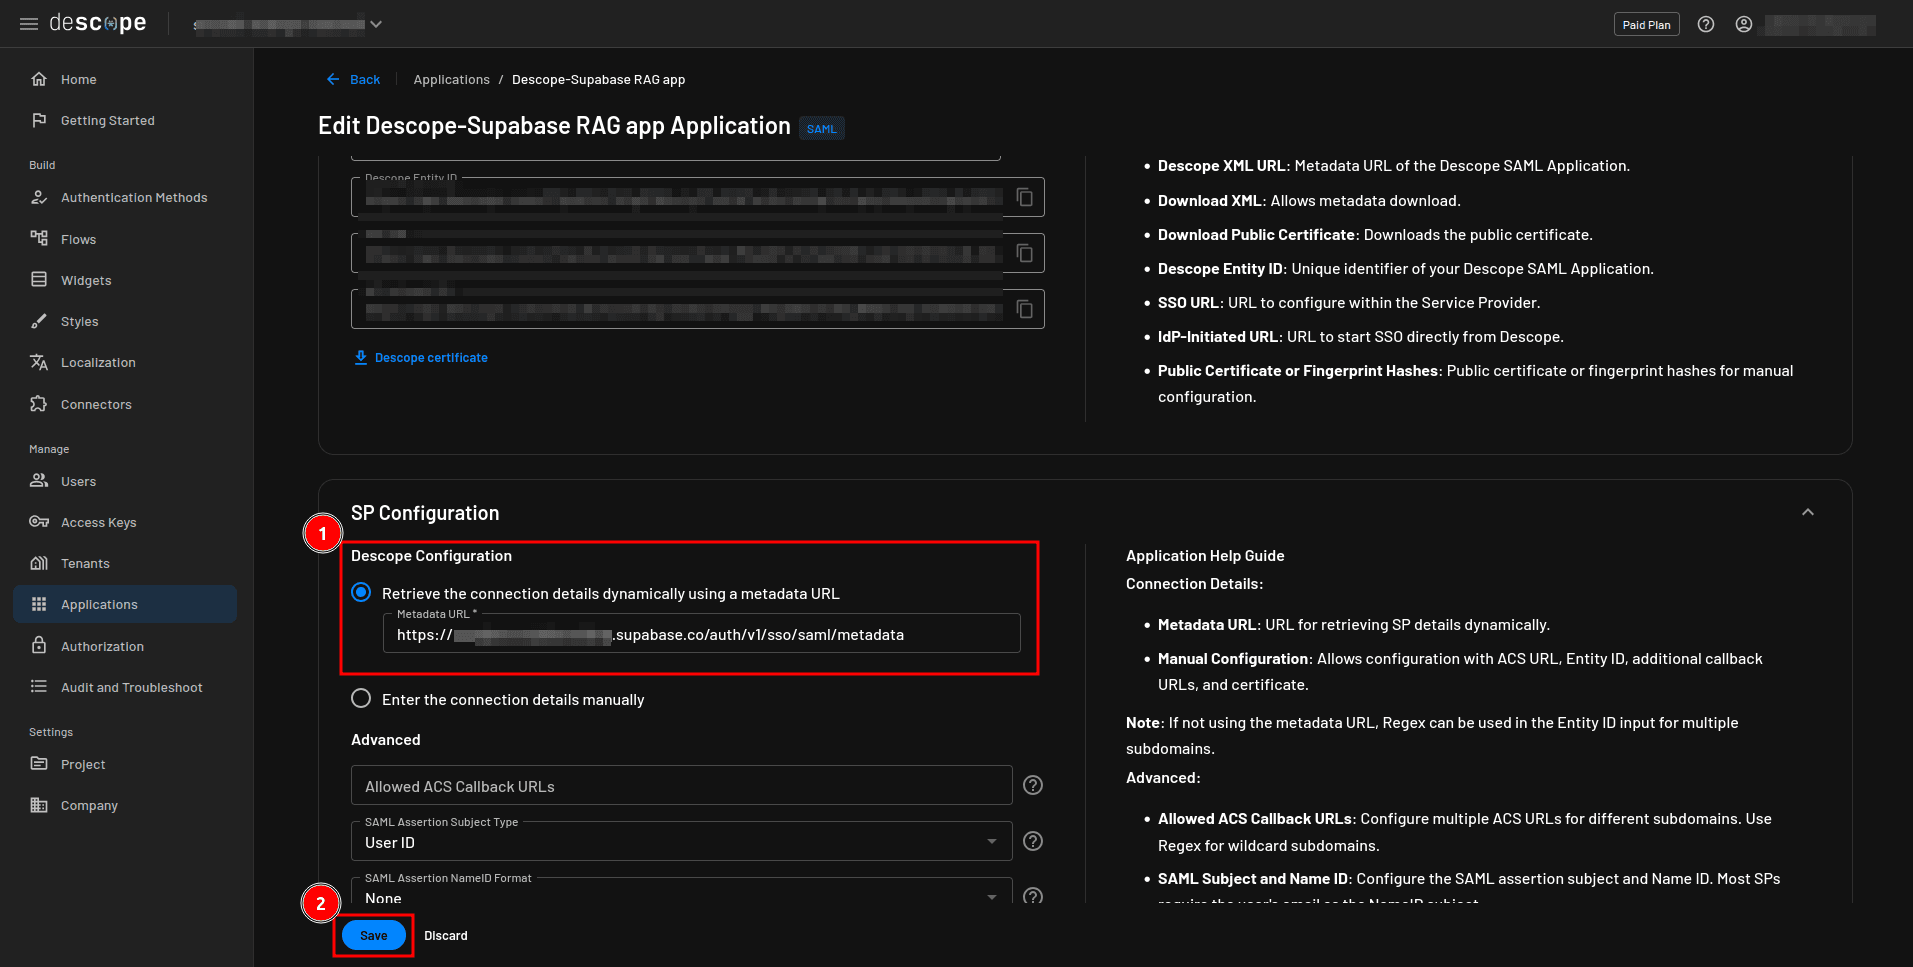
You can now configure the SAML application to enable secure SSO and manage user authentication. Start by providing the service provider (SP) configuration, in this case, Supabase. Navigate to SP Configuration > Descope Configuration and select Retrieve the connection details dynamically using a metadata URL. In the Metadata URL field, provide https://<YOUR-SUPABASE-PROJECT-ID>.supabase.co/auth/v1/sso/saml/metadata, replacing <YOUR-SUPABASE-PROJECT-ID> with your Supabase project ID. You can obtain this ID by navigating to Project Settings > General on your Supabase dashboard:
Click Save:
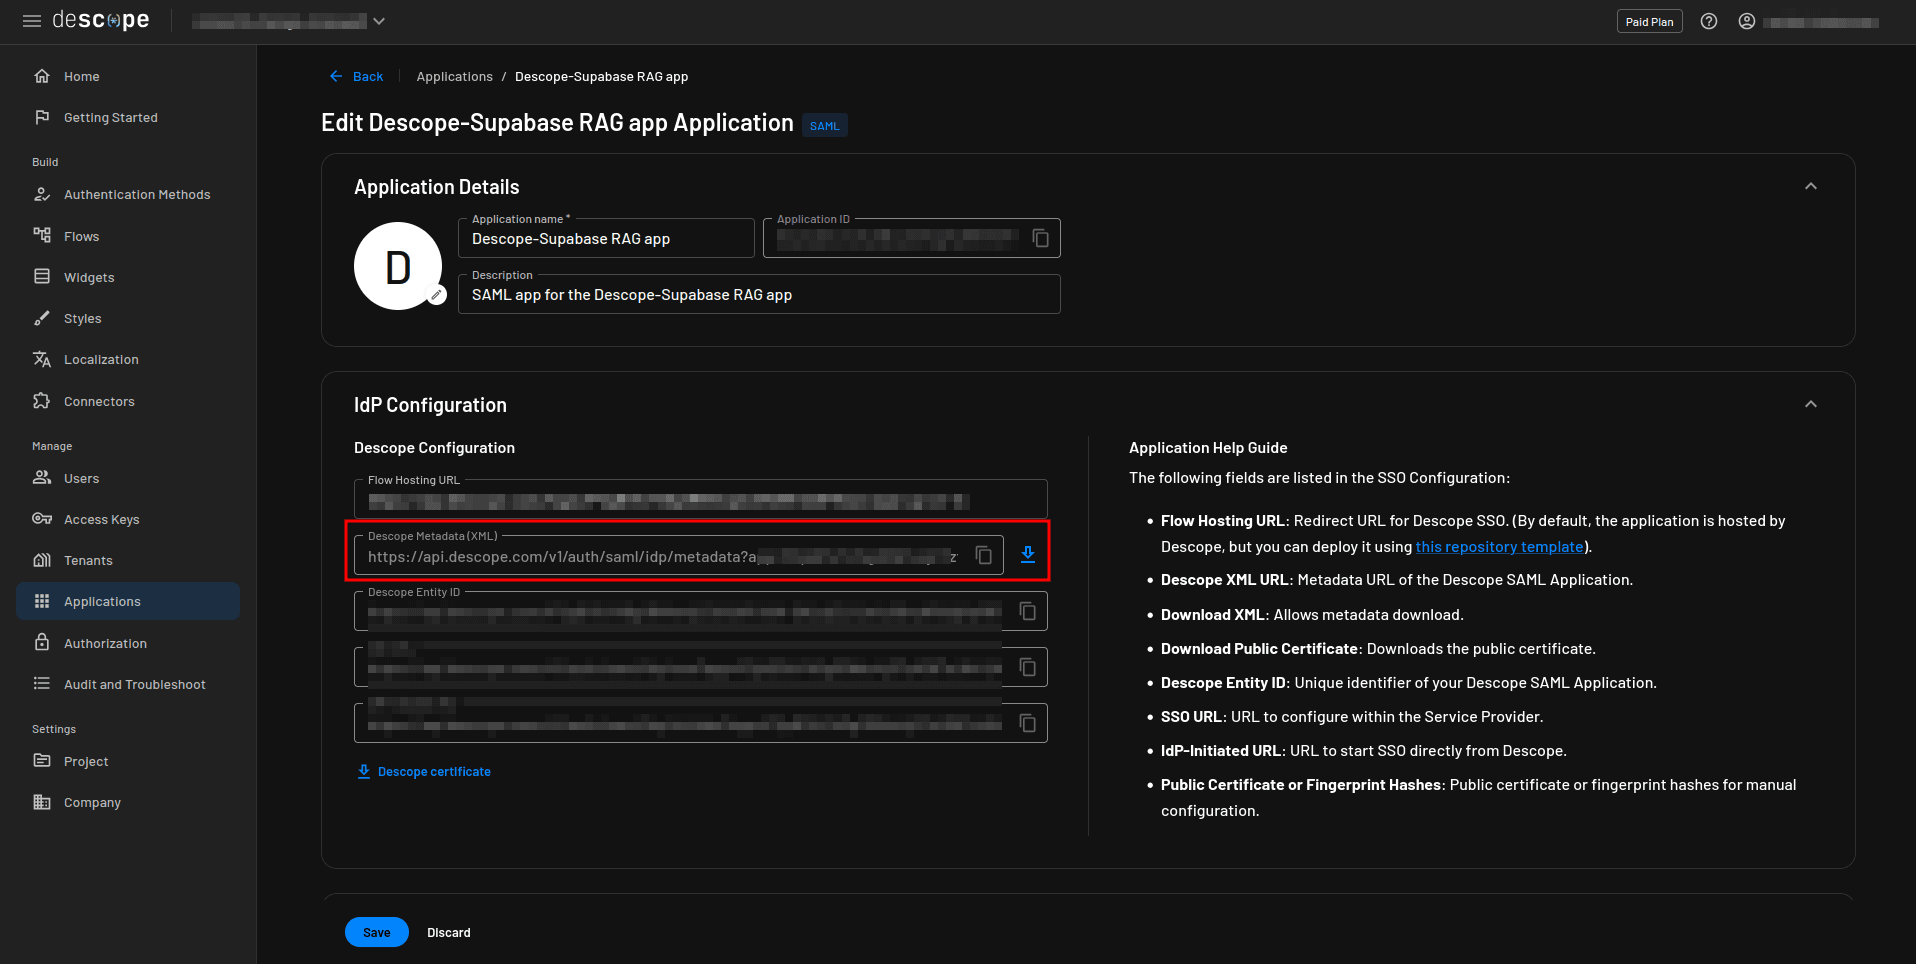
You will come back to this page to apply other configurations later. Before leaving this page, make sure you copy the Descope Metadata XML link as you will use it in the next step:

You have now configured the SAML application in Descope. The next step is to add a SAML 2.0 connection to your Supabase project.
Before adding the connection, you need to enable SAML 2.0 support to your project via the Supabase Auth Providers page:
With the support for SAML 2.0 enabled, you can now add a connection using the Supabase CLI. Launch your terminal and execute the following command:
supabase sso add --type saml --project-ref <YOUR-SUPABASE-PROJECT-ID> \
 --metadata-url '<YOUR-DESCOPE-METADATA-URL>' \
 --domains <YOUR-DOMAIN>
Note: Some terminals may escape certain characters in the XML metadata URL, such as ? and = (eg \? or \=), which can cause the command to fail. If you encounter issues, double-check the URL formatting and remove any unnecessary escape characters.
This command registers a new IdP with your project’s auth server.
Make sure to replace the placeholder values with actual values.
<YOUR-DOMAIN>is the email domain that uses SSO to authenticate your project. For example, if you plan to log in with an email likeuser@descope.com, the domain should bedescope.com.
With this, Descope is set as the IdP for your Supabase project.
Implementing role-based access control
The next step is to implement role-based access control (RBAC) to ensure that users can access only the data they are authorized to access. This involves configuring both Descope and Supabase.
Since the users’ data is stored in Descope, it makes sense to define the roles in Descope where you can easily assign them to users. To make the best use of RBAC, you usually define permissions, assign them to roles, and then assign the roles to users. However, for simplicity, you only define roles and assign them to users in this example.
As mentioned in part one, the example app supports two roles: dev and marketer. Users with the dev role can access info from the Descope documentation, while users with the marketer role can access Descope product information.
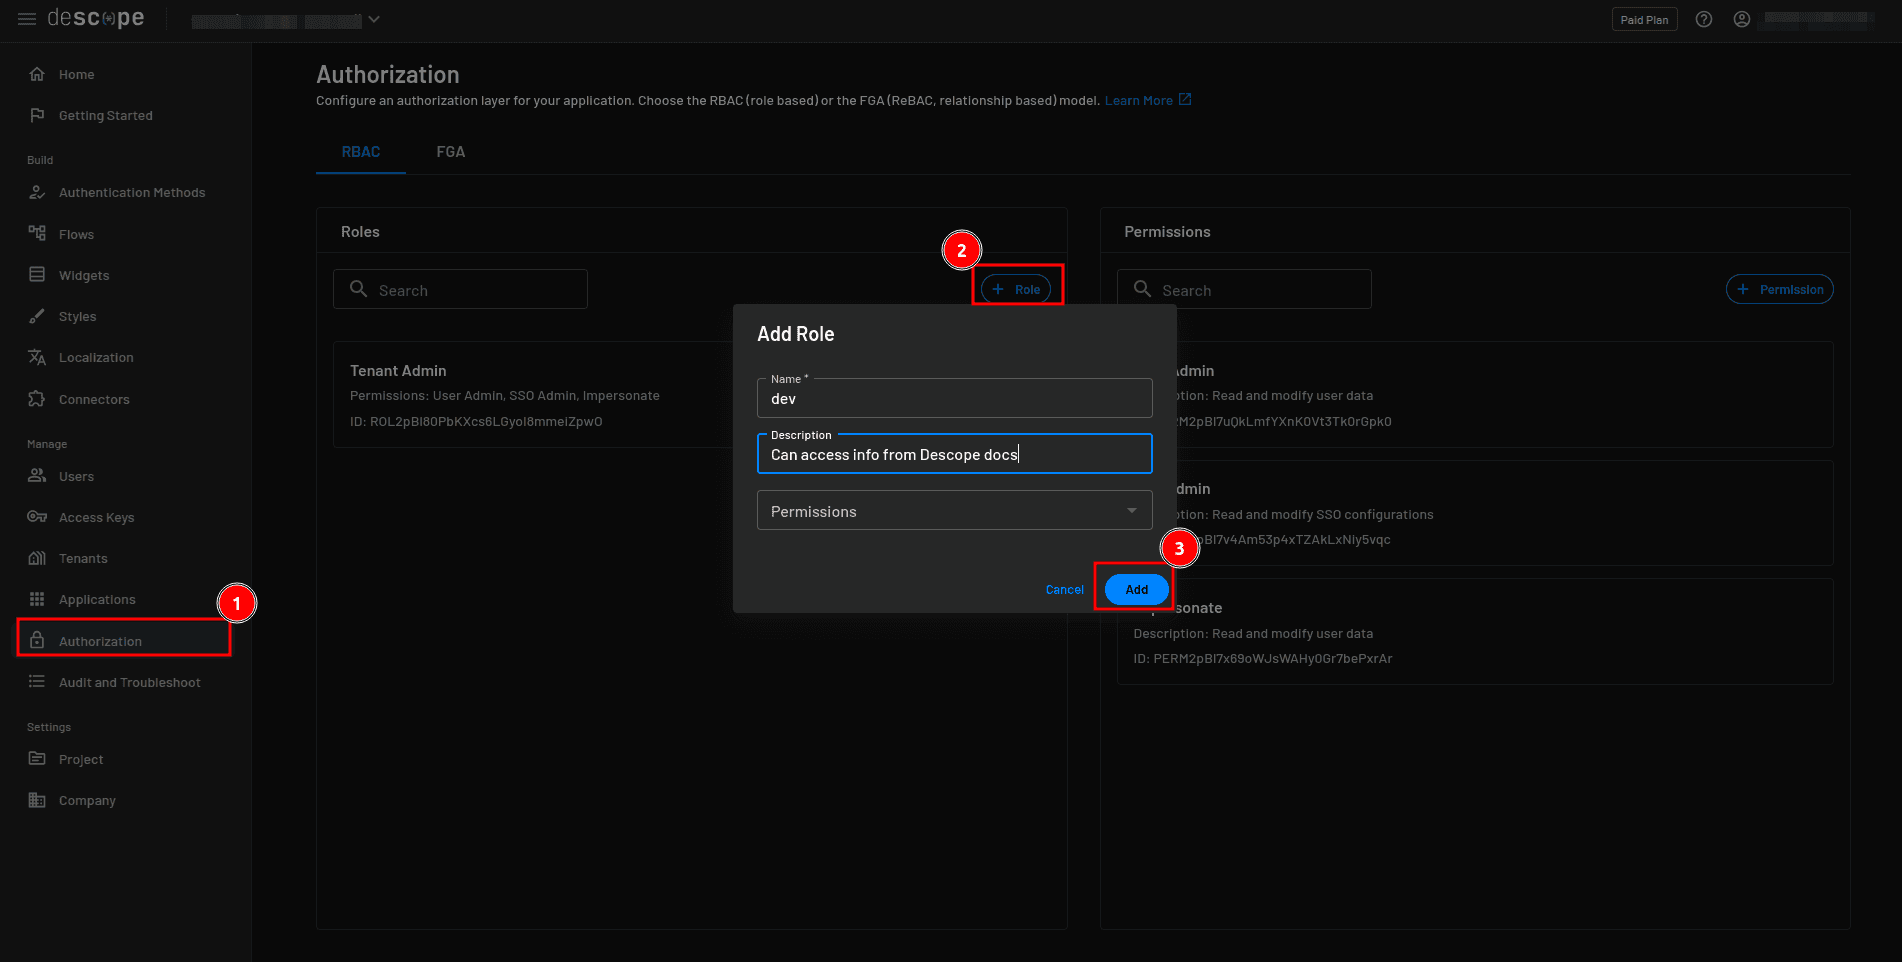
To create the roles, select Authorization from the Descope console sidebar. Then on the Authorization page, click the + Role button to create a new role. In the Add Role modal, provide “dev” as the name and “Can access info from Descope docs” as the description. Click Add to save the role:
Repeat the previous process and create a role with the name “marketer” and “Can access product info” as the description.
The next step is to configure how these roles are passed to the service provider, in this case, Supabase. This is done through group mapping.
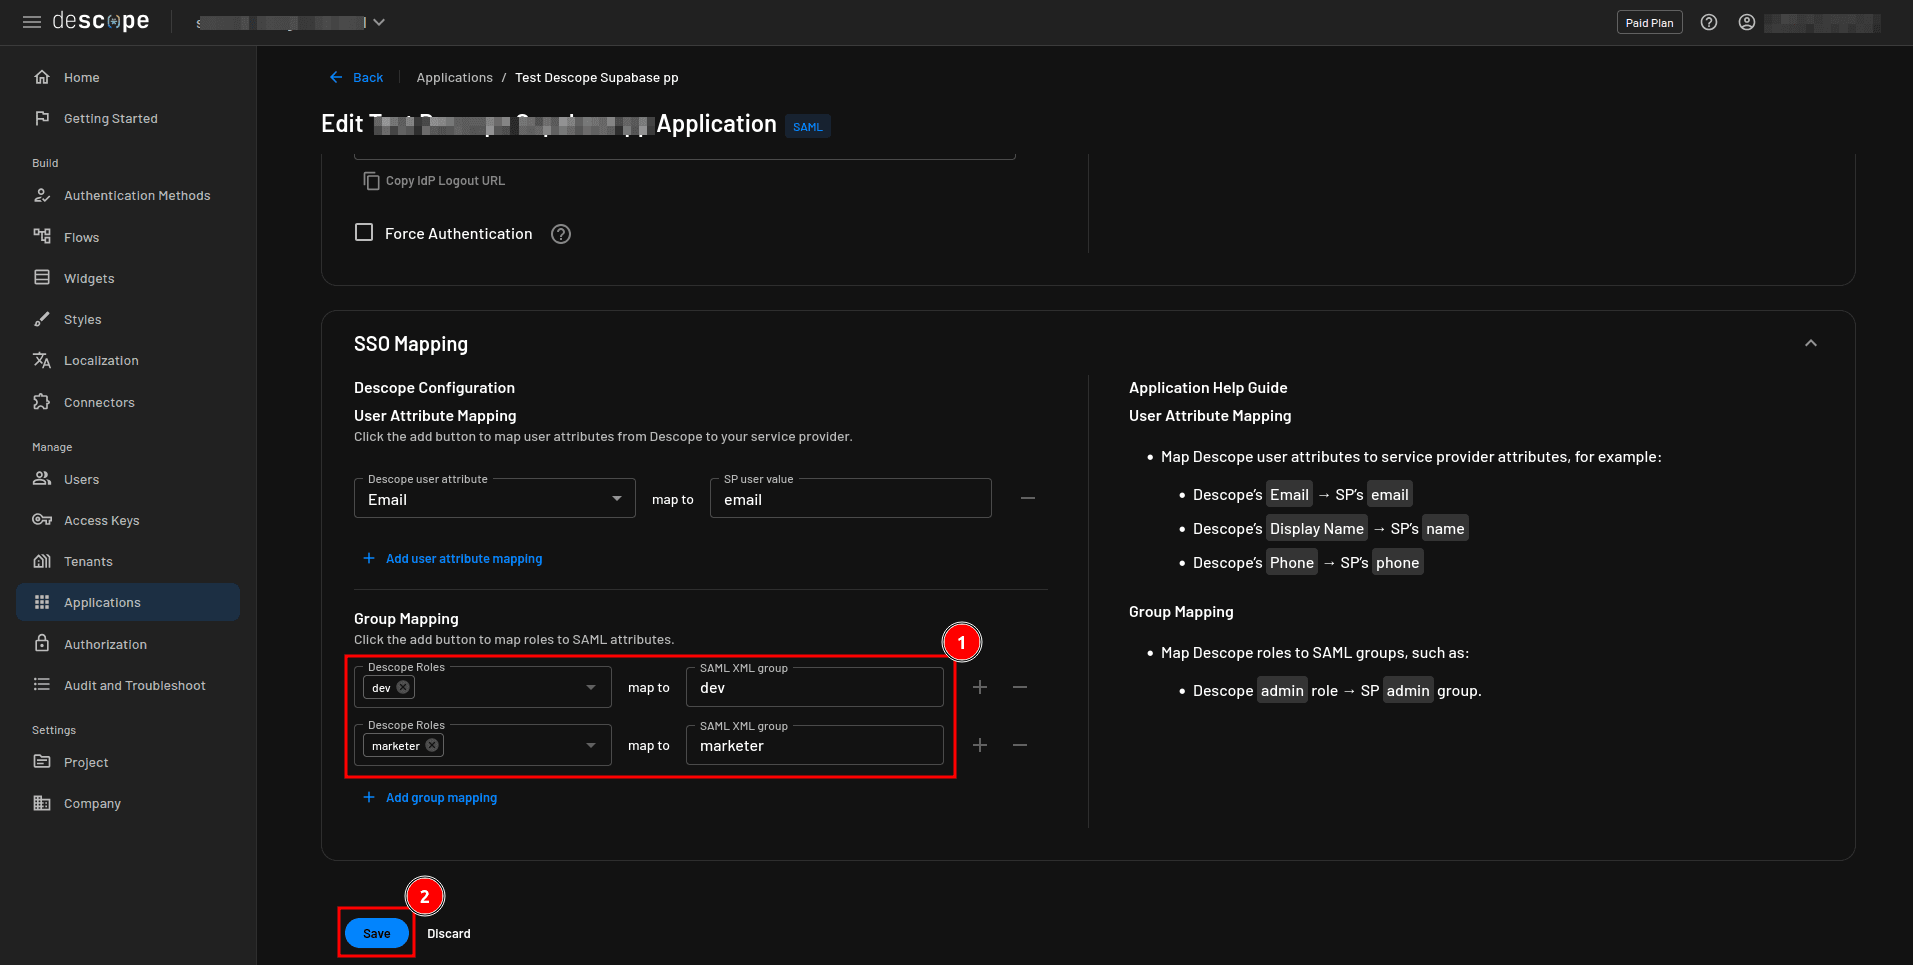
To configure group mapping, navigate back to the Descope SAML application details page and scroll down to the SSO Mapping section. Under Group Mapping, map the dev Descope role to the dev SAML XML group role and the marketer Descope role to the marketer SAML XML group role. Click Save to apply the new configuration:
You also need to configure your Supabase project to recognize these roles and map them into the database using a JSON structure through a process known as attribute mapping. To do this, you first create an attribute mapping JSON file. Create a file named mapping.json in any location on your local machine and add the following content:
{
    "keys": {
        "role_dev": {
            "name": "dev"
        },
        "role_marketer": {
            "name": "marketer"
        }
    }
}
This file maps the roles dev and marketer from Descope to the keys role_dev and role_marketer, respectively, in your Supabase project.
The next step is to configure attribute mapping for the provider you created earlier using this JSON file. To do this, you first need to identify the ID of the provider. You can do this by executing this command in your terminal:
supabase sso list --project-ref <YOUR-DESCOPE-PROJECT-ID>This command lists all the registered IdPs. Copy the value of your IdP ID.
Apply the attribute mapping file you just created to your IdP using the command:
supabase sso update <YOUR-IDENTITY-PROVIDER-ID> --project-ref <YOUR-DESCOPE-PROJECT-ID> \
 --attribute-mapping-file <PATH-TO-MAPPING-JSON-FILE>
Remember to replace all the placeholder values with the actual values.
With this setup, Descope roles are now being passed to Supabase.
Implementing RLS
RLS allows you to enforce fine-grained access control at the row level. It helps you ensure that users can access or modify only the specific data they are authorized to view, which helps to enhance security and data privacy. In this section, you enable RLS in your database and define policies for controlling access. When preparing the backend in the previous part of this series, the table you created had a row named role that stored the role required to access specific data. You write a policy that checks that the user has the appropriate role before retrieving the data.
You’ll use the roles you just passed from Descope in this policy, so there’s no need to create new roles in Supabase. These roles are currently stored under user_metadata in the JWT claims, but this is not an ideal location for authorization data because authenticated users can modify it. You need to move the roles to app_metadata, which cannot be updated by the user. To do this, you use the Supabase custom access token hook. This hook is run every time a user logs in before the JWT is issued, and it allows you to add additional claims to the JWT. Here, you use it to store the user roles passed from Descope into the app_metadata claim. Open your Supabase SQL Editor, add the following query, and execute it:
create or replace function custom_access_token_hook(event jsonb)
returns jsonb
language plv8
as $$
 // Ensure 'claims' exists in the event object
 if (!event.claims) {
    event.claims = {};
 }

 // Ensure 'app_metadata' exists in the claims
 if (!event.claims.app_metadata) {
    event.claims.app_metadata = {};
 }

 // Get custom claims from user_metadata
 const userMetadata = event.claims.user_metadata || {};
 const customClaims = userMetadata.custom_claims || {};

 // Extract roles from custom_claims where keys start with 'role_'
 const roles = [];
 for (const key in customClaims) {
    if (key.startsWith("role_")) {
    roles.push(customClaims[key]); // Add the role value to roles array
    delete customClaims[key]; // Remove the role key from custom_claims
    }
 }

 // Add roles to app_metadata
 event.claims.app_metadata.roleNames = roles;

 return event;
$$;
This code first ensures the claims and app_metadata fields exist in the event object. It then extracts custom roles from user_metadata.custom_claims by identifying keys starting with role_. These roles are stored in an array and added to app_metadata under the roleNames key. The function also cleans up the custom claims by removing the role_ keys, which ensures that the roles are centralized and accessible within the access token.
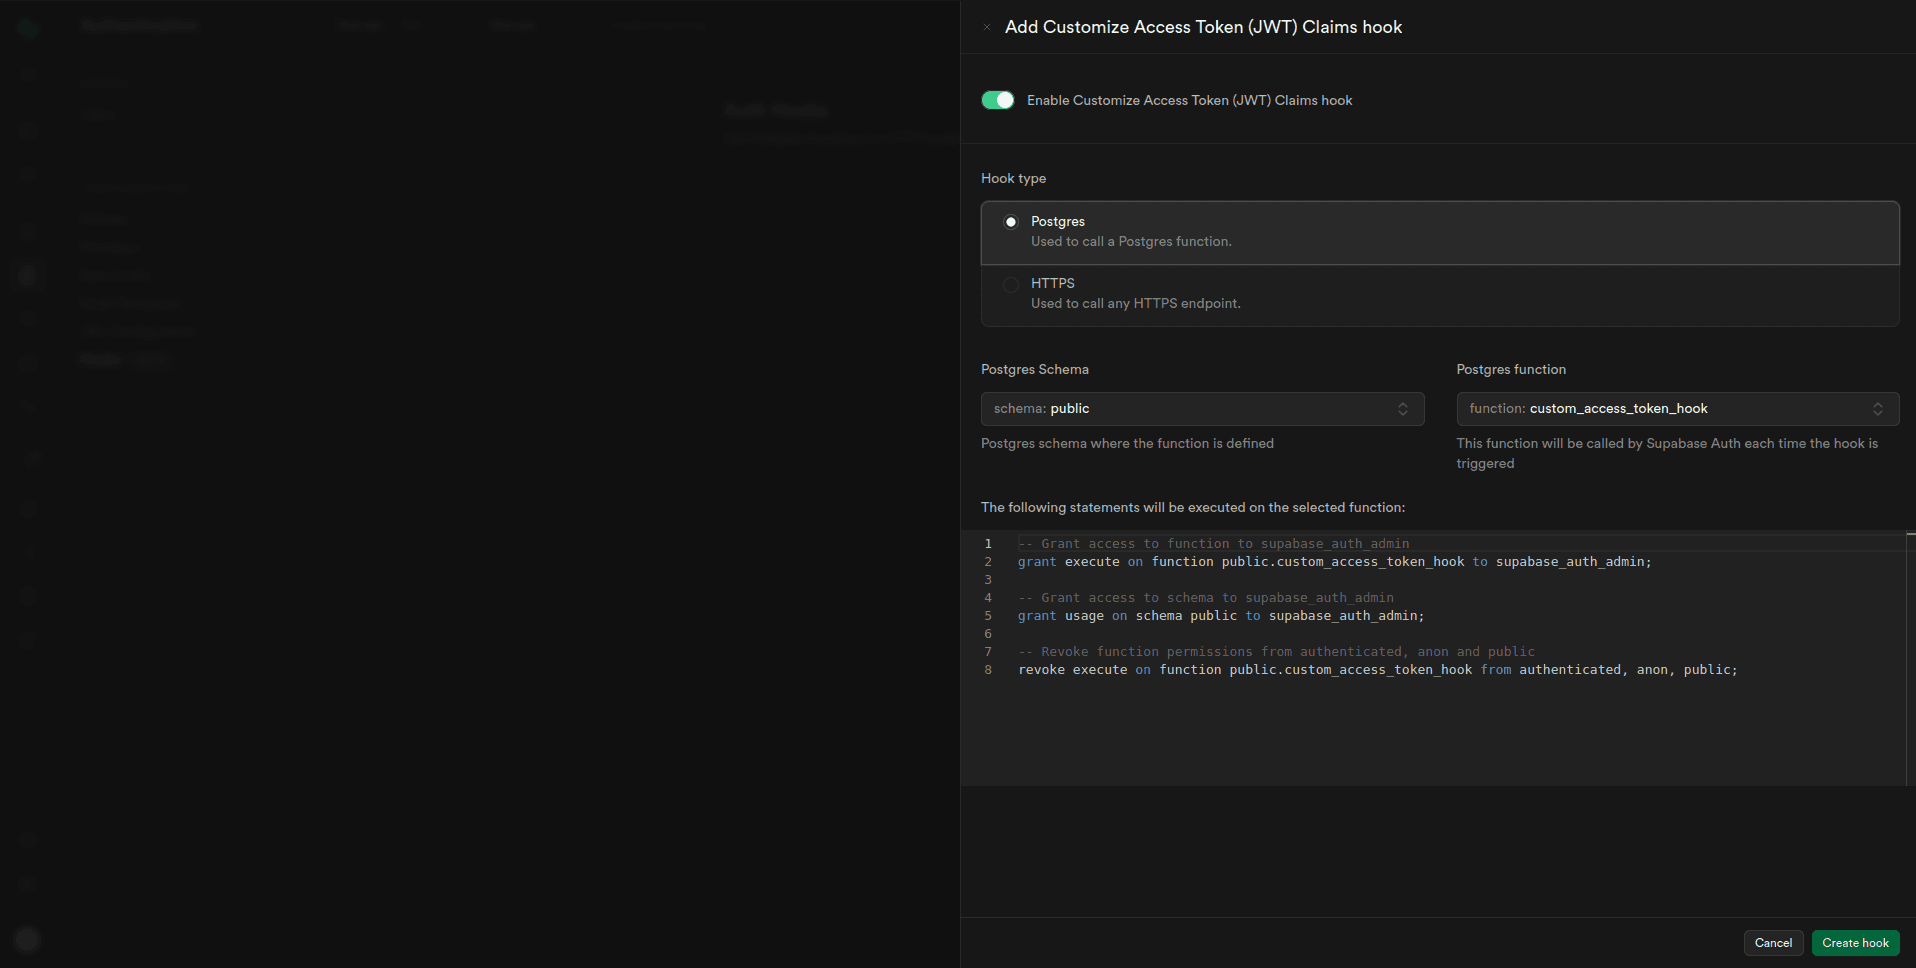
Next, you need to enable this hook on your Supabase console by navigating to Authentication > Hooks > Add hook > Customize Access Token (JWT) Claims hook:
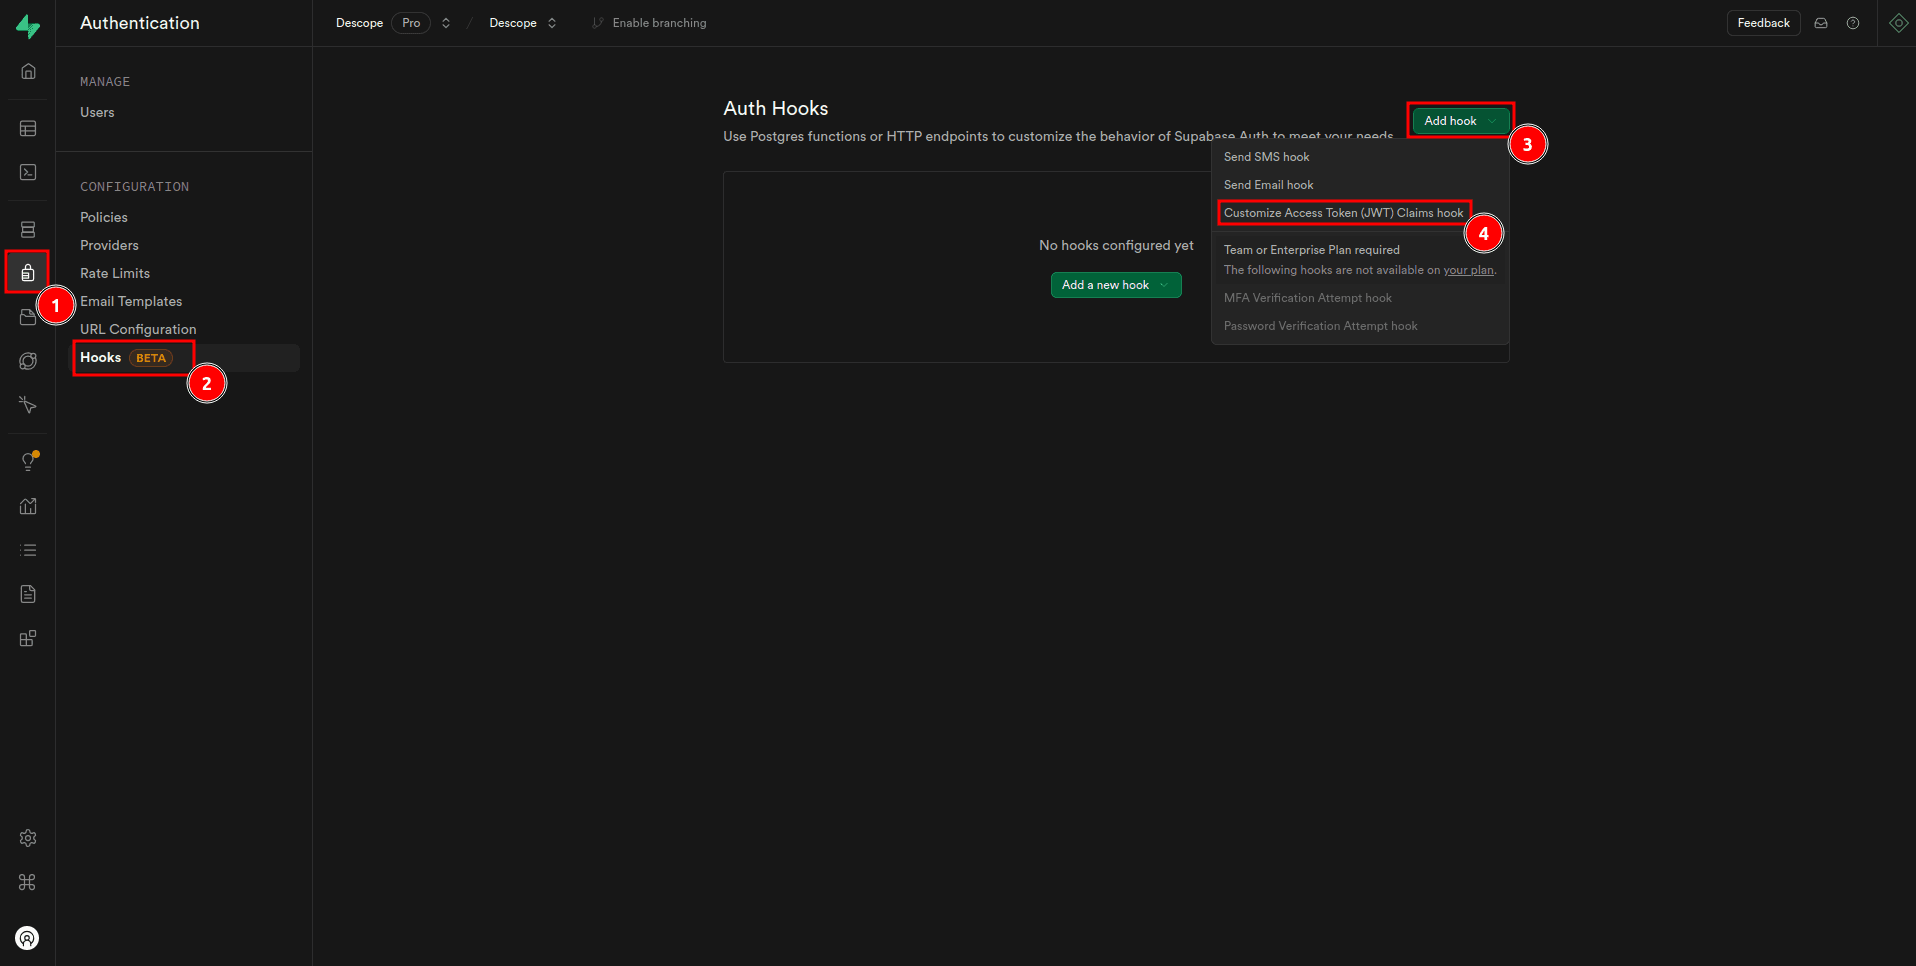
On the Add Customize Access Token (JWT) Claims hook page, check the Enable Customize Access Token (JWT) Claims hook checkbox, select custom_access_token_hook under Postgres function, and click Create hook:
You can now enable RLS on the documents table that you created in the previous part of this series using the following command:
CREATE POLICY "User can access documents based on their role(s)"
ON documents
FOR SELECT
USING (
 role = ANY(
    SELECT jsonb_array_elements_text(auth.jwt() -> 'app_metadata' -> 'roleNames')
 )
);
This policy ensures that users can access rows in the documents table based on their assigned roles. It uses the USING clause to check if the role of a document matches any of the roles listed in the roleNames array within the app_metadata of the user’s JWT (retrieved using auth.jwt()). This dynamic access control ensures that users only with appropriate roles can view specific documents.
Building the frontend
To keep the guide focused on the key aspects of RAG app development and make it easy to follow, this example uses an application UI prebuilt with React and hosted on GitHub. To clone the UI on your local machine and install all the dependencies, execute the following commands in your terminal:
git clone https://github.com/kimanikevin254/descope-supabase-rag-app.git

cd descope-supabase-rag-app/frontend

npm i
Here’s an overview of the different files in the frontend project:
src/utils/extractor.jsexports therunExtractor()function that generates embeddings from the provided user query.src/utils/openai.jsexports an OpenAI client instance.src/utils/supabase.jsexports a Supabase client instance.src/pages/login.jsdefines a component that uses Supabase for SSO authentication with error handling and redirection.src/pages/chat.jsenables authenticated users to submit queries, fetch relevant documents using embeddings, and receive responses in a user-friendly interface.
To fully set up the project and ensure it can run smoothly, you need to provide a couple of environment variables. To do this, create a file named .env in the frontend folder and add the following:
VITE_SUPABASE_PROJECT_URL=<YOUR-SUPABASE-PROJECT-URL>
VITE_SUPABASE_PROJECT_ANON_KEY=<YOUR-SUPABASE-PROJECT-ANON-KEY>
VITE_OPENAI_SECRET_KEY=<YOUR-OPENAI-SECRET-KEY>
VITE_SSO_DOMAIN=<YOUR-SSO-EMAIL-DOMAIN>
Make sure to replace the placeholder values with the actual values you have obtained throughout the series.
Testing the RAG application
To test that everything is working as expected, open the frontend folder in the terminal and run the development server using the following command:
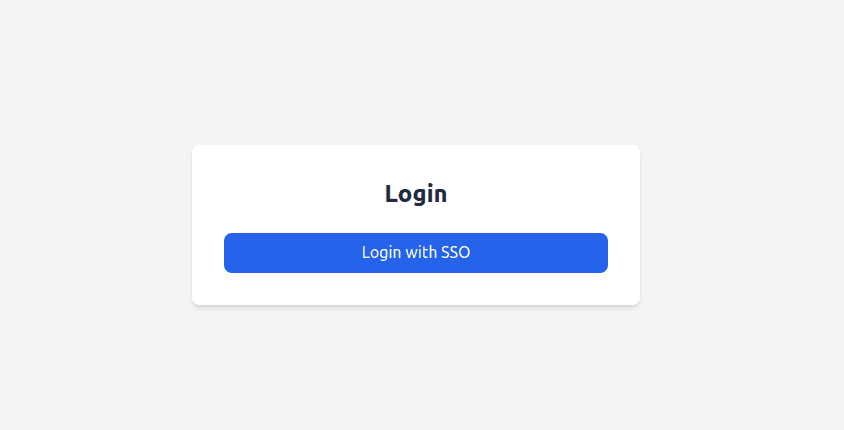
npm run devNext, navigate to http://localhost:3000 on your browser. You should be navigated to the auth page:
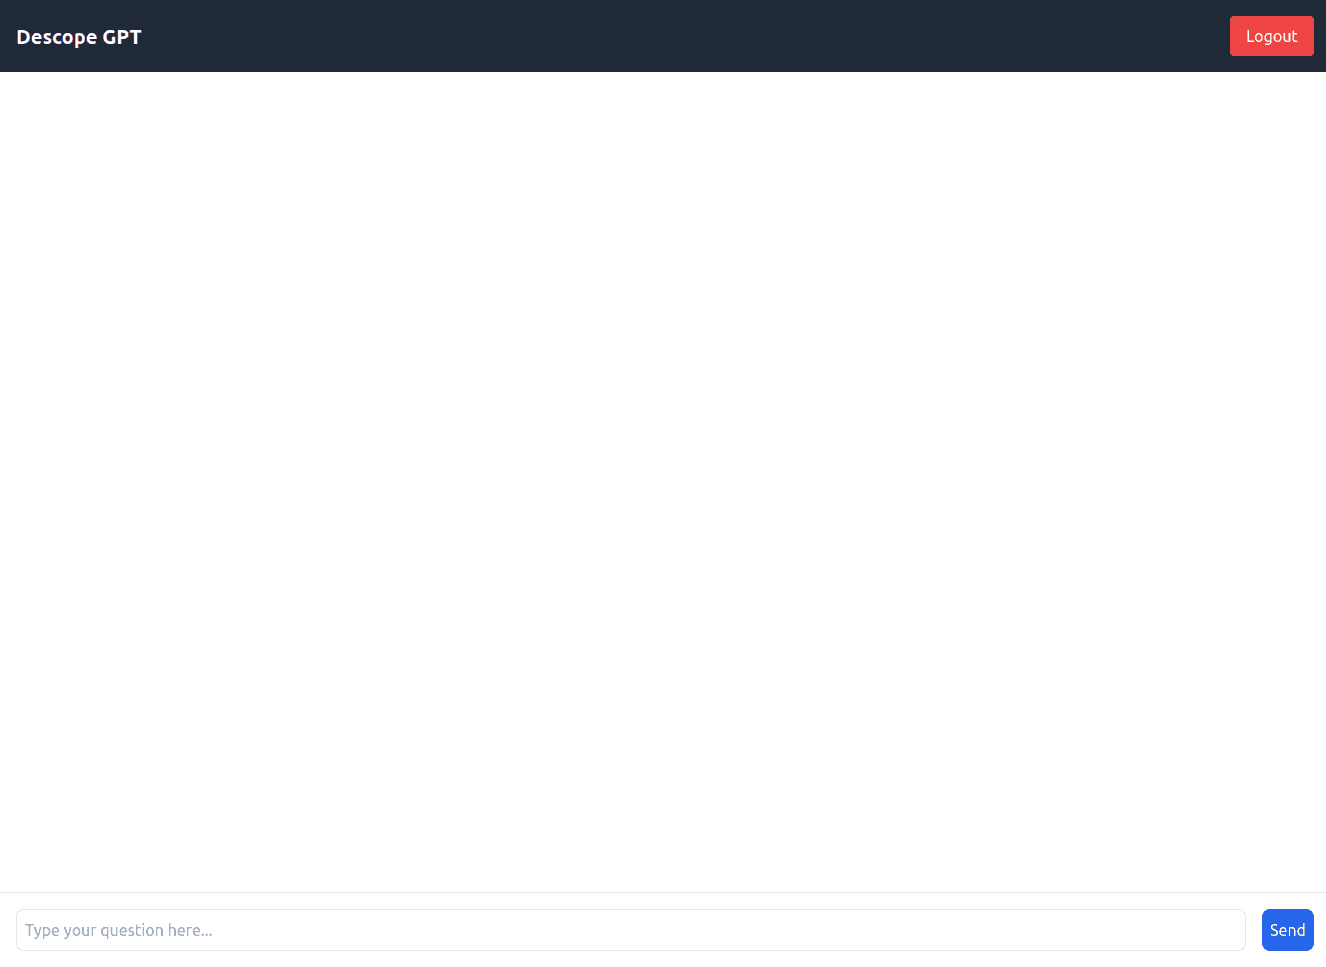
After clicking Login with SSO and completing the authentication process successfully, you should be redirected to the chat interface page:
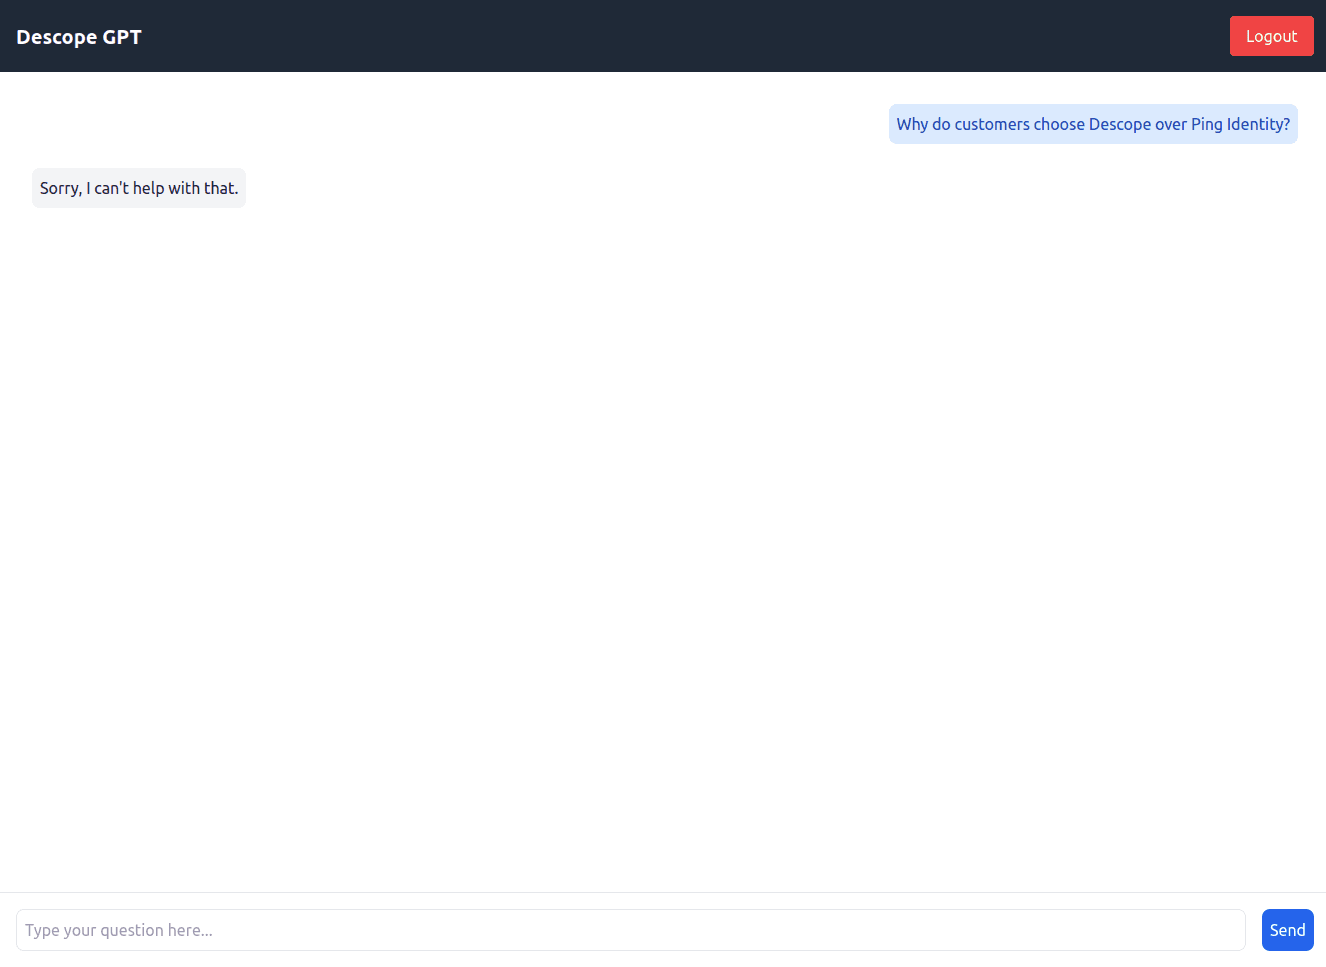
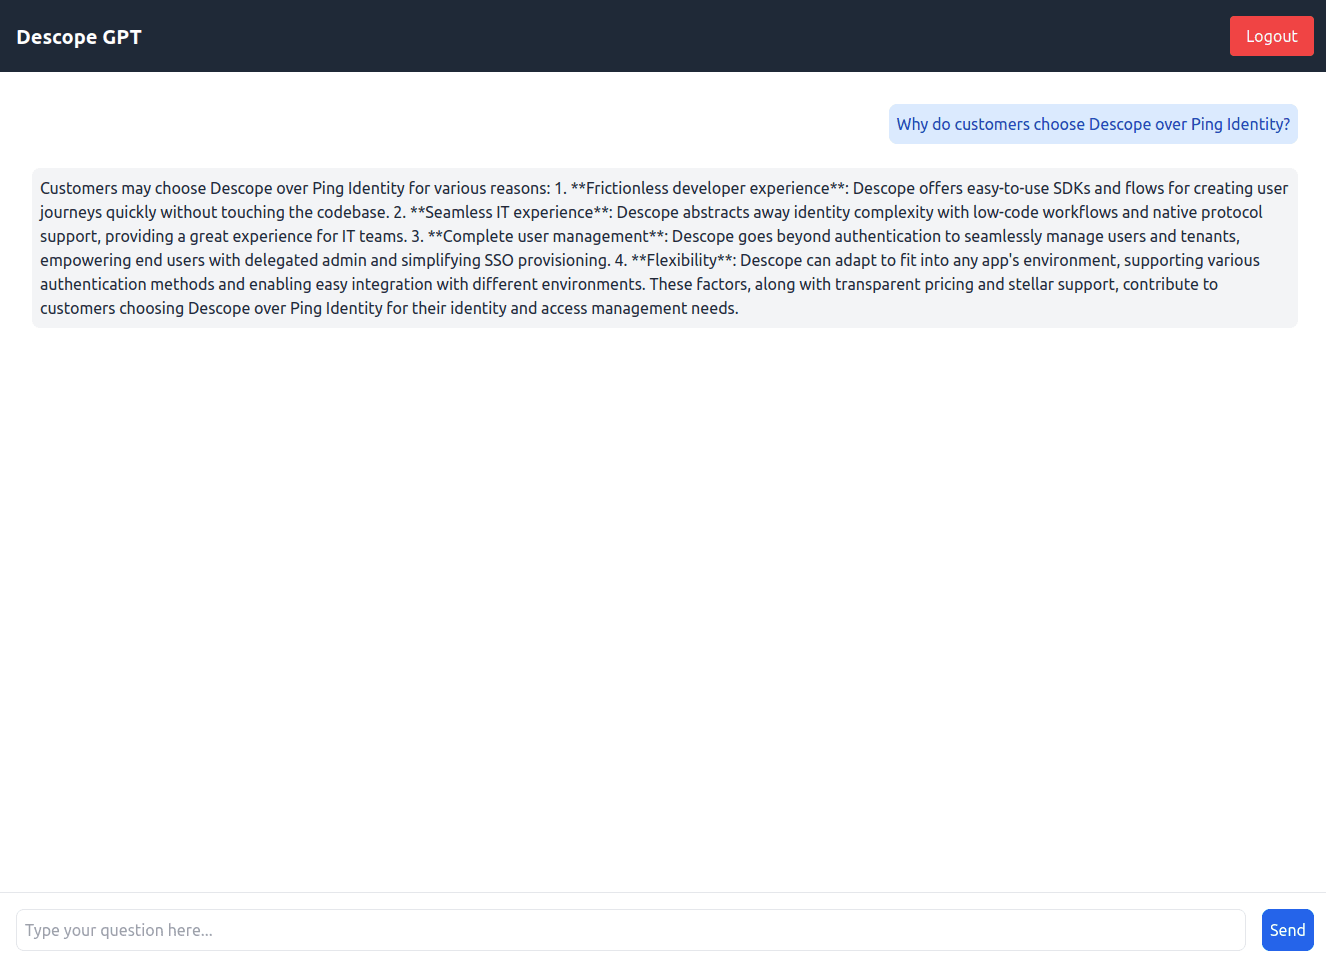
Type the question, “Why do customers choose Descope over Ping Identity?” Then hit Send. You should get the response, “Sorry, I can’t help with that.” This is because the user does not have any roles assigned to them, which means they cannot access embeddings from the database:

Navigate to the Users page on the Descope console, edit your user to assign them the dev role, and save the changes:

Head back to http://localhost:3000, log out of the app, log in again, and ask the same question. You should still get the same answer even though the user is now assigned a role. This is because the product info can be accessed only by users with the marketer role:
Go back to the Descope console and assign the user the marketer role. Head back to http://localhost:3000, log out of the app, log in again, and ask the same question. You should now get a proper answer:
Deploying the RAG app
When deploying the RAG application, you should consider using managed services for convenience and reliability. Supabase’s hosted infrastructure simplifies the overall setup process and scaling. However, if you’re looking for more control, you should consider self-hosting with Docker. For Descope, you should ensure you have ticked off everything in the predeployment checklist to ensure it runs well in the production environment. For the React frontend, platforms like Vercel or Netlify are ideal for fast delivery backed by a content delivery network (CDN). However, if you’re looking for more control over your hosting environment, you should go for cloud providers like Amazon Web Services (AWS) or Google Cloud.
Note: Descope’s plugin with AWS SaaS Builder Toolkit (SBT) lets you deeply integrate Descope authentication, MFA, authorization, and M2M capabilities into your AWS SaaS apps.
To ensure that the app remains secure in production, RLS policies are a solid start to ensure that data access is restricted based on user roles. You should also use environment variables for sensitive credentials and regularly review your apps’ access logs. Scalability can be achieved by leveraging Supabase’s connection pooling and optimizing database queries. You should set up monitoring tools like Sentry to track app performance and quickly address any issues that may arise.
Conclusion
In this two-part series, you learned how to build a secure and scalable RAG application by combining three powerful tools: Descope, Supabase, and pgvector. From using Supabase as a reliable backend infrastructure and integrating Descope for seamless, secure authentication to leveraging pgvector for efficient embedding storage and retrieval, you now have a solid foundation to create advanced AI-powered applications.
For more developer tutorials, subscribe to the Descope blog or follow us on LinkedIn.