
Table of Contents
This tutorial was written by Kevin Kimani, a passionate developer and technical writer who enjoys explaining complicated concepts in a simple way. You can check out his GitHub or X account to connect and see more of his work!
As applications powered by artificial intelligence (AI) continue to reshape almost all industries, combining intelligent functionality with robust security is more important than ever. Retrieval-augmented generation (RAG) enhances the accuracy and relevance of AI-generated responses by integrating external knowledge into the process. Combining Descope for authentication, Supabase for the backend infrastructure, and pgvector for embedding storage and retrieval allows developers to create scalable, high-performance apps prioritizing functionality and security.
In this two-part series, you’ll learn how to combine all these tools to build a secure and intelligent RAG application. In this first part, you will set up the backend using Supabase and utilize pgvector to manage embeddings. In the second part of this series, you will integrate Descope for authentication as a custom Security Assertion Markup Language (SAML) provider and leverage the Supabase Row-Level Security (RLS) to implement granular permissions to make sure that data is accessible only to authorized users.
You can skip to the second part of the series here.
RAG app overview
You’re going to build a RAG app that allows users to query information on the Descope website, such as product info and documentation. The application will have two roles: developer and marketer. Users with the marketer role will be able to query product info–related data, while users with the developer role will be able to query information from the docs.
Here’s an overview of the whole process you’ll follow in this first part of the series:
Preprocess the knowledge base (in this case, Descope developer docs) and generate embeddings for each of these pages.
Store the page content, along with the generated embeddings in Supabase.
Prompt the user for input.
Generate embeddings for the user input and use it to perform a similarity search against the embeddings in the database.
Return the most similar pages and pass them to OpenAI API to generate a response for the user’s query.
Prerequisites
To complete this tutorial, you need the following:
A basic understanding of pgvector
Familiarity with AI concepts, like embeddings and vector similarity search
OpenAI developer account with credits
Node.js installed on your local machine
Setting up Supabase as your backend
Supabase is an open source backend-as-a-service built on PostgreSQL that offers features like authentication, real-time capabilities, and RLS. Its integration with pgvector and support for SAML-based single sign-on (SSO) via Descope make it ideal for securely managing embeddings in this RAG application.
To create a new Supabase app, navigate to the New Project page, provide all the required details, and click Create new project:

Once the new project is created, you need to enable the pgvector extension so that you can store and query embeddings. To do this, select SQL Editor on the sidebar, paste the following SQL code inside the editor, and execute it by clicking the Run button:
CREATE EXTENSION IF NOT EXISTS vector;
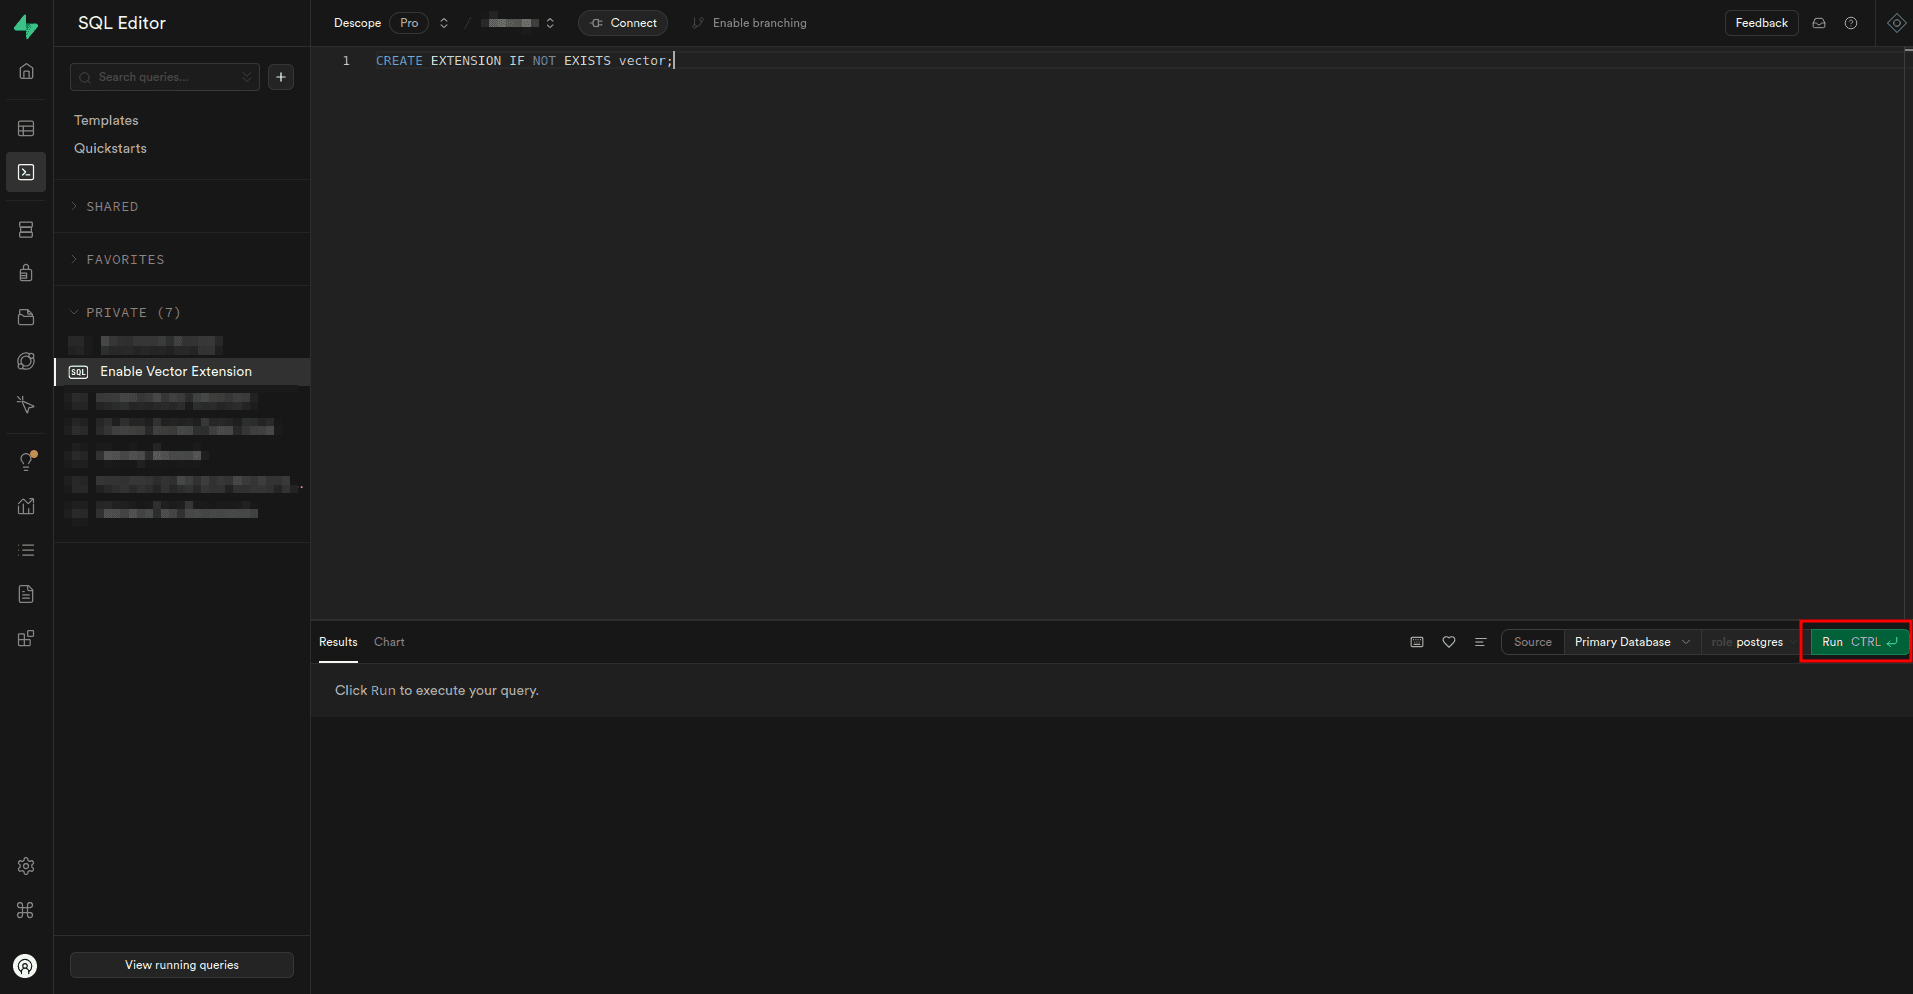
The extension is not enabled. You can go ahead and create a table to store your embeddings.
Configuring pgvector for embeddings
pgvector is an open source PostgreSQL extension that adds support for storing and querying embeddings directly in the database, which eliminates the need for a separate vector database. With pgvector, you can perform vector similarity searches to find data points that are most similar to a given vector. This is achieved using distance metrics, such as Euclidean distance, cosine similarity, or inner product.
You also need to create a table in the database that stores embeddings alongside other relevant information. To do this, paste the following SQL query inside the SQL Editor:
CREATE TABLE documents (
   id SERIAL PRIMARY KEY,               -- Auto-incrementing unique identifier
   created_at TIMESTAMPTZ DEFAULT NOW(),-- Timestamp of creation with default current time
   role TEXT NOT NULL,                  -- Role required to access this data
   url TEXT,                            -- Optional URL of the content
   content TEXT NOT NULL,               -- The content text data
   embedding VECTOR(384)               -- Embedding vector dimension size
);
This SQL query creates a table called documents with six columns. All the columns have been explained in the snippets, but the most important ones here are role, content, and embeddings. The role column is crucial for defining access permissions, ensuring only authorized users can interact with specific data. The content column stores the original document text that is used to create the embedding and passed to the AI model. The embeddings column is defined with the VECTOR data type and a size of 384, specifying the number of dimensions each vector holds. This size is set to 384 to align with the output dimensions of the Supabase/gte-small model, which you’ll use to generate embeddings.
Highlight the query in the editor and execute it by clicking the Run selected button.
Next, you need to perform a similarity search over the embeddings stored in your database to find those most closely related to the user’s query embedding. To do this, paste this code inside the SQL Editor to create a database function:
CREATE OR REPLACE FUNCTION get_relevant_docs (
   query_embedding vector(384),
   threshold float,
   docs_count int
)
RETURNS TABLE (
   id int,
   content text,
   similarity float
)
LANGUAGE sql STABLE
AS $$
   SELECT
       documents.id,
       documents.content,
       1 - (documents.embedding <=> query_embedding) AS similarity
   FROM documents
   WHERE 1 - (documents.embedding <=> query_embedding) > threshold
   ORDER BY (documents.embedding <=> query_embedding) asc
   LIMIT docs_count;
$$;
This code defines a SQL function named get_relevant_docs that retrieves relevant documents based on their similarity to a given query embedding. It takes three parameters:
query_embeddingis the vector representing the query.thresholdis the minimum similarity score for a document to be considered relevant.docs_countis the number of documents to return.
The function calculates the similarity between each document’s embedding. Meanwhile, the query using the <=> operator filters the documents based on the similarity threshold. Then, it returns the top docs_count documents, ordered by similarity. The results include the document’s ID, content, and calculated similarity.
You will call this function later on from the client code.
Remember to run this query to create the function.
Generating and inserting embeddings into the database
Before inserting data into the database, you need to create a Node.js project, which allows you to use the supabase-js library to insert data and query the database.
To create a Node.js project, create a folder named descope-supabase-rag-app, open it in the terminal, and execute the following command:
npm init -yAdd "type": "module" into the package.json to ensure Node.js treats all .js files in your project as ES modules. This eliminates the need for .mjs extensions and allows you to use modern import and export syntax seamlessly throughout the project.
Install the relevant dependencies using the following command:
npm i dotenv @supabase/supabase-js @xenova/transformers openai puppeteer p-limit strip-indentHere’s how you use each of these dependencies:
dotenvis for loading environment variables from a .env file.@supabase/supabase-jsis used to interact with Supabase.@xenova/transformersis for using Transformer models for embedding generation.openaiis used to interact with OpenAI APIs.puppeteeris for scraping the Descope website for data.p-limitis used to run multiple async functions with limited concurrency.strip-indentis used to remove leading white space from each line in a string.
You also need to define which data you want to scrape from the Descope website. For this, create a file named lib/urls.js in the project root folder. This file holds all the URLs to be scraped. Add the following code to this file:
const marketerData = [
   { role: "marketer", url: "https://www.descope.com/product" },
   { role: "marketer", url: "https://www.descope.com/flows" },
   { role: "marketer", url: "https://www.descope.com/integrations" },
   { role: "marketer", url: "https://www.descope.com/descope-vs-auth0" },
   { role: "marketer", url: "https://www.descope.com/descope-vs-ping" },
   { role: "marketer", url: "https://www.descope.com/" },
];
const devData = [
   { role: "dev", url: "https://docs.descope.com/management" },
   { role: "dev", url: "https://docs.descope.com/lingo" },
   { role: "dev", url: "https://docs.descope.com/auth-methods/otp" },
   { role: "dev", url: "https://docs.descope.com/auth-methods/magic-link" },
   {
       role: "dev",
       url: "https://docs.descope.com/auth-methods/enchanted-link",
   },
   { role: "dev", url: "https://docs.descope.com/auth-methods/oauth" },
   { role: "dev", url: "https://docs.descope.com/auth-methods/sso" },
   { role: "dev", url: "https://docs.descope.com/auth-methods/passkeys" },
   { role: "dev", url: "https://docs.descope.com/auth-methods/auth-apps" },
   { role: "dev", url: "https://docs.descope.com/auth-methods/passwords" },
   { role: "dev", url: "https://docs.descope.com/auth-methods/notp" },
   { role: "dev", url: "https://docs.descope.com/auth-methods/embedded-link" },
   { role: "dev", url: "https://docs.descope.com/fingerprinting" },
   {
       role: "dev",
       url: "https://docs.descope.com/security-best-practices/authentication-methods",
   },
   {
       role: "dev",
       url: "https://docs.descope.com/security-best-practices/refresh-token-storage",
   },
   {
       role: "dev",
       url: "https://docs.descope.com/security-best-practices/m2m-security",
   },
   {
       role: "dev",
       url: "https://docs.descope.com/security-best-practices/custom-claims",
   },
   {
       role: "dev",
       url: "https://docs.descope.com/security-best-practices/content-security-policy",
   },
   {
       role: "dev",
       url: "https://docs.descope.com/security-best-practices/crossite-cookies",
   },
   {
       role: "dev",
       url: "https://docs.descope.com/security-best-practices/firewall-acl",
   },
   {
       role: "dev",
       url: "https://docs.descope.com/security-best-practices/golang-cert-verification",
   },
   { role: "dev", url: "https://docs.descope.com/rate-limiting" },
   {
       role: "dev",
       url: "https://docs.descope.com/additional-security-features-in-descope/jwk-rotation",
   },
   {
       role: "dev",
       url: "https://docs.descope.com/additional-security-features-in-descope/refresh-token-rotation",
   },
];
export const urls = marketerData.concat(devData);
This code defines two arrays, marketerUrls and devUrls, each containing objects with a role and a URL. The URLs in marketerUrls are for marketing-related resources on Descope, while devUrls contains links to technical documentation for developers. Both arrays are combined into one urls array for centralized access.
After the URLs are scraped, you need to insert the data into Supabase. To authenticate your requests so you can interact with the Supabase API, create a new file named .env in the project root folder and add the following code:
SUPABASE_PROJECT_URL=<YOUR-SUPABASE-PROJECT-URL>
SUPABASE_PROJECT_ANON_KEY=<YOUR-SUPABASE-PROJECT-ANON-KEY>
Replace the placeholder values with the actual values that are available on your project’s API settings on the Supabase dashboard, which you can access by selecting Project Settings > API on the sidebar:
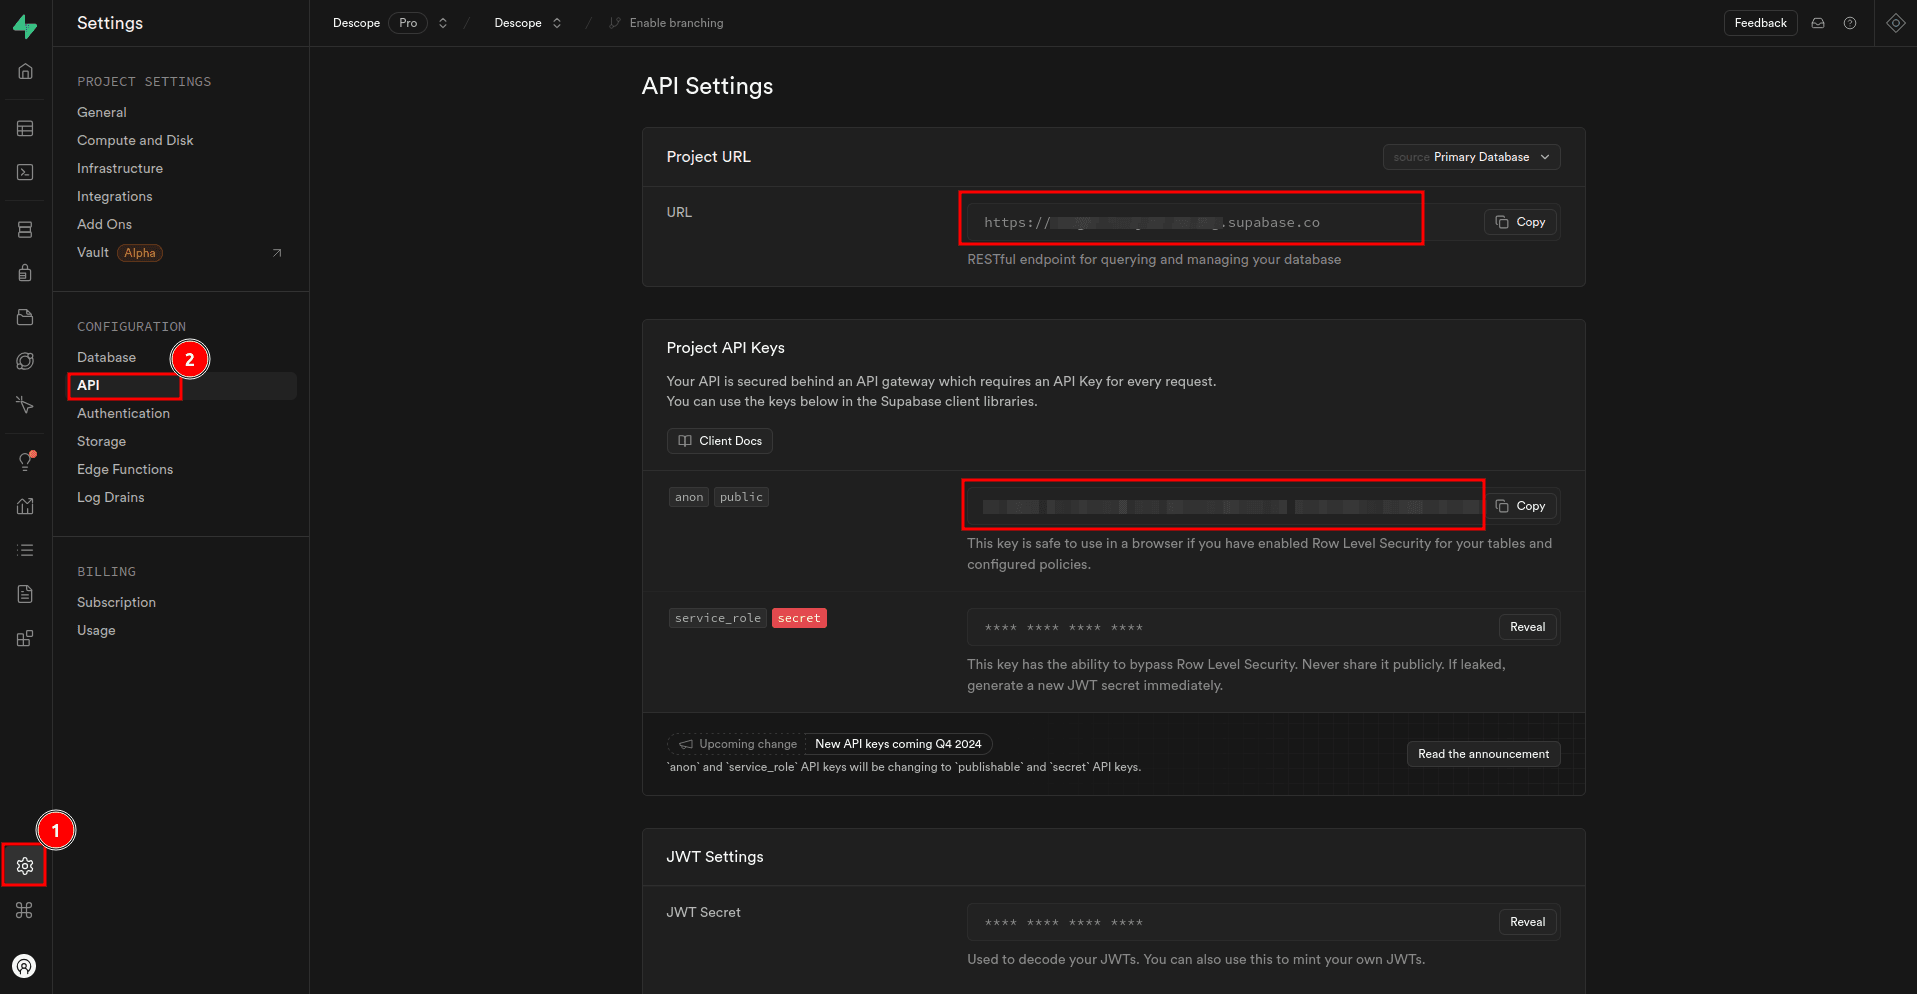
The project URL is available under Project URL, while the project anon key is available under Project API Keys.
Create a file named supabase.js in the lib folder and add the following code to create a Supabase client instance that is exported for use in other parts of the application:
import "dotenv/config";
import { createClient } from "@supabase/supabase-js";
export const supabase = createClient(
   process.env.SUPABASE_PROJECT_URL,
   process.env.SUPABASE_PROJECT_ANON_KEY
);
Your app also needs a function for generating embeddings. Create a new file named extractor.js in the lib folder and add the following code:
import { pipeline } from "@xenova/transformers";
const extractor = await pipeline("feature-extraction", "Supabase/gte-small");
// Function to extract embeddings
export async function runExtractor(text) {
   try {
       const { data, size } = await extractor([text], {
           pooling: "mean",
           normalize: true,
       });
       return { size, data };
   } catch (error) {
       console.error("❌ Error during embedding extraction:", error);
       throw error;
   }
}
This code imports the pipeline function from the @xenova/transformers package and creates an extractor using the Supabase/gte-small model for feature extraction. The runExtractor function uses this extractor to generate embeddings for a given text input. It processes the text, applies mean pooling and normalization to the resulting embeddings, and returns the embedding data along with its size. If an error occurs during the extraction process, it logs the error and throws it.
Then, create a script that scrapes the pages and uploads the data to Supabase, create a file named scrape-and-upload.js in the project root folder, and add the following code:
import puppeteer from "puppeteer";
import { pipeline } from "@xenova/transformers";
import { supabase } from "./lib/supabase.js";
import { urls } from "./lib/urls.js";
import dotenv from "dotenv";
import pLimit from "p-limit";
import { runExtractor } from "./lib/extractor.js";
// Load env variables
dotenv.config();
// Utility to chunk arrays into smaller batches
function chunkArray(array, size) {
   const chunks = [];
   for (let i = 0; i < array.length; i += size) {
       chunks.push(array.slice(i, i + size));
   }
   return chunks;
}
// Function to scrape data from a single page
async function scrapePage(browser, { role, url }) {
   const page = await browser.newPage();
   try {
       console.log(`🌍 Navigating to: ${url}`);
       await page.goto(url, { waitUntil: "networkidle2" });
       console.log(`🔍 Extracting data from ${url}...`);
       // Extract the full text content of the page
       const content = await page
           .evaluate(() => document.body.innerText)
           .catch(() => {
               console.warn(`⚠️ No content found for ${url}`);
               return "";
           });
       console.log("🚀 Generating embeddings...");
       const { data: embedding } = await runExtractor(content);
       console.log("✅ Embeddings generated successfully!");
       return {
           role,
           url,
           content,
           embedding: Array.from(embedding),
       };
   } catch (error) {
       console.error(`❌ Error scraping ${url}:`, error);
       return null; // Return null to skip failed pages
   } finally {
       await page.close();
   }
}

// Main function to scrape and push data
async function scrapeAndPushData() {
   console.log("🚀 Launching browser...");
   const browser = await puppeteer.launch({ headless: true });
   const scrapedData = [];
   const limit = pLimit(5); // Limit concurrency to 5
   try {
       const scrapeTasks = urls.map((url) =>
           limit(() => scrapePage(browser, url))
       );
       const results = await Promise.all(scrapeTasks);
       scrapedData.push(...results.filter((result) => result)); // Filter out null results
       console.log("🛑 Browser closed.");
   } catch (error) {
       console.error("❌ Error during scraping:", error);
   } finally {
       await browser.close();
   }
   // Push to Supabase in chunks
   if (scrapedData.length > 0) {
       console.log("🚀 Pushing data to Supabase...");
       const chunks = chunkArray(scrapedData, 10); // Chunk size of 10
       for (const chunk of chunks) {
           try {
               const { data, error } = await supabase
                   .from("documents")
                   .insert(chunk);
               if (error) {
                   console.error(
                       "❌ Error pushing data chunk to Supabase:",
                       error
                   );
                   throw new Error(error.message);
               } else {
                   console.log("✅ Data pushed successfully:", data);
               }
           } catch (error) {
               console.error("❌ Failed to push chunk:", error);
           }
       }
   } else {
       console.log("⚠️ No data to push to Supabase.");
   }
}
await scrapeAndPushData().catch((error) => {
   console.error("❌ Fatal Error:", error);
});
This code scrapes web pages, extracts content, generates embeddings for the text, and pushes the data to a Supabase database. It defines utility functions chunkArray, used to split data into manageable batches, and runExtractor, used to extract embeddings for a given text. The scrapePage function navigates to a given URL, scrapes the page content, generates embeddings, and returns the results. The main scrapeAndPushData function orchestrates the scraping process using concurrency limits, collects the scraped data, and pushes it to the Supabase database in chunks. If any errors occur during the process, they are logged, and the function ensures the browser is closed after completion.
Execute the code using the command node scrape-and-upload.js.
Querying and retrieving similar vectors based on embeddings
Now that you have all the necessary data for the RAG app from the Descope website in the database, you can try to retrieve similar vectors based on embeddings. To do this, create a new file in the project root folder named retrieve-relevant-docs.js and add the following code:
import { runExtractor } from "./lib/extractor.js";
import { supabase } from "./lib/supabase.js";
async function main() {
   const query = "Why do customers choose Descope over Ping Identity?";
   console.log("🔍 Generating embeddings for the input...");
   try {
       const { data: queryEmbedding } = await runExtractor(query);
       console.log("✅ Embeddings generated.");
       // Call supabase function to get matching docs
       const { data, error } = await supabase.rpc("get_relevant_docs", {
           query_embedding: Array.from(queryEmbedding),
           threshold: 0.8,
           docs_count: 3,
       });
       if (error) {
           console.error("❌ Error fetching relevant documents:", error);
           return;
       }
       console.log("✅ Relevant documents retrieved successfully:", data);
   } catch (err) {
       console.error("❌ Error occurred:", err);
   }
}
main().catch((error) => {
   console.error("❌ Fatal error in main execution:", error);
});
This code imports the runExtractor function to generate embeddings for a query and uses Supabase’s rpc method to call the database function named get_relevant_docs that you created earlier to retrieve documents related to the query. It first generates embeddings for the input query. It then passes the embeddings, a similarity threshold, and a limit on the number of documents to Supabase to get relevant documents. If successful, it logs the retrieved documents; otherwise, it handles and logs any errors.
Execute the code using the command node retrieve-relevant-docs.js. You should then get three documents that are related to your query.
Building the RAG component
At this point, you’ve set up everything except the RAG component. As mentioned, RAG enhances language model responses by incorporating external knowledge. You’ve already prepared a knowledge base and implemented a way to fetch relevant documents based on user queries. Now, you pass these documents to the OpenAI GPT-3.5 Turbo model, enabling it to generate more accurate and contextually relevant responses.
Navigate to the API keys on your OpenAI developer dashboard and click the + Create new secret key button to launch the Create new secret key modal. Fill out the required details, click the Create secret key, and copy your secret key:

Open the .env file in the project root folder and paste the following code, replacing the placeholder value with the secret key you just copied:
OPENAI_SECRET_KEY=<YOUR-OPENAI-SECRET-KEY>Create a new file named openai.js in the lib folder. Then add the following code to initialize an OpenAI client instance with the secret key from environment variables and export it for use in other parts of the application:
import OpenAI from "openai";
import dotenv from "dotenv";
dotenv.config();
export const openai = new OpenAI({ apiKey: process.env.OPENAI_SECRET_KEY });
Create a file named generate_response.js in the project root folder and add the following code to pass the contextually relevant documents to the OpenAI model and generate a response:
import { runExtractor } from "./lib/extractor.js";
import { supabase } from "./lib/supabase.js";
import stripIndent from "strip-indent";
import dotenv from "dotenv";
import { openai } from "./lib/openai.js";
// Load environment variables
dotenv.config();
async function main() {
   const query = "Why do customers choose Descope over Ping Identity?";
   console.log("🔍 Generating embeddings for the input...");
   try {
       const { data: queryEmbedding } = await runExtractor(query);
       console.log("✅ Embeddings generated.");
       // Call Supabase function to get matching docs
       try {
           const { data, error } = await supabase.rpc("get_relevant_docs", {
               query_embedding: Array.from(queryEmbedding),
               threshold: 0.8,
               docs_count: 3,
           });
           if (error) {
               throw new Error(error.message);
           }
           console.log(
               `✅ ${data.length} Relevant documents retrieved successfully`
           );
           // Concat docs
           const context = data
               .map((doc) => stripIndent(doc.content.trim()))
               .join("\n");
           console.log("Generating response");
           const system_message = `
               You are a friendly Descope chatbot. \
               You can answer questions about Descope, its features, and docs. \
               You respond in a concise, technically credible tone. \
               If the answer is not explicitly provided in the context, say "Sorry, I can't help with that."
           `;

           const messages = [
               { role: "system", content: system_message },
               { role: "user", content: query },
               {
                   role: "assistant",
                   content: `Relevant information: ${context}`,
               },
           ];
           const response = await openai.chat.completions.create({
               model: "gpt-3.5-turbo",
               messages,
           });
           console.log(response.choices[0].message.content);
       } catch (err) {
           console.error("❌ Error fetching relevant documents:", err);
       }
   } catch (err) {
       console.error("❌ Error occurred:", err);
   }
}
main().catch((error) => {
   console.error("❌ Fatal error in main execution:", error);
});
This code first generates embeddings for a user query using the runExtractor. It then uses the Supabase rpc function to fetch relevant documents from a database based on the generated embeddings. The retrieved documents are concatenated to form the context for the response. The code then formats the context and user query into a message for the OpenAI API to generate a response using the GPT-3.5 Turbo model. The assistant’s response is based on the relevant documents, and if the context does not provide an answer, it defaults to saying, “Sorry, I can’t help with that.” Finally, any errors in the process are logged.
Run this code using the command node generate_response.js. You will then get an output similar to the following:
Customers choose Descope over Ping Identity for several reasons:
1. Frictionless developer experience: Descope offers client, backend, and mobile SDKs combined with Descope Flows to create user journeys for any app quickly, allowing modifications without touching the codebase.
2. Seamless IT experience: Descope abstracts away identity complexity for IT teams with low/no code workflows and native support for standard protocols, providing a great developer experience.
3. Complete user management: Descope goes beyond authentication to seamlessly manage users and tenants, empower end users with delegated admin capabilities, and simplify SSO provisioning for tenant admins.
4. Flexibility: Descope can easily adapt to fit into any app's environment, supporting different methods and MFA options, allowing for both rip-and-replace or augmentation scenarios.
In summary, customers prefer Descope for its developer-friendly approach, seamless user management, and flexibility to adapt to different environments.
If you change the query to something like “Why is the sky blue?”, you should get the following output:
Sorry, I can't help with that.This confirms that the RAG application is working as expected!
Conclusion
In this blog, you prepared your Supabase database for embedding data, used pgvector to store and retrieve embeddings, and created a database function to retrieve relevant documents. These documents were then passed to the language model as context, enabling it to generate accurate and contextually relevant responses.
In the next part of the series, you will learn how to integrate Descope as a SAML provider for secure login and access control, implement RLS, and build the frontend for the RAG application. Subscribe to our blog or follow us on LinkedIn and Bluesky to stay up to date when the next blog is published!