
Table of Contents
Security and access control are fundamental to modern applications. By integrating Descope, Next.js, and Supabase, developers can build secure, scalable apps with seamless authentication and authorization. In this guide, we’ll demonstrate how to integrate Descope for authentication and Supabase for authorization, implementing Row Level Security (RLS) to create a secure “todo list” app.
While Supabase auth requires more manual setup, Descope offers flexible, no-code authentication with advanced security features like multi-factor authentication and risk-based protection. Using Descope for authentication and Supabase for authorization ensures a more secure and scalable architecture with minimal complexity.
In this guide, we’ll build a simple “todo list” application where users authenticate with Descope, and Supabase enforces access control using RLS. While Supabase supports external SAML providers—eliminating the need to generate tokens manually—this feature is only available on the Pro tier and above. You can check out our guide on setting up SSO in Supabase for more details. If you're using Supabase’s Free tier, the approach in this sample app is the recommended solution.
Let’s explore how Descope and Supabase work together to enhance security while keeping the developer experience seamless.
Supabase and Row Level Security (RLS)
Supabase is an open-source alternative to Firebase, offering backend services such as authentication, real-time databases, and serverless functions. Built on Postgres, it provides a scalable and reliable foundation for modern applications.
A key feature of Supabase is Row Level Security (RLS), which allows developers to enforce fine-grained access control at the database level. By defining policies based on user attributes, such as user IDs or roles, you can ensure users access only their own data.
By integrating Descope for authentication and Supabase for authorization, we can build a fully functional Next.js todo list app with strong security controls. This guide will take you through the process step by step.
Prerequisites
The source code for this tutorial is available in the Descope + Supabase Next.js Sample App repository. Follow the README instructions to install the required dependencies.
Sample app overview
Here’s an overview of how the sample app operates:
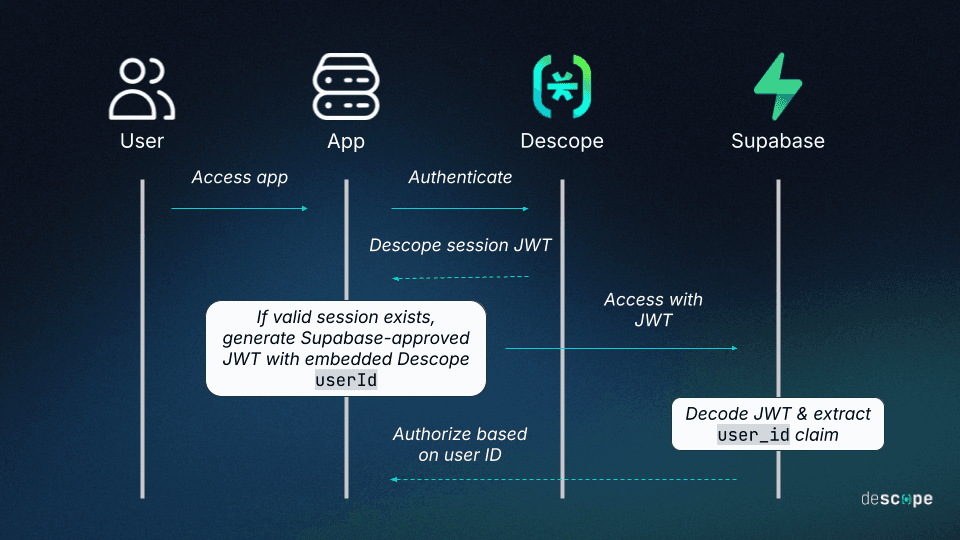
The Descope Next.js SDK is used in the frontend to manage authentication and create a Descope session JWT.
The app generates a Supabase-approved JWT using
joseand the Supabase JWT secret, embedding the Descope user ID in the token.Supabase decodes the JWT, extracts the
user_idclaim, and uses it to identify the user.The session is managed with Descope in the frontend, and the app creates a Supabase JWT only when a valid session exists.
Following this setup, we can leverage Descope-based user details to enforce access control in our application.
Setting up the Next.js application
Configure environment variables using
.env.local.example. Rename the file to.env.localand set your Descope Project ID, found on the Project Settings page:
NEXT_PUBLIC_DESCOPE_PROJECT_ID=<Your Descope Project ID>Setting up Supabase
First, create a new Supabase project at database.new.
Add the following values, found on your Supabase API settings page, to your
env.localfile:
NEXT_PUBLIC_SUPABASE_URL=your-project-url
NEXT_PUBLIC_SUPABASE_ANON_KEY=your-anon-public-key
SUPABASE_SIGNING_SECRET=your-jwt-secret
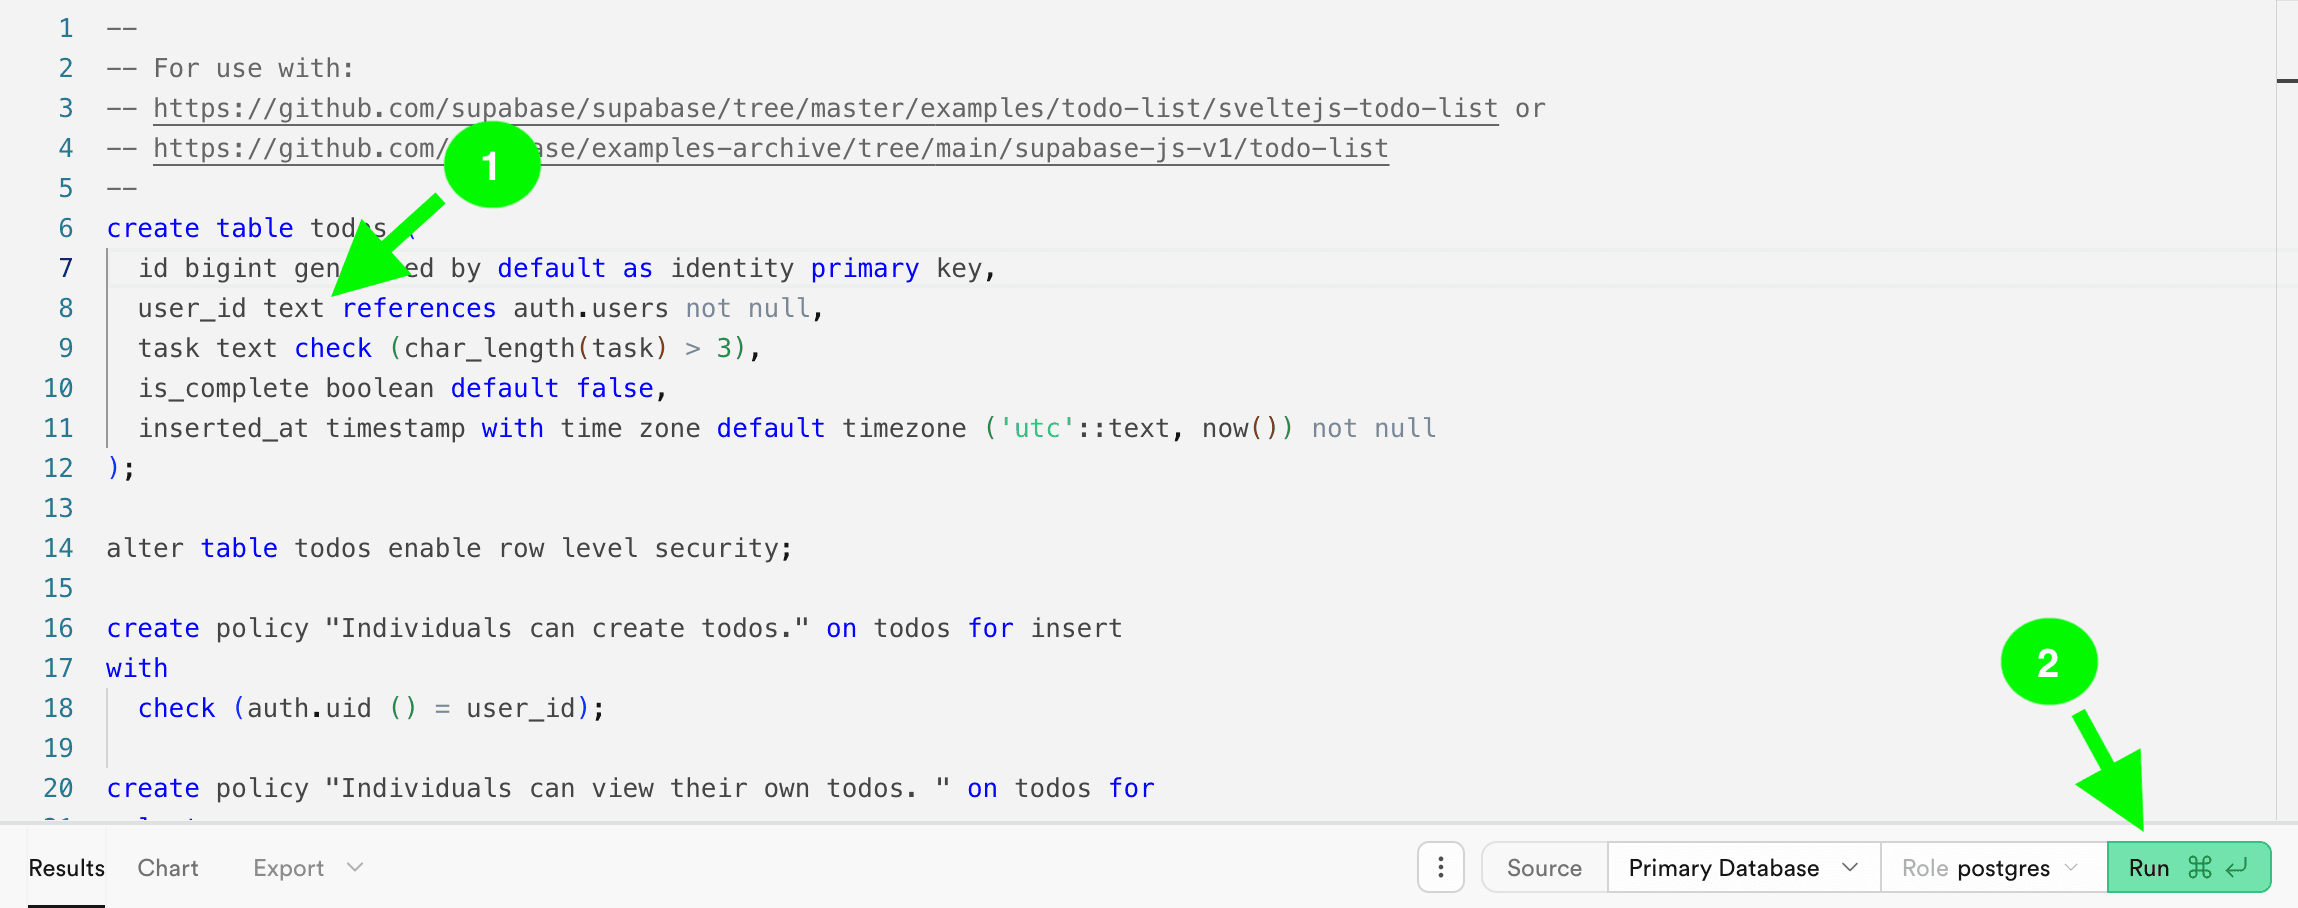
Select the “Todo List” quickstart in the SQL editor tab:

Before running the query, change the type of
user_idfromuuidtotext. Then click “Run”:
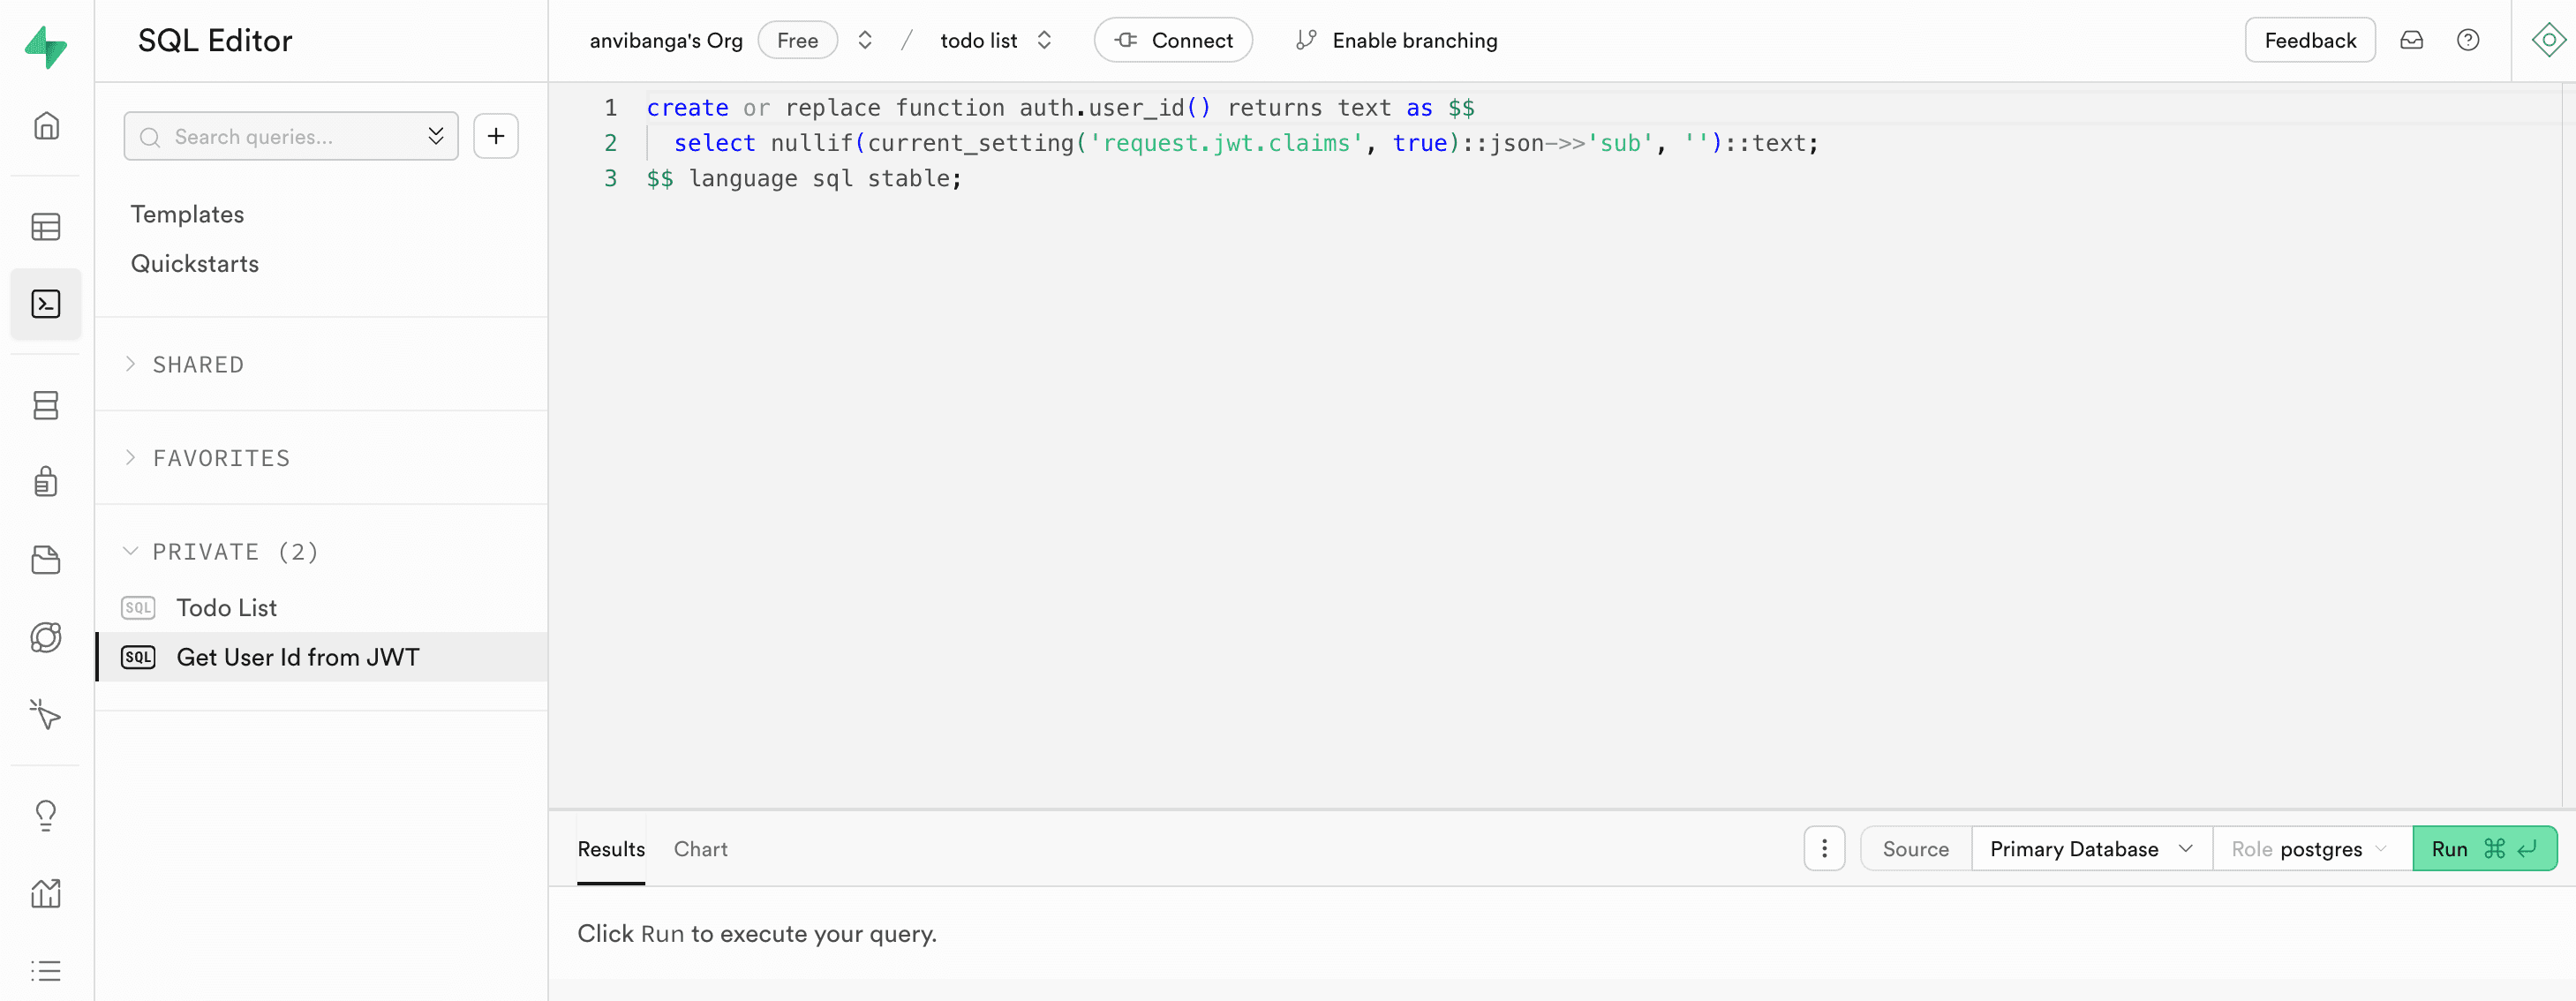
Define a function to map the
auth.user_id()function to the JWT claims:
create or replace function auth.user_id() returns text as $$
  select nullif(current_setting('request.jwt.claims', true)::json->>'sub', '')::text;
$$ language sql stable;
Enter and run the query in the Supabase SQL Editor:
Understanding the application architecture
Let’s take a step back and walk through the architecture of the application, specifically how we implement authentication, authorization, and our “todo list” frontend.
Implementing authentication
In pages/index.tsx, we use the Descope Next.js SDK to display a login form for unauthenticated users and the “todo list” for authenticated users:
// pages/index.tsx

import { Descope } from "@descope/nextjs-sdk";
import { useDescope, useSession, useUser } from '@descope/nextjs-sdk/client';
import TodoList from "@/components/TodoList";

export default function Home() {
const { isAuthenticated, isSessionLoading, sessionToken } = useSession();
const { logout } = useDescope();

  return (
    <>
      <div>
        {!isAuthenticated ? (
          <div>
            <span>Login</span>
            <Descope
                  flowId={
                    process.env.NEXT_PUBLIC_DESCOPE_FLOW_ID
                  }
                />
          </div>
        ) : (
          <div>
            <TodoList />
            <button
              onClick={async () => {
                const { error } = await logout();
                if (error) console.log("Error:", error);
              }}
            >
              Logout
            </button>
          </div>
        )}
      </div>
    </>
  );
}
Generating the Supabase JWT
We defined the “todo list” functionality in components/TodoList.tsx. In this file, first, we fetch the Descope session token and current userId using the Descope Next.js SDK:
// components/TodoList.tsx
import { useSession } from '@descope/nextjs-sdk/client';

const { isAuthenticated, isSessionLoading, sessionToken } = useSession();
const decodedToken = sessionToken
    ? jwtDecode<{ sub?: string }>(sessionToken)
    : {};
const userId: string = decodedToken?.sub ?? "";
In pages/api/create-jwt.ts, we define a function to sign a JWT with the Supabase secret. We use the userId from the Descope Session Token.
// pages/api/create-jwt.ts
import { SignJWT } from "jose";

export default async function handler(req: any, res: any) {
  if (req.method === "POST") {
    try {
      const { userId } = req.body;
      const supabaseSecret = process.env.SUPABASE_JWT_SECRET;
      if (!supabaseSecret) {
        return res.status(500).json({ error: "Missing SUPABASE_JWT_SECRET" });
      }
      const secretKey = new TextEncoder().encode(supabaseSecret);
      const newToken = await new SignJWT({ sub: userId })
        .setProtectedHeader({ alg: "HS256" })
        .sign(secretKey);
      res.status(200).json({ token: newToken });
    } catch (error) {
      res.status(500).json({ error: "Error generating JWT" });
    }
  } else {
    res.setHeader("Allow", ["POST"]);
    res.status(405).end(`Method ${req.method} Not Allowed`);
  }
}
Initializing Supabase
We create a Supabase client in lib/initSupabase.ts:
// lib/initSupabase.ts

import { createClient } from '@supabase/supabase-js';

export const createSupabaseClient = (jwtToken: any) => {
  return createClient(
    process.env.NEXT_PUBLIC_SUPABASE_URL ?? '',
    process.env.NEXT_PUBLIC_SUPABASE_ANON_KEY ?? '',
    {
      global: {
        headers: {
          Authorization: `Bearer ${jwtToken}`
        }
      }
    }
  );
};
Within the components/TodoList.tsx file, we retrieve the Supabase JWT. Then, we initialize the Supabase Client using the Supabase URL and anonymous key.
// components/TodoList.tsx
const initializeSupabase = async () => {
      try {
        const response = await fetch("/api/create-jwt", {
          method: "POST",
          headers: { "Content-Type": "application/json" },
          body: JSON.stringify({ userId }),
        });

        if (!response.ok) throw new Error("Failed to fetch JWT");

        const data = await response.json();
        if (data?.token) {
          const client = createSupabaseClient(data.token);
          setSupabase(client as SupabaseClient<Database>);
        } else {
          throw new Error("Invalid token received");
        }
      } catch (error) {
        console.error("Error initializing Supabase:", error);
      }
    };
Now, we use the Supabase Client to fetch tasks from the database.
// lib/initSupabase.ts

if (supabase) {
      const fetchTodos = async () => {
        const { data, error } = await supabase
          .from("todos")
          .select("*")
          .order("id", { ascending: true });

        if (error) console.log("error", error);
        else if (data) setTodos(data as Todos[]);
      };

      fetchTodos();
}
At this stage, you should be able to log in to the application and see any tasks that are defined in the database. Next, we’ll make sure that users of this “todo list” application can only view, update, and delete tasks that they own. For this, we’ll go back into the Supabase console and implement Row Level Security (RLS).
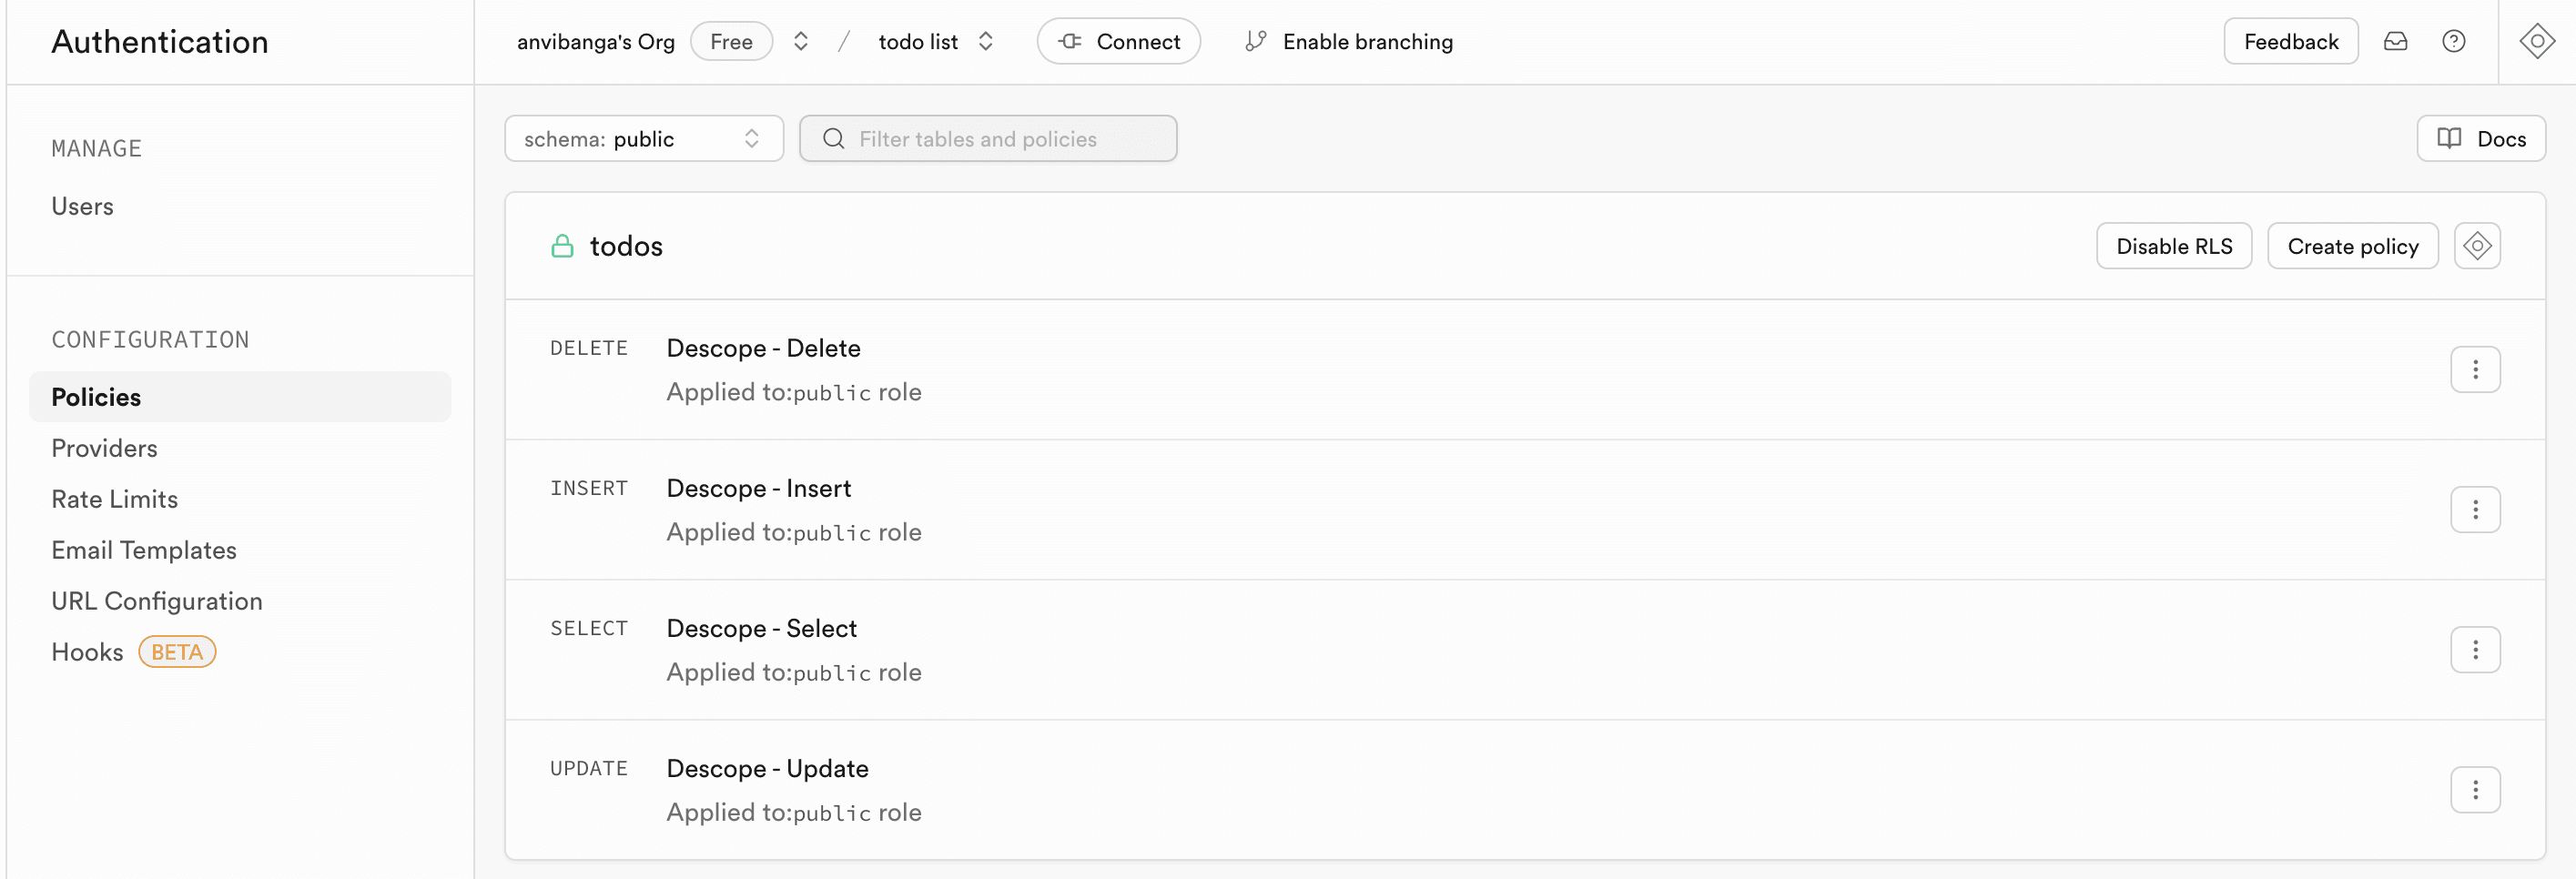
Configuring Supabase Row Level Security
To enforce access control, we need to set the Row Level Security policies within Supabase. Navigate to Authentication -> Policies in the Supabase console. Then, create four policies for the SELECT, INSERT, UPDATE, and DELETE commands with the condition: user_id = auth.user_id().
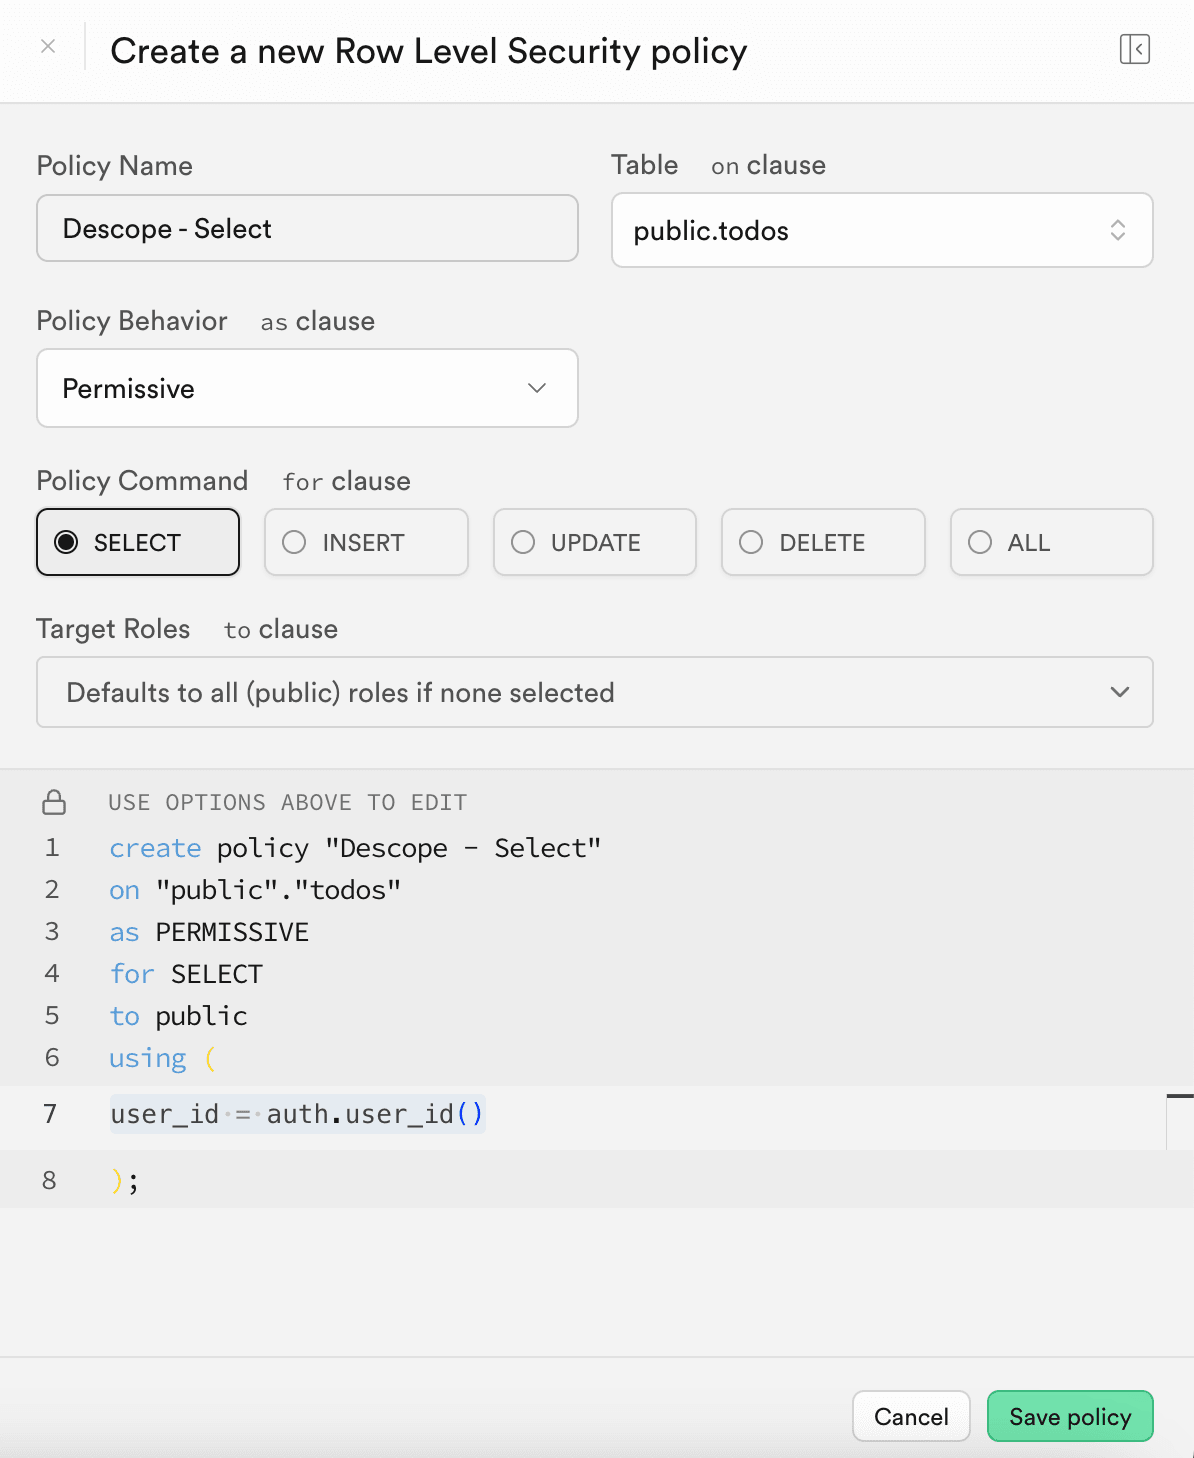
Now, authenticated users can only access their own tasks in the “todo list”!
Demonstration
Now, User A can log in to the application and add a task.
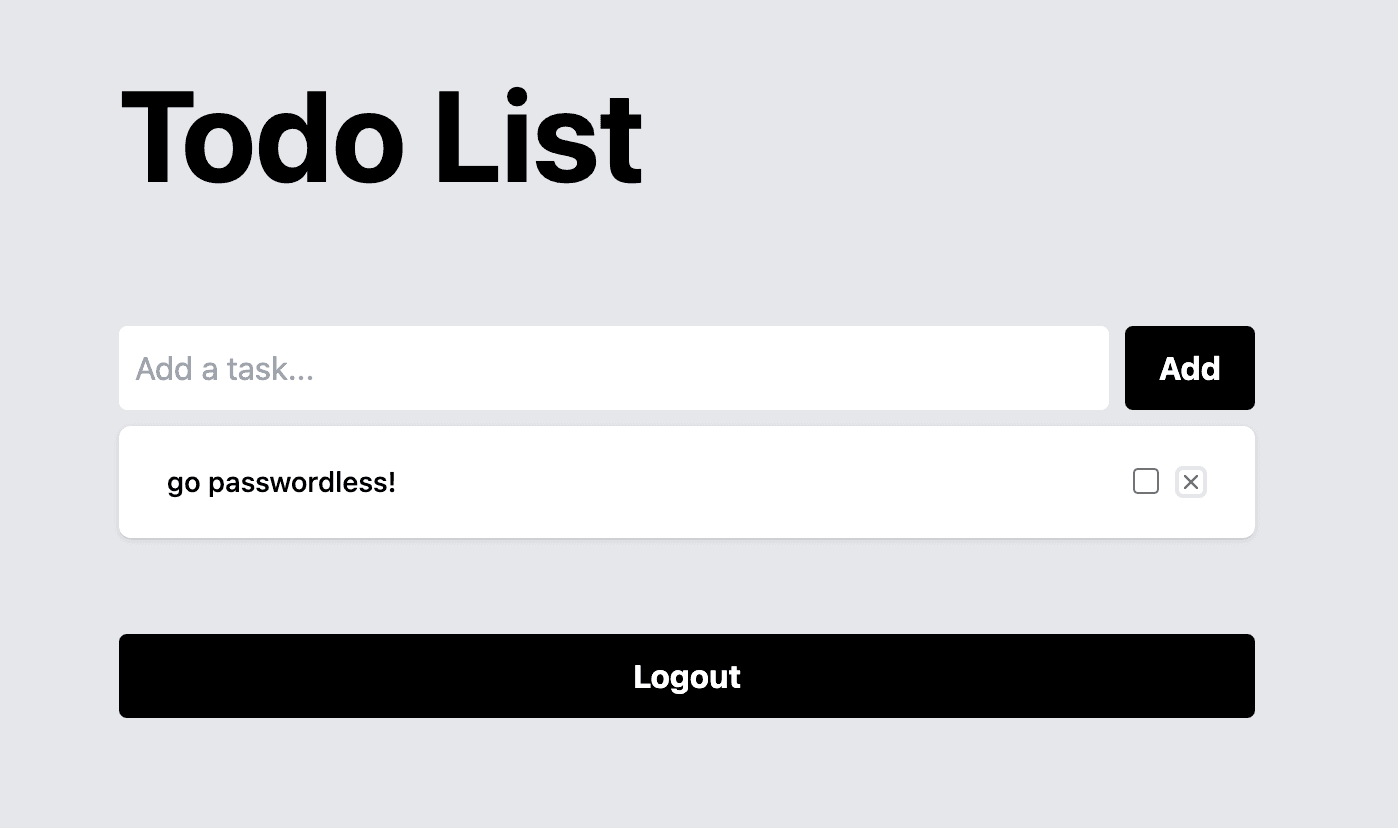
This update is reflected in the application UI, and in the Supabase table itself.

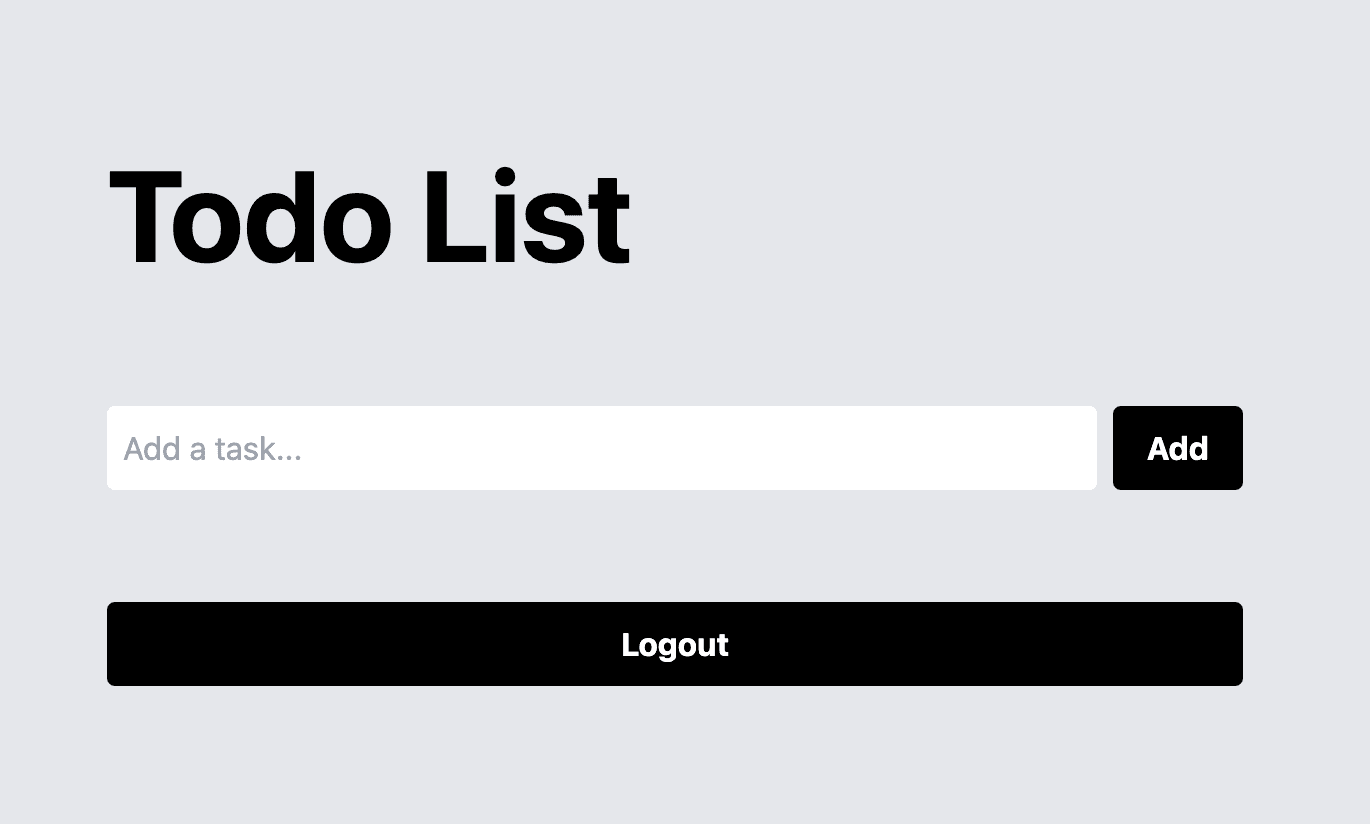
If User B logs in, they will not see any tasks, since the only task in the database is not associated with them.
When User B adds a task to the list, they will only be able to see their task, and User A will not see the new task.
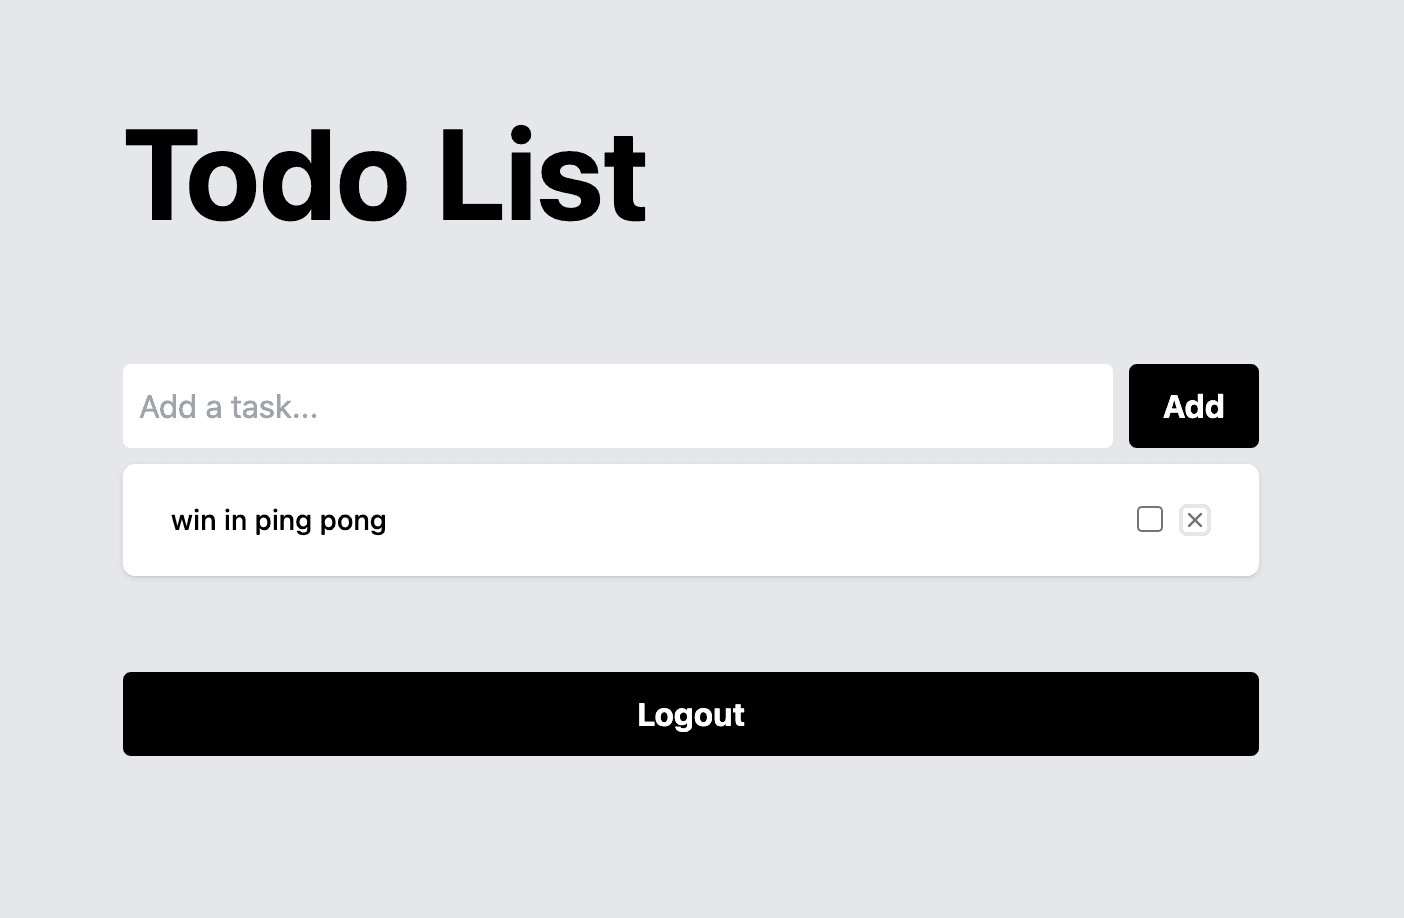
When we go back and view the database in Supabase, we can see both tasks are present in the same table, but they’re associated with different user_ids in Supabase. Thus, only users with the corresponding userId in Descope will be able to view their tasks.

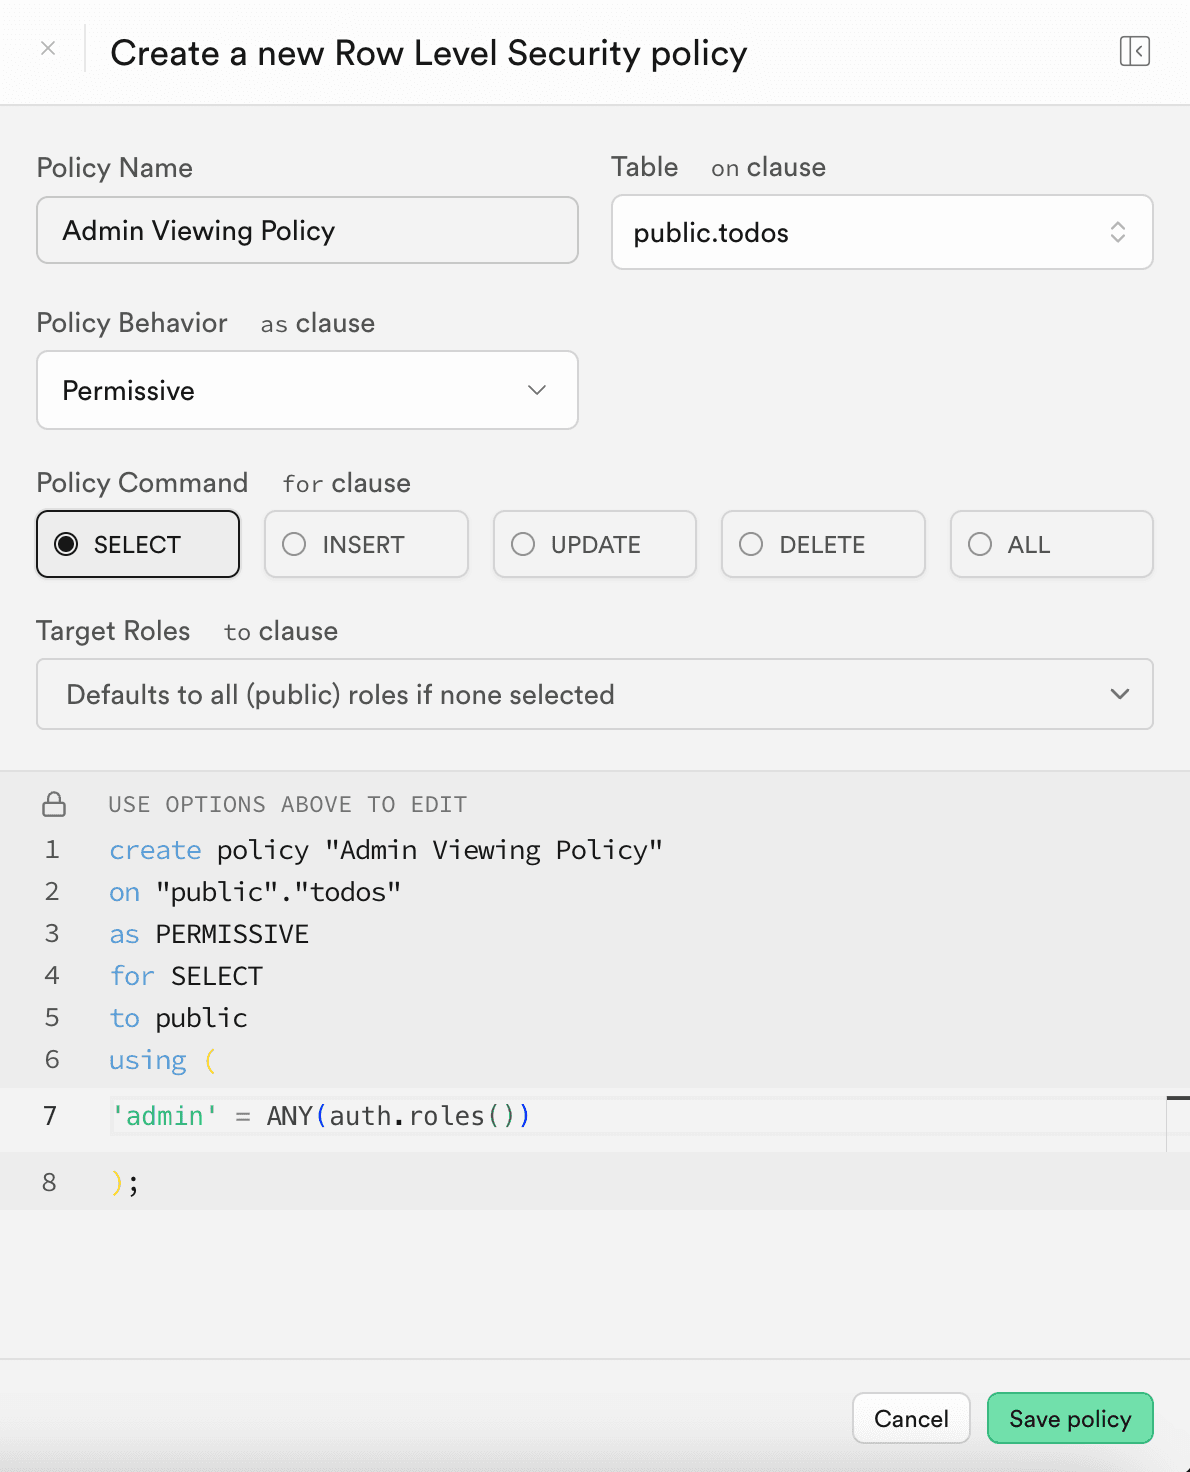
To implement a custom RLS policy using role claims in the JWT, you can include a role claim in the Descope-issued JWT and use it within Supabase’s policies. When a user logs in, their JWT contains their assigned role, which Supabase can reference in RLS policies.
For example, in Supabase, you could create an RLS policy for the “todo list” that allows only users with the "admin" role to access all tasks, while restricting others to only their own:
For a deeper dive into managing roles and permissions with Descope tokens for your RLS policies, check out our Role Based Access Control documentation..
Conclusion
In this blog post we looked at how to easily create a secure and functional “todo list” application leveraging Descope for authentication and Supabase row-level security for authorization. This combination allows for seamless user sign-ins and controlled access to tasks—without the need for complex backend logic.
This is just the beginning. These same authentication and authorization principles can be extended to a wide range of applications, including RAG-based AI systems, multi-tenant platforms, and more. Interested in exploring further?
For additional Descope and Supabase integrations, check out our blog on adding SSO to Supabase, and Part One and Part Two on building a RAG App with Descope, Supabase, and pgvector.