Table of Contents
The state of VR authentication
This tutorial was written by Keanan Koppenhaver, a developer passionate about one-on-one teaching and helping other devs level up their code. Connect with him on his website or X to see more of his work!
Previously relegated to the realm of science fiction, virtual reality (VR) headsets continue to get cheaper, more portable, and more accessible. Just as the iPhone kicked off a whole wave of smartphone apps being built, the latest generation of VR headsets has proven that VR can be a good interface for more than just games.
However, once you start building serious applications on any platform, you need to think about authentication.
This article explains how to create a streamlined authentication and MFA workflow in a Unity VR application using OpenID Connect (OIDC) and Descope.
The state of VR authentication
When considering authentication in a VR application, reusing the typical username and password authentication scheme isn’t always the best option. VR users don’t have a physical keyboard to type long passwords or a mouse to click through complex authentication schemes.
In addition, the immersive nature of VR means that any break in presence, such as a login screen or two-factor authentication (2FA) on a mobile device, can be jarring and disruptive to the user experience.
With all these challenges, it’s tempting to just skip authentication altogether. However, VR headsets are often shared devices, especially in commercial or educational settings, which means not only is authentication important, but it also needs to be able to support multiple users and quick and seamless logging in and out.
A great compromise here is OIDC. Think of OIDC as a secure digital ID card that allows users to verify their identity across various websites and apps without having to create new passwords for each one. When you click Sign in with Google, OIDC enables Google to confirm your identity using cryptographic security, eliminating the need for other services to manage their own username/password databases. By simplifying the login process, OIDC helps address some of the issues with complex authentication flows. However, implementing the entire OIDC authentication flow yourself can sometimes be difficult and require configuration of a lot of tricky details.
Why Descope
With Descope, you can implement OIDC as a no-code user flow, meaning you can get your authentication up and running faster and get back to working on your app. The OIDC flow simplifies the user-facing interface as well, allowing the user to authenticate with a provider where they’re likely already logged in, saving clicks and password retyping. Though this tutorial focuses on flows, Descope also offers SDKs and a comprehensive REST API, which gives you the flexibility to choose the best implementation method for your specific VR project.
Create a Descope account
The first step in setting up and configuring this flow inside an actual VR application is getting a Descope account if you don’t have one already.
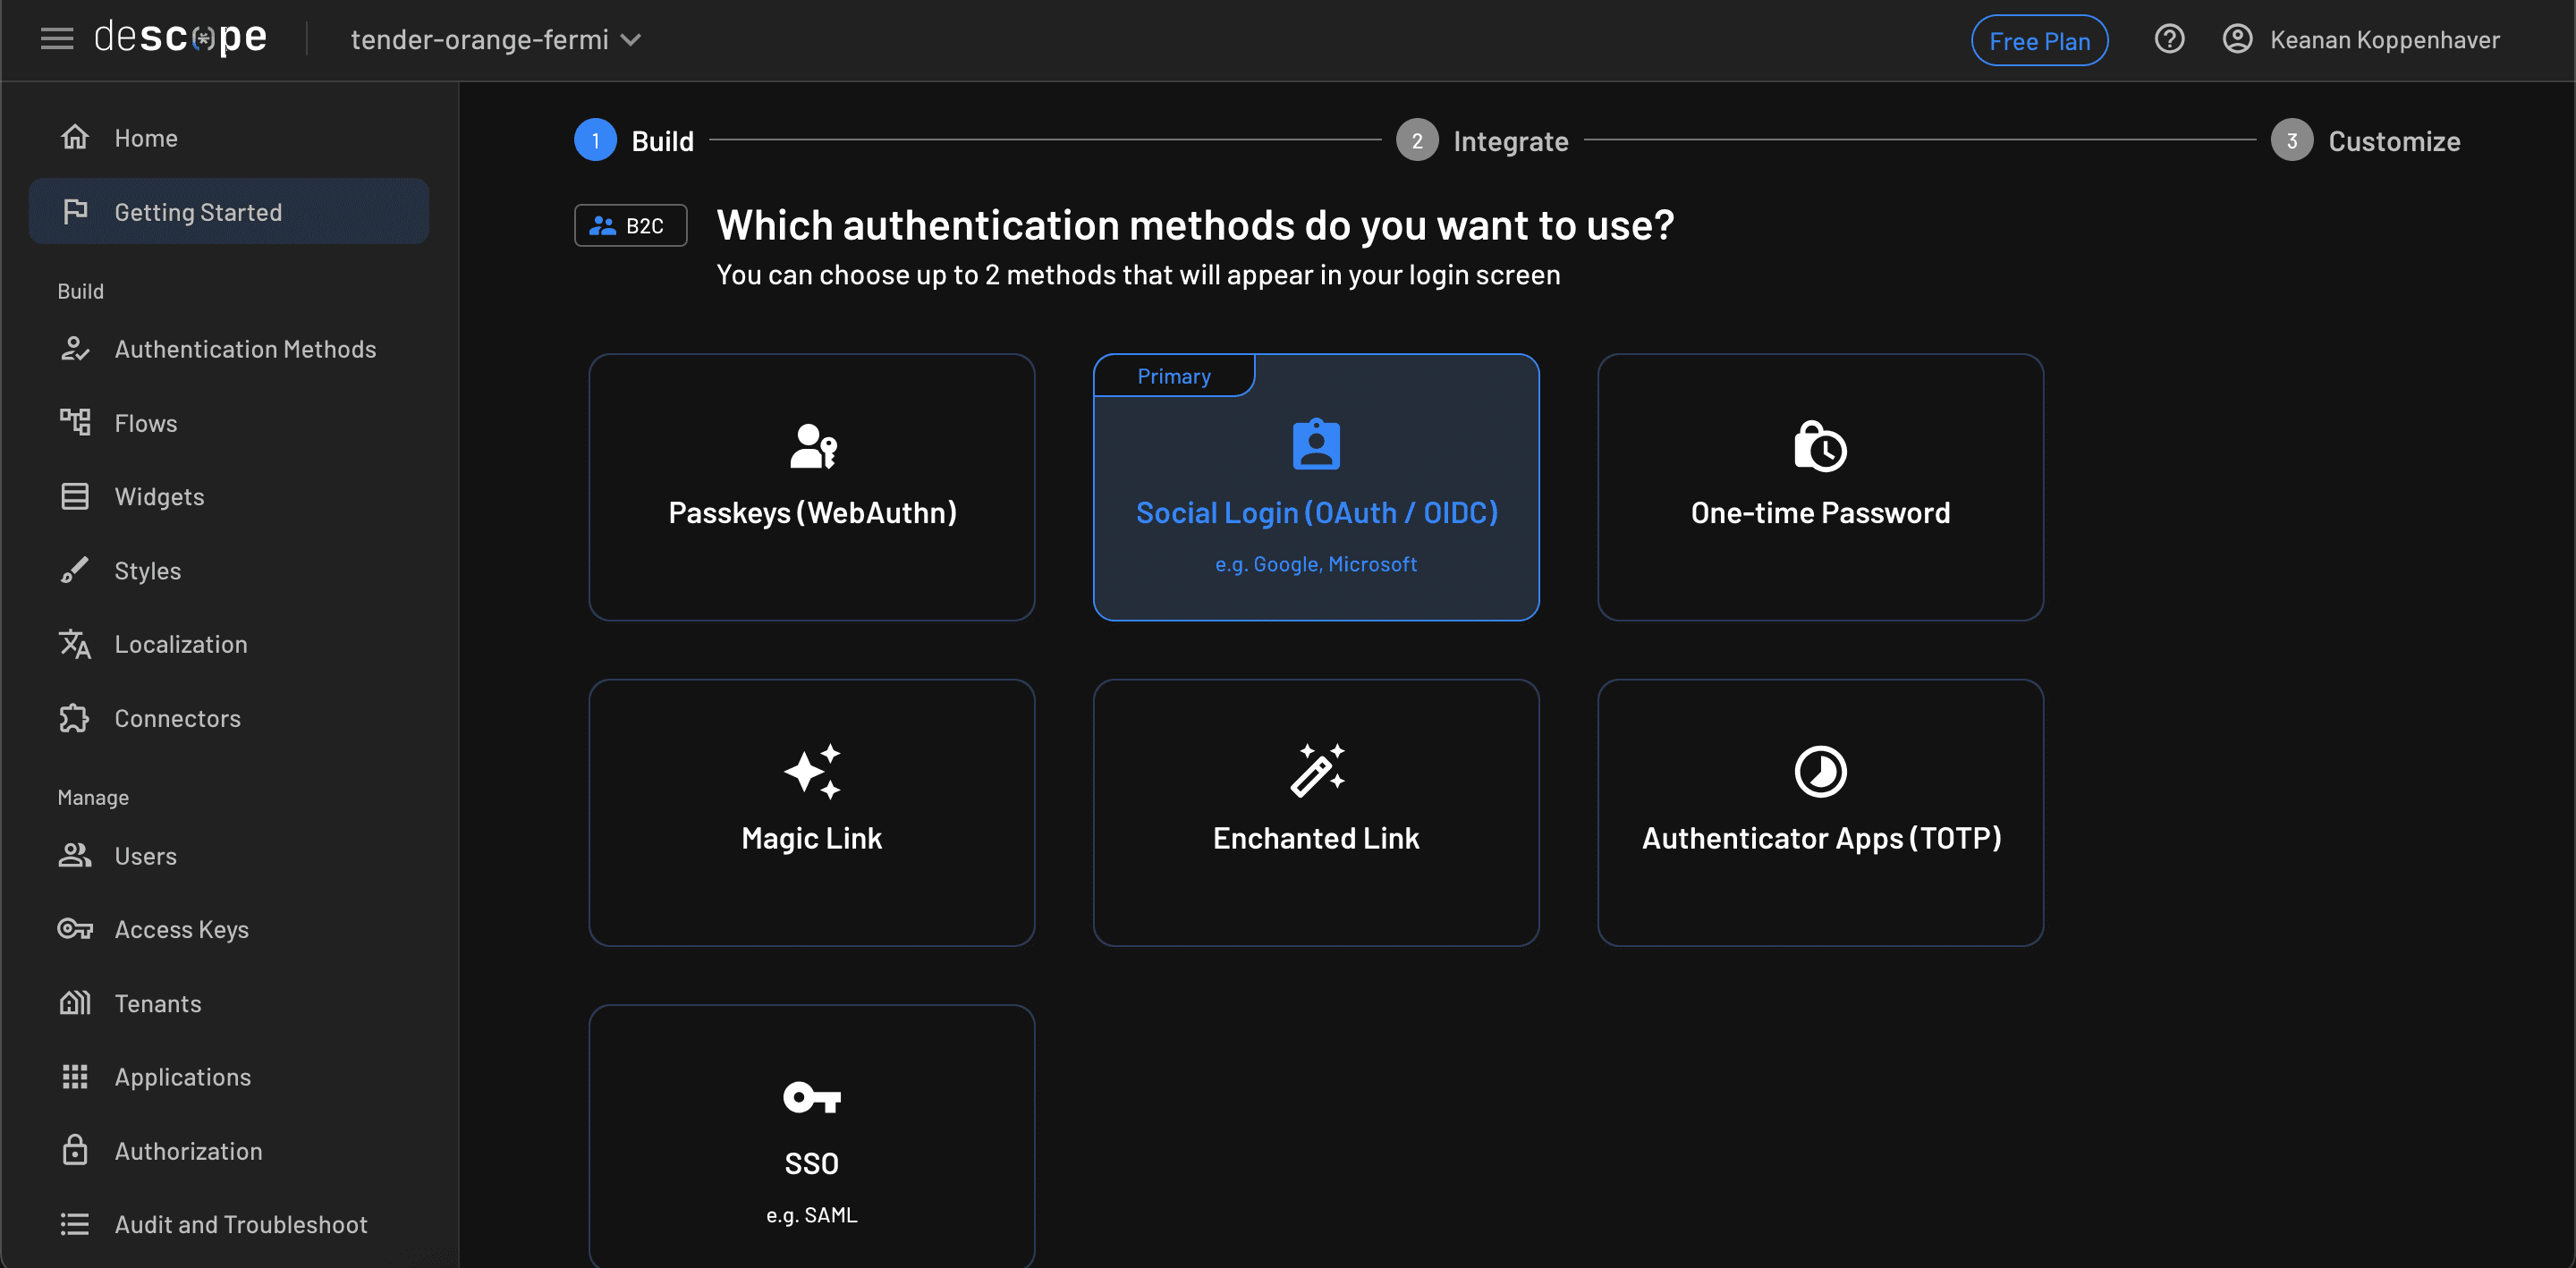
Head over to Descope and sign up for an account. You’ll go through a series of onboarding steps, where Descope asks for details to tailor your account setup. When you’re asked which authentication method you want to use, make sure to choose Social Login:
On the Customize screen, you’ll see an optional list of actions to help set up and personalize your account:
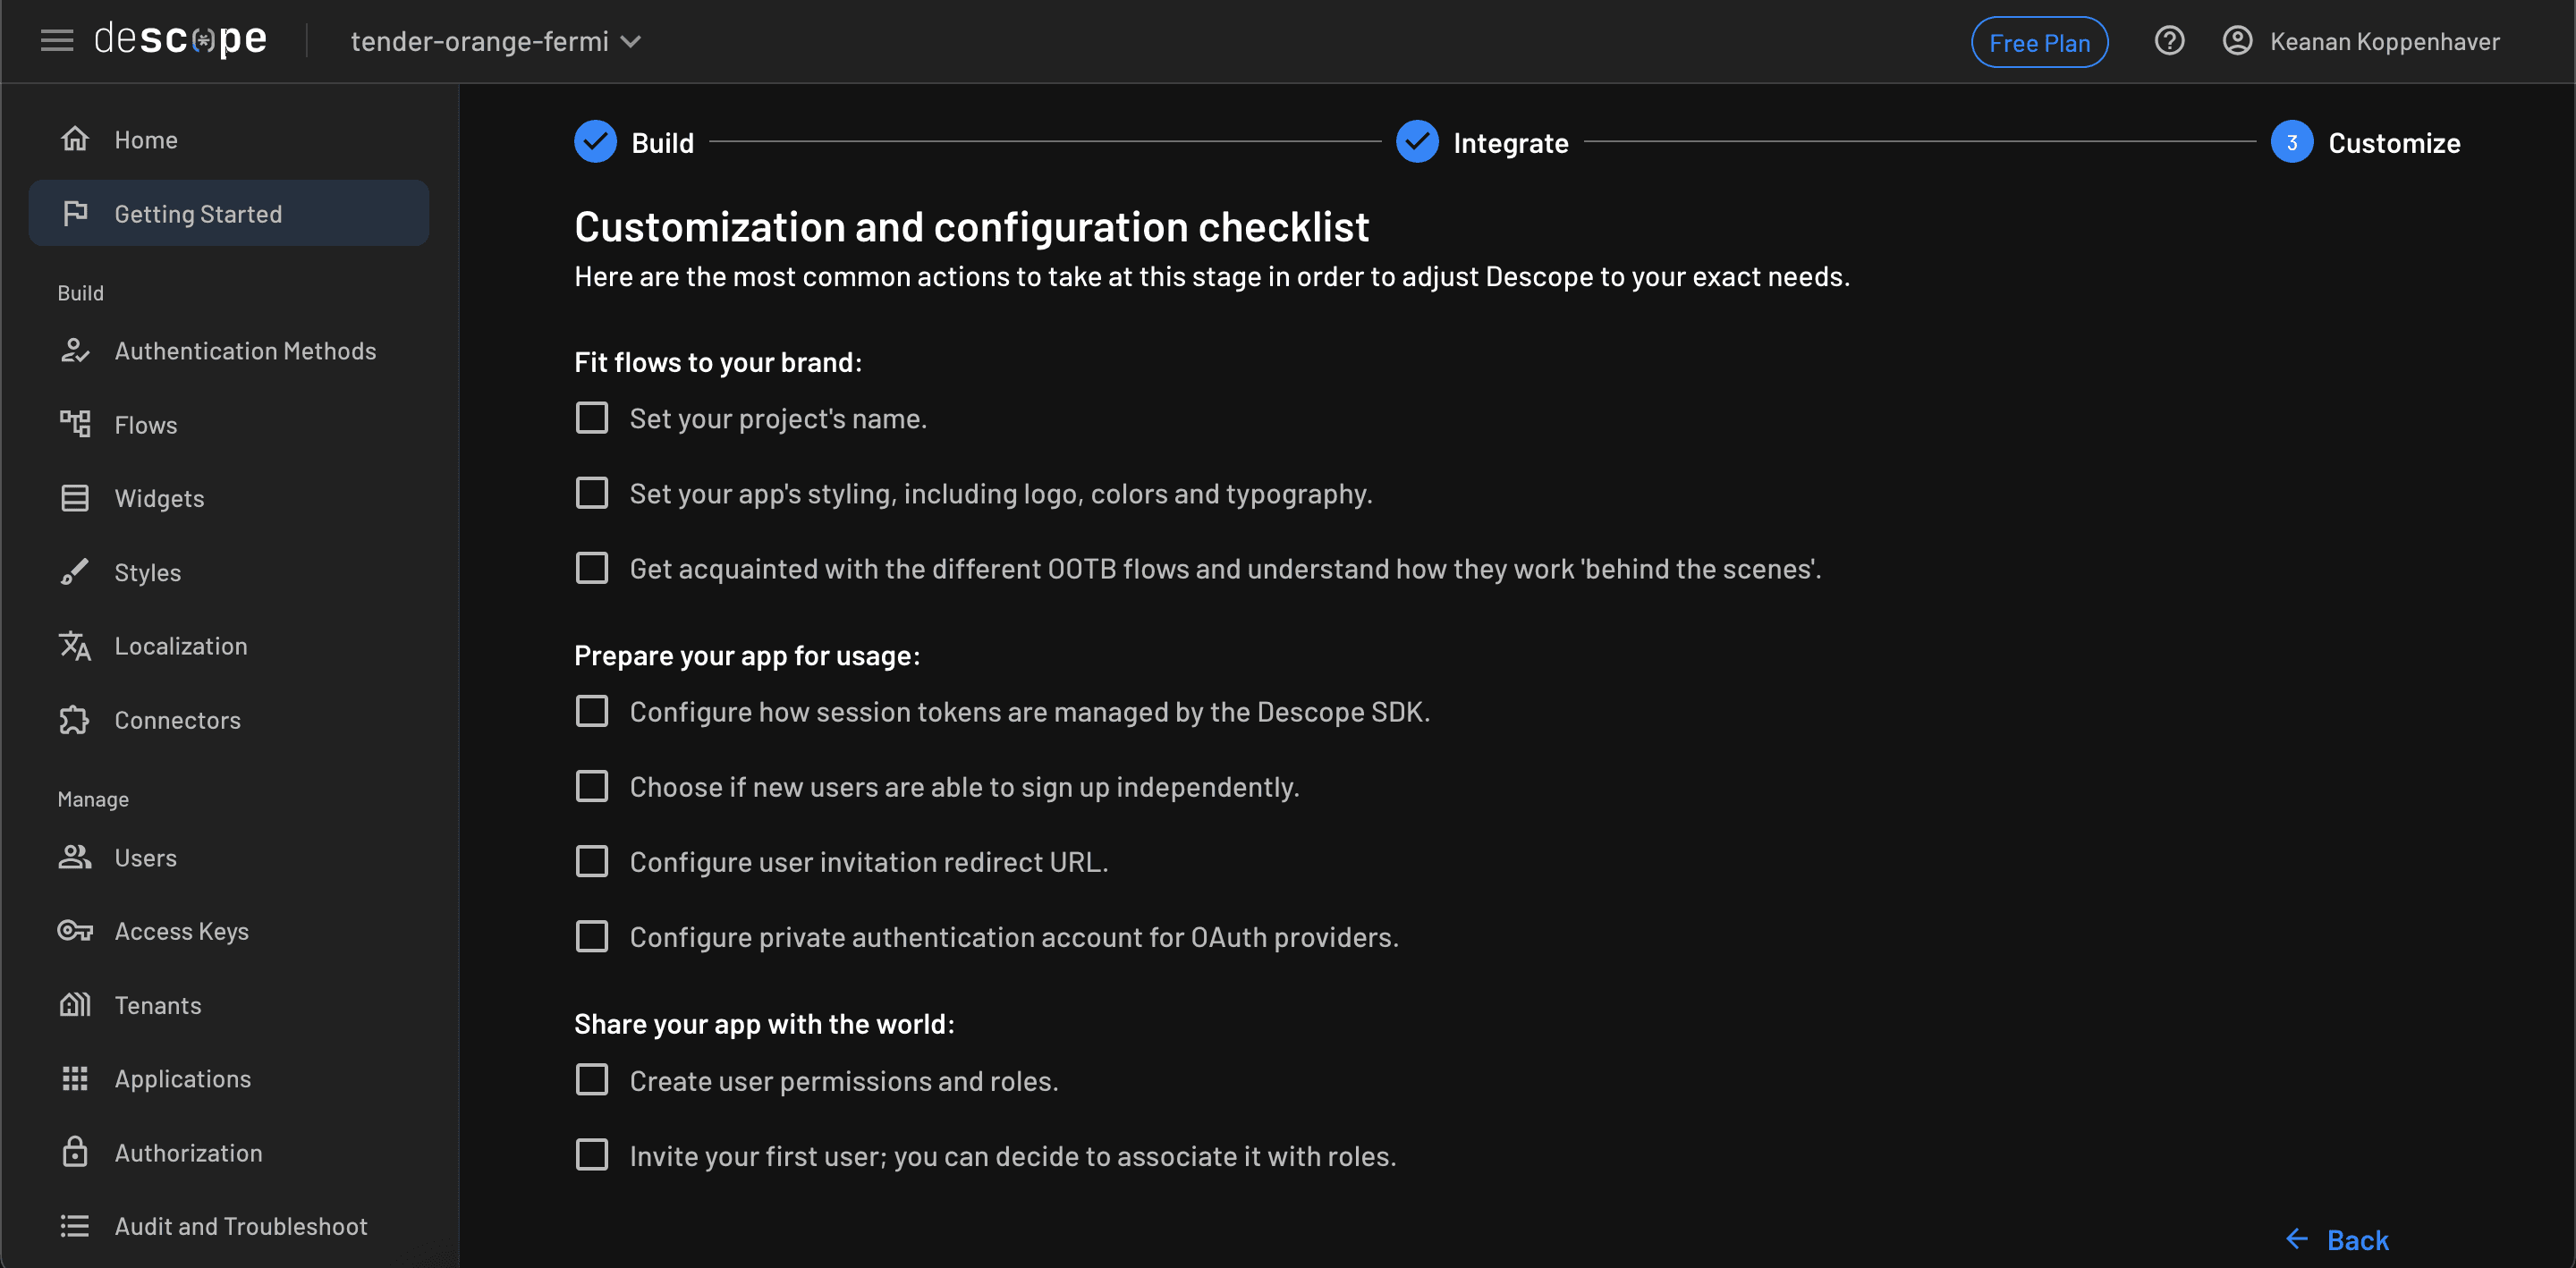
If you don’t want to complete any of those steps, you can come back to them later. Now you’re ready to create your first flow.
Configure the OIDC flow
Click the Flows item in the left-hand navigation to navigate to the Flows screen:
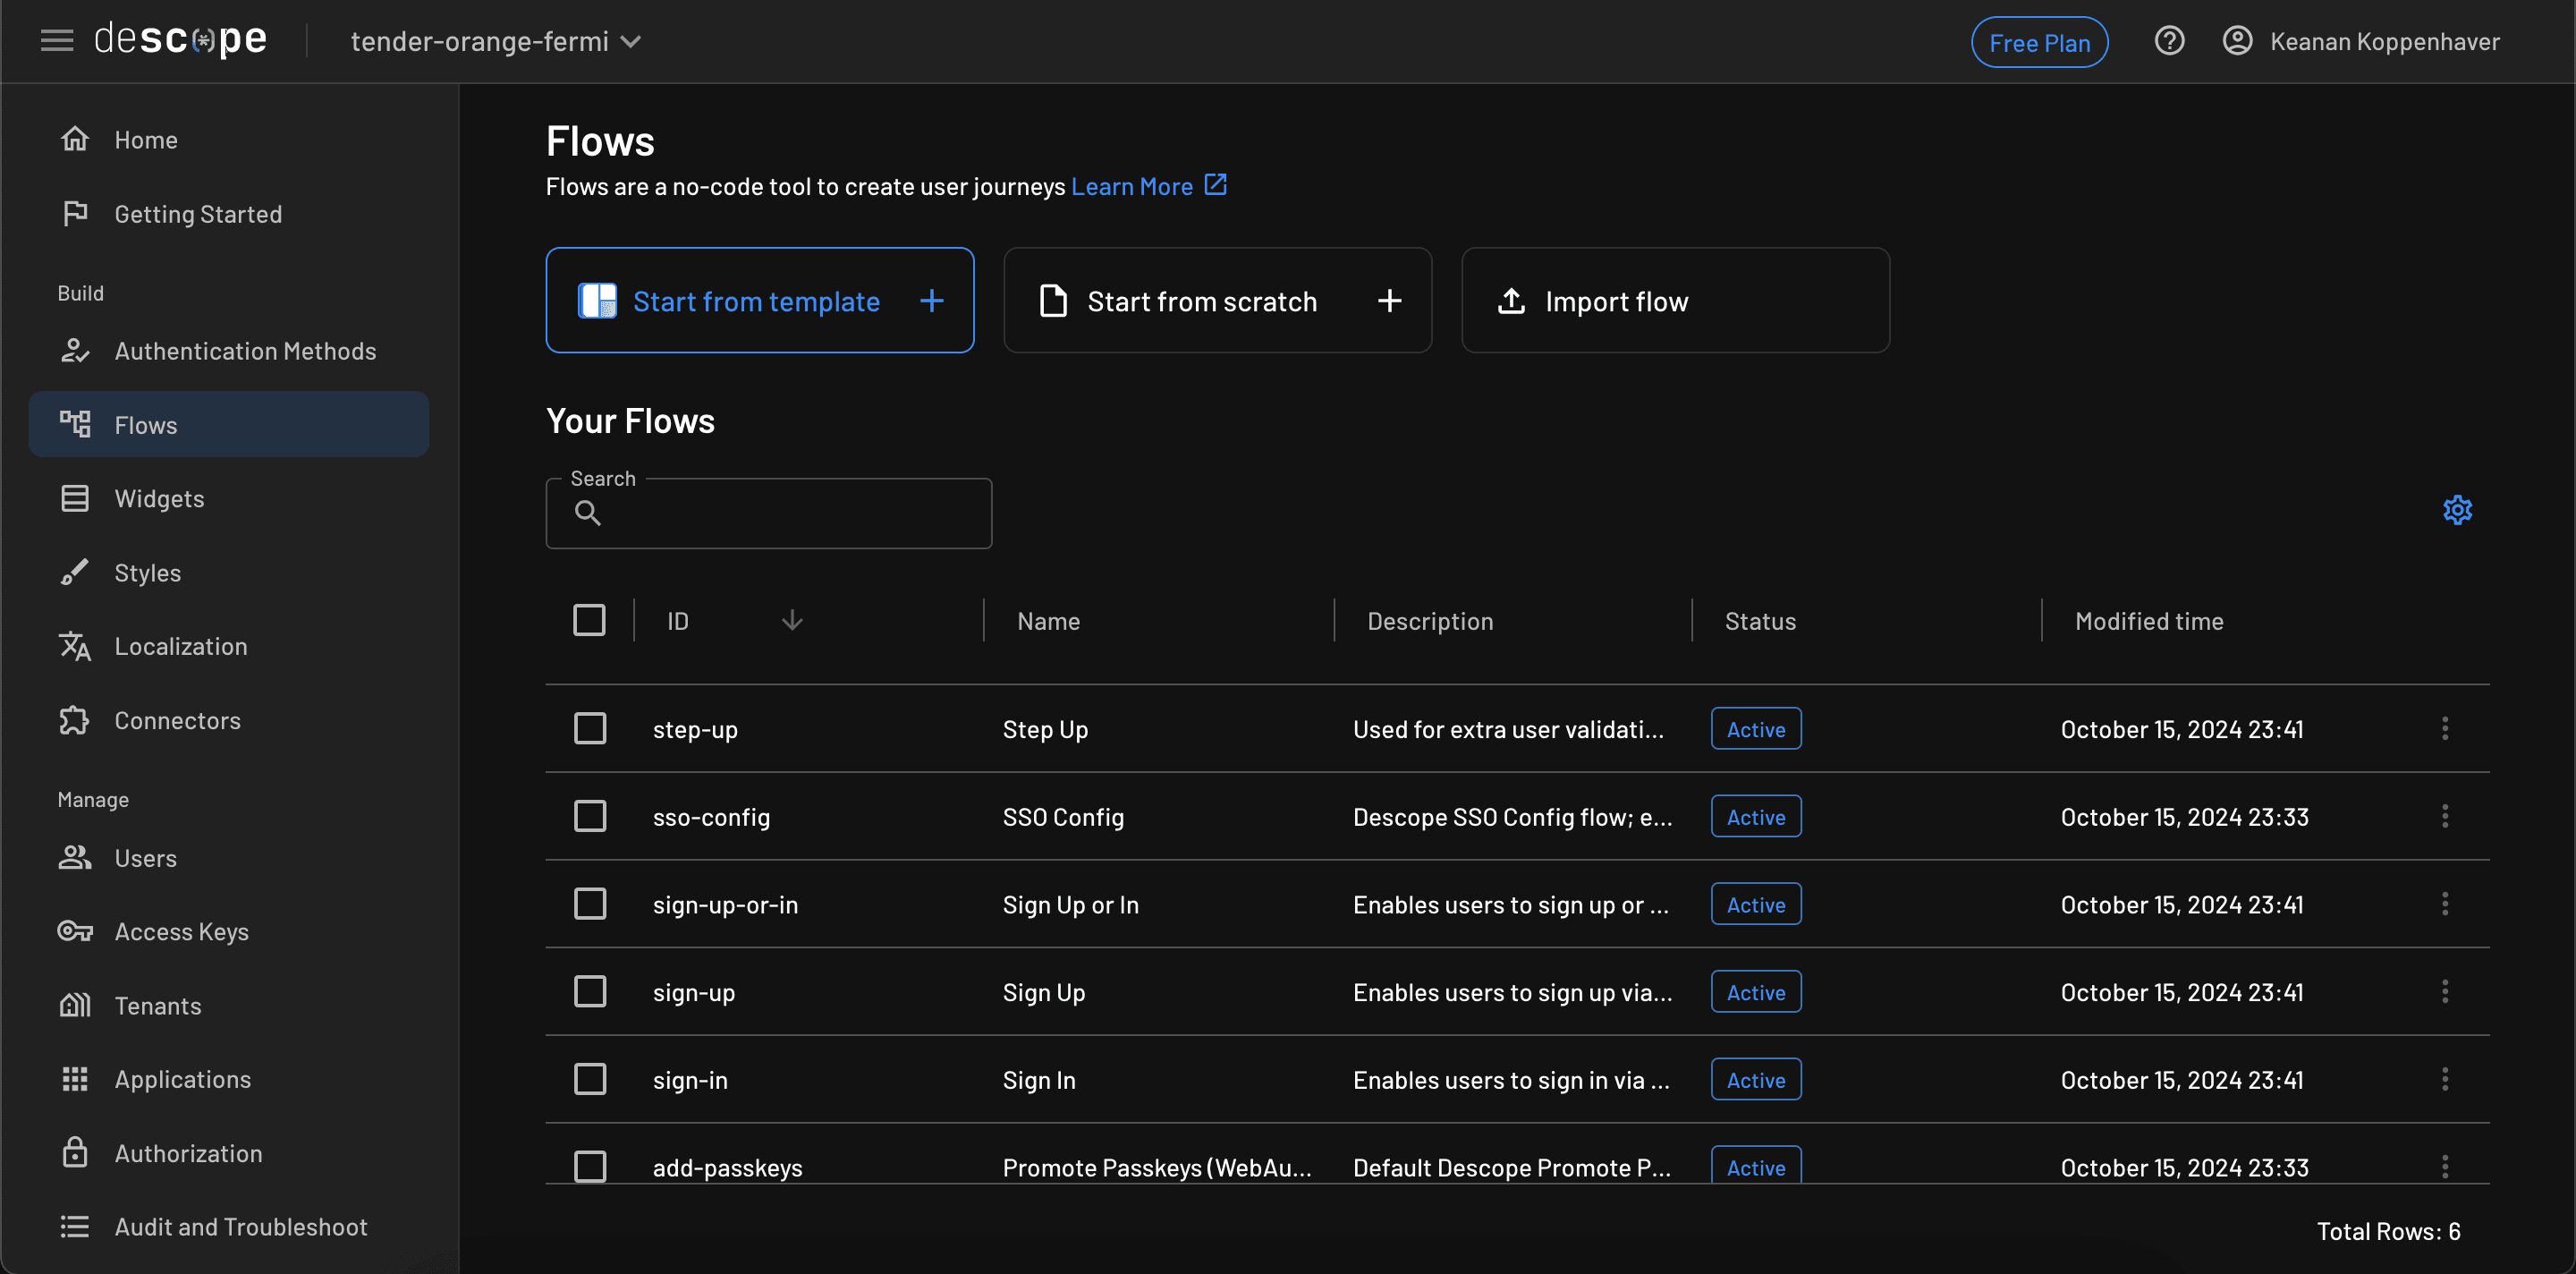
You’ll see there are already some preconfigured flows. Click the Sign In flow to see what a basic flow looks like in Descope:
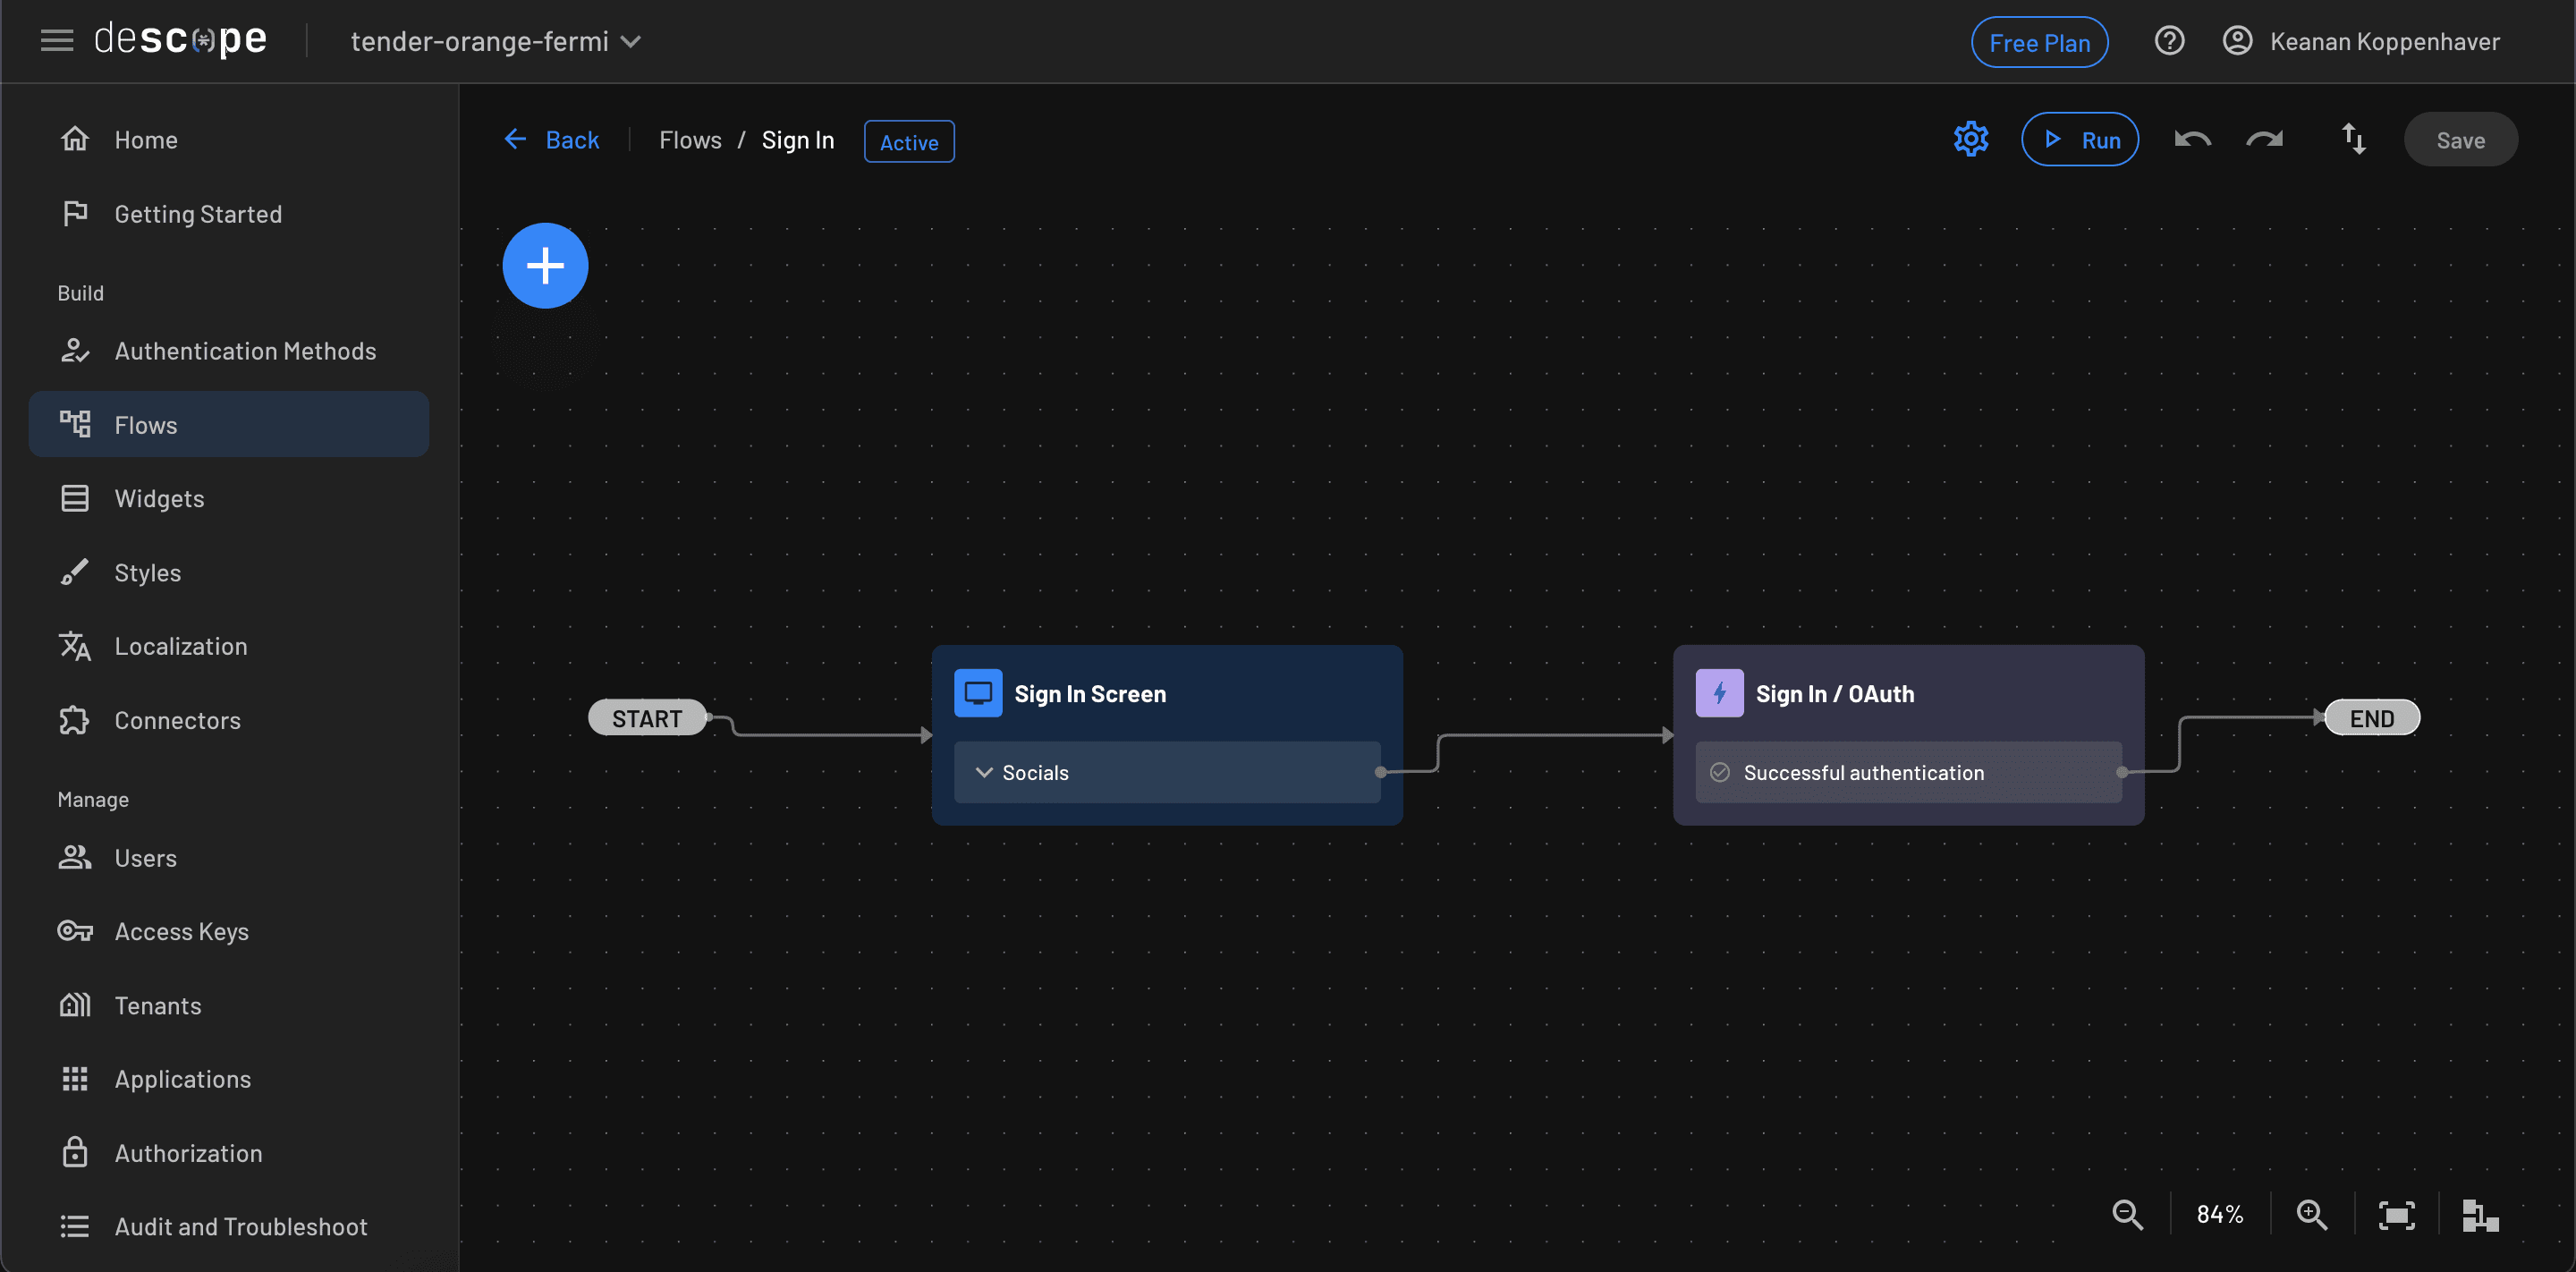
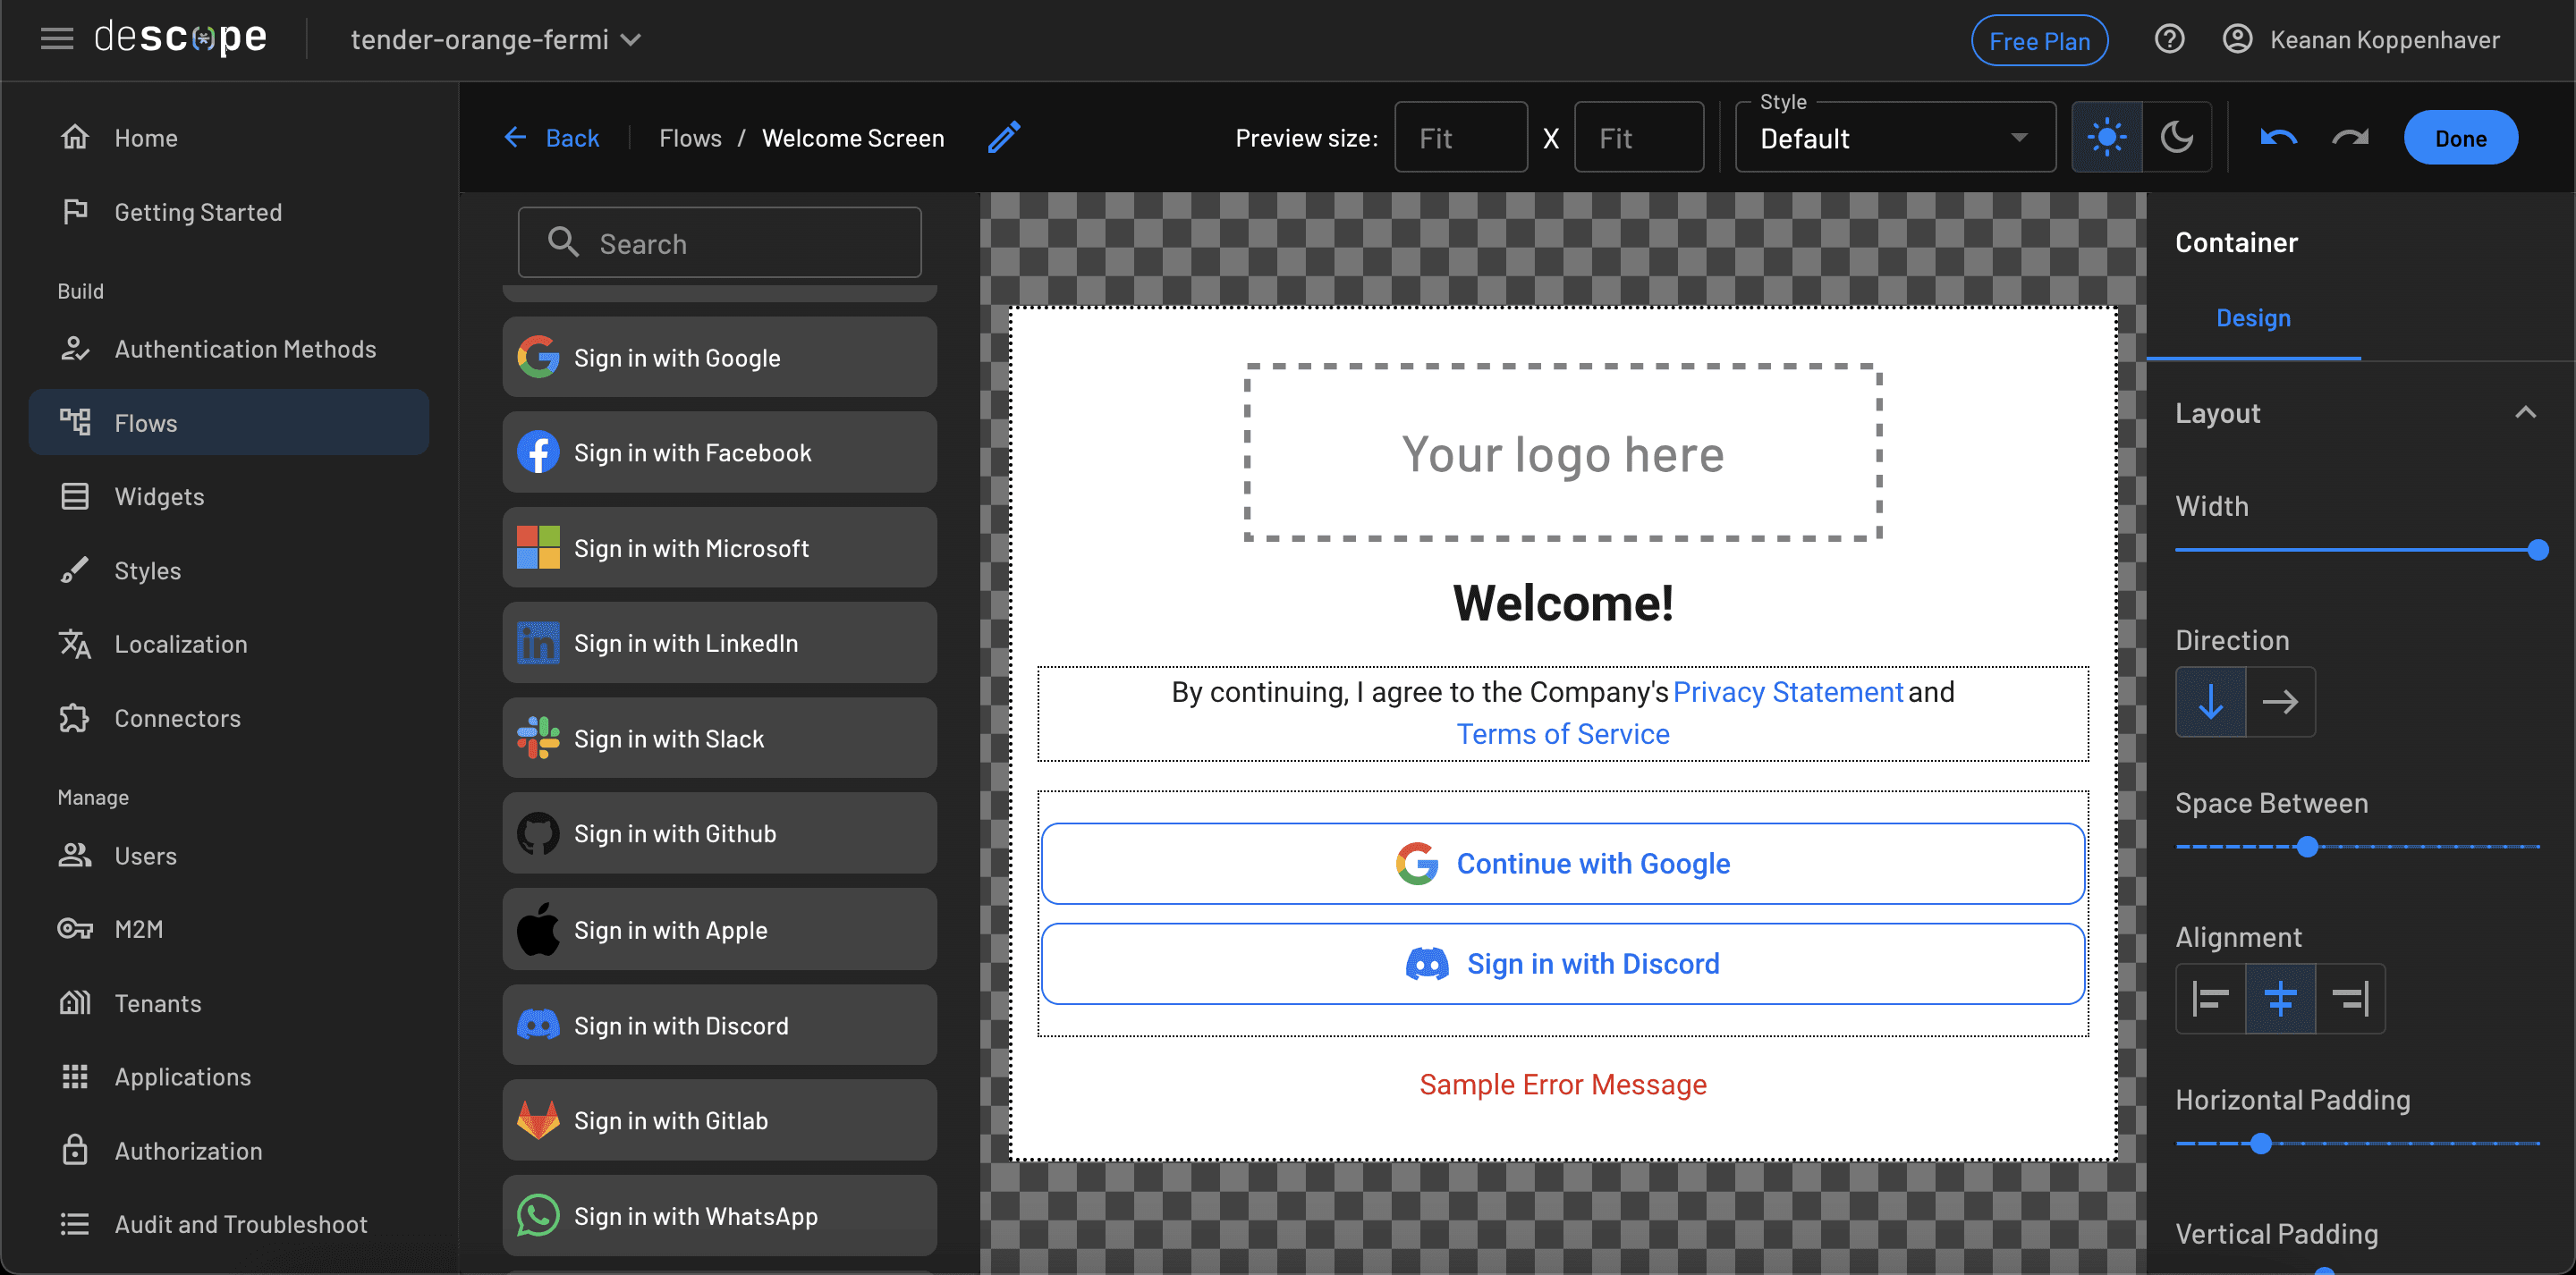
Let’s configure the first block to use a few different login providers, specifically Google and Discord. Clicking the pencil icon brings up the edit screen for that block, where you can drag and drop the providers you want to use:
After completing the first step, you can add an SMS OTP as a second factor for logging in. With any other solution, you’d have to jump into your code editor, maybe pull in an external library just for this purpose and start hooking everything up. However, with Descope, you can use the flow editor to add this block to the flow you already created.
Clicking the blue + button in the upper left of your flow will give you the option to add an Action. Search for or select Sign Up or In / OTP / SMS and a collection of blocks will be inserted into your flow. Use the connectors on the left and right sides of each block to integrate them into the rest of your workflow. With that, you’ve just added SMS as an MFA method!
Now that you’re done configuring your flow, click Save in the top-right corner of the page. Once saved, your flow is now ready for deployment in a VR app.
Create a Unity VR app
If you already have a Unity VR app up and running, you can skip ahead to the Configure OIDC Auth from within Unity section. However, if you need one, you can use the VR app template that’s available inside the Unity Hub as a starting point:
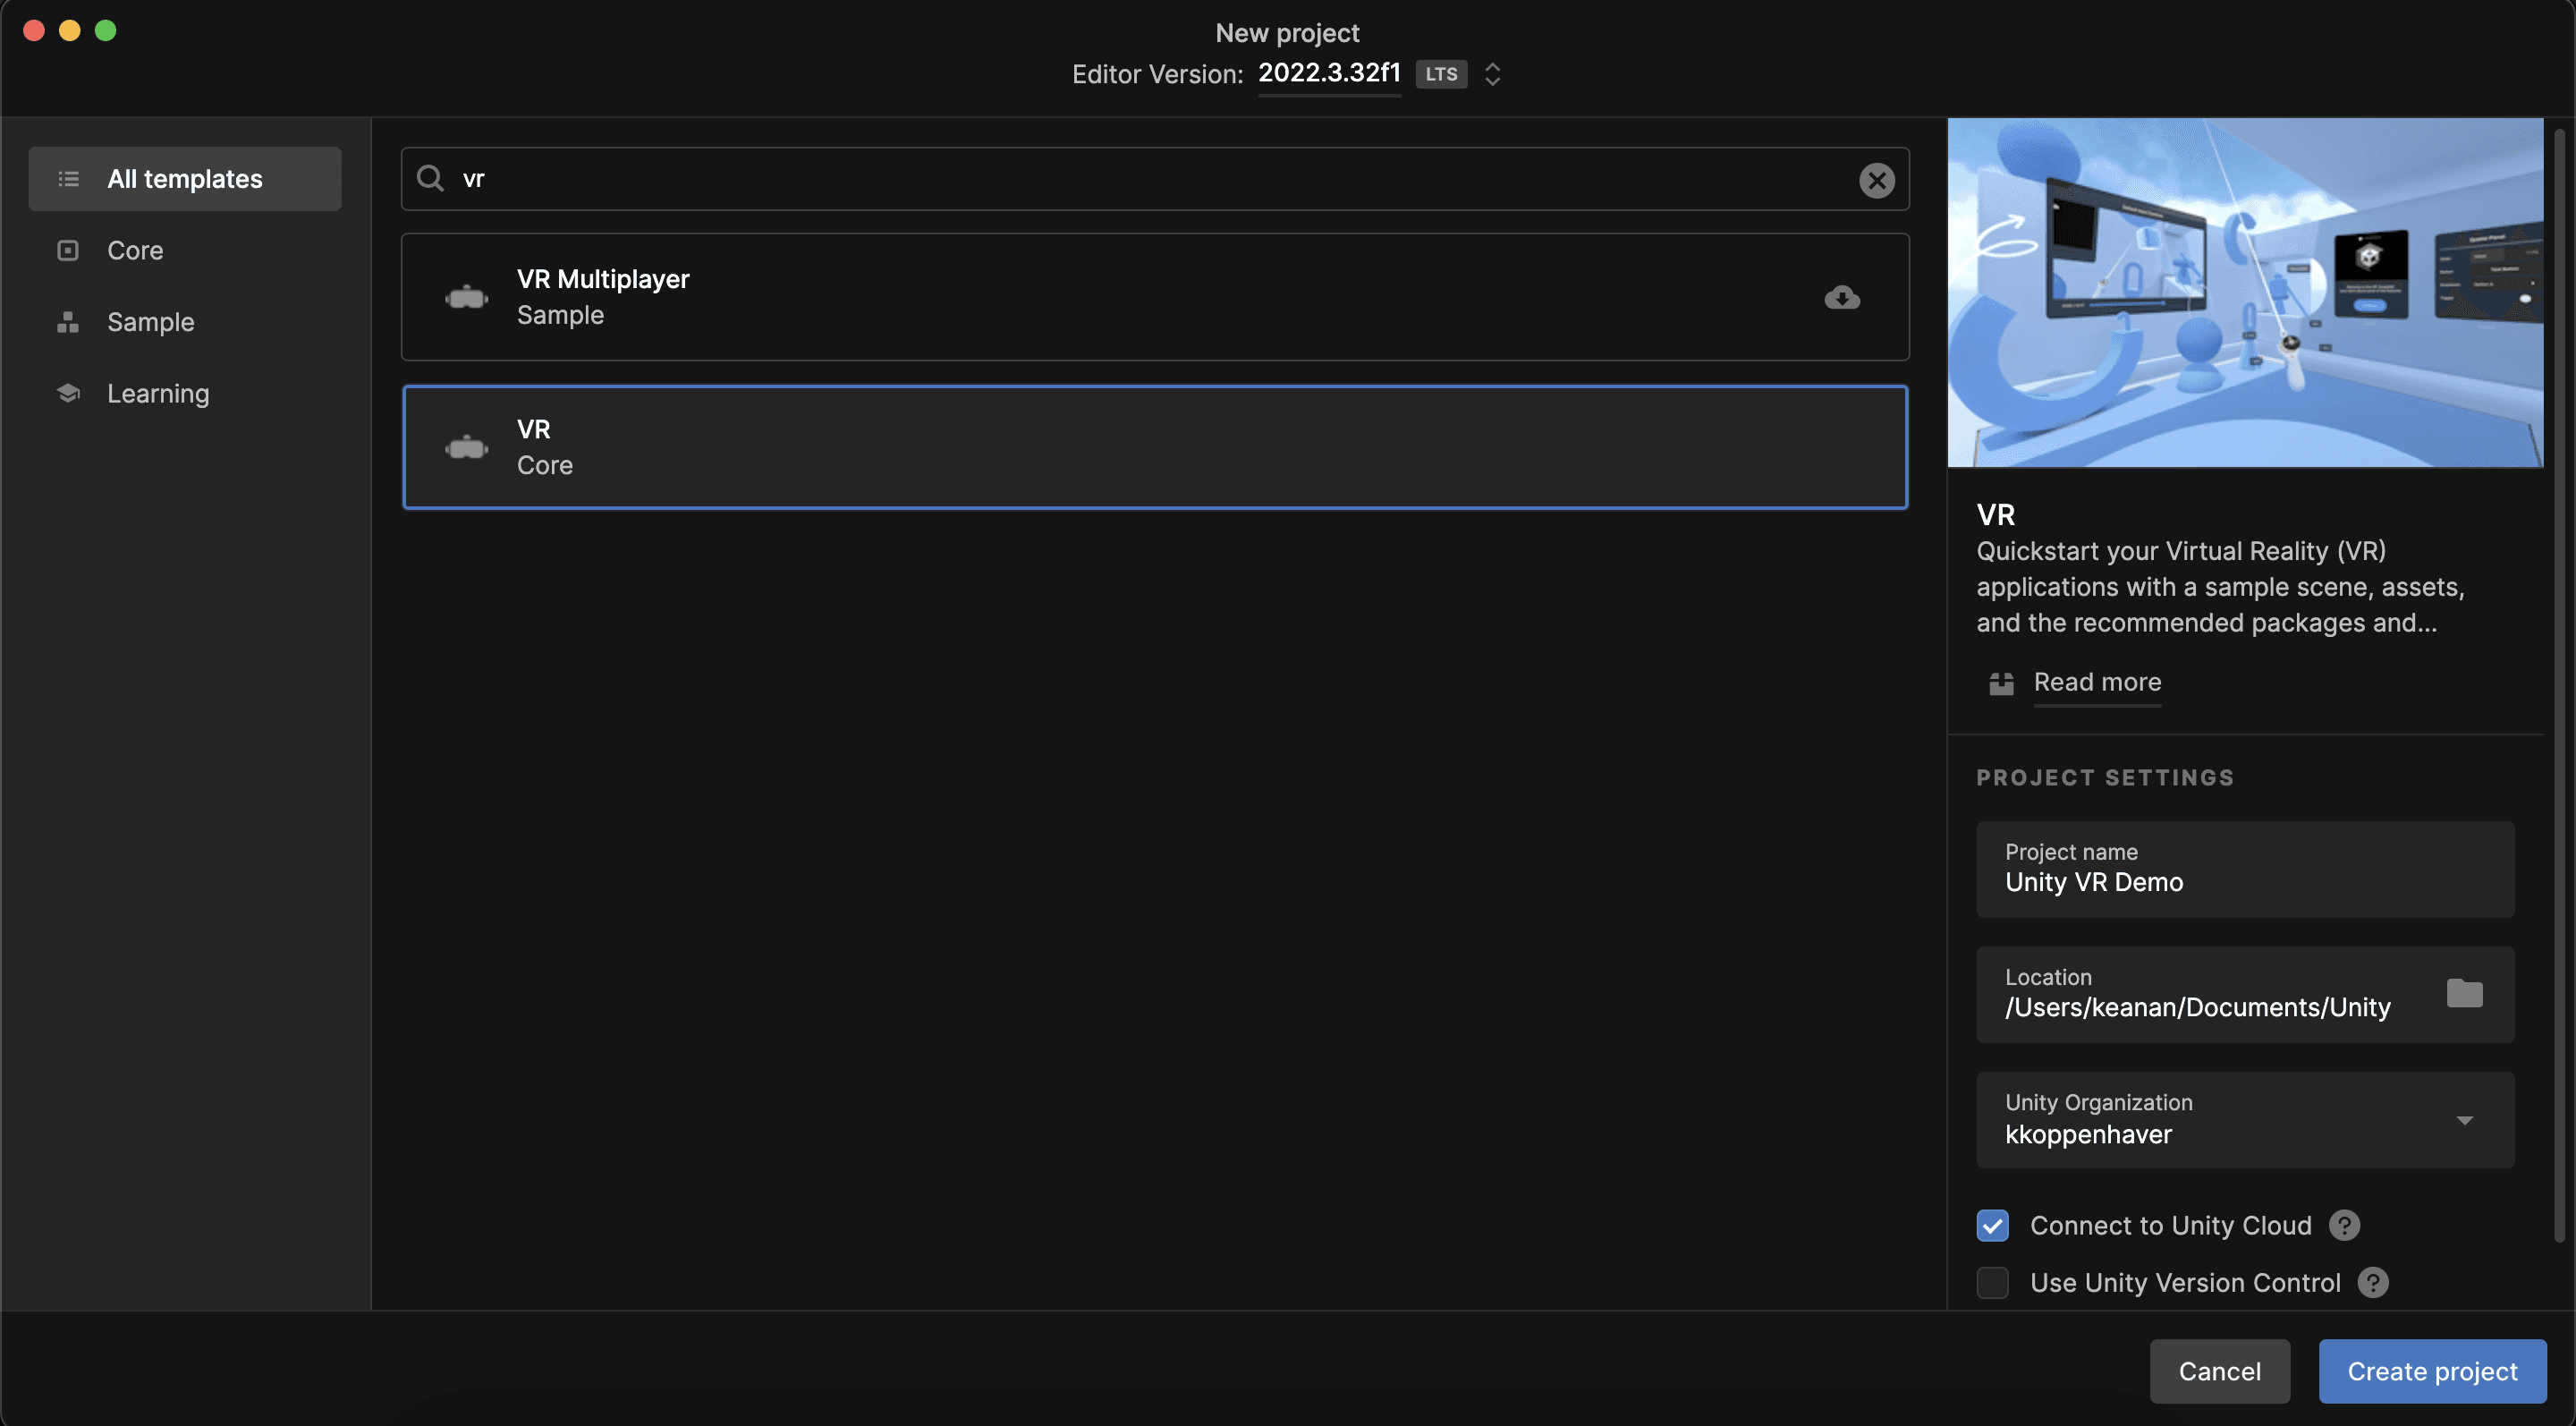
Clicking Create project turns your chosen template into a new project and takes you to the Unity editor where you can start editing.
Since you’re building a VR app, you’ll receive the following instructions once your project loads:
Before you begin, go to Edit > Project Settings > XR Plug-in Management and select the platform(s) you plan to deploy to.
This is an important step that specifies how Unity should prepare your project for deployment. When you go to the XR Plug-in Management screen, you’ll see options for various VR platforms:
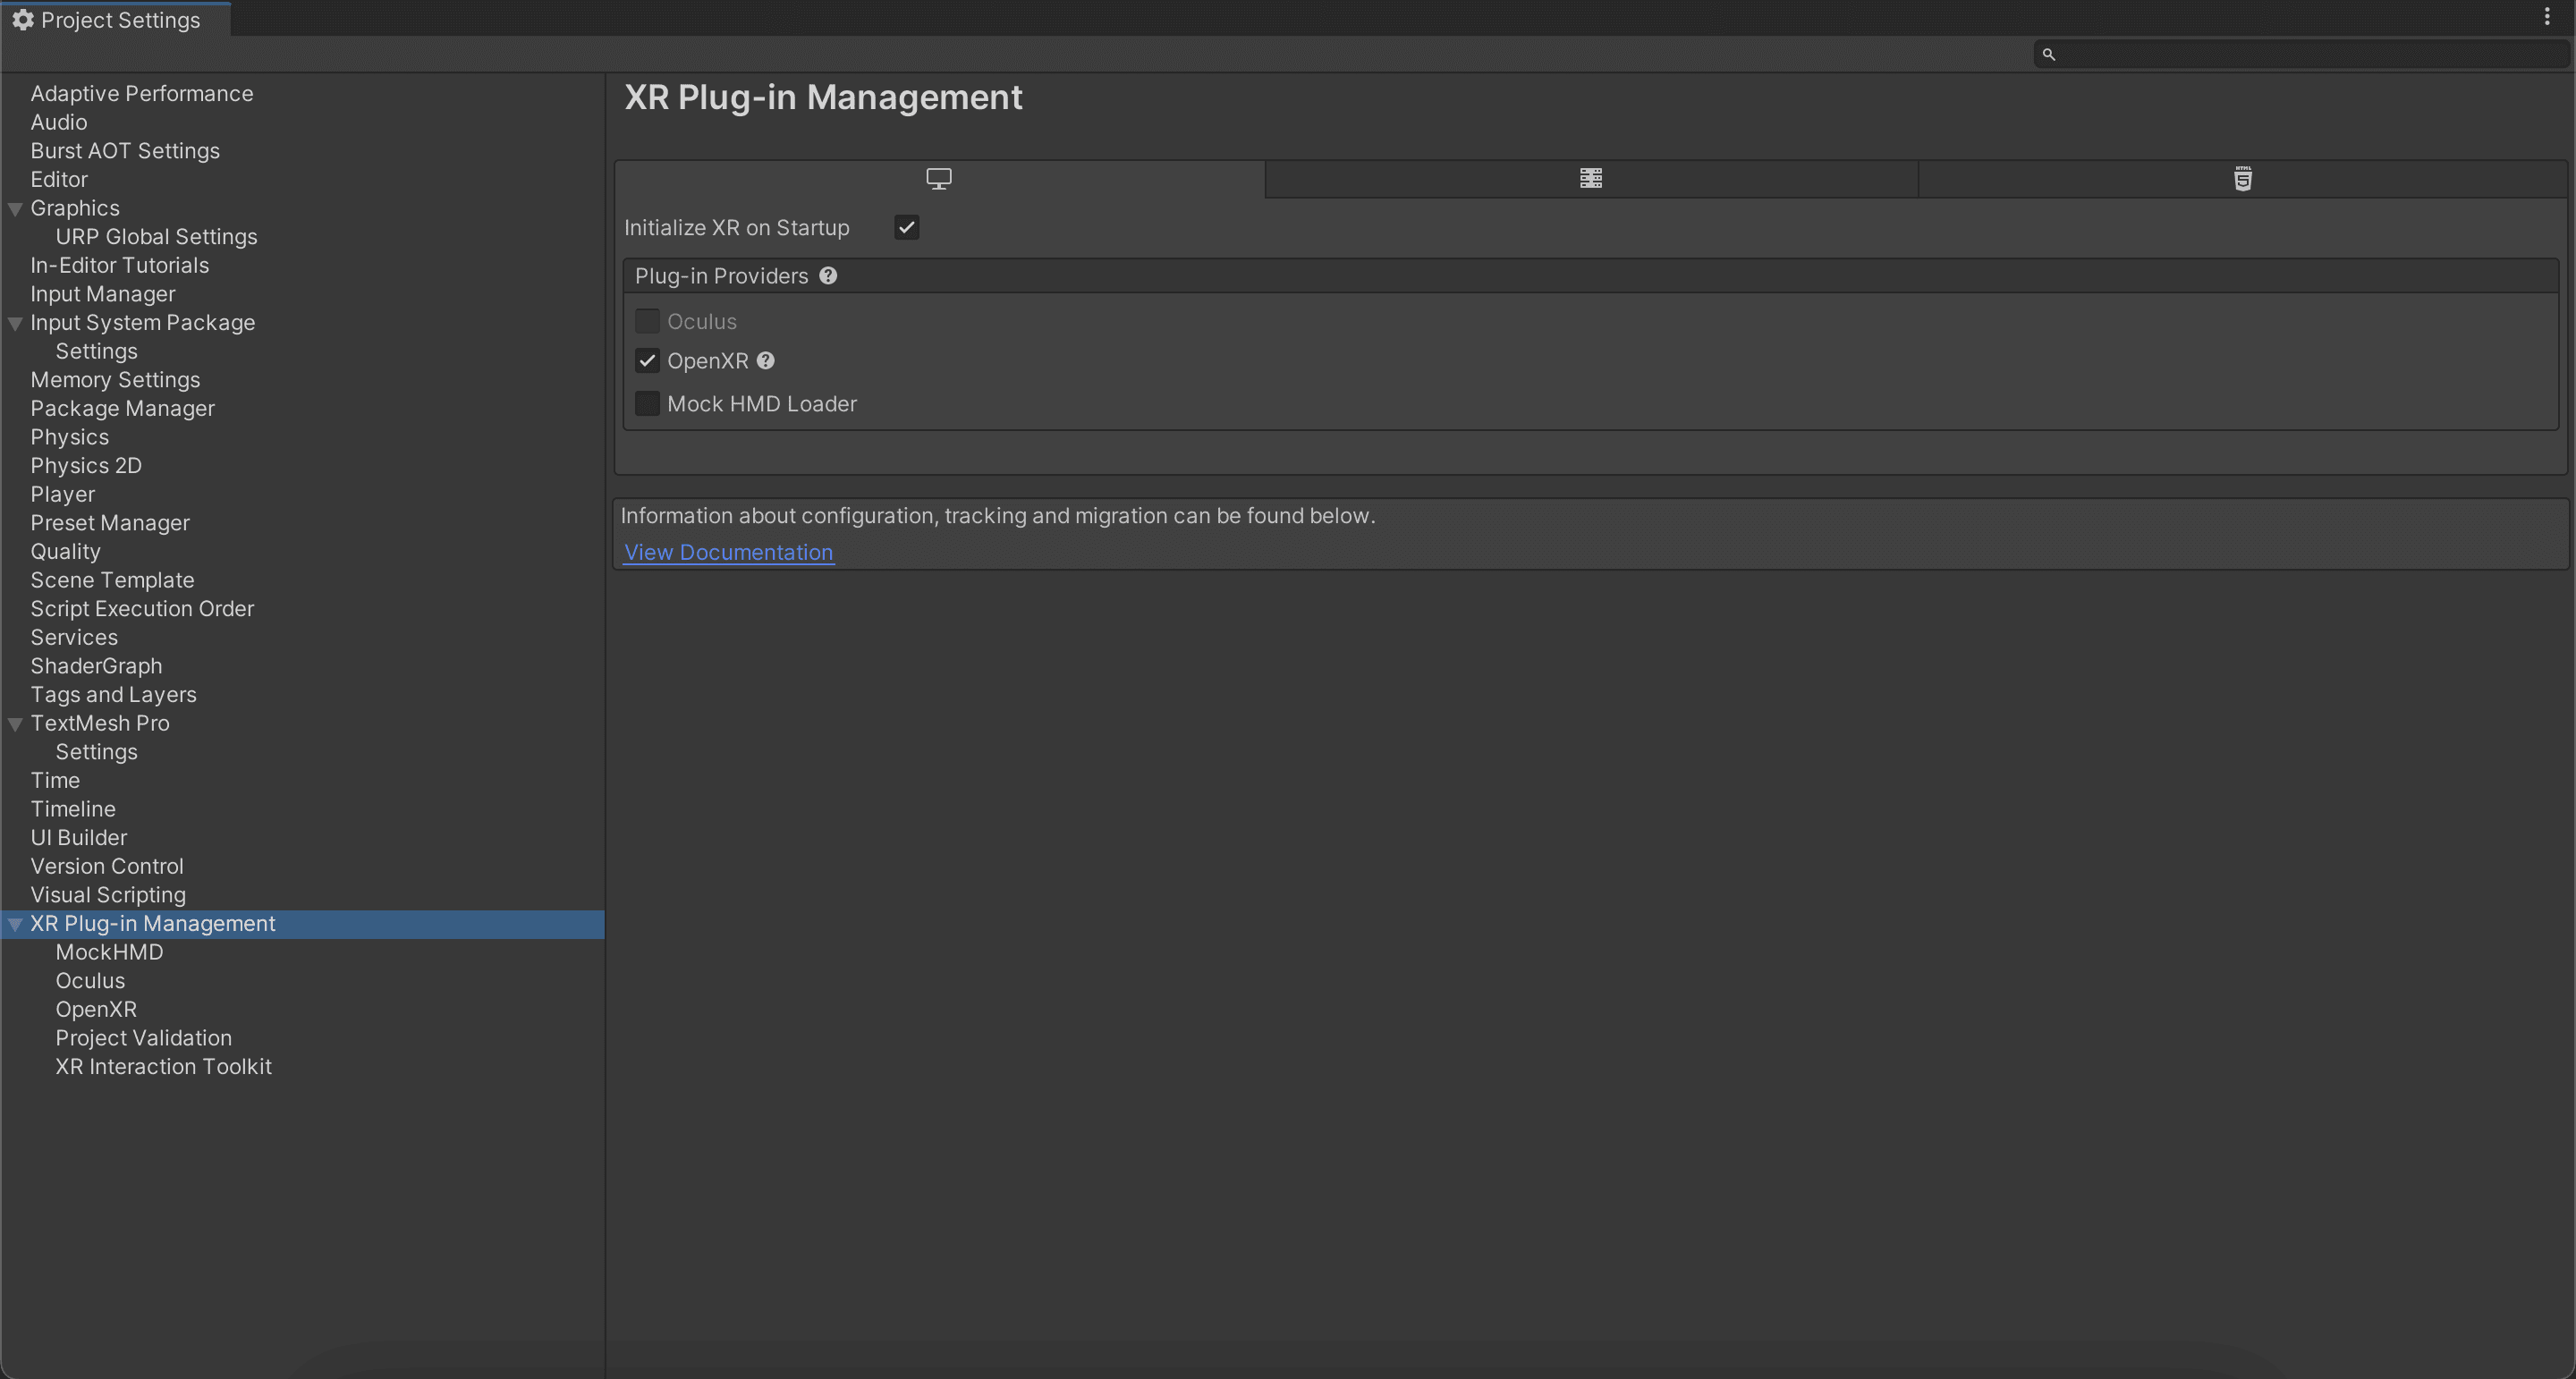
As you check or uncheck these boxes, Unity alerts you to any necessary, additional configuration steps, many of which can perform automatically.
Once you have your project properly configured for the VR platform you’re going to deploy to, you’re ready to implement the authentication flow within your VR app.
Configure OIDC auth from within Unity
To add authentication in Unity, open the Package Manager. If the Unity Authentication package isn’t already installed, search for Authentication and install it.
After you’ve confirmed that the Authentication package is installed, go to the Edit menu, click Project Settings, and then select Services > Authentication from the left-hand navigation. Select OpenId Connect from the drop-down on the right. You’ll then be presented with a screen with the input fields you need to configure the Unity OIDC integration:
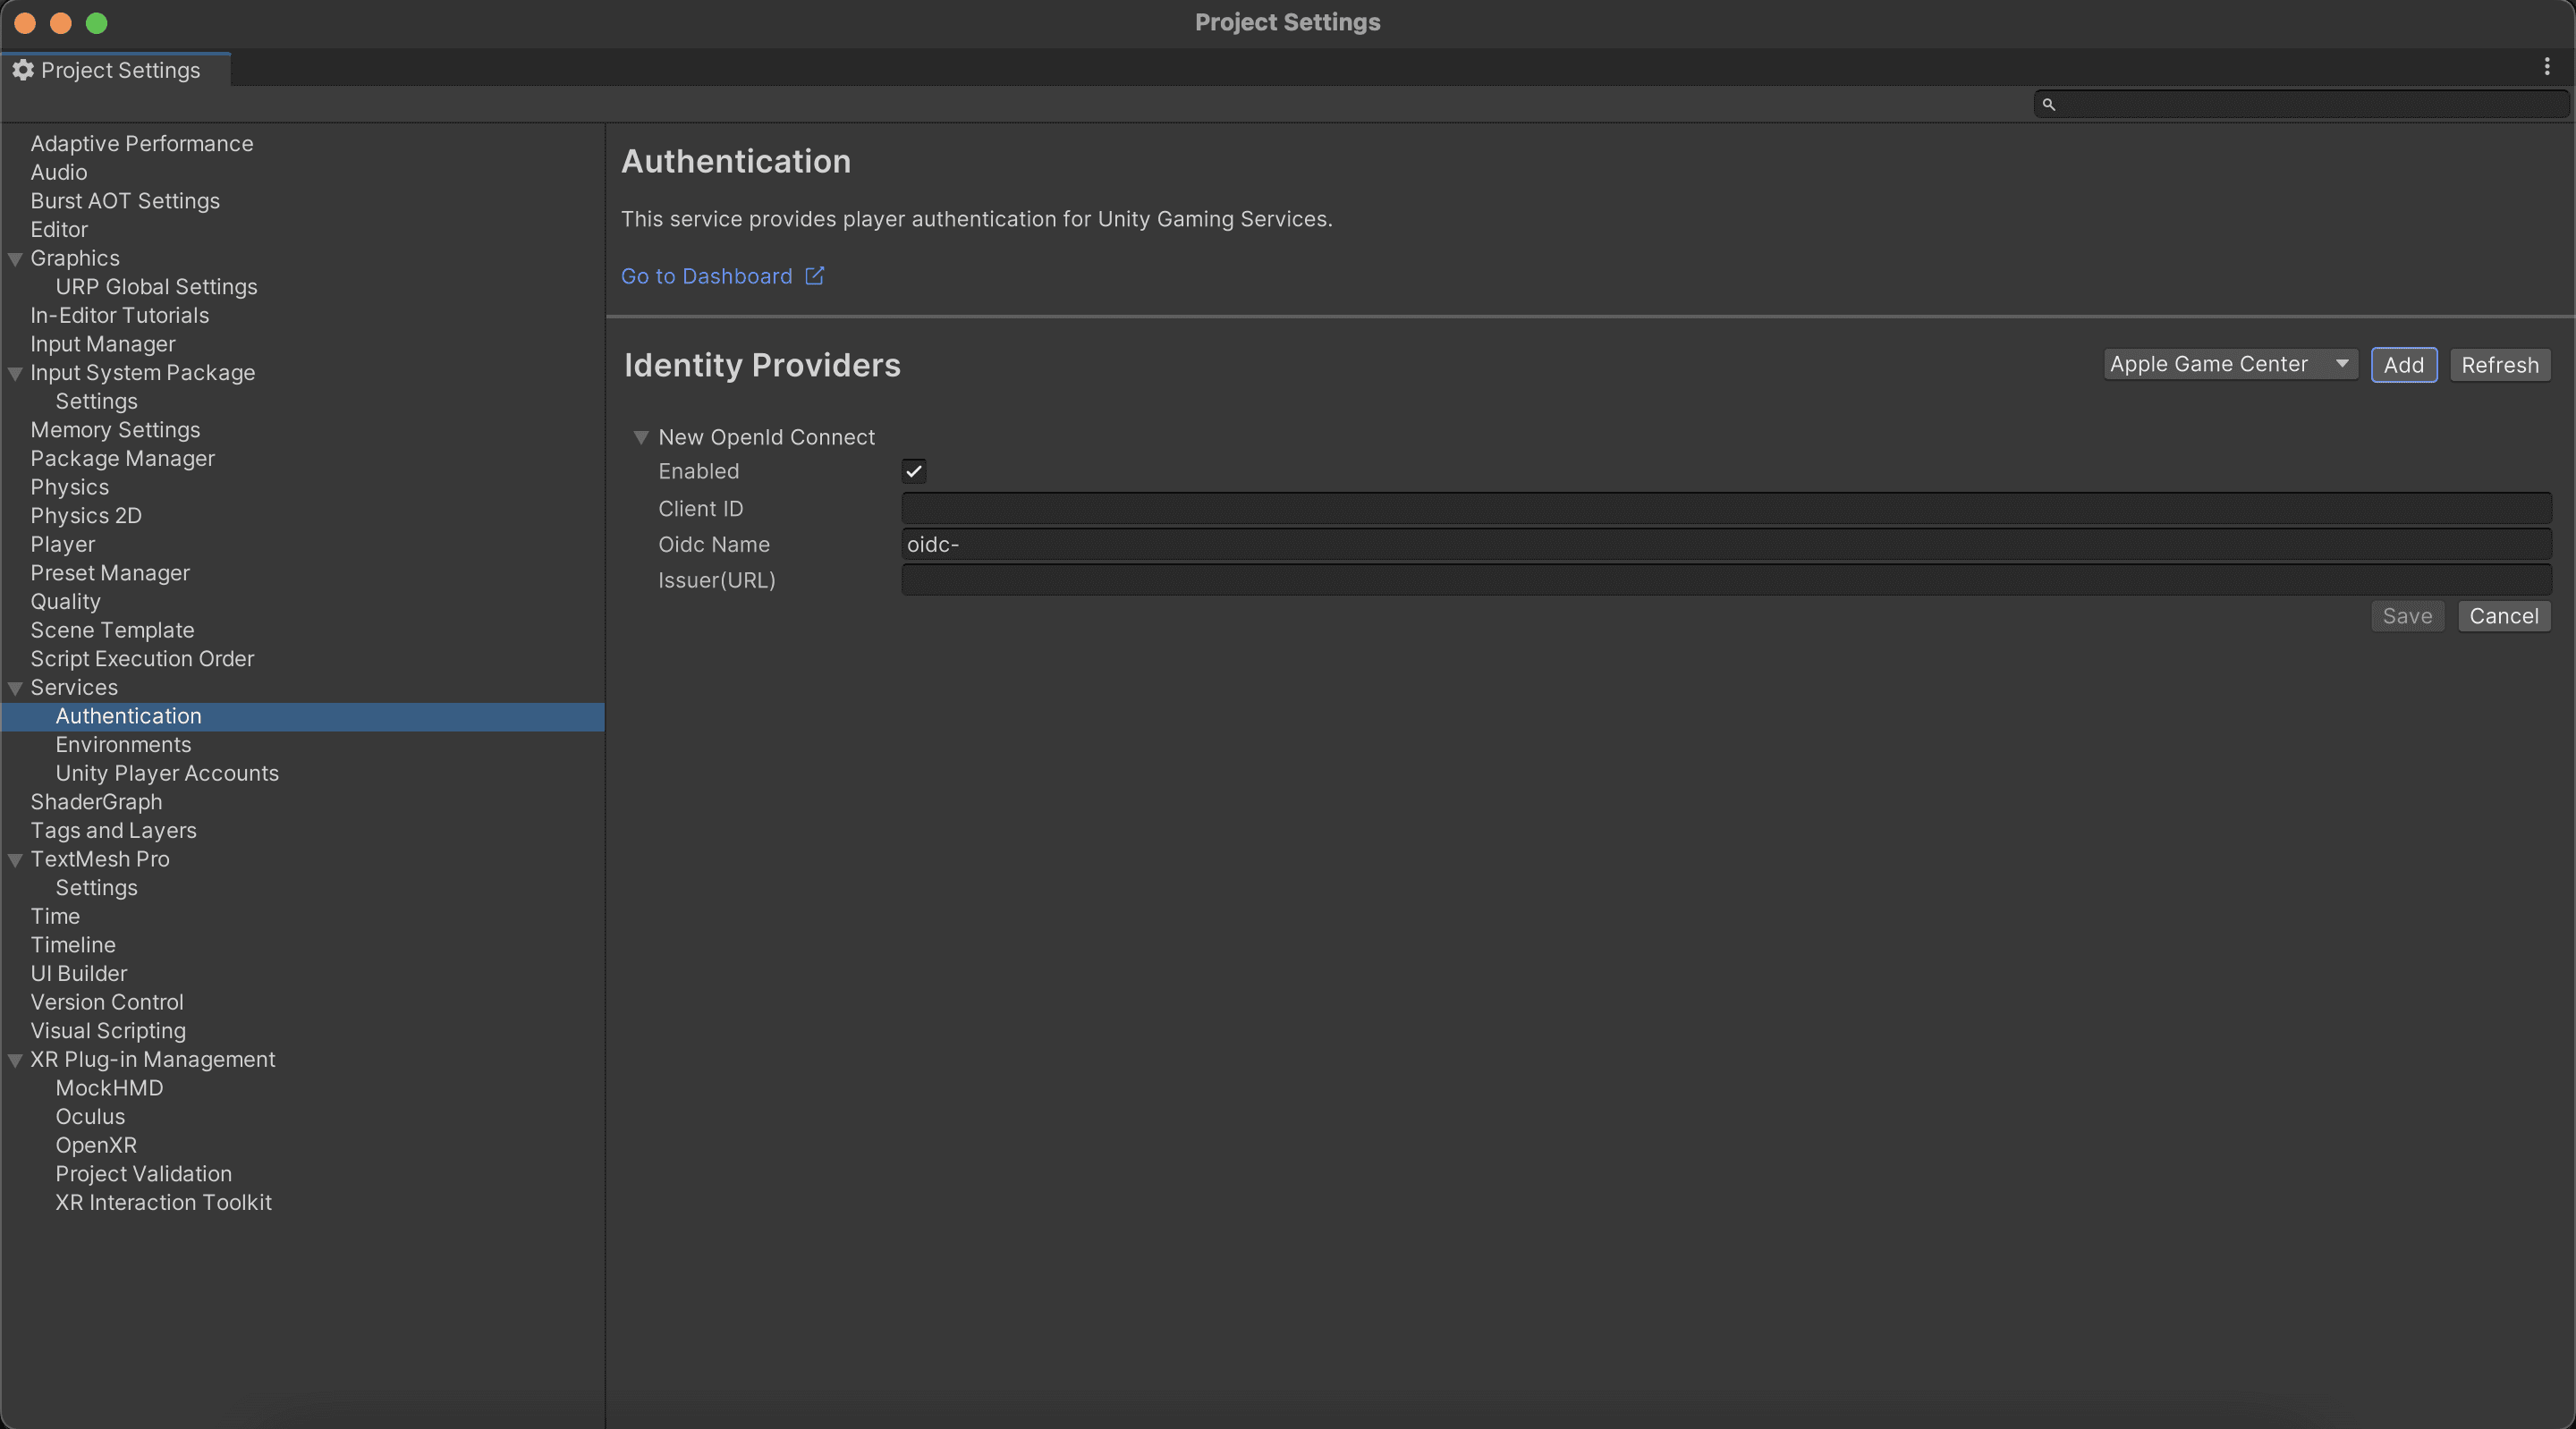
From there, you need to grab a couple of credentials from your Descope project that you previously set up. Over on the Applications screen in Descope, you should see a default OIDC application. Clicking that brings you to the credentials page, where you can grab the ID and issuer URL for your project:
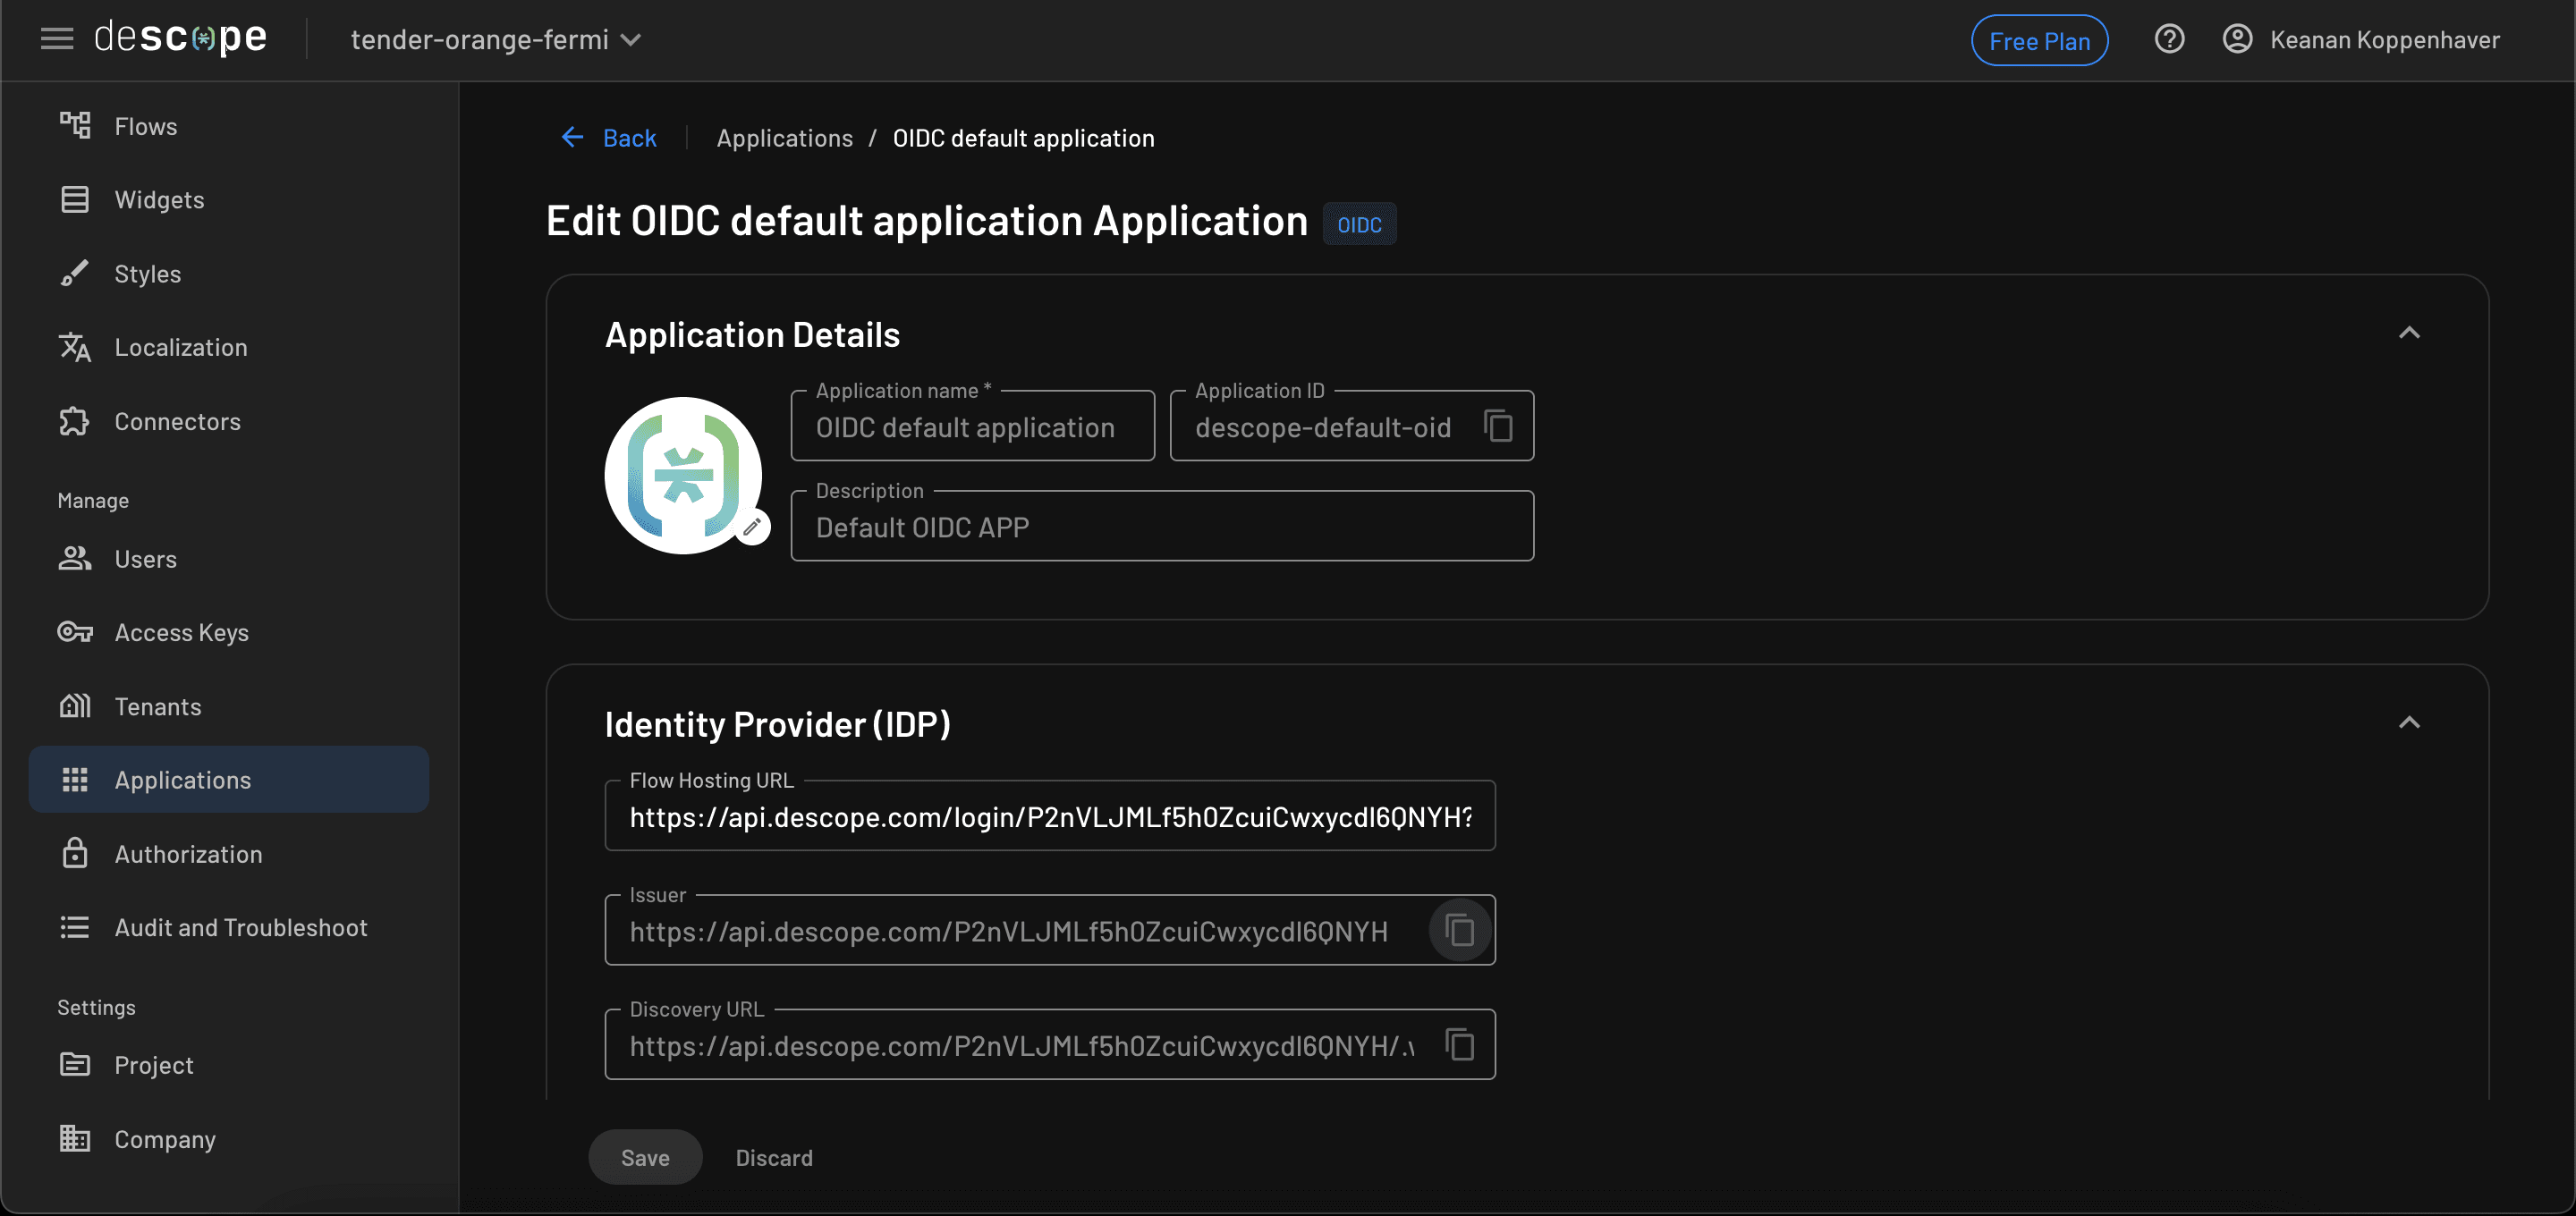
Once you have these, you can fill out the remainder of the fields within Unity and click Save to save your changes.
Up to this point, you’ve configured the settings necessary to get OIDC working, but you still need to get the actual OIDC flow that provides users with a token already set up. Looking at the Unity OpenID Connect documentation, you’ll see that “to provide a custom ID provider sign-in option for the players in the game, follow the instructions given by your custom ID provider to get an ID token inside your Unity game.” Here, you need to integrate the previously created Descope flow. This setup ensures that once users in Unity complete authentication, they receive the required ID token for Unity to recognize them as authenticated. Integrating this flow to authenticate users outside your app and pass in the token varies slightly based on the VR platform you’re using.
Oculus integration example
Let’s walk through an example with the Oculus platform, which guides the user through the Descope flow and returns them to your application.
The first part of the script sets up all the variables that you need later and imports the various libraries and packages that you to get things working:
using UnityEngine;
using System;
using System.Collections.Generic;
using System.Threading.Tasks;
using UnityEngine.Networking;
using Meta.WitAi;
using System.Linq;

public class DescopeVRAuth : MonoBehaviour
{
    [SerializeField]
    private string projectId; // Your Descope Project ID

    [SerializeField]
    private string flowId = "sign-up-or-in"; // Default flow, can be changed

    // Descope OIDC configuration
    private const string AUTH_DOMAIN = "auth.descope.io";
    private const string API_DOMAIN = "api.descope.com";

    // Construct the Flow URL
    private string FlowUrl => $"https://{AUTH_DOMAIN}/{projectId}?flow={flowId}";

    // OIDC endpoints
    private string TokenEndpoint => $"https://{API_DOMAIN}/oauth2/v1/token";

    // VR-specific protocol handler
    private const string REDIRECT_URI = "oculus-quest://callback";

    private string currentState;
    public event System.Action<bool, string> OnAuthenticationComplete;
Then, you initialize the class and create the StartDescopeAuth method, which is what’s triggered to start using the Descope flow:
 [System.Serializable]
    private class TokenResponse
    {
        public string access_token;
        public string id_token;
        public string refresh_token;
        public string token_type;
        public int expires_in;
    }

    public void StartDescopeAuth()
    {
        var authUri = BuildAuthorizationUrl();
        OpenOculusBrowser(authUri);
    }
The following method uses the variables you set up previously to build the correct URL that you need to perform the authorization:
   private string BuildAuthorizationUrl()
    {
        currentState = GenerateRandomState();

        var parameters = new Dictionary<string, string>
        {
            {"client_id", projectId},
            {"redirect_uri", REDIRECT_URI},
            {"response_type", "code"},
            {"scope", "openid profile email"},
            {"state", currentState},
            {"prompt", "login"}
        };

        return BuildUrl(FlowUrl, parameters);
    }
The next method handles opening the Oculus browser and redirecting the user back into the app once the callback URL from the Descope flow is triggered:
private void OpenOculusBrowser(string url)
    {
        try
        {
            // Use Oculus Platform SDK to launch browser
            var platformInit = Oculus.Platform.Core.Initialize();
            if (!platformInit)
            {
                Debug.LogError("Failed to initialize Oculus Platform SDK");
                OnAuthenticationComplete?.Invoke(false, "Failed to initialize Oculus Platform");
                return;
            }

            // Register for app launch callback
            Oculus.Platform.Application.RegisterForAppLaunchInternal((Message<string> message) =>
            {
                if (message.IsError)
                {
                    Debug.LogError($"Error in app launch callback: {message.GetError().Message}");
                    return;
                }

                string launchUrl = message.Data;
                if (!string.IsNullOrEmpty(launchUrl) && launchUrl.StartsWith(REDIRECT_URI))
                {
                    HandleAuthCallback(launchUrl);
                }
            });

            // Launch Oculus Browser
            Oculus.Platform.Application.LaunchOtherApp(url);
        }
        catch (Exception e)
        {
            Debug.LogError($"Failed to open Oculus Browser: {e.Message}");
            OnAuthenticationComplete?.Invoke(false, "Failed to open browser");
        }
    }
This method processes the callback and catches any of the possible edge cases when the authentication is not going as planned:
  private async void HandleAuthCallback(string url)
    {
        try
        {
            var uri = new Uri(url);
            var queryParams = ParseQueryString(uri.Query);

            if (!queryParams.ContainsKey("state") || queryParams["state"] != currentState)
            {
                OnAuthenticationComplete?.Invoke(false, "Invalid state parameter");
                return;
            }

            if (queryParams.ContainsKey("error"))
            {
                string errorDescription = queryParams.ContainsKey("error_description")
                    ? queryParams["error_description"]
                    : queryParams["error"];
                OnAuthenticationComplete?.Invoke(false, errorDescription);
                return;
            }

            if (!queryParams.ContainsKey("code"))
            {
                OnAuthenticationComplete?.Invoke(false, "No authorization code received");
                return;
            }

            await ExchangeCodeForTokens(queryParams["code"]);
        }
        catch (Exception e)
        {
            Debug.LogError($"Error handling auth callback: {e.Message}");
            OnAuthenticationComplete?.Invoke(false, "Failed to process authentication response");
        }
    }
In this method, you make the call to the OIDC endpoint you previously defined in the Unity settings and perform the token exchange that is core to the OIDC process:
 private async Task ExchangeCodeForTokens(string code)
    {
        var tokenRequestParams = new Dictionary<string, string>
        {
            {"grant_type", "authorization_code"},
            {"client_id", projectId},
            {"code", code},
            {"redirect_uri", REDIRECT_URI}
        };

        try
        {
            using (UnityWebRequest request = UnityWebRequest.Post(TokenEndpoint, tokenRequestParams))
            {
                await request.SendWebRequest();

                if (request.result != UnityWebRequest.Result.Success)
                {
                    OnAuthenticationComplete?.Invoke(false, $"Token exchange failed: {request.error}");
                    return;
                }

                var tokenResponse = JsonUtility.FromJson<TokenResponse>(request.downloadHandler.text);
                await StoreTokensSecurely(tokenResponse);
                OnAuthenticationComplete?.Invoke(true, "Authentication successful");
            }
        }
        catch (Exception e)
        {
            Debug.LogError($"Error exchanging code for tokens: {e.Message}");
            OnAuthenticationComplete?.Invoke(false, "Failed to exchange code for tokens");
        }
    }
After you’ve successfully performed the authentication flow, you need to store the tokens so that you don’t have to go through this same flow every time:
  private async Task StoreTokensSecurely(TokenResponse tokens)
    {
        // For Oculus, you can use the Platform SDK's DataStore
        try
        {
            await Oculus.Platform.Users.GetLoggedInUser();
            Oculus.Platform.DataStore.Save(
                "auth_tokens",
                JsonUtility.ToJson(tokens),
                (Message<bool> message) =>
                {
                    if (message.IsError)
                    {
                        Debug.LogError($"Failed to save tokens: {message.GetError().Message}");
                    }
                }
            );
        }
        catch (Exception e)
        {
            Debug.LogError($"Failed to store tokens: {e.Message}");
            // Fallback to PlayerPrefs if Platform SDK fails
            PlayerPrefs.SetString("access_token", tokens.access_token);
            PlayerPrefs.SetString("id_token", tokens.id_token);
            PlayerPrefs.SetString("refresh_token", tokens.refresh_token);
            PlayerPrefs.SetString("token_expiry", (DateTime.UtcNow.AddSeconds(tokens.expires_in)).ToString("O"));
            PlayerPrefs.Save();
        }
    }
Finally, you need some utility methods to make other parts of the script cleaner. These help construct the necessary URLs, generate a random state for the URL, and parse any URL query strings that are needed:
   private Dictionary<string, string> ParseQueryString(string queryString)
    {
        var query = queryString.TrimStart('?');
        return query.Split('&')
            .Select(param => param.Split('='))
            .Where(param => param.Length == 2)
            .ToDictionary(
                param => Uri.UnescapeDataString(param[0]),
                param => Uri.UnescapeDataString(param[1])
            );
    }

    private string BuildUrl(string baseUrl, Dictionary<string, string> parameters)
    {
        var queryString = string.Join("&",
            parameters.Select(kvp =>
                $"{Uri.EscapeDataString(kvp.Key)}={Uri.EscapeDataString(kvp.Value)}")
        );
        return $"{baseUrl}&{queryString}";
    }

    private string GenerateRandomState()
    {
        return System.Convert.ToBase64String(System.Guid.NewGuid().ToByteArray())
            .Replace("+", "-")
            .Replace("/", "_")
            .Replace("=", "");
    }
}
Once you have all these pieces combined into one script, you can trigger it anywhere within your app (when the user first launches your app, clicks a button, or triggers some other game component) with the following code:
public class VRGameManager : MonoBehaviour
{
    private DescopeVRAuth auth;

    void Start()
    {
        auth = GetComponent<DescopeVRAuth>();
        auth.OnAuthenticationComplete += HandleAuthComplete;
    }

    // Call this from your VR UI
    public void StartLogin()
    {
        auth.StartDescopeAuth();
    }

    private void HandleAuthComplete(bool success, string message)
    {
        if (success)
        {
            // Show success in VR UI
            Debug.Log("Successfully authenticated!");
        }
        else
        {
            // Show error in VR UI
            Debug.LogError($"Authentication failed: {message}");
        }
    }
}
Test your VR application
As this is a VR application, the testing process is slightly different. With most other applications, you can run a local version on the same machine you’re using to develop it, creating a short feedback loop that lets you make changes and fix bugs quickly. In this case, your application expects the same sort of controls and environment that a VR device would have, making emulation on your computer a bit more difficult. While you can click the Run button in Unity and launch it, you’ll have a very hard time controlling the application and testing due to the lack of VR controls since they don’t pair nicely with anything other than a VR headset.
However, if you have a VR headset, you can often connect it to your computer via USB. Unity should recognize it as a target device, allowing you to build and run the application directly on the headset for a more realistic test. Tools like Oculus Linkintosh can streamline this setup further. Once you have the device configured as a target device, Unity should be able to run your VR app directly on the device, letting you launch the app, go through the login flow, and test any of the other interactions in your game directly on the hardware that it eventually runs on.
Wrapping up
When you’re dealing with an entirely different reality than most web and mobile applications, it’s important to think about how authentication and user management need to change. With VR applications becoming more complex, authentication is often table stakes. However, if you don’t want to make your users jump through a ton of UI hoops and you want to get an authentication flow built and delivered quickly, using OIDC is a great way to shorten both the development cycle and the end-user experience.
By using a solution like Descope, you can not only create your authentication flows in a no-code environment but also easily hook these flows into your app and make updates to them without having to constantly go in and refactor your authentication code.
To learn more about Descope Flows, check out the documentation. When you’re ready to get started, sign up for Descope and create your first flow today!
