
Table of Contents
Single Sign-On (SSO) simplifies user authentication by allowing individuals to access multiple domains using a single credential or authentication method. This centralizes the login process, reduces "credential fatigue"—the overwhelming frustration of constantly resetting passwords—and strengthens overall security.
However, each tenant is typically an entire organization that requires its own discrete configuration to function (sometimes with multiple identity providers), which presents a challenge when switching providers. Typical SSO migrations require these tenants to manually reconfigure on their end, which can take considerable planning, time, and effort to avoid disruption.
Descope provides a first-of-its-kind migration method that eliminates this reconfiguration, enabling a smooth customer transition without any modifications on their end. Through a combination of DNS redirection and Descope Flows (or the relevant SDK), your organization can move existing SSO customers to Descope without being forced to reconfigure.
This guide explains how this method can migrate SSO connections to Descope, using Auth0 and WorkOS as an example for the incumbent provider. Before we dive in, let’s grasp the bigger picture by discussing a typical SSO deployment, the time and bandwidth considerations, and how Descope helps.
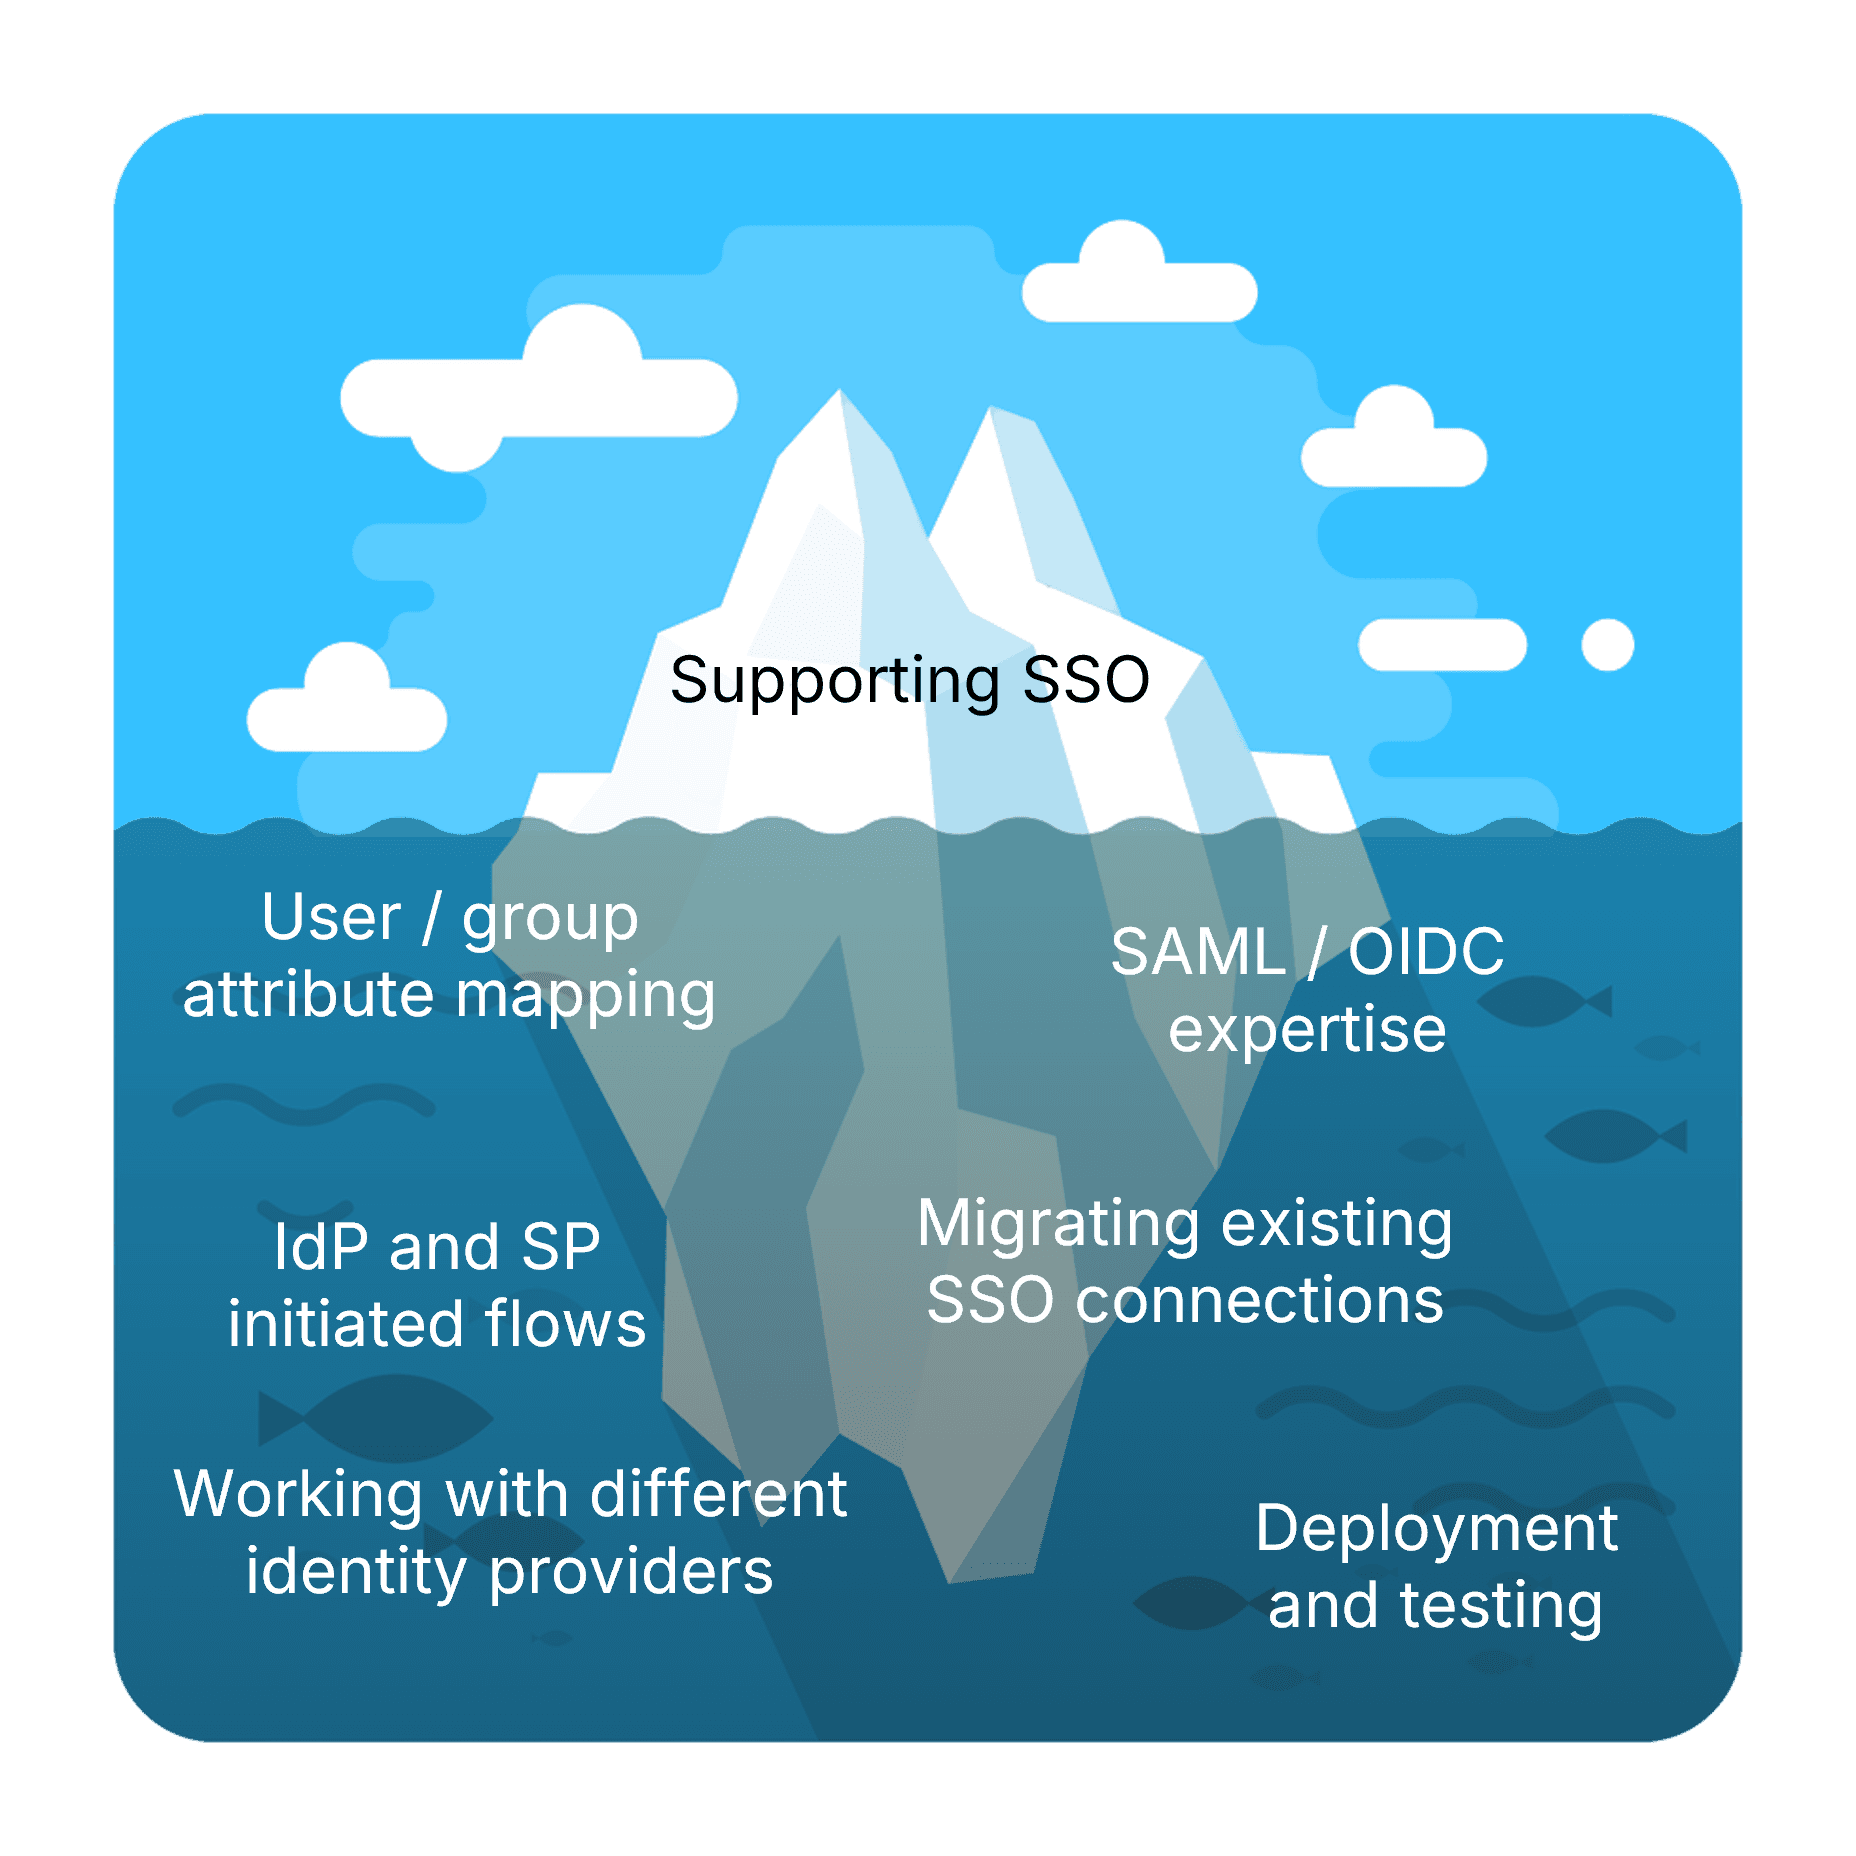
The SSO iceberg
SSO appears straightforward initially, but it can quickly reveal layers of unexpected (and unwanted) complexity. Much like an iceberg, SSO hides a seemingly endless array of engineering and organizational hurdles just beneath the surface.
Setting up SSO for a new customer (i.e., another business) typically involves several time-consuming steps:
Scheduling coordination: You need to schedule a meeting with your customer’s IT team—professionals who, despite their talent, are likely already overloaded with other priorities.
Technical back-and-forth: Explaining your architecture, introducing the third-party identity provider handling authentication, and outlining implementation requirements.
Parameter exchange: Communicating and clarifying technical configurations, where even small misalignments can lead to authentication errors.
Testing and deployment: Multiple rounds of testing, CI/CD integration, and coordinated production deployment.
Each element takes more and more time investment with minimal return on your core business.
Descope simplifies SSO
Descope transforms the typically coordinated SSO effort into a self-service, simplified process:
Self-service setup: We provide a seamless way to delegate SSO setup to your customers through the SSO Setup Suite. This standalone self-service portal takes care of all your B2B tenant admins’ SSO and SCIM setup needs, dramatically reducing configuration overhead and saving you and your customers valuable dev / IT time.
Identity orchestration: Descope customers can orchestrate user identities across different platforms. Our SSO applications ensure a single identity in Descope will work across all your various services (such as support and ticketing) with no redundancy or fragmentation.
Disruption-free migration: With this first-ever functionality, we’re resolving perhaps the biggest pain point of the entire SSO iceberg: transitioning existing tenants from one IdP and SP to another without disruption.
By addressing these challenges, Descope enables your development team to focus on growing your core product or service rather than managing authentication infrastructure.
Descope SSO migration overview
The migration process follows these straightforward steps:
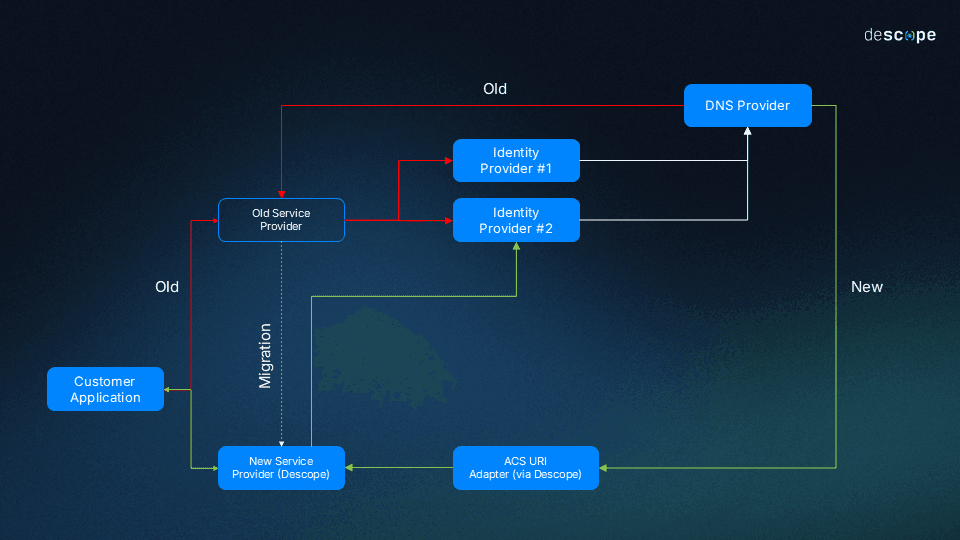
When an end user starts SSO authentication, Descope creates a relay state.
The user is redirected to the Identity Provider (IdP), where authentication proceeds normally.
After successful authentication, the IdP response returns to the same Service Provider (SP) ACS URL that was previously configured in the IdP’s settings.
Using a DNS provider, this response is redirected to Descope, passing all necessary parameters to complete the authentication.
Descope processes the response and authenticates the user.
The user is successfully authenticated and logs in.
This new process maintains your existing IdP relationships while seamlessly introducing Descope as your authentication service provider. But the biggest benefit of this method is its one-sidedness—the transition happens through DNS redirection rather than complex, coordinated reconfiguration for each of your SSO customers.
Migrating customer SSO from existing providers to Descope
This section walks through the migration process from both Auth0 and WorkOS as service providers and Okta as the IdP. If you’re using a different SP or IdP, visit the SSO migration documentation page for more generalized steps.
Prerequisites
Before you begin, be sure you have:
Administrative control over your DNS settings: Your organization must have the authority to modify DNS settings (e.g., creating redirects, workers) for the domain configured in your existing SSO implementation.
A Descope account: If you don’t already have a Descope account, sign up for free.
An Auth0 or WorkOS account with SSO enabled: This guide assumes you are using Auth0 or WorkOS configured with a domain you control and Okta as the IdP.
Implement SSO authentication with Descope Flows
Let’s start our SSO migration process by setting up SSO authentication on Descope.
This initial step prepares Descope to receive authentication requests and ultimately replace Auth0. Creating the flow first ensures we can support your specific use case before moving to the next steps.
You can set up SSO authentication using either Descope Flows or an SDK. Flows offers a much faster and easier approach than manual configuration, though you can still use code snippets if preferred.
To create a flow using a Descope Flow template, go to the Flows page from the navigation menu on the Descope Console, then click on the Start From Template button.
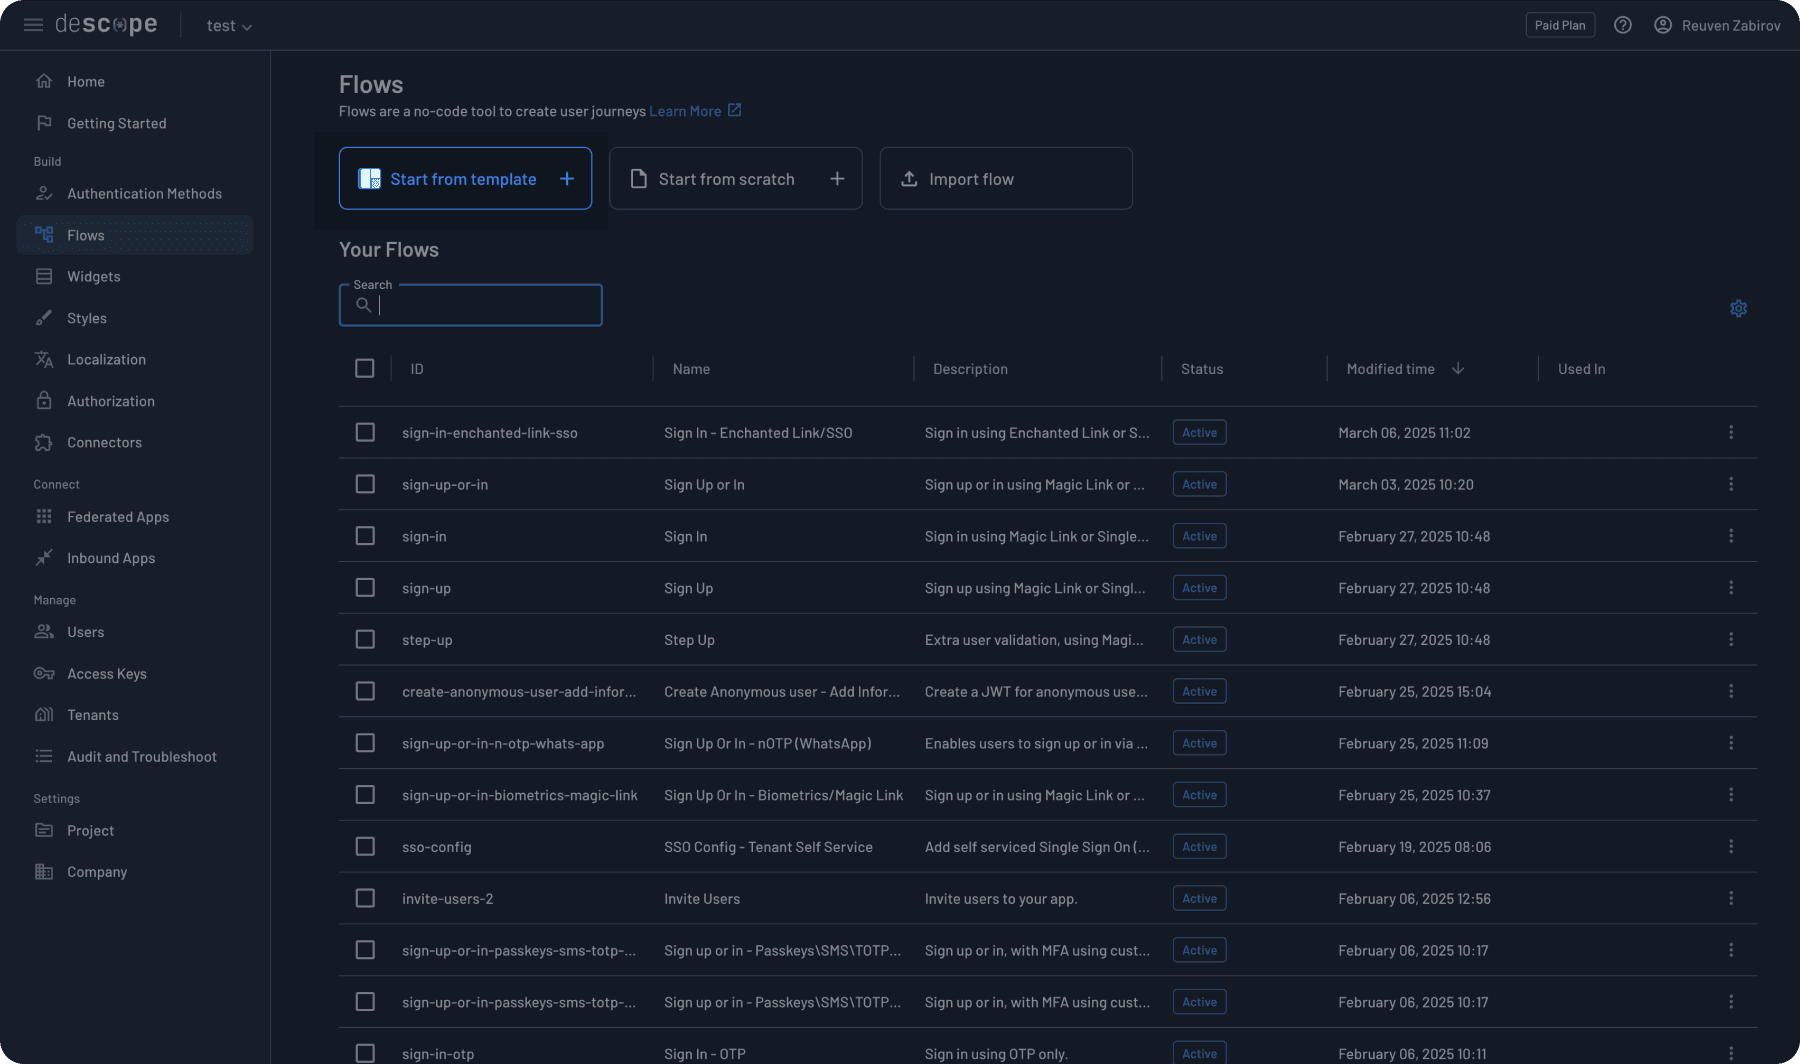
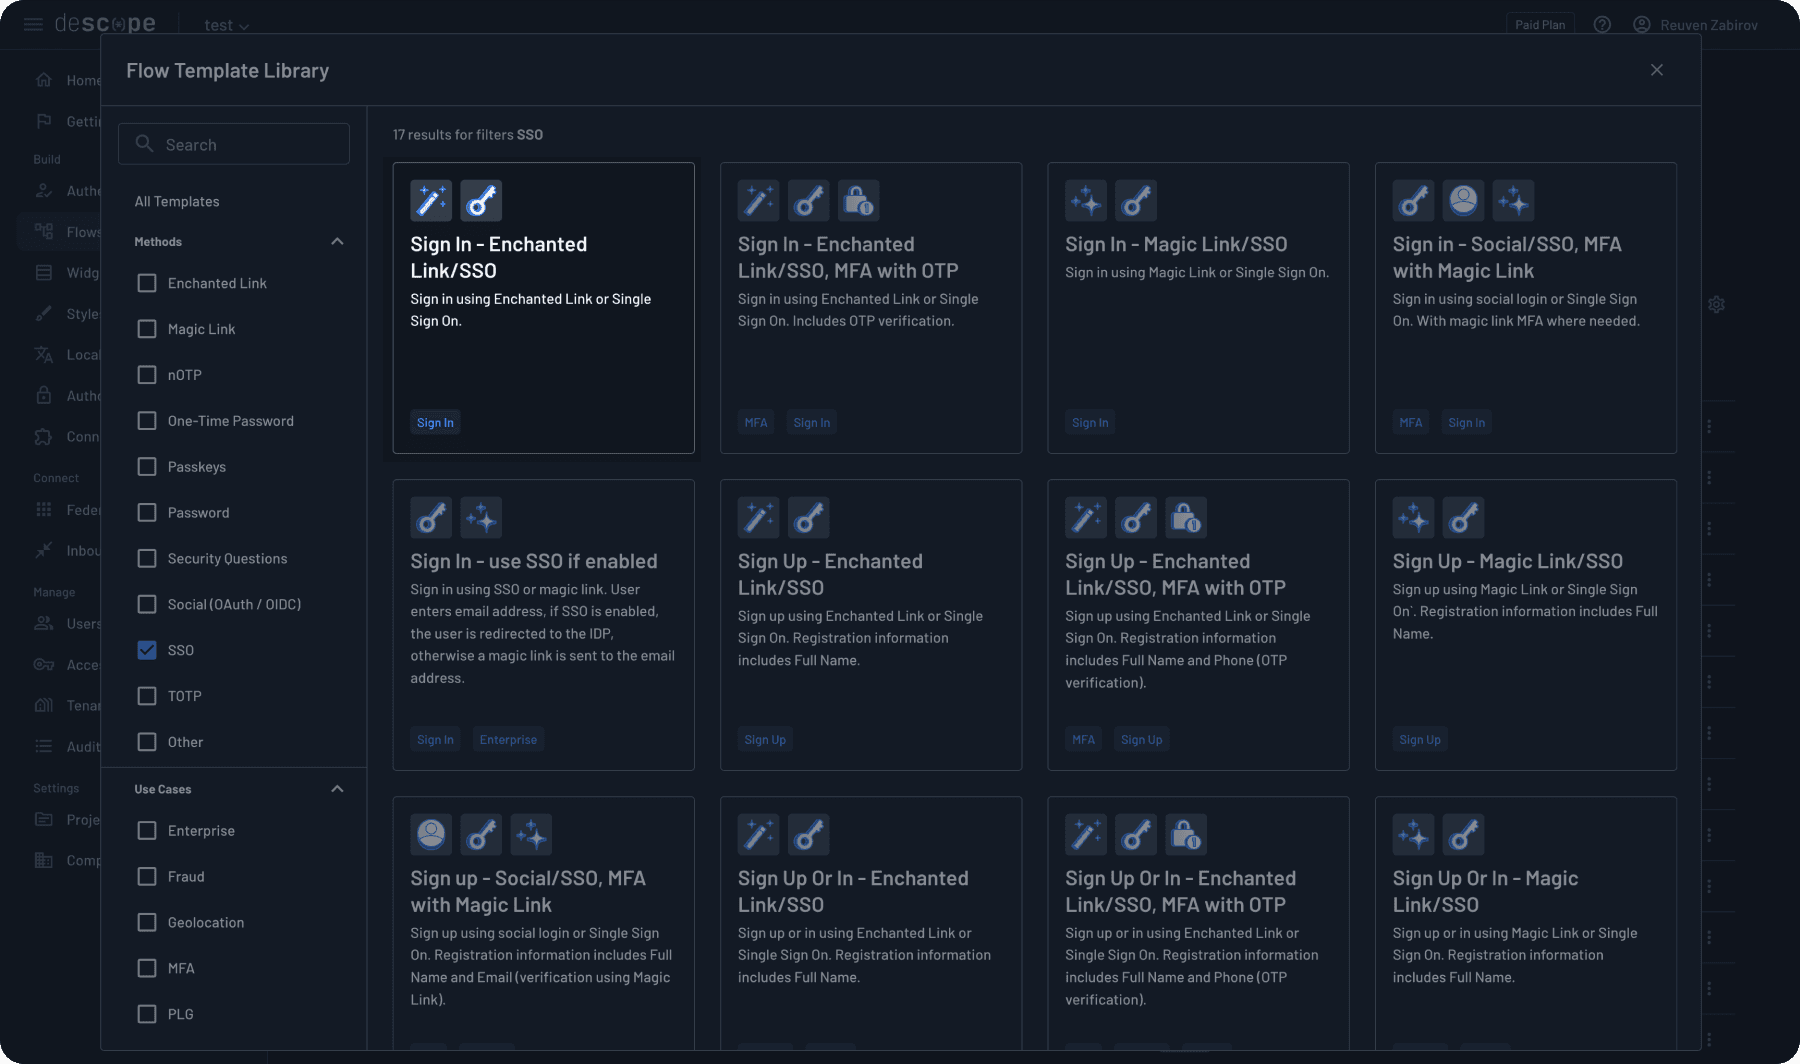
Filter by SSO and select an appropriate template. For this demonstration, we’ll use “Sign In - Enchanted Link/SSO.” Note that many options are available, so select the one that suits your organization’s needs.
Before continuing, let’s examine some essential components of our flow. First, note that our flow starts with a condition called “IdP Initiated.”
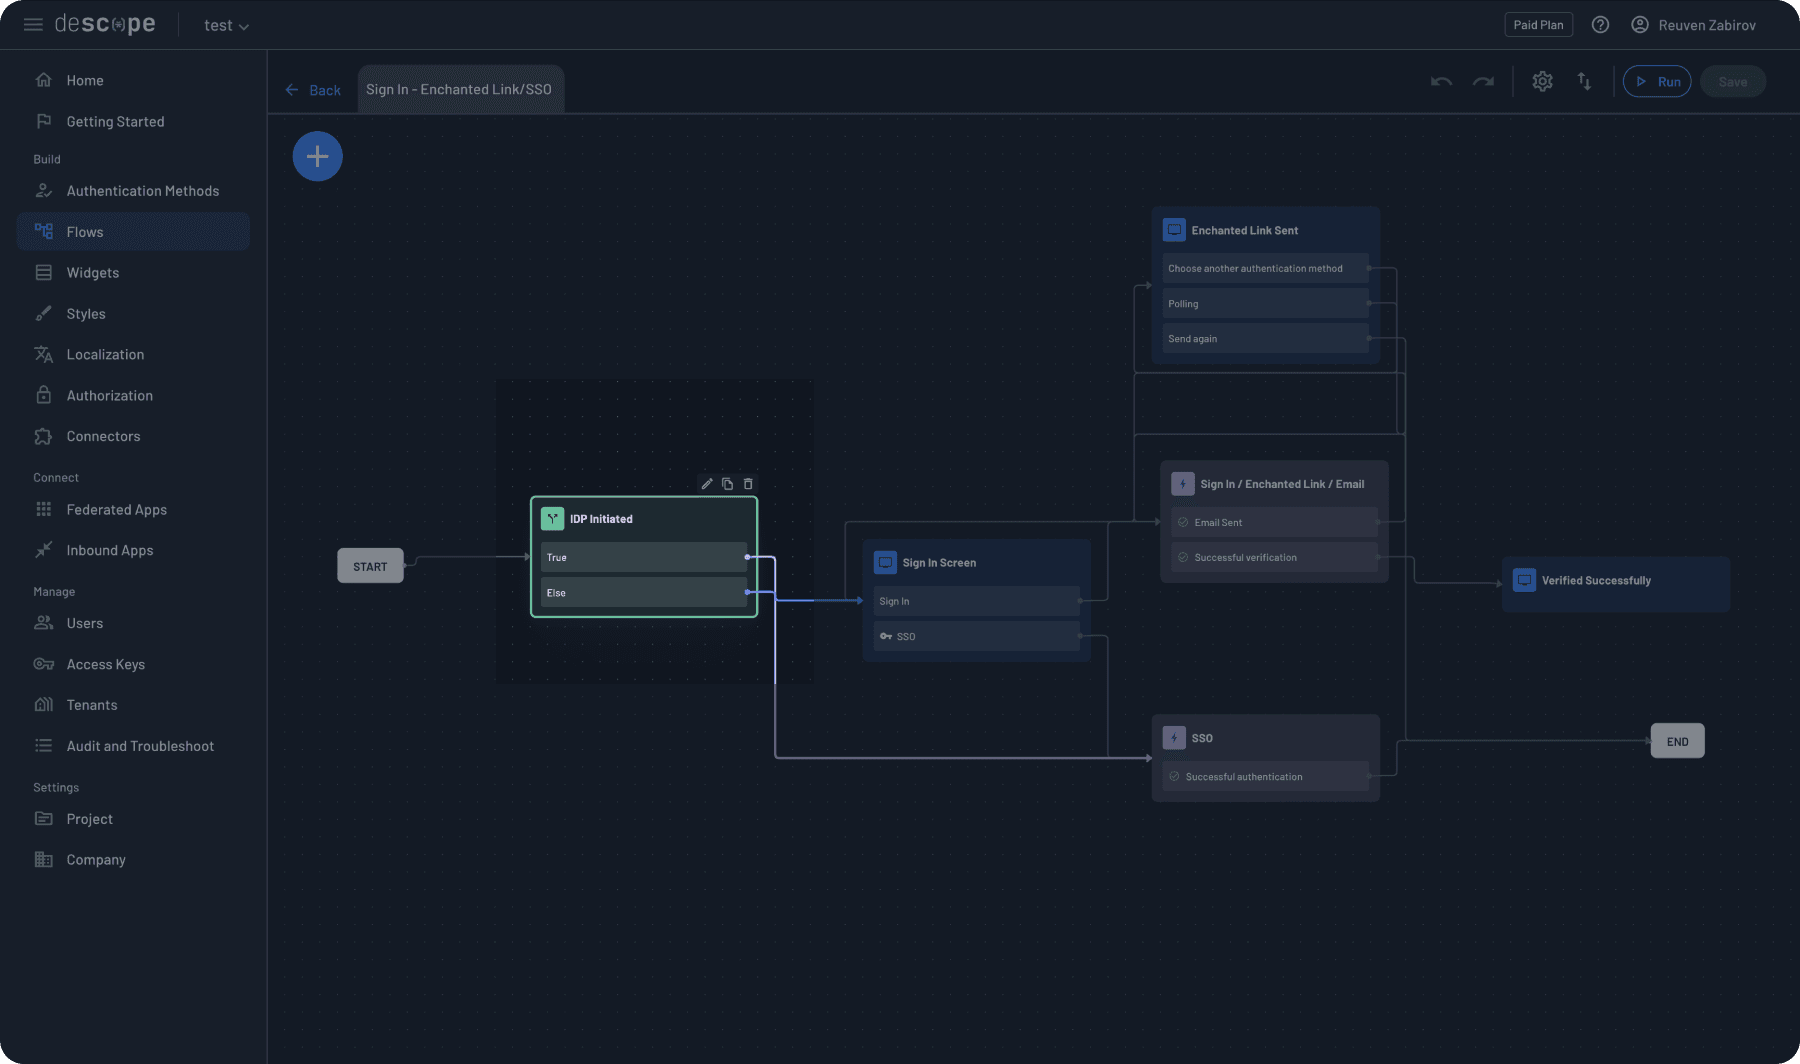
This condition handles scenarios where users begin their login process from the identity provider side rather than your application. The flow checks whether the authentication request originated from an IdP and routes it accordingly.

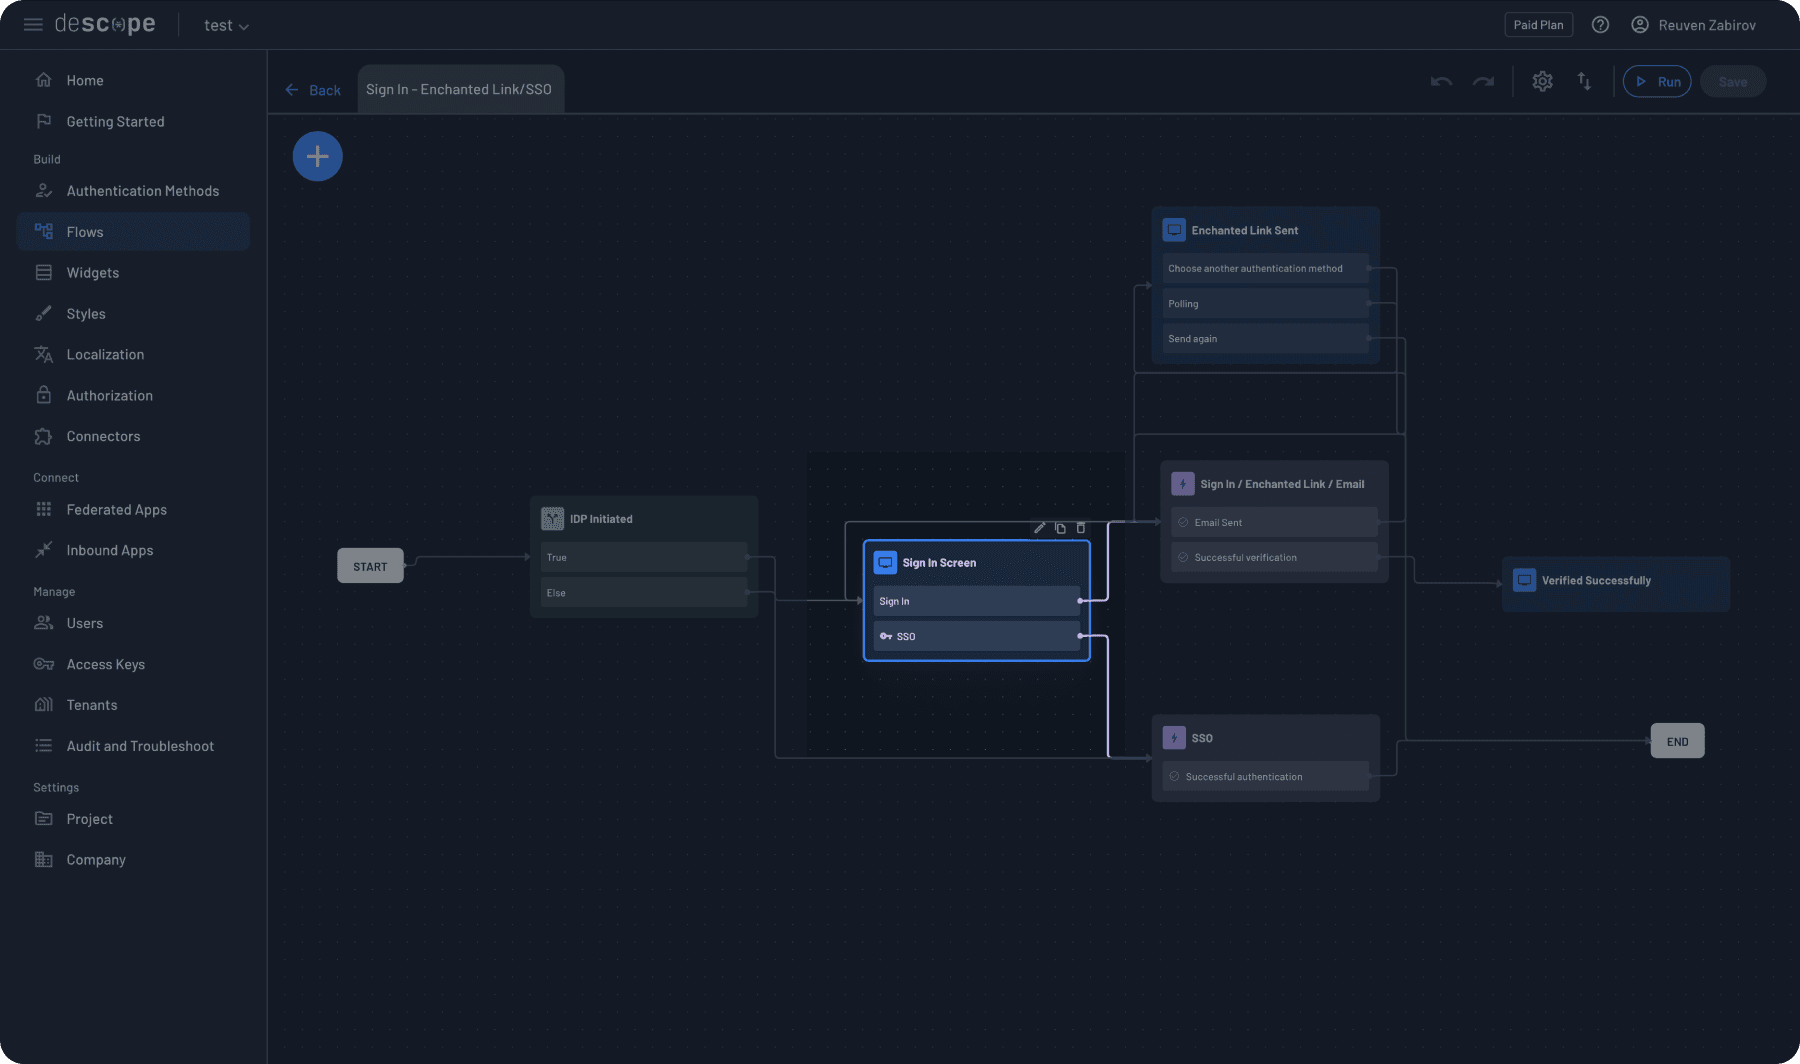
If the authentication starts from your application (not the IdP), the “Sign In Screen” task displays the login interface to your users. This is what most users will see when they try to log in.
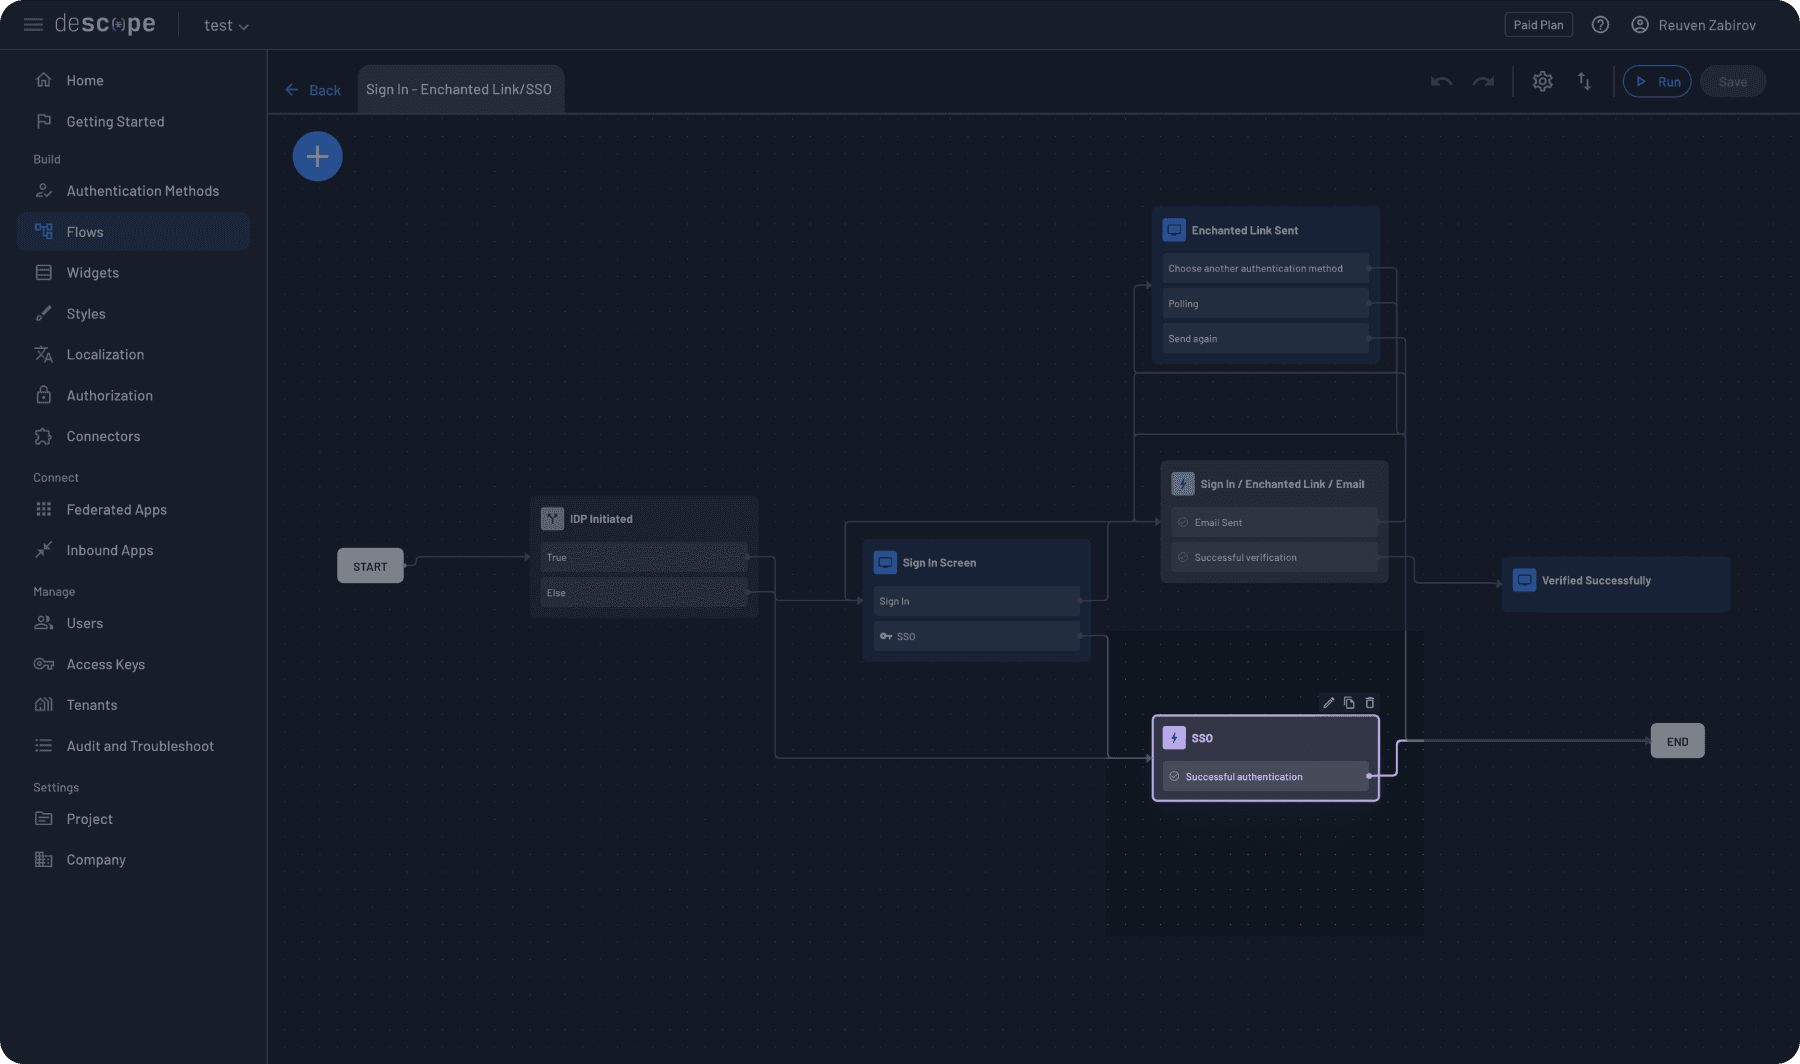
Finally, the “SSO Flow” task manages the actual SSO authentication process, handling the communication between your application, Descope, and the IdP.
To implement this flow in your application, add the following code snippet from the Getting Started page:
{/* The code below includes your Project ID */}
<AuthProvider projectId="<project-id>">
	<Descope
		flowId="sign-up-or-in"
		theme="light"
		onSuccess={(e) => {
			console.log(e.detail.user.name)
			console.log(e.detail.user.email)
		}}
		onError={(err) => {
			console.log("Error!", err)
		}}
	/>
</AuthProvider>
When properly implemented, your users will see a login screen with an SSO option, as shown in this example from Descope’s B2B sample app.
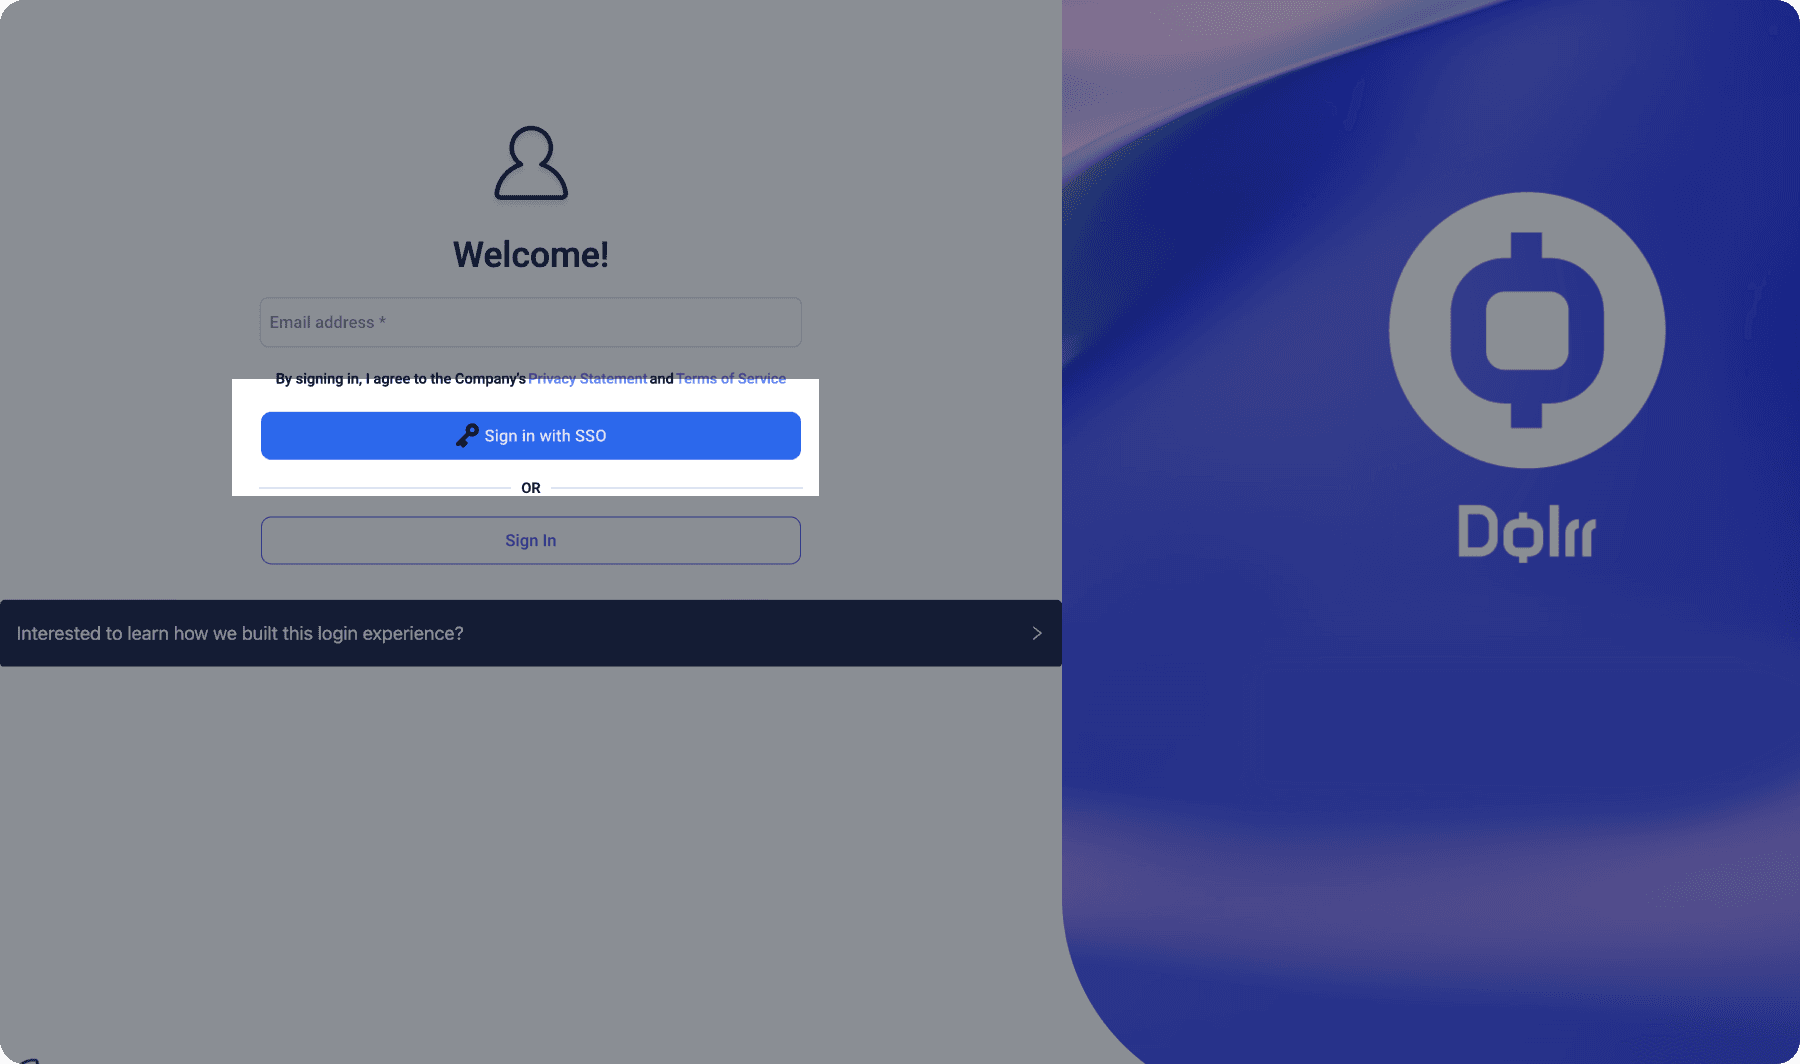
This setup enables users to log in seamlessly using SSO, with authentication tied to their specific tenant.
Read more about the capabilities of SSO, tenants and identity orchestration in Descope Flows.
Set up Descope tenants with SSO settings using the SDK
Next, we must create or update the necessary tenants in Descope to match our migration configuration. We’ll be using the Descope Node SDK in this example, but Descope supports a wide range of backend SDKs.
If you haven’t created one already, adding a customer tenant using the SDK is simple:
import DescopeClient from '@descope/node-sdk';

const descopeClient = DescopeClient({ projectId: '', managementKey:''});

const tenant = await descopeClient.management.tenant.create('tenant-id', ['mydomain.com'])
SAML-specific configuration steps with Auth0
The following steps are only needed for configurations using SAML. If your implementation will use OIDC, skip to the next section.
For SAML configurations, we’ll need to gather the necessary information about the IdP (Okta) and the SP (Auth0). From the Okta Developer Console, select the relevant Okta App integration, and copy the following values:
idpURL,entityID, andidpCertOR just
idpMetadataUrl
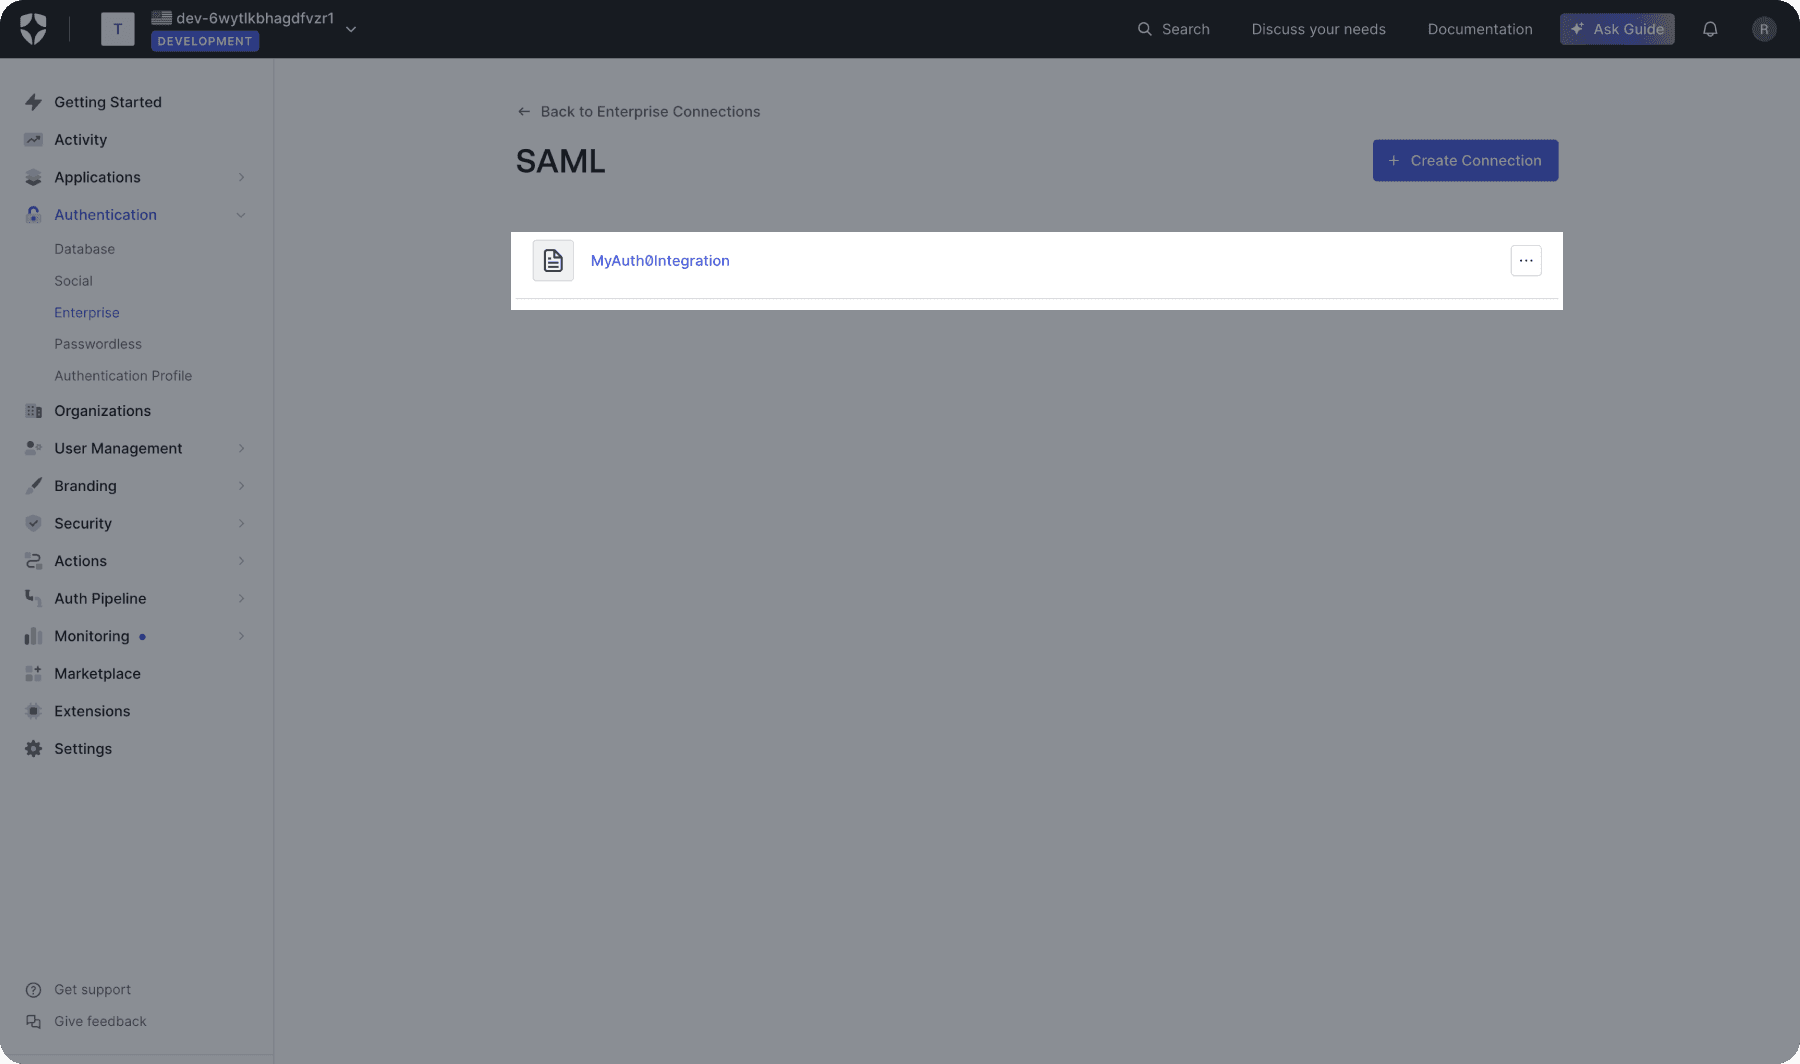
From the Auth0 Dashboard, go to Authentication > Enterprise.
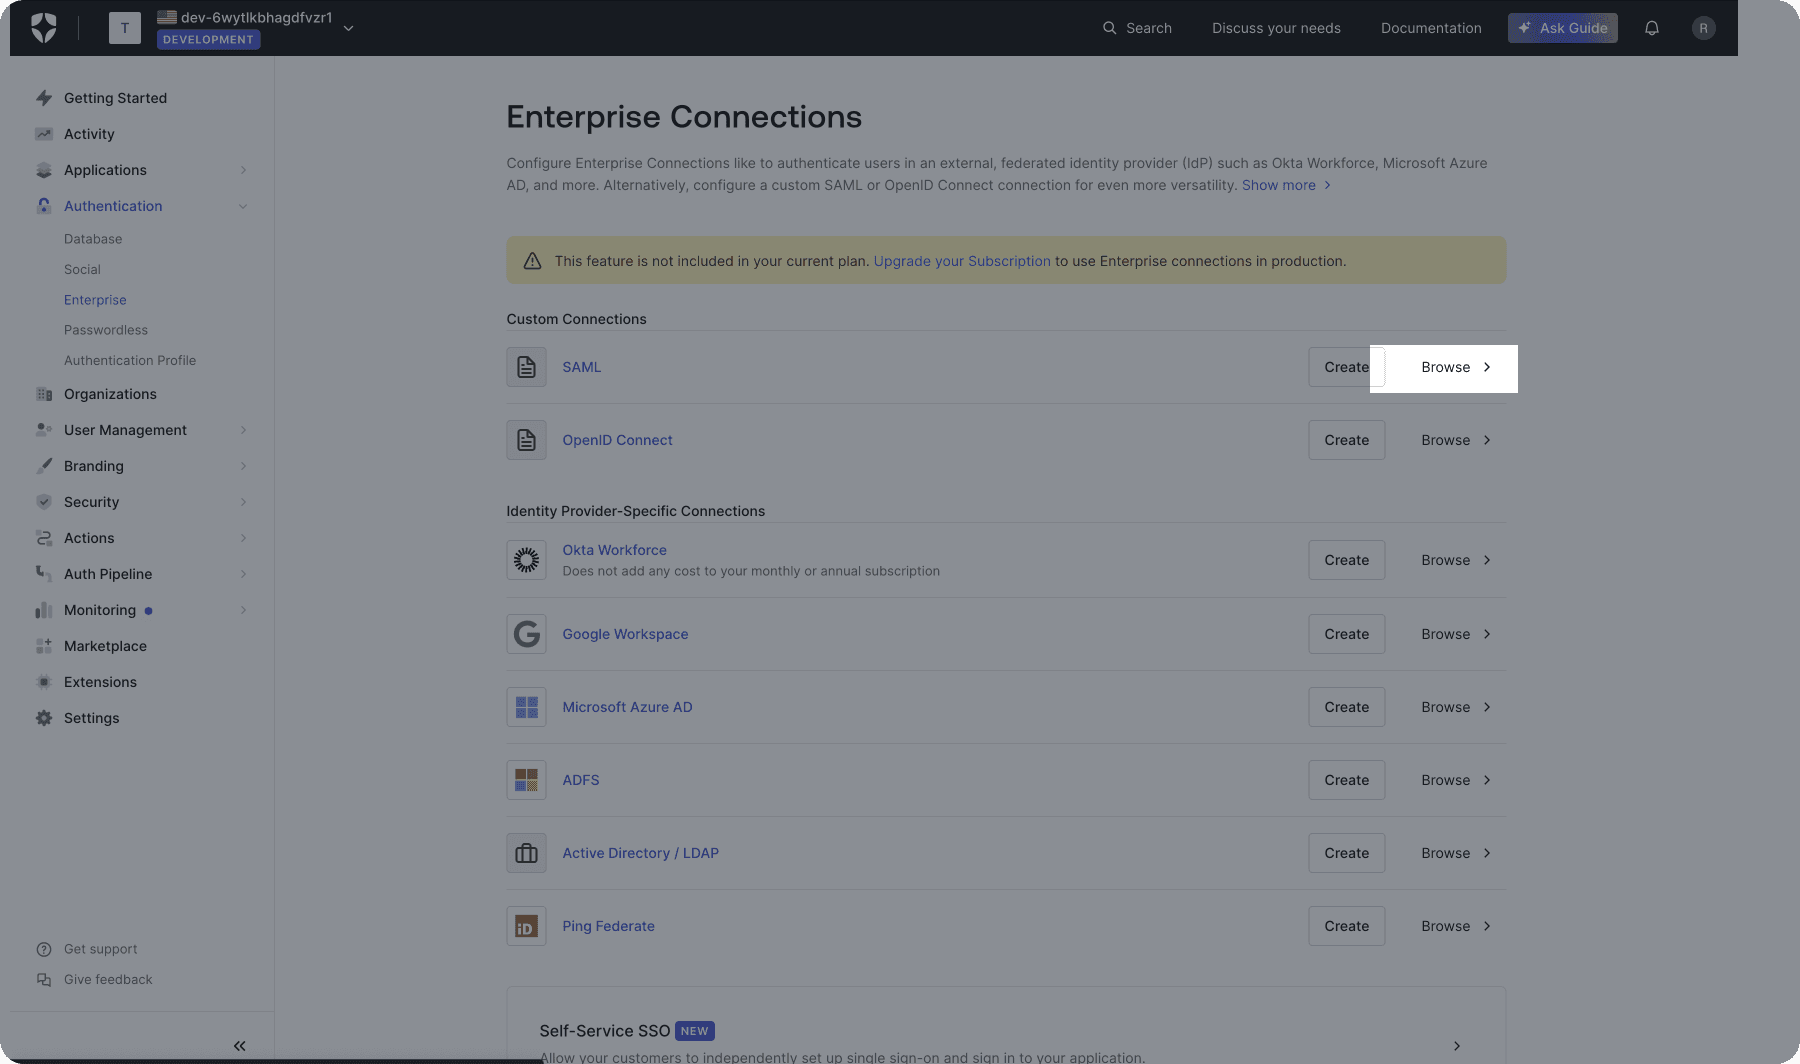
Select a connection type, then copy the spEntityId and spAcsUrl values.
The next steps are specific to WorkOS, which Auth0 users can skip. Resume the guide at the section following the WorkOS-specific steps, Configuring tenant SSO settings for SAML.
SAML-specific configuration steps with WorkOS
The following steps are only needed for configurations using SAML. If your implementation will use OIDC, skip to the next section.
For SAML configurations, we’ll need to gather the necessary information about the IdP (Okta) and the SP (WorkOS).
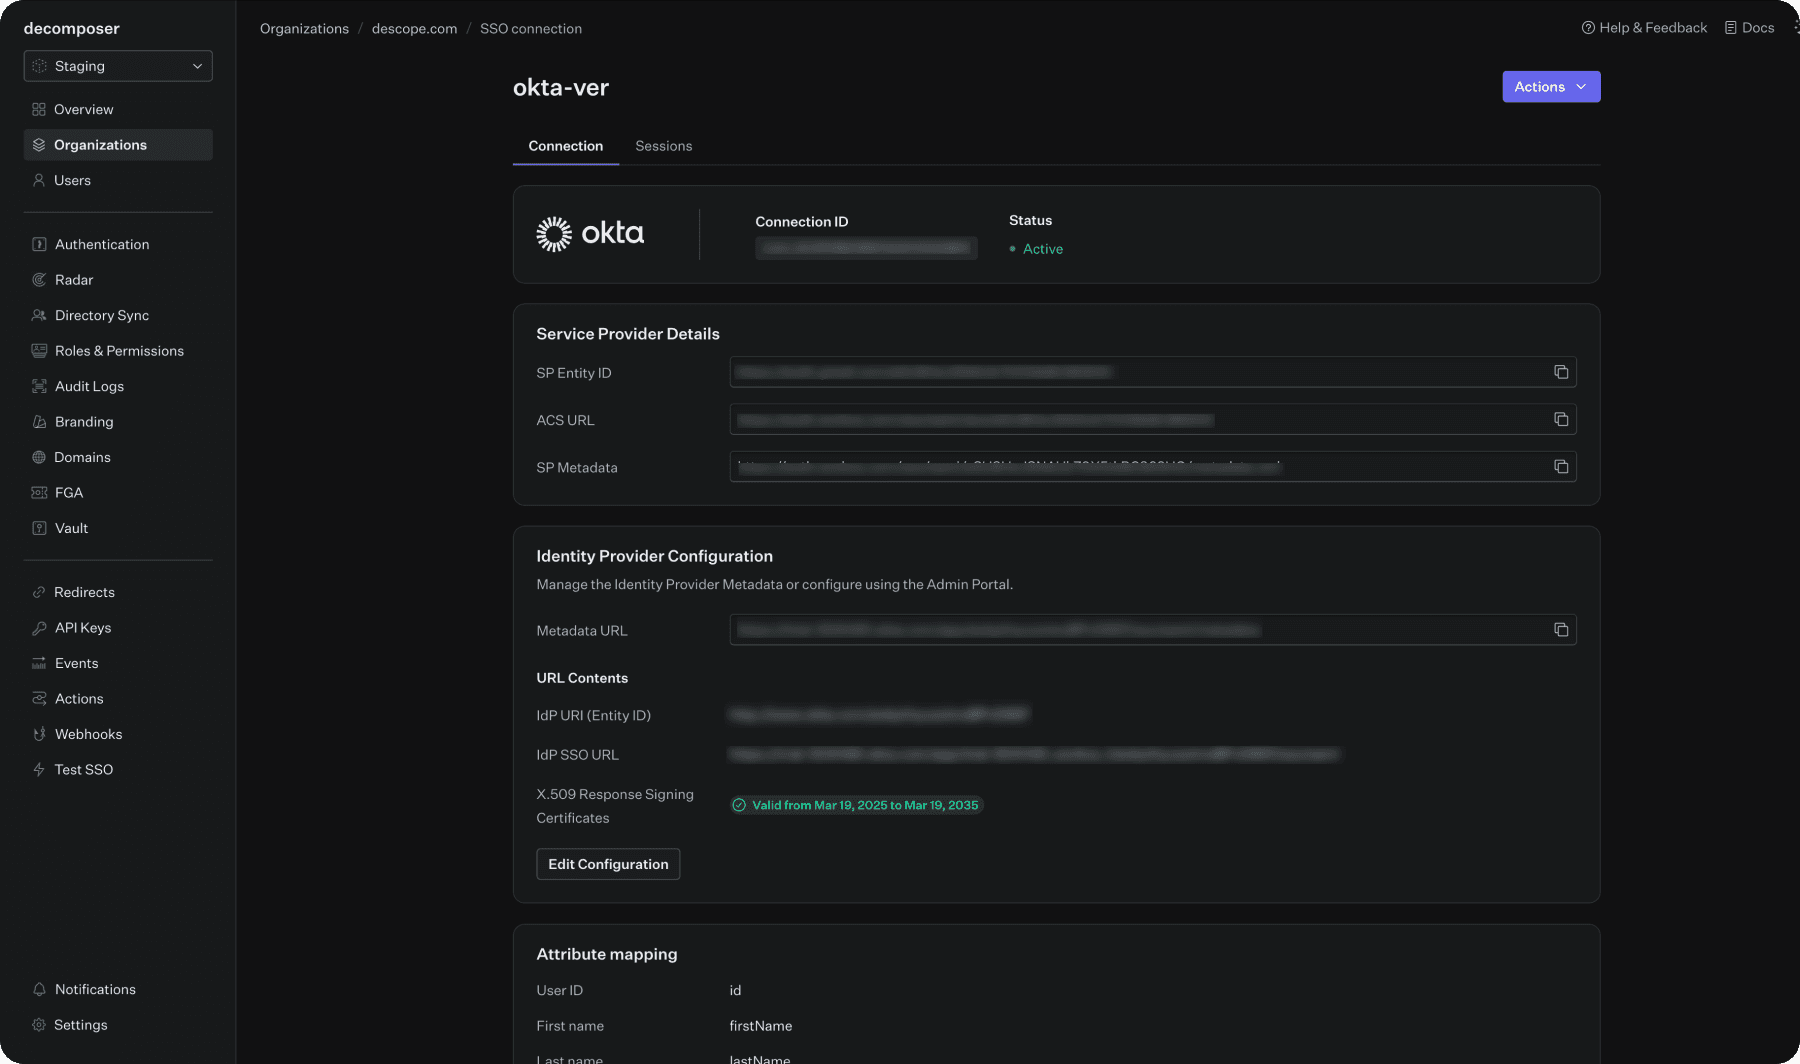
From the WorkOS Dashboard, go to Organization > select the designated organization to migrate.
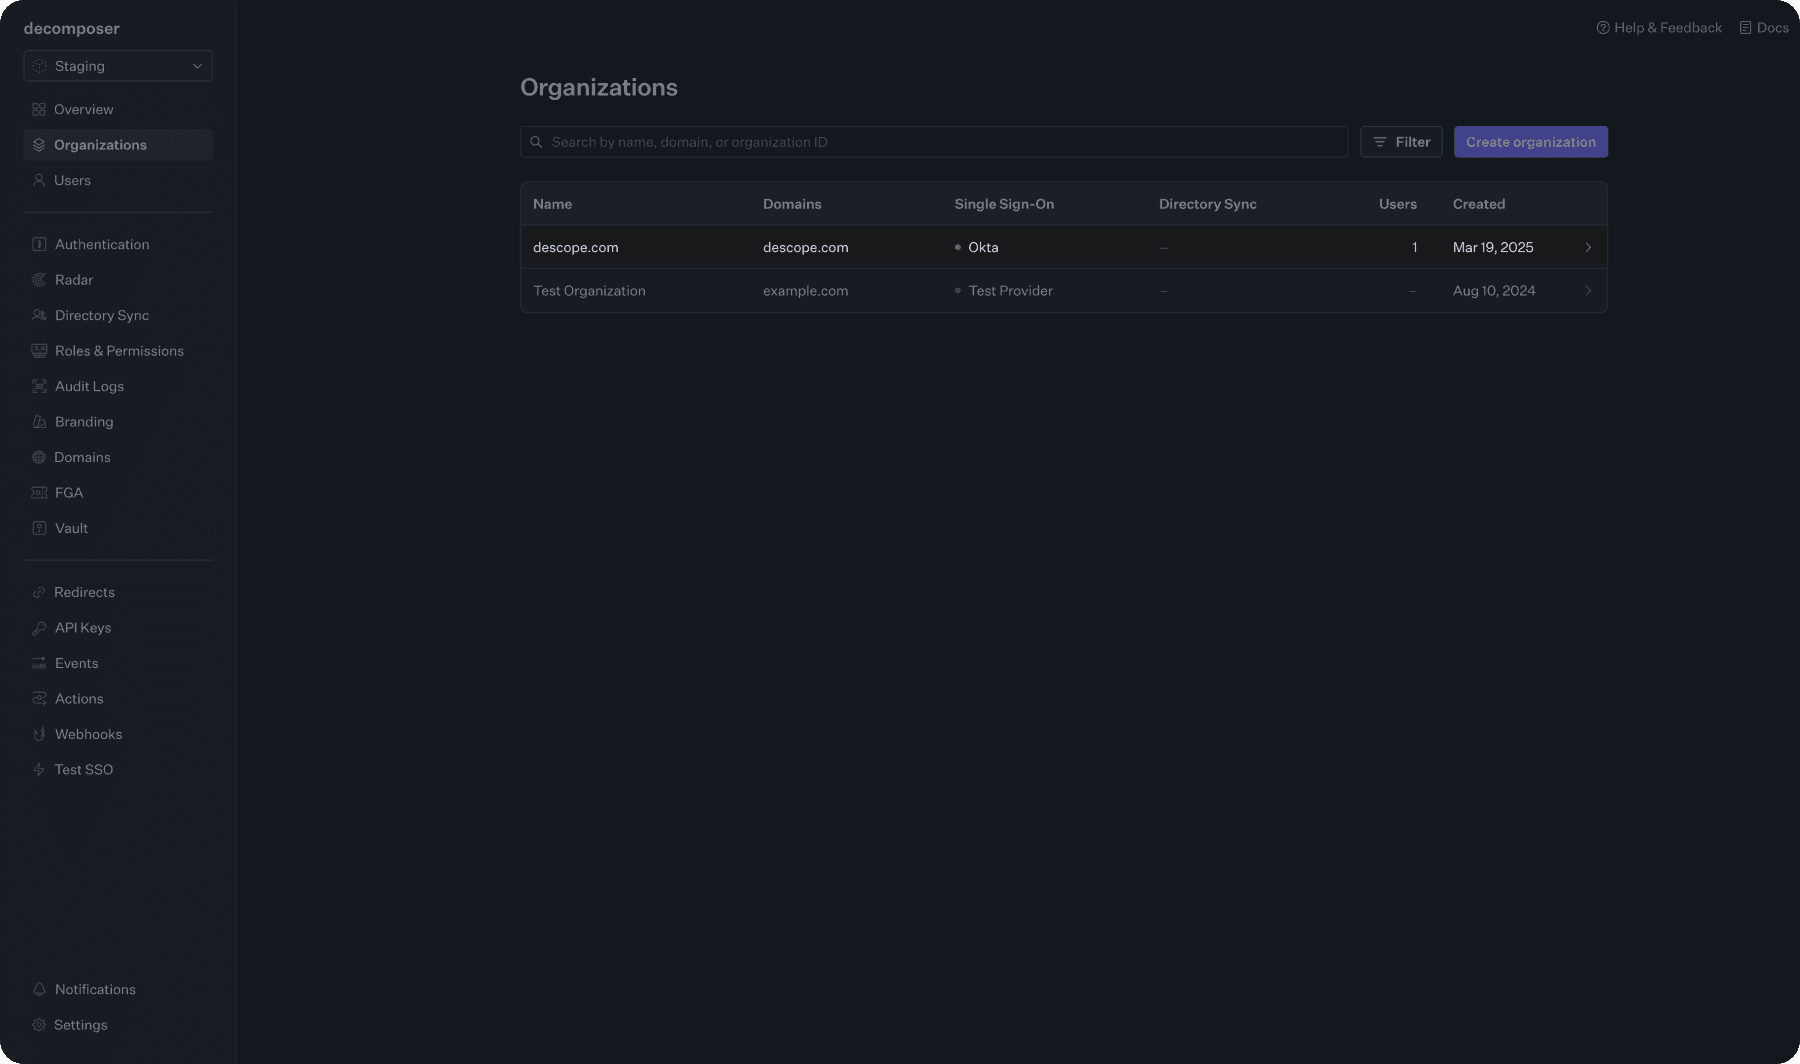
Select the connection by clicking View connection.
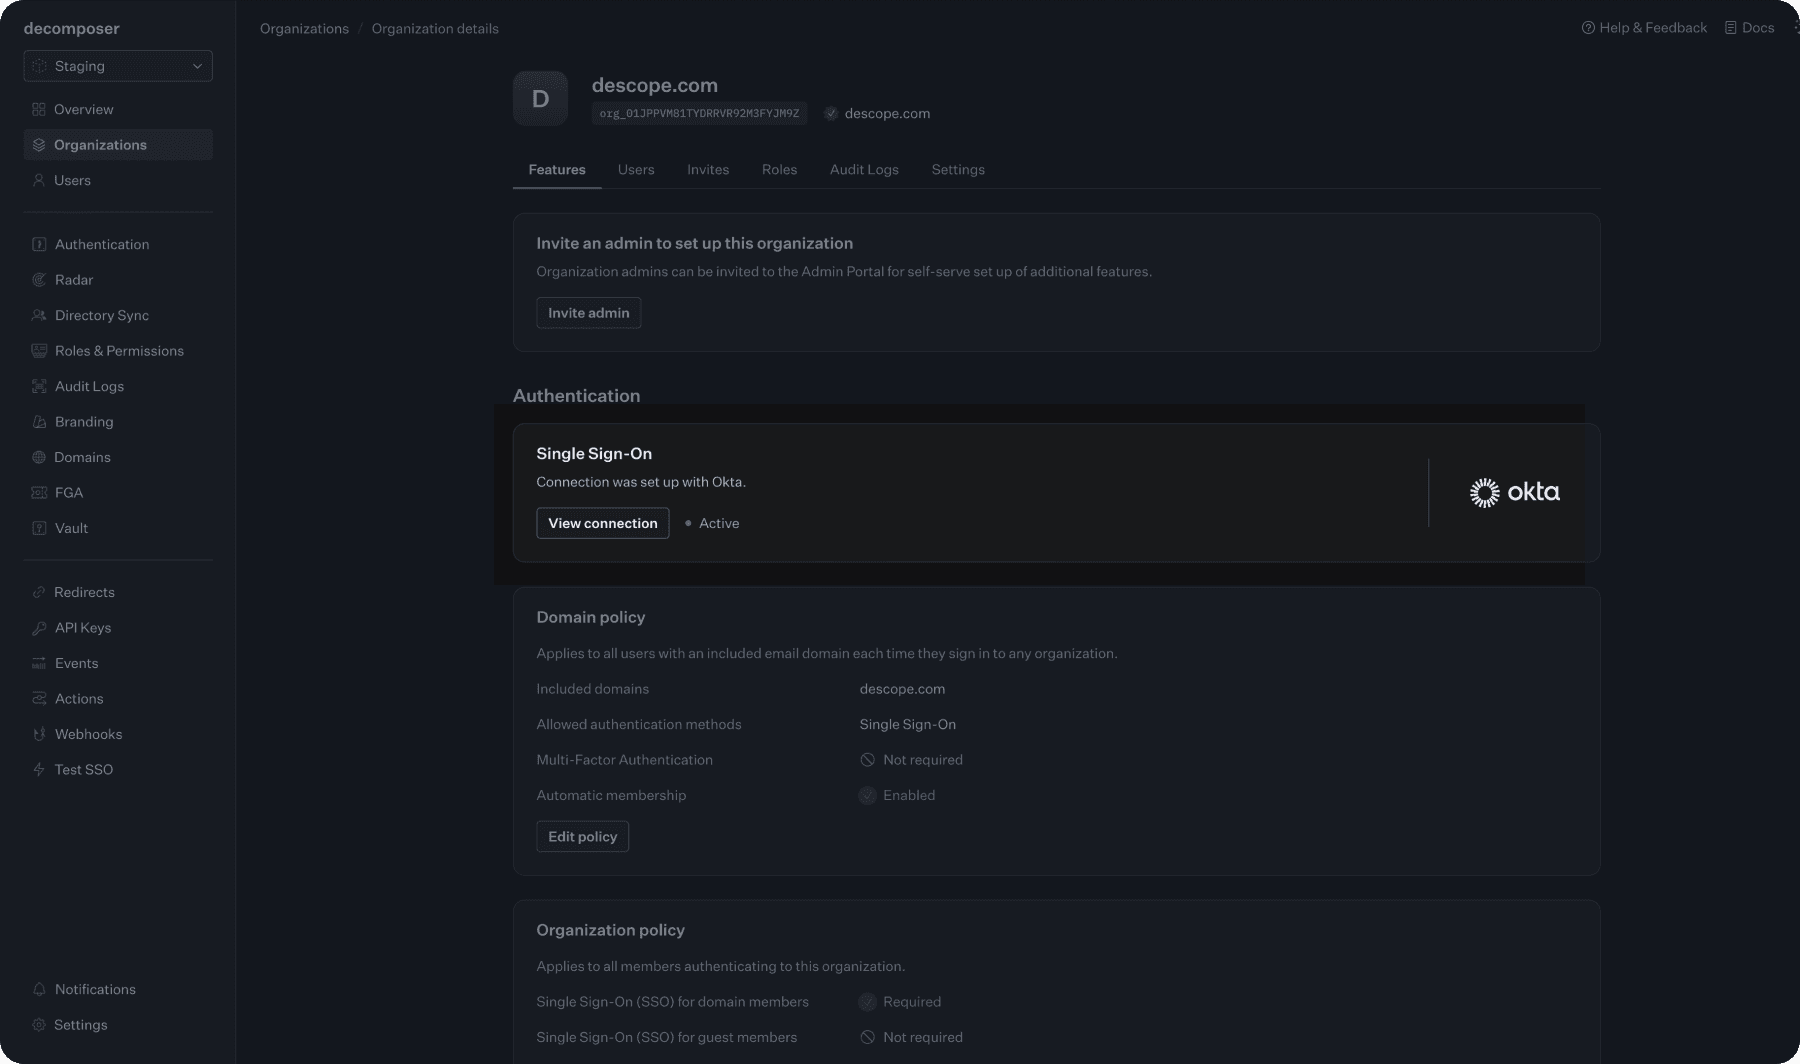
Copy the necessary variables:
Under Service Provider Details -
SP Entity ID,ACS URL,SP MetadataUnder Identity Provider Configuration -
Metadata URL
Now, use the information you’ve collected to configure SSO settings for your tenant.
For WorkOS use the configureSAMLByMetadata variant.
Configuring tenant SSO settings for SAML
Now, use the information you’ve collected to configure SSO settings for your tenant.
// You can get SSO settings for a specific tenant ID
const ssoSettings = await descopeClient.management.sso.loadSettings("tenant-id")


// You can configure SSO settings manually by setting the required fields directly
const tenantId = 'tenant-id' // Which tenant this configuration is for
const idpURL = 'https://idp.com'
const entityID = 'my-idp-entity-id'
const idpCert = '<your-cert-here>'
const redirectURL = 'https://my-app.com/handle-sso' // Global redirect URL for SSO/SAML
const domains = ['tenant-users.com'] // Users authentication with this domain will be logged in to this tenant
// "Extra" Settings for SSO Migration Handling
const spAcsUrl = "https://domain.com/saml"
const spEntityId = "my-custom-entity-id"
await descopeClient.management.sso.configureSAMLSettings(tenantID, {idpURL, entityID, idpCert, spAcsUrl, spEntityId}, redirectURL, domains)


// Alternatively, configure using an SSO metadata URL
await descopeClient.management.sso.configureSAMLByMetadata(tenantID, {idpMetadataUrl: 'https://idp.com/my-idp-metadata', spAcsUrl, spEntityId}, redirectURL, domains)
The configuration above accomplishes two critical steps:
It sets up Descope to communicate with your customer’s existing Okta IdP using the same parameters they’ve already established.
The
spAcsUrlandspEntityIdvalues from Auth0 tell Descope how to interpret the SAML response coming from Okta. These values ensure Descope can properly handle authentication responses that were originally intended for Auth0.
OIDC-specific configuration steps
For OIDC configurations, the process is similar, but there are no special migration-specific parameters required. Simply ensure that all parameters match exactly what the customer had previously configured in Auth0 or WorkOS.
Set up the DNS redirect with Cloudflare
In this section, we’ll configure DNS redirection using Cloudflare. While these steps are specific to Cloudflare, you can adapt them for other DNS providers by following their documentation.
Create a Cloudflare API token
Go to the Cloudflare Dashboard, then create an account-level token by clicking on Account API Tokens > Create Token.
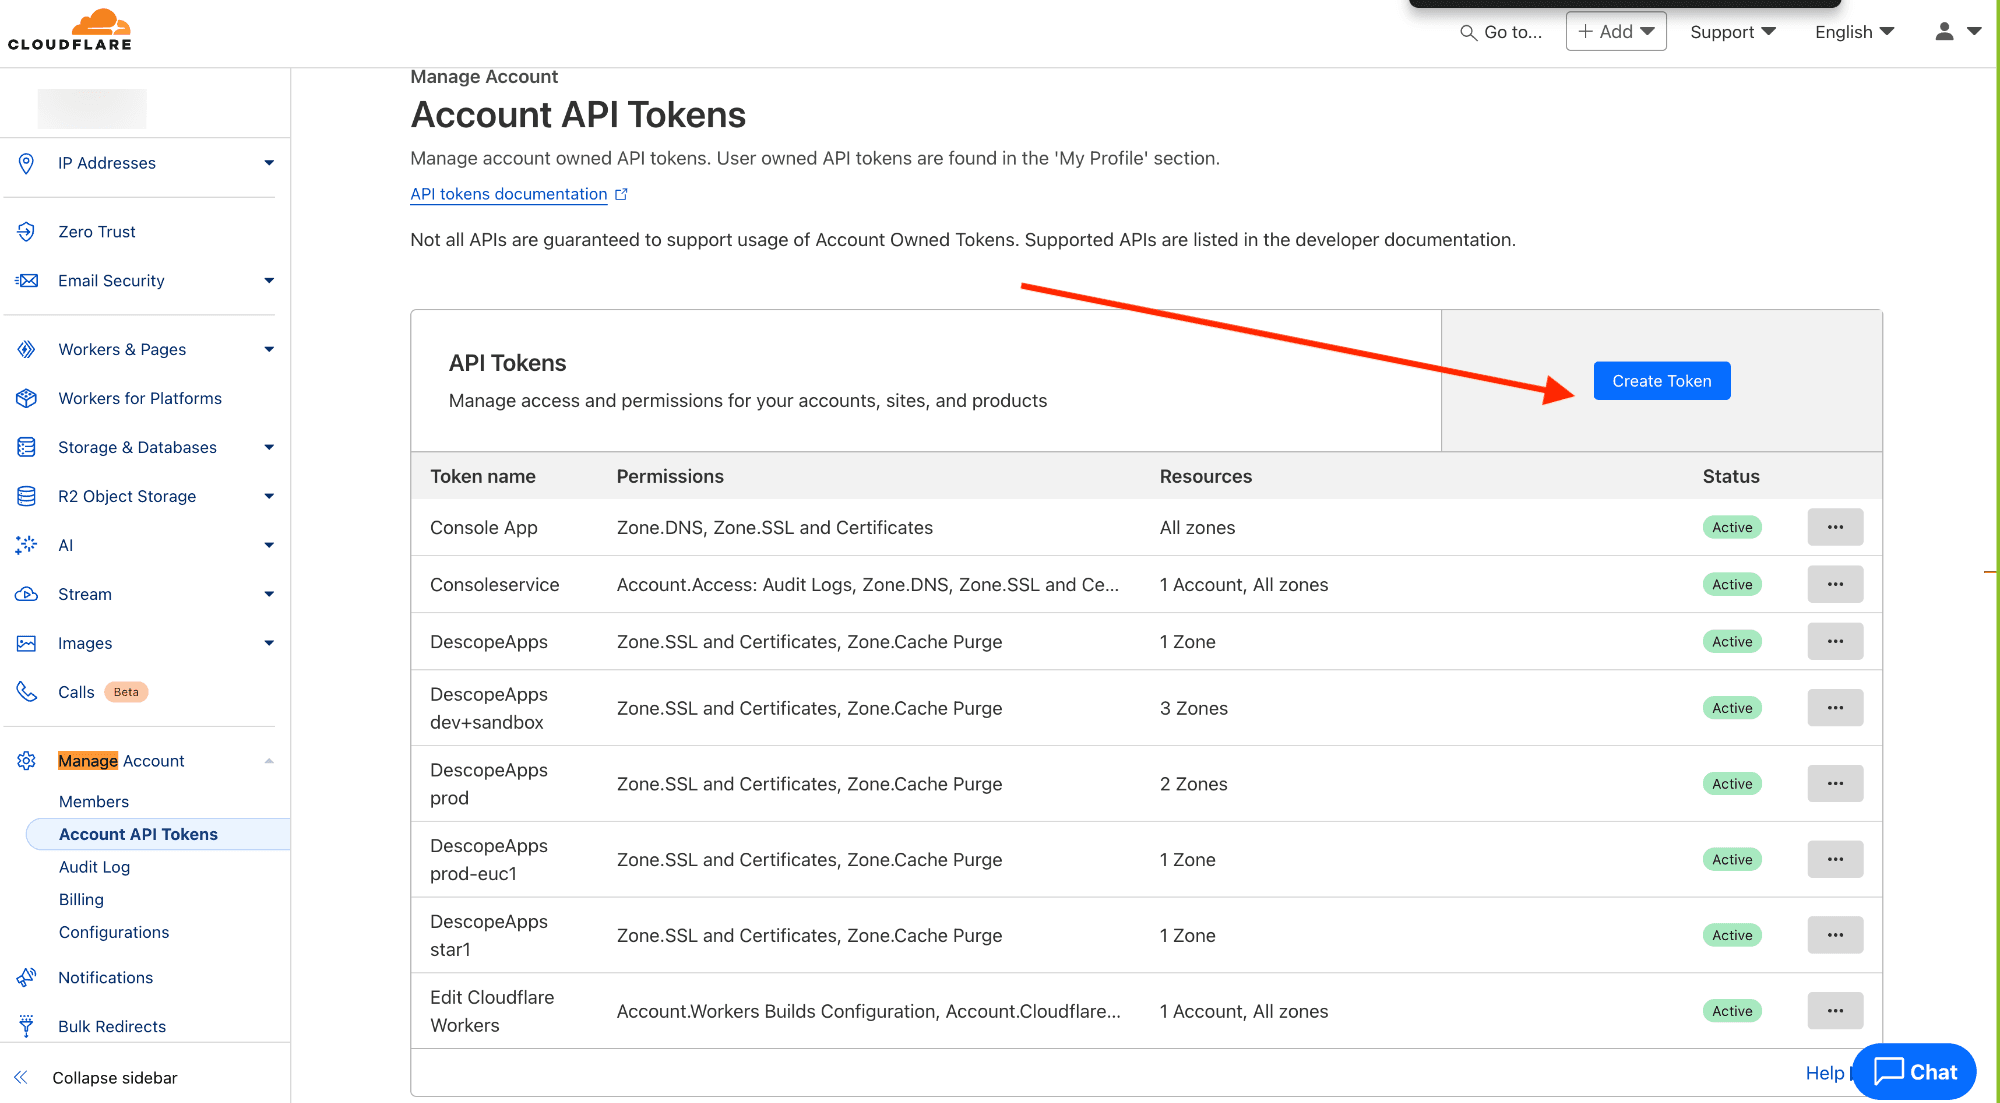
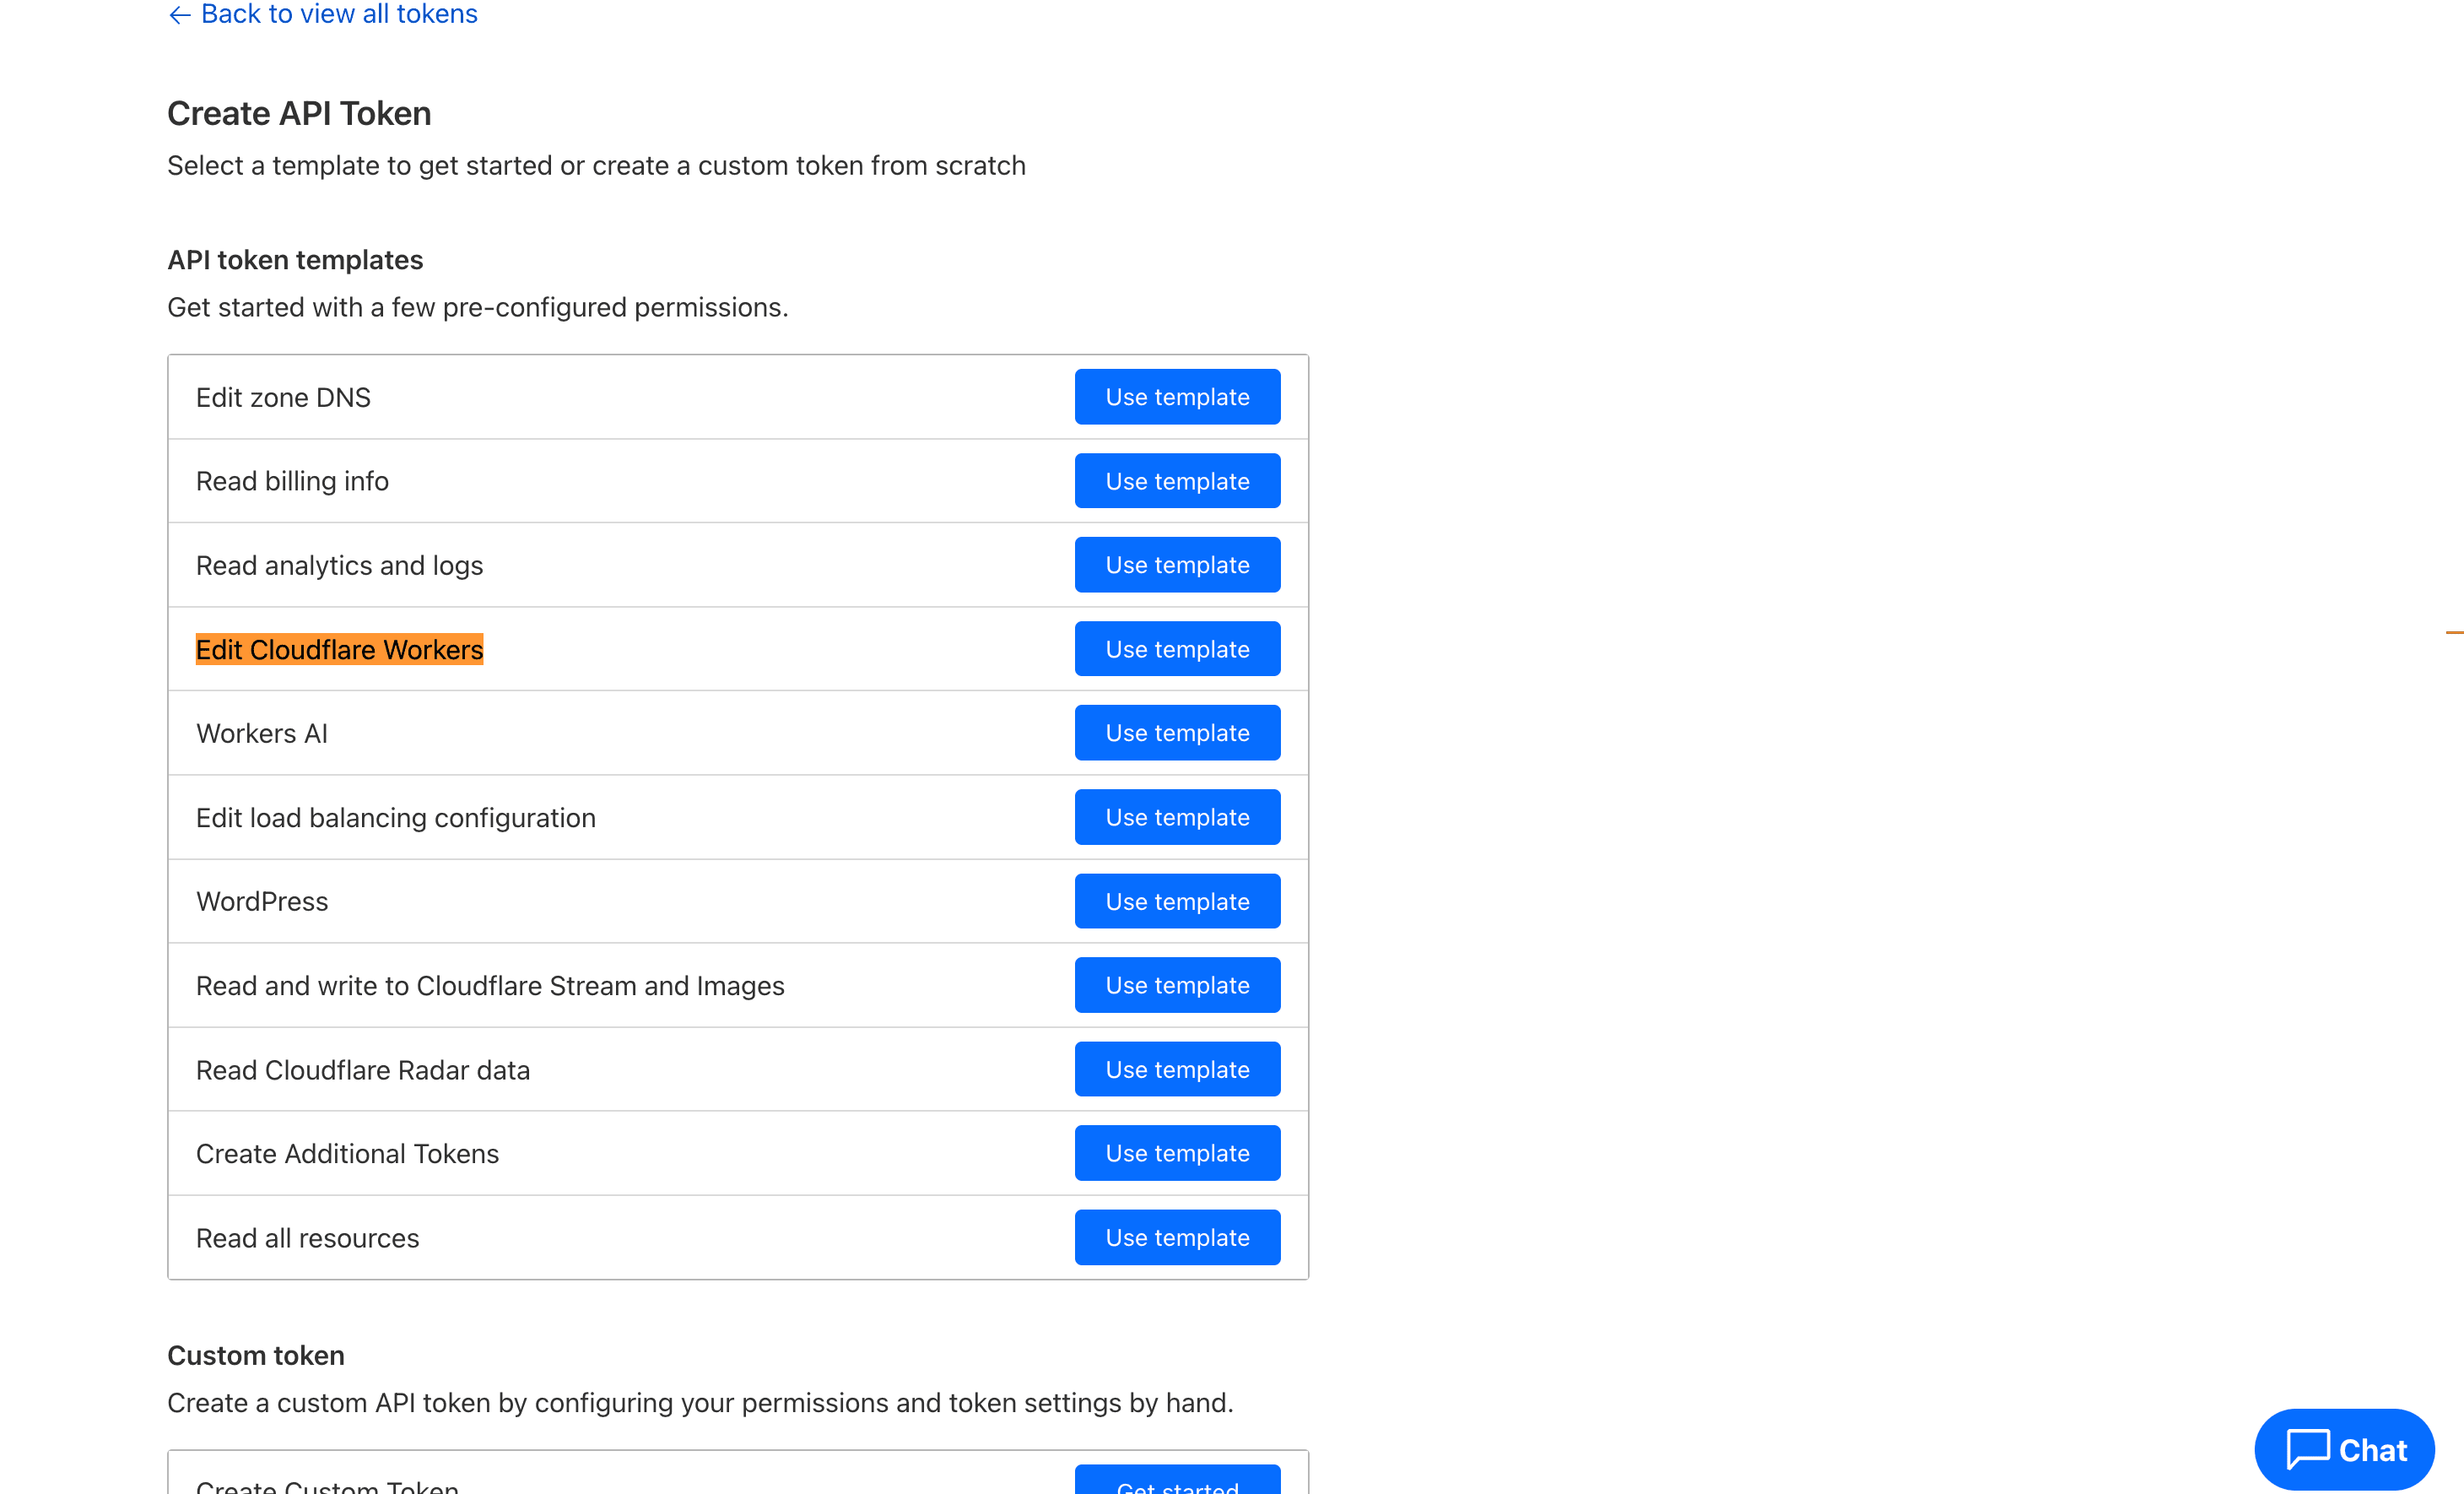
Next, select Use Template for the “Edit Cloudflare Workers” option.
Copy the created token and export it as an environment variable locally:
export CLOUDFLARE_API_TOKEN=<CLOUDFLARE_TOKEN>Clone the worker template from our official GitHub repository. Then, change the following lines in wrangler.toml to match your new settings:
Line 27 should be set to your old backend host (old-auth.example.com).
Lines 14-15 should be set to your pattern and zone.
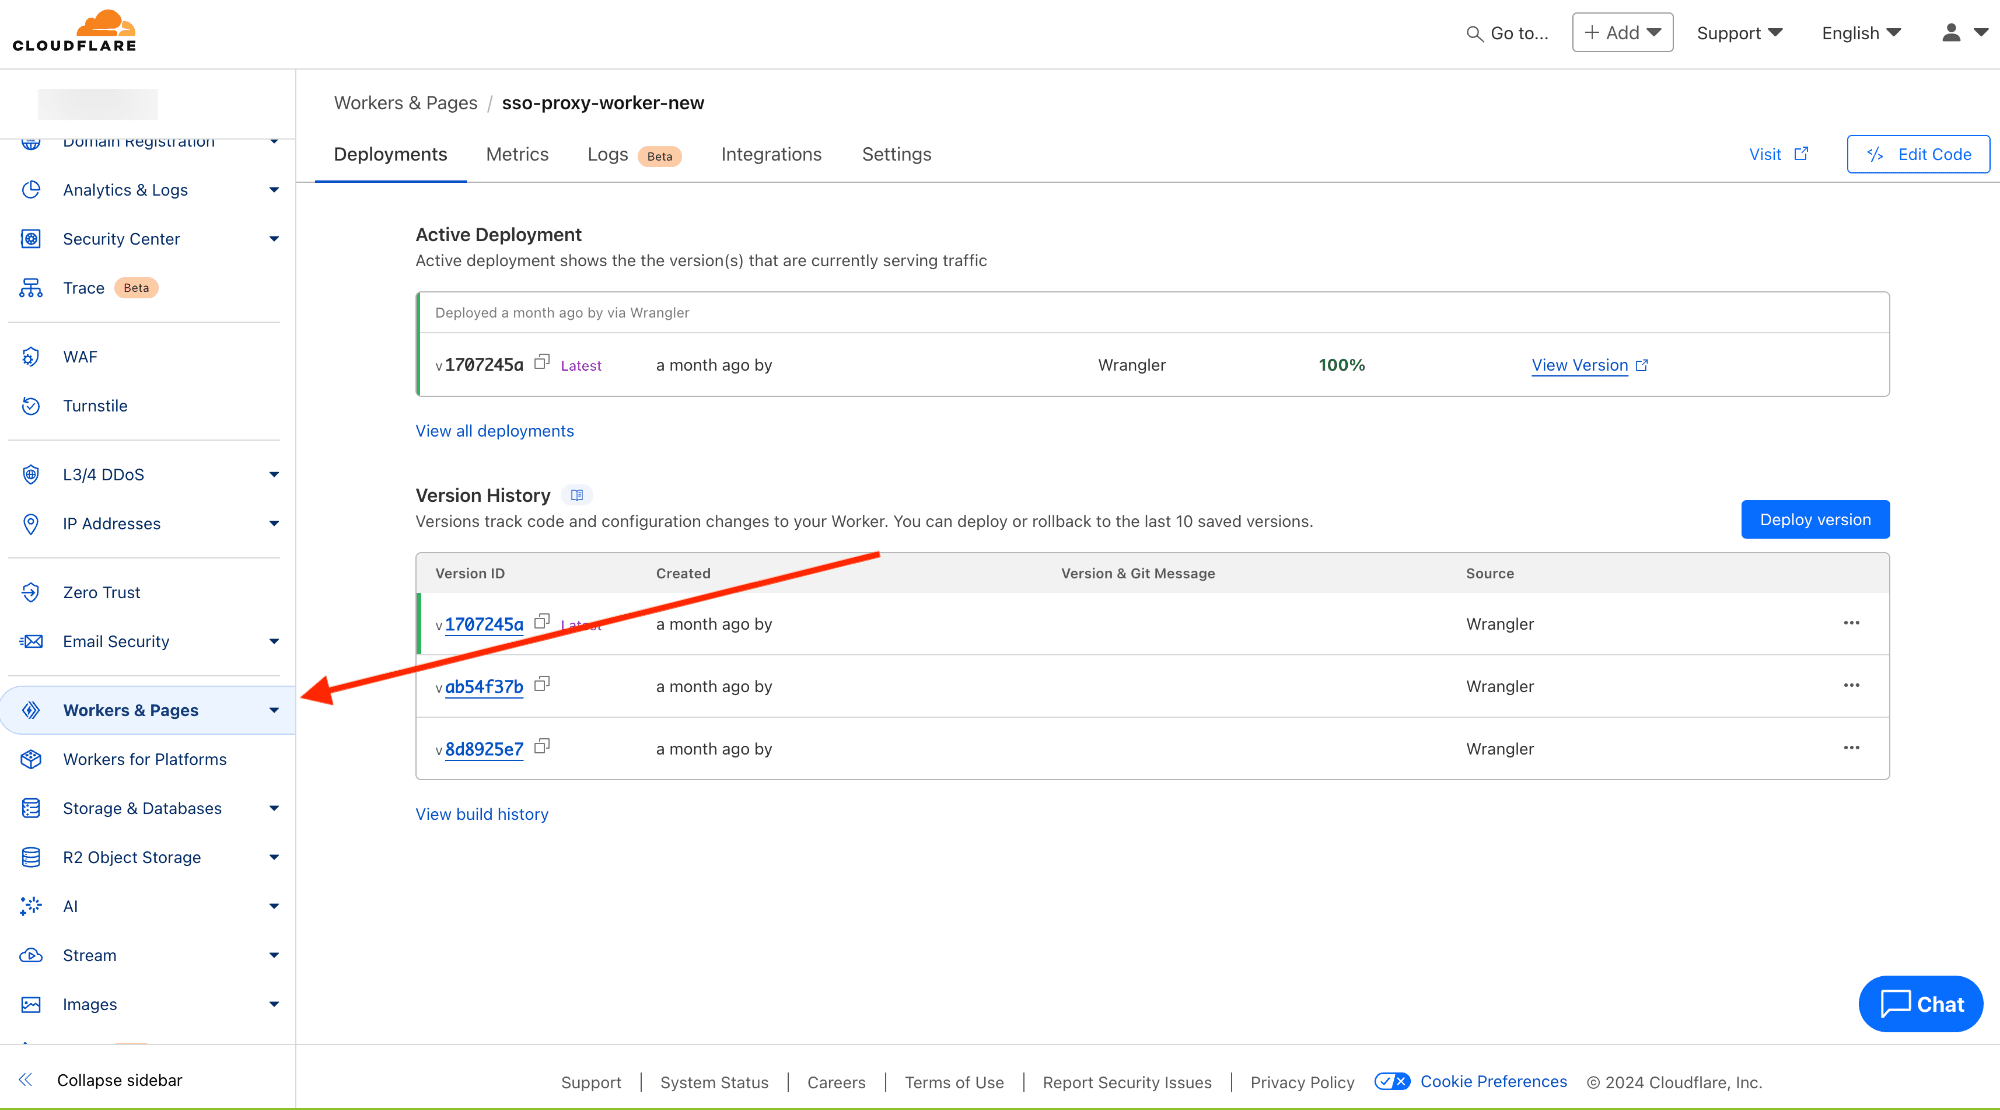
Next, deploy the Cloudflare worker using this command (running inside the Cloudflare template folder):
npm i && npm run deployYou should now be able to see the worker in the Cloudflare dashboard.
Test the integration
After successfully configuring the integration, we recommend that you test it with internal accounts. This way, if there are errors in the configuration, end users won’t notice any disruption.
We also recommend you gradually migrate your customers. For example, you may implement a migration plan that transitions smaller subsets of customers over time. This ensures the migration happens behind the scenes, without users noticing any changes to their login experience.
While testing the integration, you should receive an Okta login prompt.
A successful integration will generate users associated with the tenant in your Descope project.

Transitioning to better auth with Descope SSO migration
In this guide, we walked through SSO implementation and highlighted Descope’s exclusive migration approach, allowing you to seamlessly transition customers without requiring reconfiguration. This flips the script on traditional SSO migration, which forces organizations to extensively plan and commit bandwidth to change providers.
Because Descope’s SSO migration eliminates vendor lock-in and eases the fear of customer churn, your organization has the freedom to choose between a legacy provider and a modern CIAM solution. While this guide focused on migrating from Auth0 or WorkOS, the process adapts to other service providers, meaning virtually any organization can benefit from Descope’s new approach.
Ready to bring your SSO into a comprehensive CIAM environment with drag & drop simplicity? Book a demo with our customer identity experts, or join our developer community, AuthTown.