Table of Contents
Why Retool and Descope go hand in hand
Descope helps developers easily add SSO-based authentication and access control to their business apps. And if you’re using Retool, you already know it simplifies the construction of custom internal applications.
By integrating these two powerful services, you can simplify the authentication and authorization of your Retool applications and easily create custom protections for Retool functions. In this tutorial, we will go through a step-by-step process of connecting Descope and Retool via OIDC federated authentication and cover some scenarios where Descope can enhance the user experience and security of your Retool app.
Why Retool and Descope go hand in hand
Retool is a platform designed to simplify the construction of custom internal applications. It offers an array of pre-built components and integrates with various databases and APIs, enabling you to quickly assemble powerful applications without starting from scratch.
When the security and authentication capabilities of Descope are paired with the versatility and simplicity of Retool, the result is a highly functional, secure, and efficient application. This integration can significantly enhance the app experience by leveraging Descope Flows and third-party connectors, among other things.
Integrate Descope with Retool using OIDC
Our Retool Guide contains more detailed instructions on how the integration with Descope and Retool works, such as how to access Descope-protected APIs. However, this blog will cover how to use SSO with OIDC in Retool.
Step 1: Set up OIDC in the Descope Console
First, sign up for a Free Forever account with Descope. Then, go to the Descope Console under Authentication Methods > SSO > Identity Provider, and select Enable Method in API and SDK.
Step 2: Get necessary Descope-related information
You'll need the following items to configure the integration:
Client ID: Your Descope Project ID, which can be found under Project Settings in the Descope Console.
Client Secret: Access key generated under Access Keys in the Descope Console.
Scopes: The standard scopes are: openid profile email (you can add other scopes such as “phone” as well)
Authorization URL: https://api.descope.com/oauth2/v1/authorize
Token URL: https://api.descope.com/oauth2/v1/token
Step 3: Connect Descope to Retool
If you want to use SSO with OIDC in Retool, you’ll need to go to Organization Settings > Single Sign On (SSO) and select OpenID SSO in the Retool console.
From there, fill out the page as shown below, providing all of the information you retrieved in the last step:
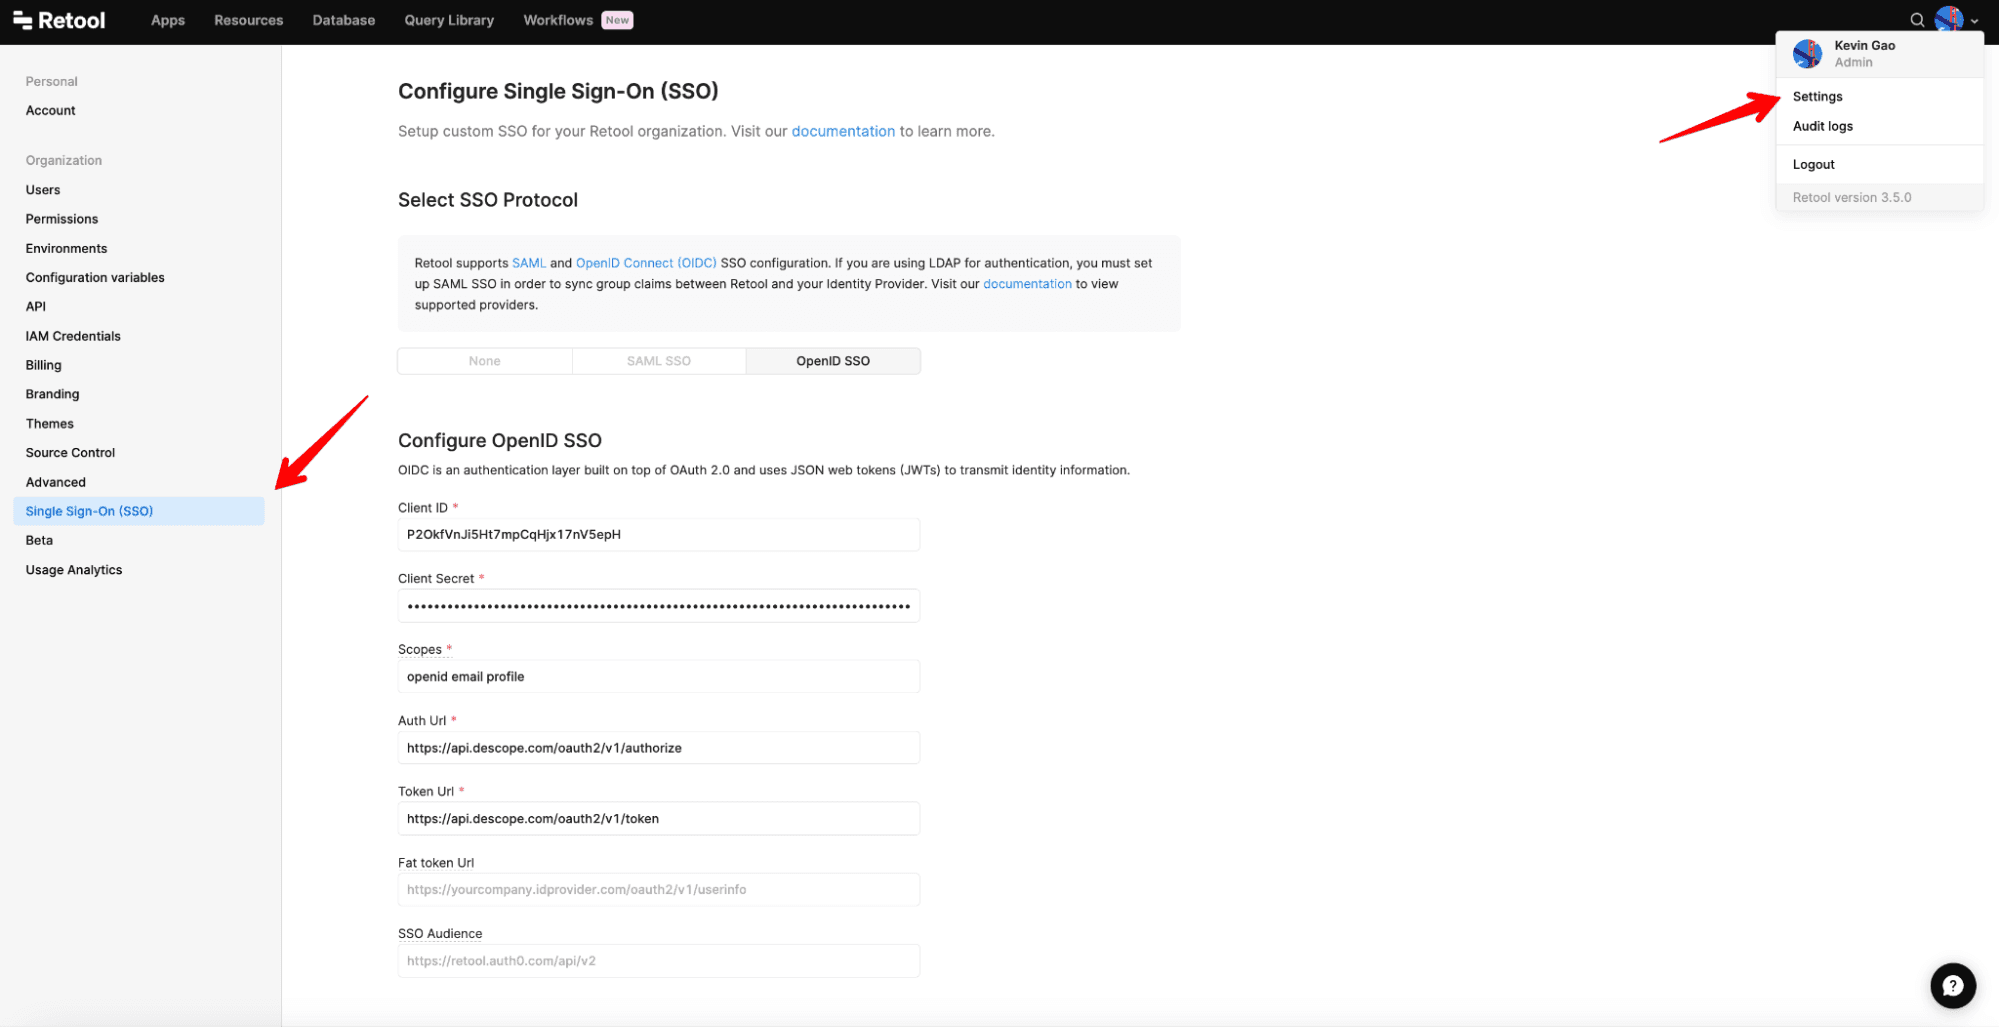
NOTE: Use OIDC instead of SAML, as OIDC will allow you to have more flexibility and access to custom claim information stored in the Descope JWT.
Step 4: Role mapping (Descope -> Retool)
We recommend mapping roles on Descope with your configured user roles in Retool in order to unleash the full potential of OIDC and RBAC authorization.
With the current Descope JWT configuration, you’ll need to map the roles as shown below:
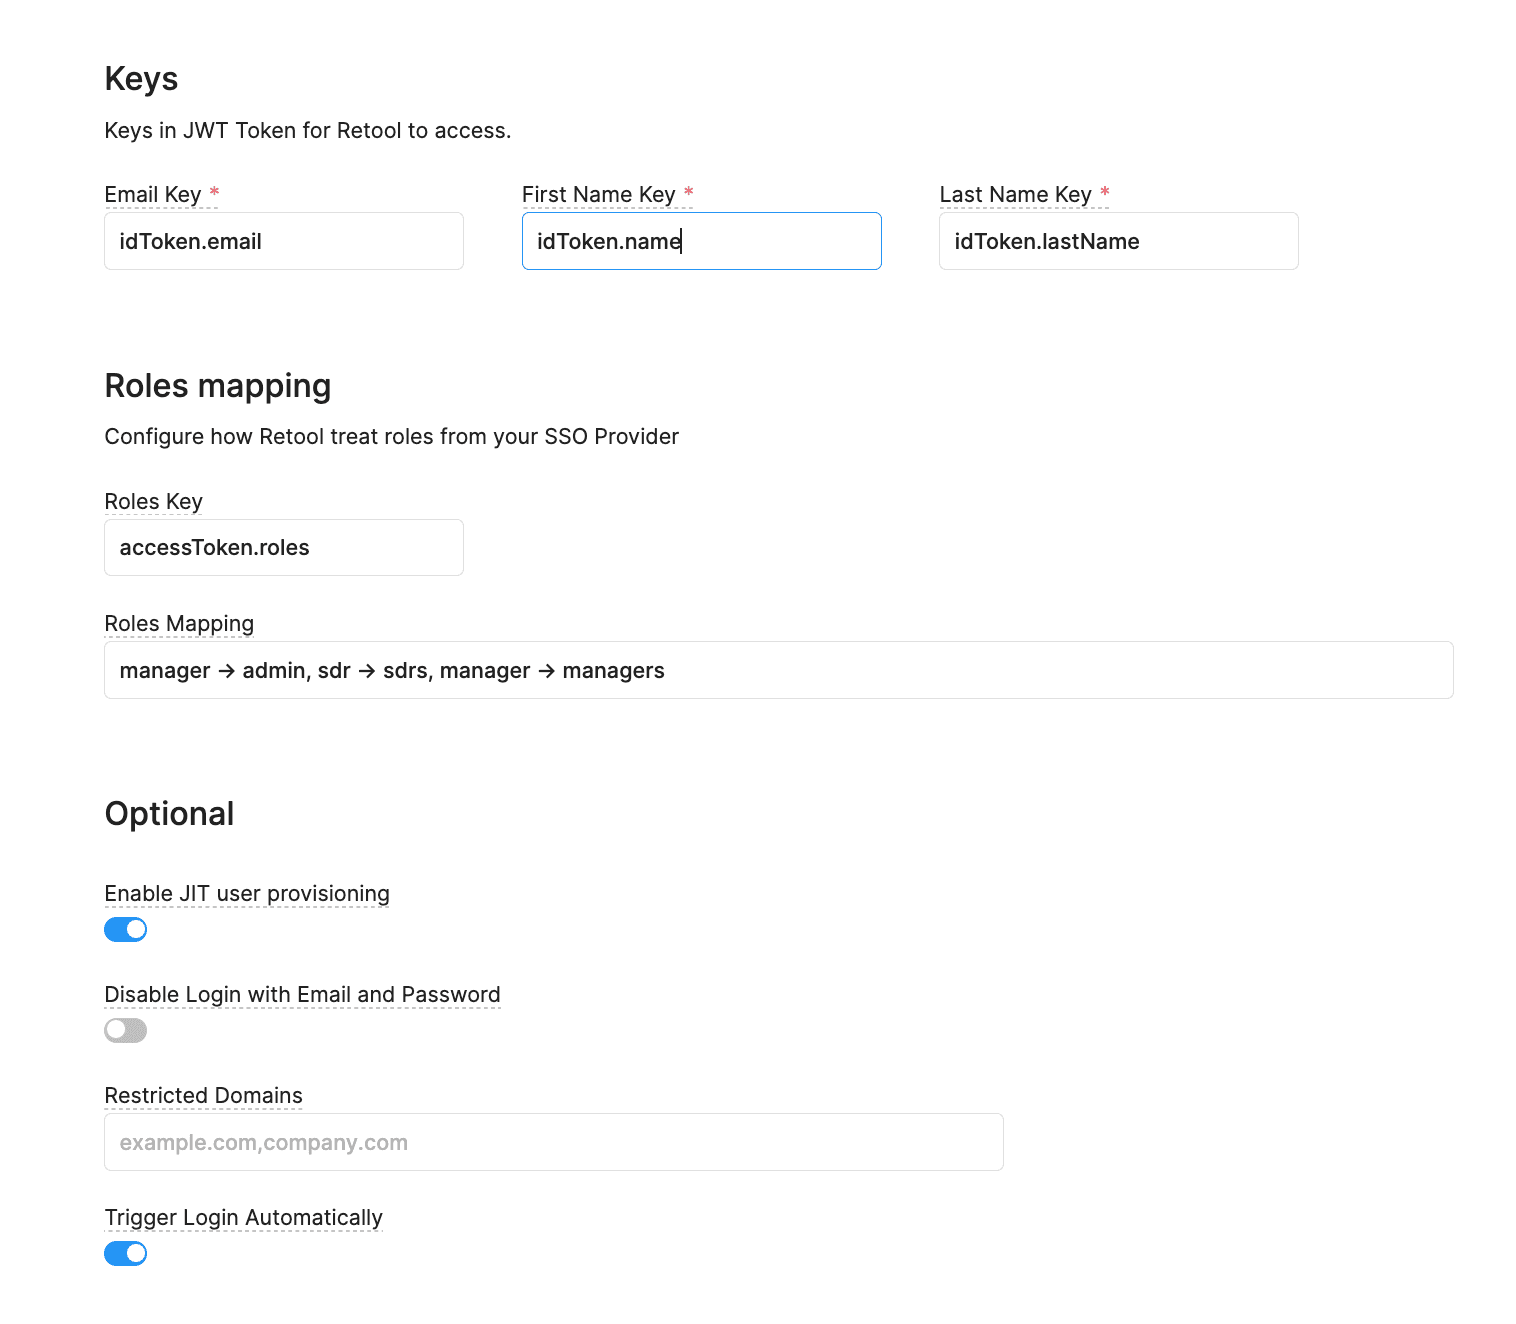
To correctly map the Email and Name, you’ll need to set the Keys as they are shown in the example above. To successfully map the roles, make sure that the Roles Key is properly set (as the accessToken contains the array of roles in Descope).
Email Key | First Name Key | Last Name |
idToken.email | idToken.name | idToken.lastName |
Under Roles Mapping, the first value will be what the role is named in Descope, and the value after the “->” is what the respective role is named in Retool.
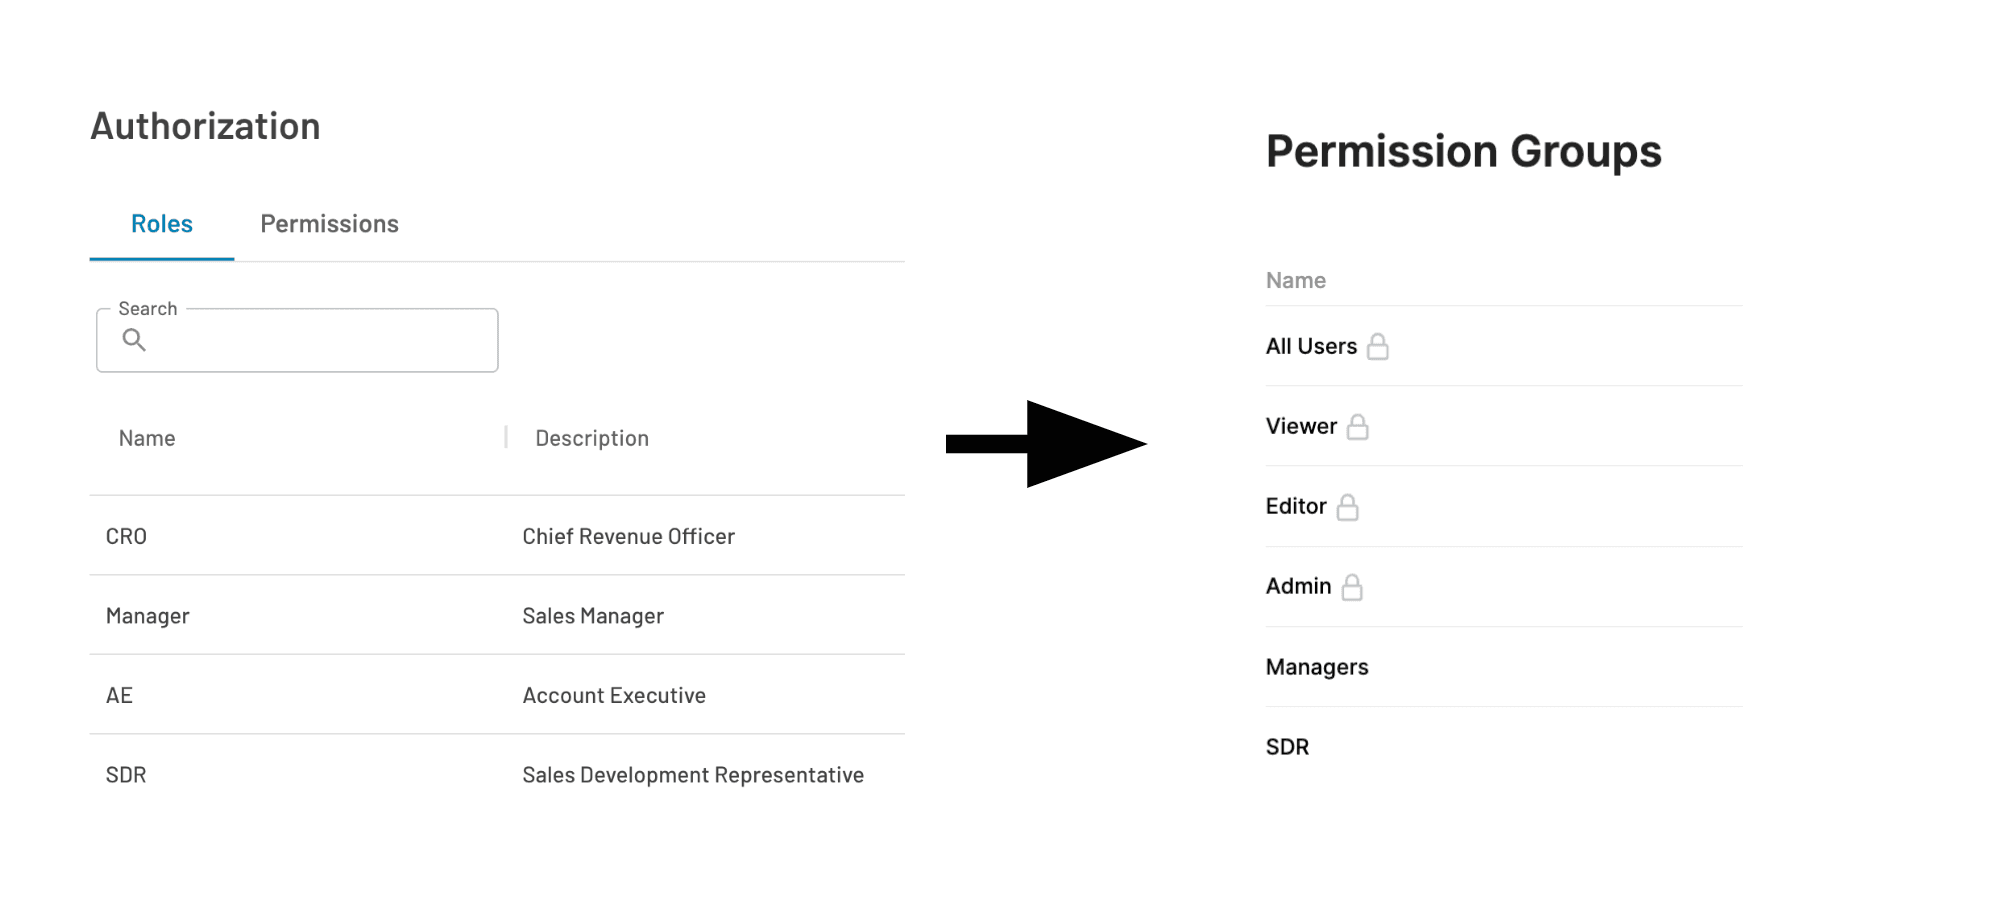
The rest of the optional items are recommended but not required, including JIT provisioning. Once you’ve filled out everything and clicked Save, you should be able to log in to Retool via SSO with a new button on the login page:
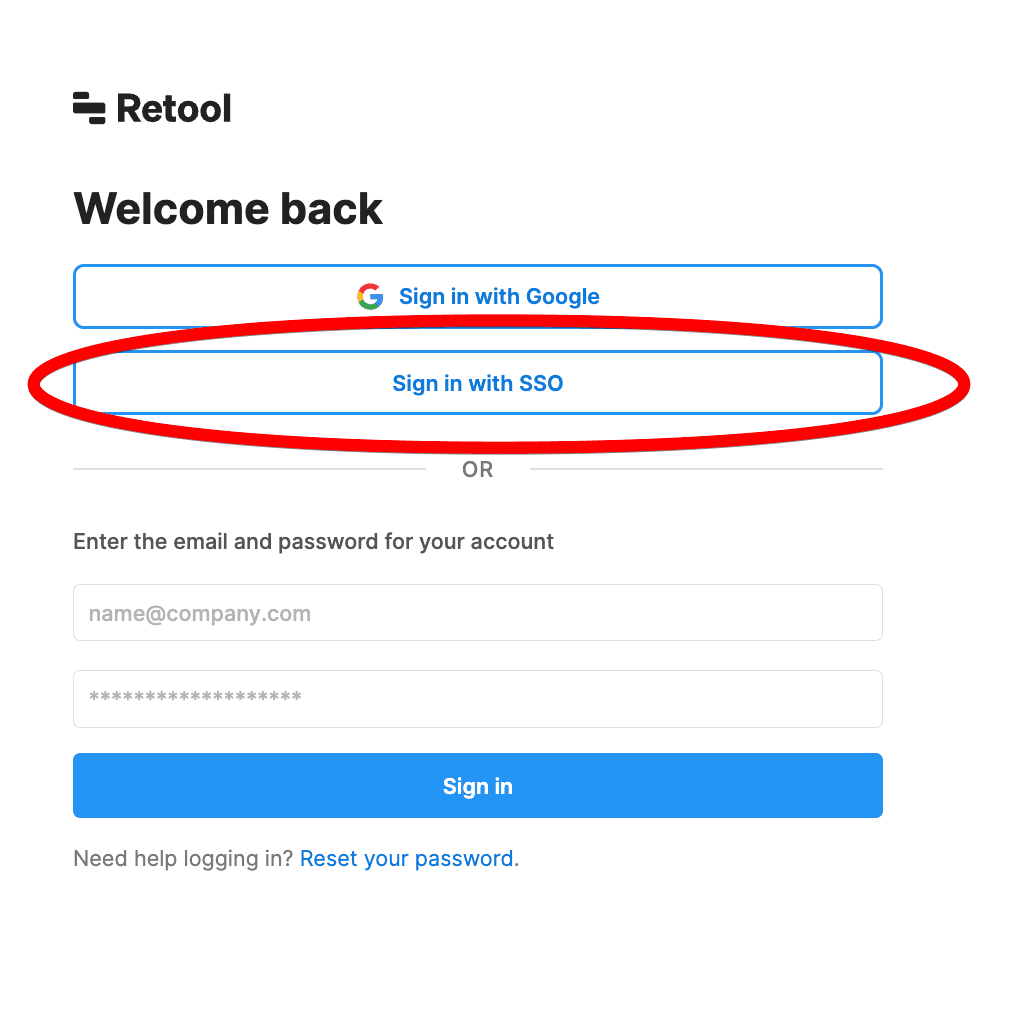
Congrats! You can now use Descope to authenticate users in your Retool applications. If you’re trying to access APIs protected by Descope, you can read about how to configure that in our Retool Guide.
Since we now have access to the claims in our Descope JWTs, we can utilize them to customize the user experience further.
How Descope can work in Retool apps
As a real life example, say you wish to display a navigation item in a menu bar in your app only if the app user has a specific role.
In this Applicant Tracking System app, if you want to show this based on the user role, you can edit this Hidden value shown in the picture below:
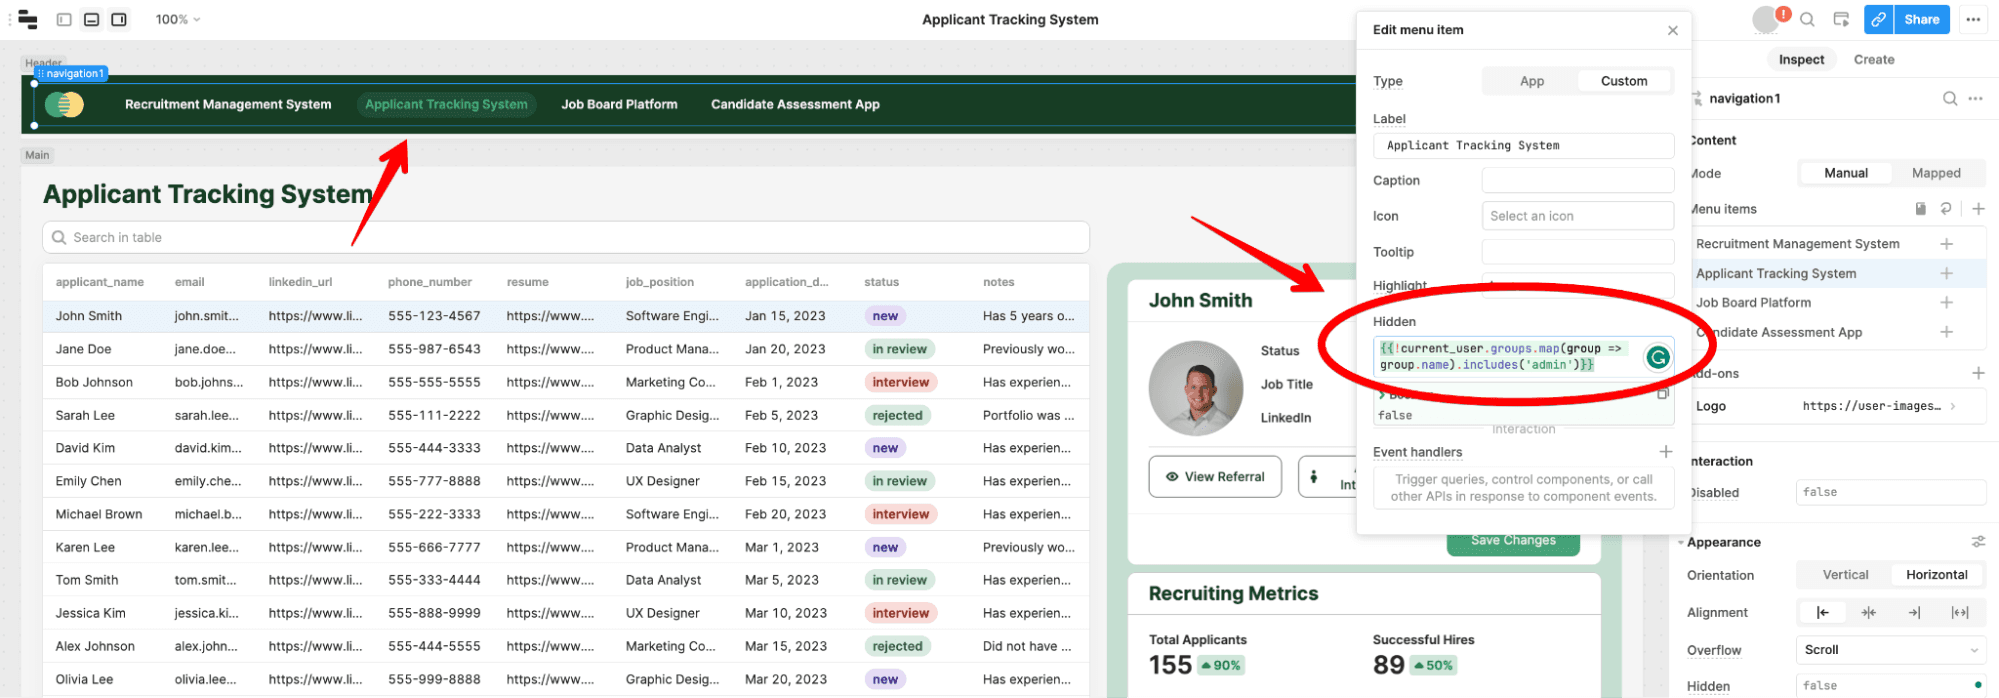
The statement below will remove references to the Applicant Tracking System if a user is not an Admin:
{{!current_user.groups.map(group => group.name).includes('admin')}}Say you want to take it a step further and actually display custom claim information in your application. You can access all of the metadata from the JWT (including custom claims) by using code snippets like the one shown below:
### Welcome Back 👋 {{current_user.metadata.idToken.name}}!
If you wish to access custom user attributes defined in Descope and display them in your application, Retool will let you do that.
Finally, you can use these custom and standard claims in the JWT to restrict access to sensitive data in your SQL queries. For example, you could restrict access to an employees table that contains a manager field, populated with the manager’s email address, by referencing current_user:
SELECT * FROM employees WHERE manager = {{current_user.metadata.idToken.<whatever your claim is called>}};This allows you to take a more granular approach to user permissions using OIDC, and also utilize information gathered through third party connectors to dictate how your app displays and uses information.
You can read more about how to reference these JWT claims in Retool’s docs. Our Retool Guide also offers a tutorial on how to access protected APIs in your application that already use Descope authentication middleware.
If you’re interested in learning about more potential scenarios where Descope can come in handy when integrated with Retool, read on!
More Descope + Retool use cases
Descope’s integration with Retool provides numerous benefits and practical applications that can enable teams to improve the UX and security of their internal apps while continuing to save on developer time. Let's explore some real-world scenarios:
Enhance user onboarding with progressive profiling
Using Descope Flows, you can build an authentication experience that gradually gathers more information about the user over multiple logins. By integrating third-party services such as a CRM, additional data about the user can also be fetched. This information can then be included in a custom claim in the JWT, providing Retool with the data it needs to offer a personalized user experience.
Display dynamic content with custom claims
Consider an internal tool built using Retool that is used by different departments of a company. By integrating Descope for authentication, you can include custom claims to detail the department information for each employee. This information can help display only relevant data to each employee, enhancing the user experience and also avoiding any accidental access mistakes.
Deliver a personalized support experience
If you're developing a support dashboard for a customer service team using Retool, you can use Descope to integrate with your ticketing system or customer database. Using custom claims to store specific information about each user in the JWT can help provide a personalized experience on your Retool application.
Conclusion
The integration of Descope with Retool not only provides secure and efficient access to protected APIs but also allows for a personalized user experience. This is achieved by including specific information in a custom claim within the Descope JWT that Retool can utilize.
Additionally, the application experience can be greatly enhanced by leveraging features such as progressive profiling, Descope Flows, and third-party connectors. With Descope and Retool, you're truly equipped to revolutionize the app experience, one interaction at a time.
If you’ve read through this tutorial and are curious to start your Descope journey, sign up for a Free Forever account. Have questions? We’d be happy to answer them on AuthTown, our open user community.


