
Table of Contents
Salesforce Commerce Cloud powers exceptional online shopping experiences. Despite commanding a lean portion of the market, Salesforce Commerce is a top-10 ecommerce contender with a growing and thriving customer base. Notable brands using Salesforce for ecommerce include Sonos, Vince, and Samsonite.
Although Salesforce Commerce Cloud boasts omnichannel support and countless storefront configurations, the platform can limit your ability to offer more modern authentication options. These include passwordless login methods (like magic links, social login, and passkeys), A/B testing, and progressive profiling.
By integrating these newer authentication features with Descope as an OIDC (OpenID Connect) provider, you can boost conversions without compromising the advantages afforded by the Salesforce platform. Additionally, you’ll gain the ability to manage authentication with drag & drop simplicity, changing complex auth flows without constantly revising your code.
Why Descope for Salesforce Commerce Cloud
Salesforce Commerce Cloud is a robust and reliable solution for ecommerce businesses of any size. Augmenting its authentication capabilities with Descope provides additional features that improve customer experience without compromising security.
Significant improvements to basic authentication include:
Passwordless login: Benefit from the enhanced security and low friction of passkeys, or usher customers through your digital turnstile faster with social login.
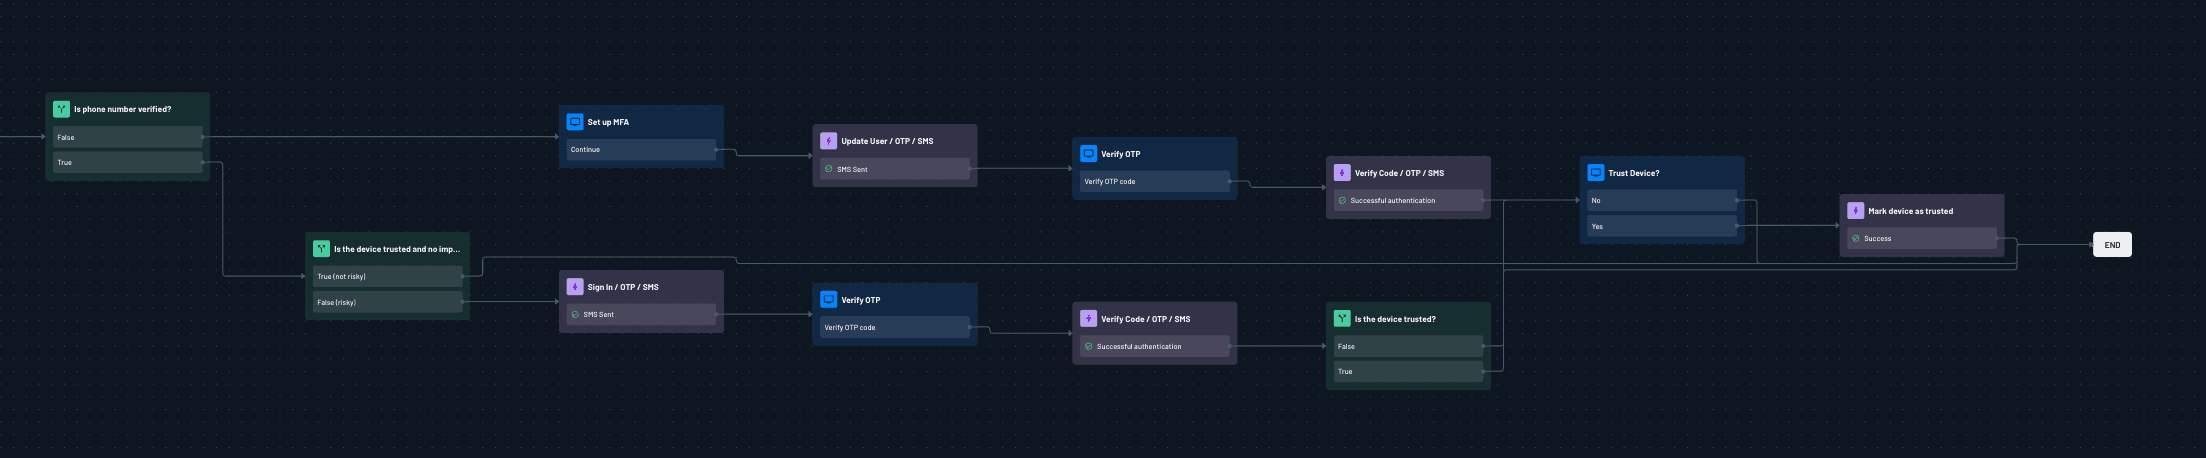
Adaptive MFA: Choose between standard MFA or a risk-based approach that triggers additional security only if necessary.
SAML/OIDC SSO: Replace Salesforce Commerce Cloud’s multichannel login with SAML or OIDC-powered single sign-on (SSO), offering more cohesive identity management.
Improved developer experience: Descope Flows turn complex authentication coding challenges into drag & drop workflows with prebuilt templates and countless options.
Identity orchestration: Dive into the Descope connector ecosystem and integrate your other systems to enrich user profiles, provide visibility, and unify disparate data.
Using Descope for authentication will subtly redirect customers to a more flexible, modern flow that you control from end to end. Unlike Salesforce Commerce Cloud authentication, you’ll be able to customize every aspect of your user authentication journey, gathering crucial data and tailoring the experience to maximize conversions.
Setting up Descope as an OIDC provider
To use Descope to manage the authentication and authorization for your Salesforce Commerce Storefront, you will set up Descope as an OpenID Connect (OIDC) provider within Salesforce.
By integrating Descope as an OIDC provider, Salesforce will trust Descope to verify user identities and issue JSON Web Tokens (JWTs) containing user claims. These tokens are then used to authenticate users within Salesforce and provide them with appropriate access.
In the following sections, we will walk through the setup process.
Create a new OIDC application in the Descope Console
Navigate to the Federated Apps tab of your Descope Console, and select + App. Select “Salesforce Commerce Cloud”, and click Create.
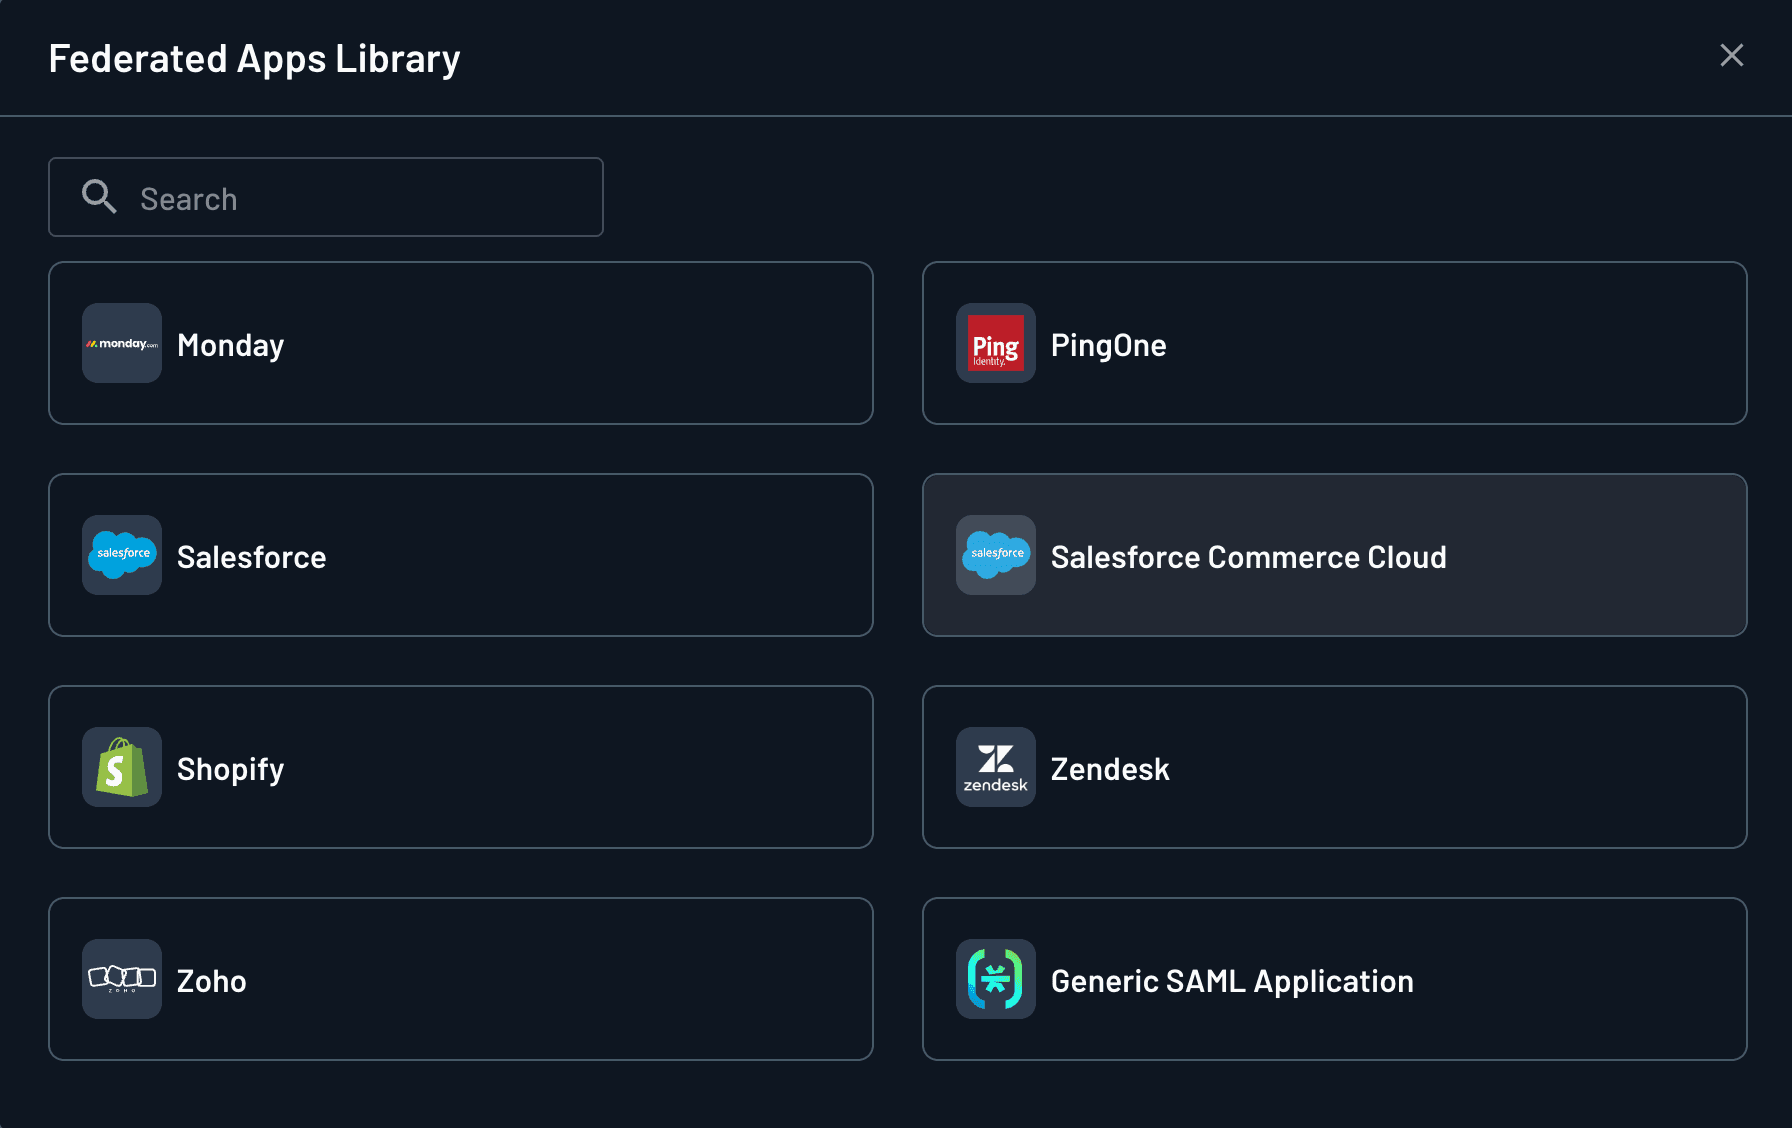
You will use the values from your new Salesforce Commerce Cloud OIDC app in the next step.
Creating a new auth provider in Salesforce
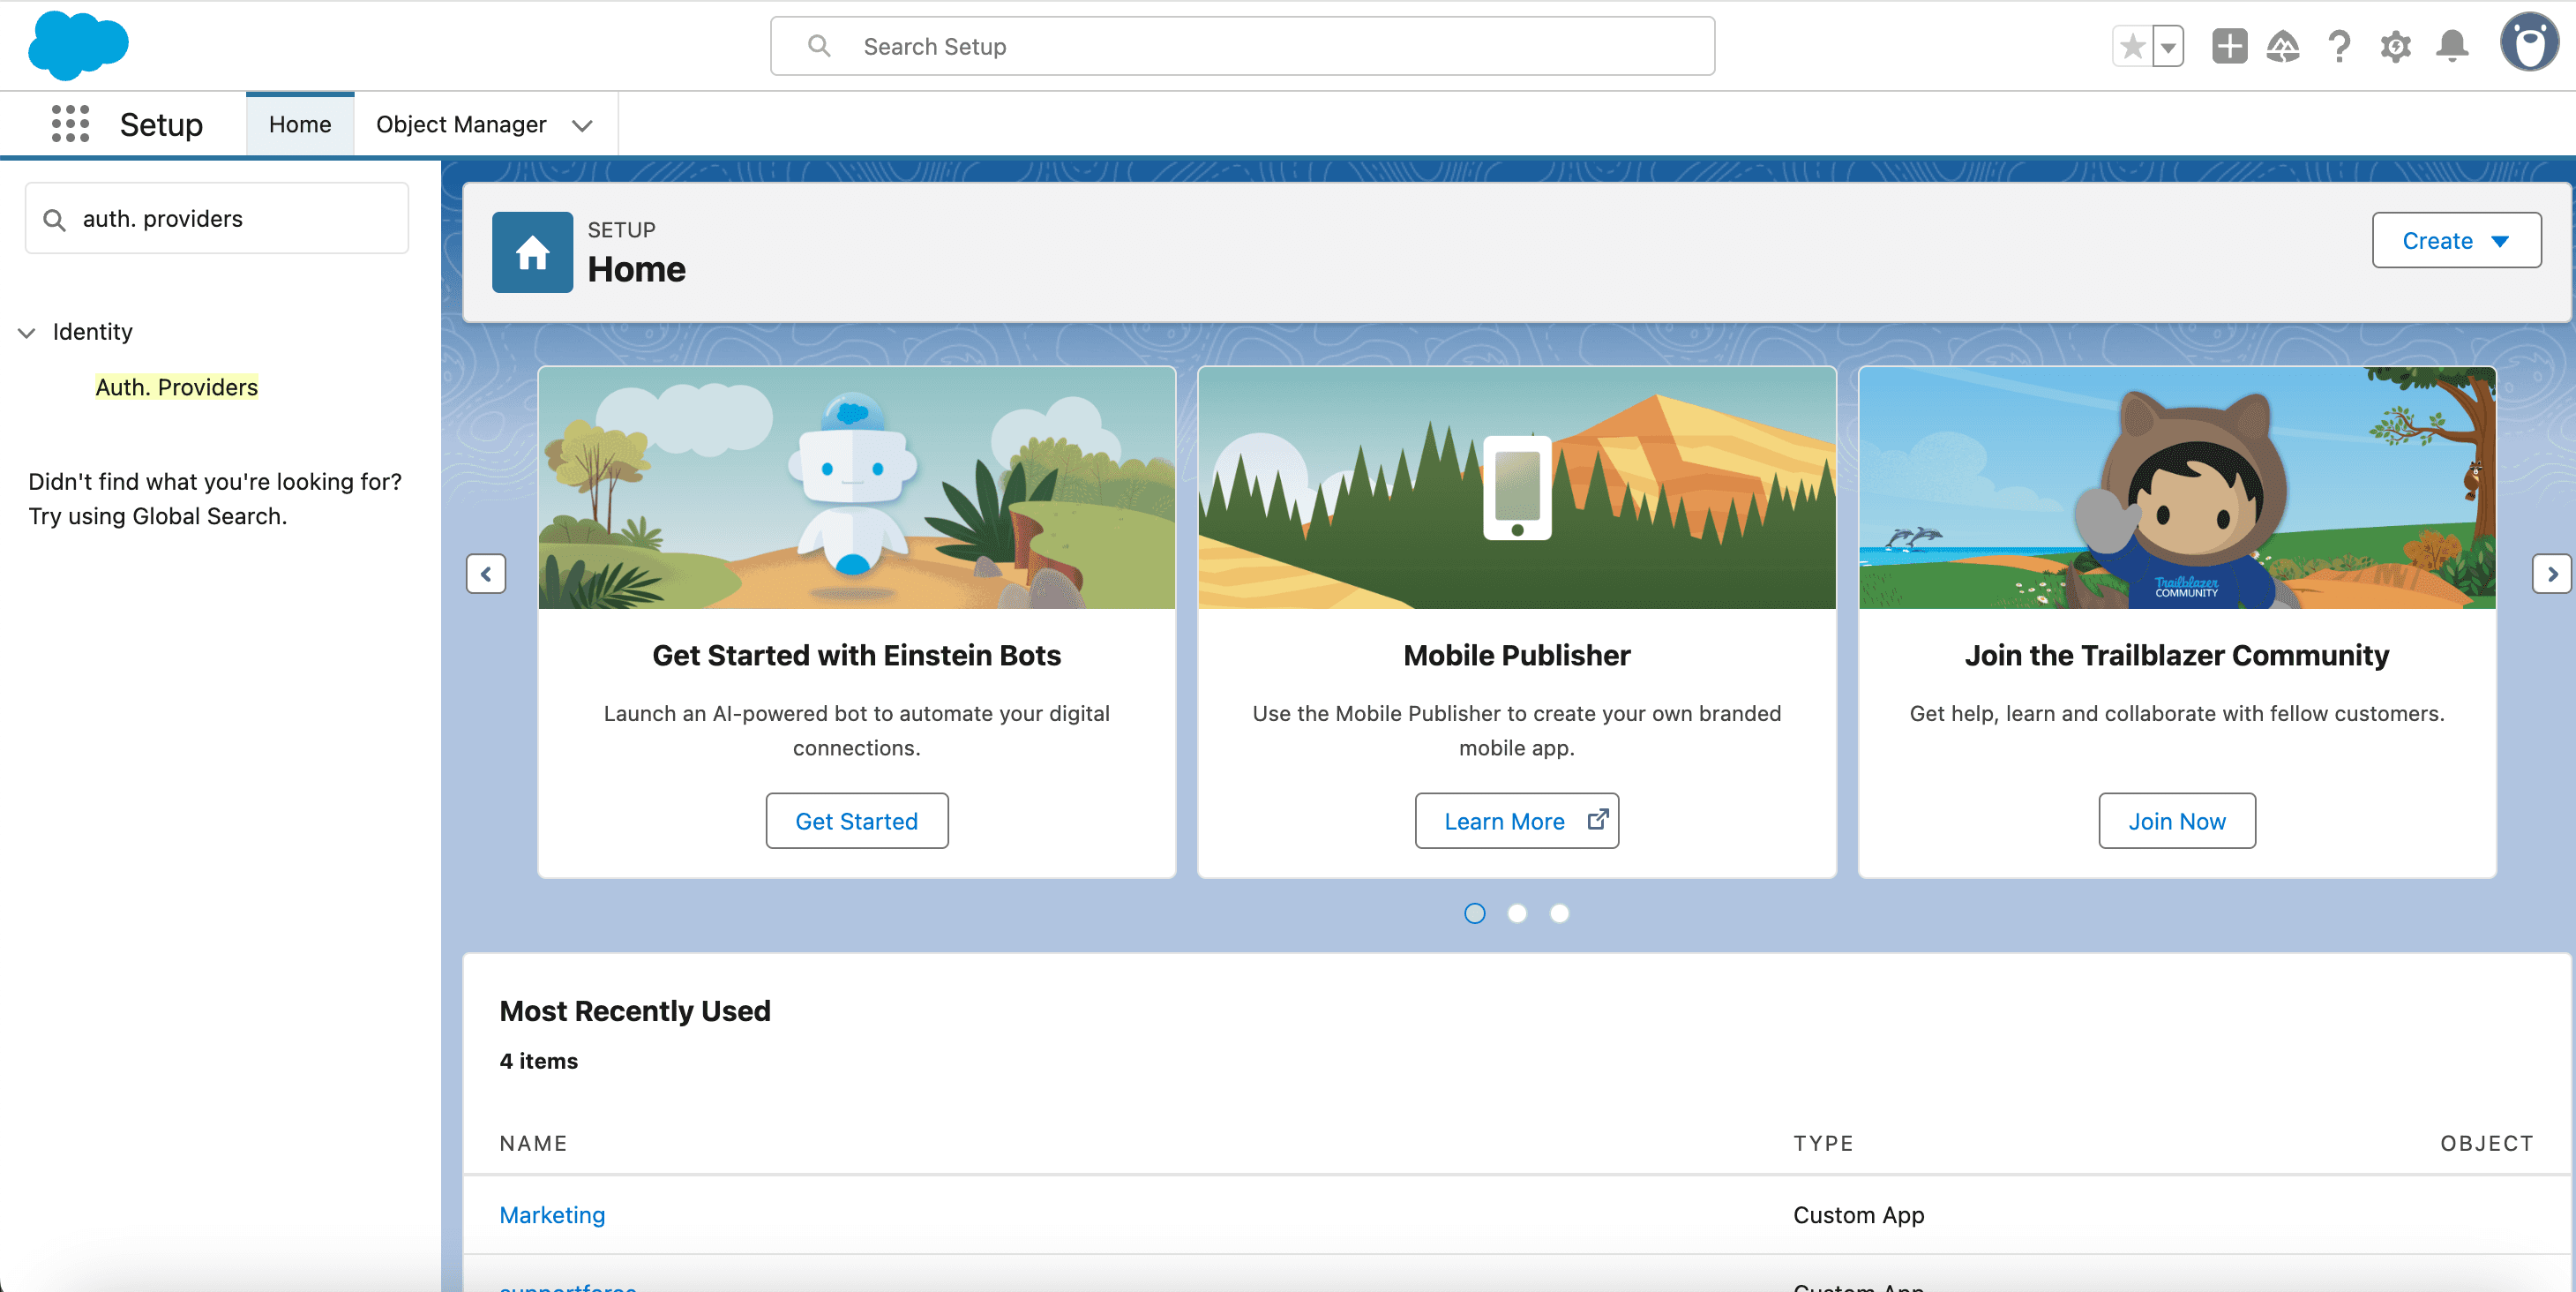
Search for Auth Providers under Setup in your Salesforce Developer Console. Then, select New and create a new Auth Provider.
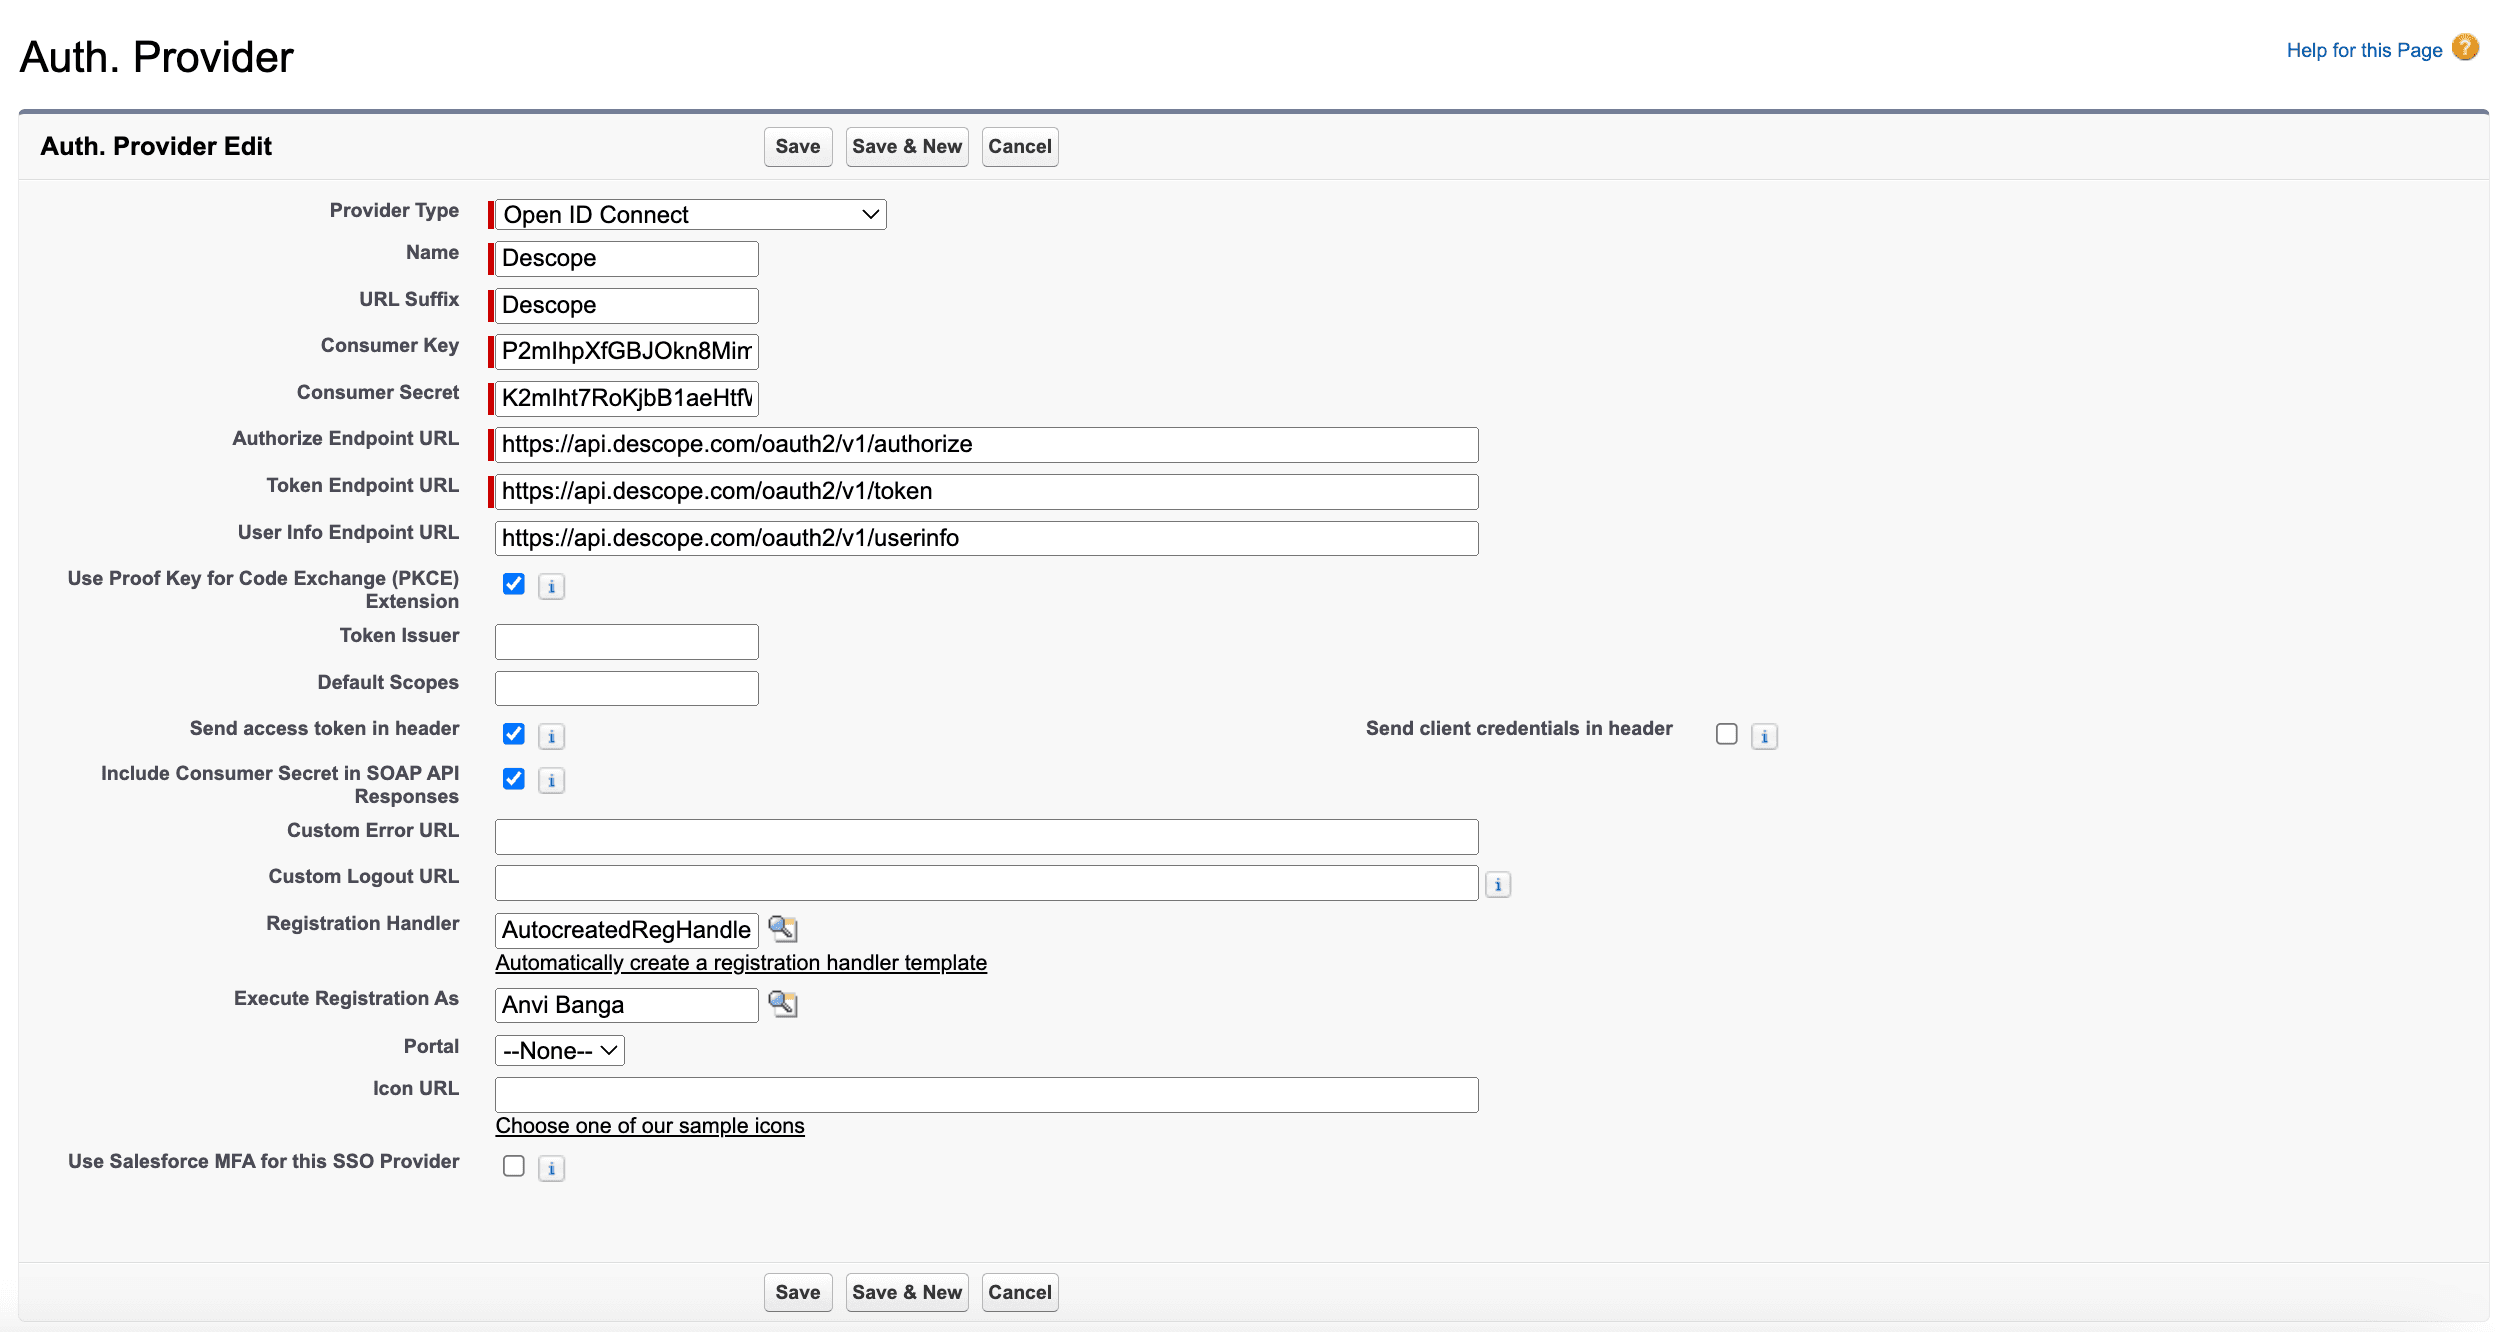
Select OpenID Connect as the provider type, and enter the following configuration values found in the Descope console from your new Salesforce Commerce Cloud OIDC app :
Name: Descope
Consumer Key: This is your Descope Project ID, found under Project Settings in the Descope Console.
Consumer Secret: This is a Descope Access Key, which you can create under M2M Access Keys in the Descope Console.
Authorize Endpoint URL: This is the “Authorization URL” on your OIDC app’s configuration page.
Token Endpoint URL: This is the “Token URL” on your OIDC app’s configuration page.
User Info Endpoint URL: https://api.descope.com/oauth2/v1/userinfo
Custom Logout URL: This is the “Logout URL” on your OIDC app’s configuration page.
Next up:
Select Automatically create a registration handler template (we’ll modify this later).
Select a user to Execute Registration As. Make sure to select a user that is a System Administrator, or someone who has the proper permissions to run Apex classes, as well as create and update user records.
Click Save.
Modifying the registration handler
Now, we must modify the auto-created Registration Handler to help Salesforce determine what to do when a user logs in with their external Descope identity.
To fully grasp this concept, it's essential to understand the key functions of a Registration Handler in Salesforce:
User creation: When a user logs in through Descope but does not have an existing Salesforce account, the registration handler generates a new Salesforce user record using details from Descope, such as their email and name.
User lookup: If the user already has a corresponding Salesforce account, the registration handler locates and retrieves that user.
User update: This optional function allows Salesforce user records to be updated with new information from Descope upon login. For example, if a user’s title changes in Descope and is properly mapped, it can be reflected in Salesforce during the SSO process.
For more details on the registration handler interface, refer to this Salesforce documentation page.
Let’s walk through modifying the registration handler (also known as an Apex Class) to efficiently create and locate users based on their email while incorporating any new data received from Descope.
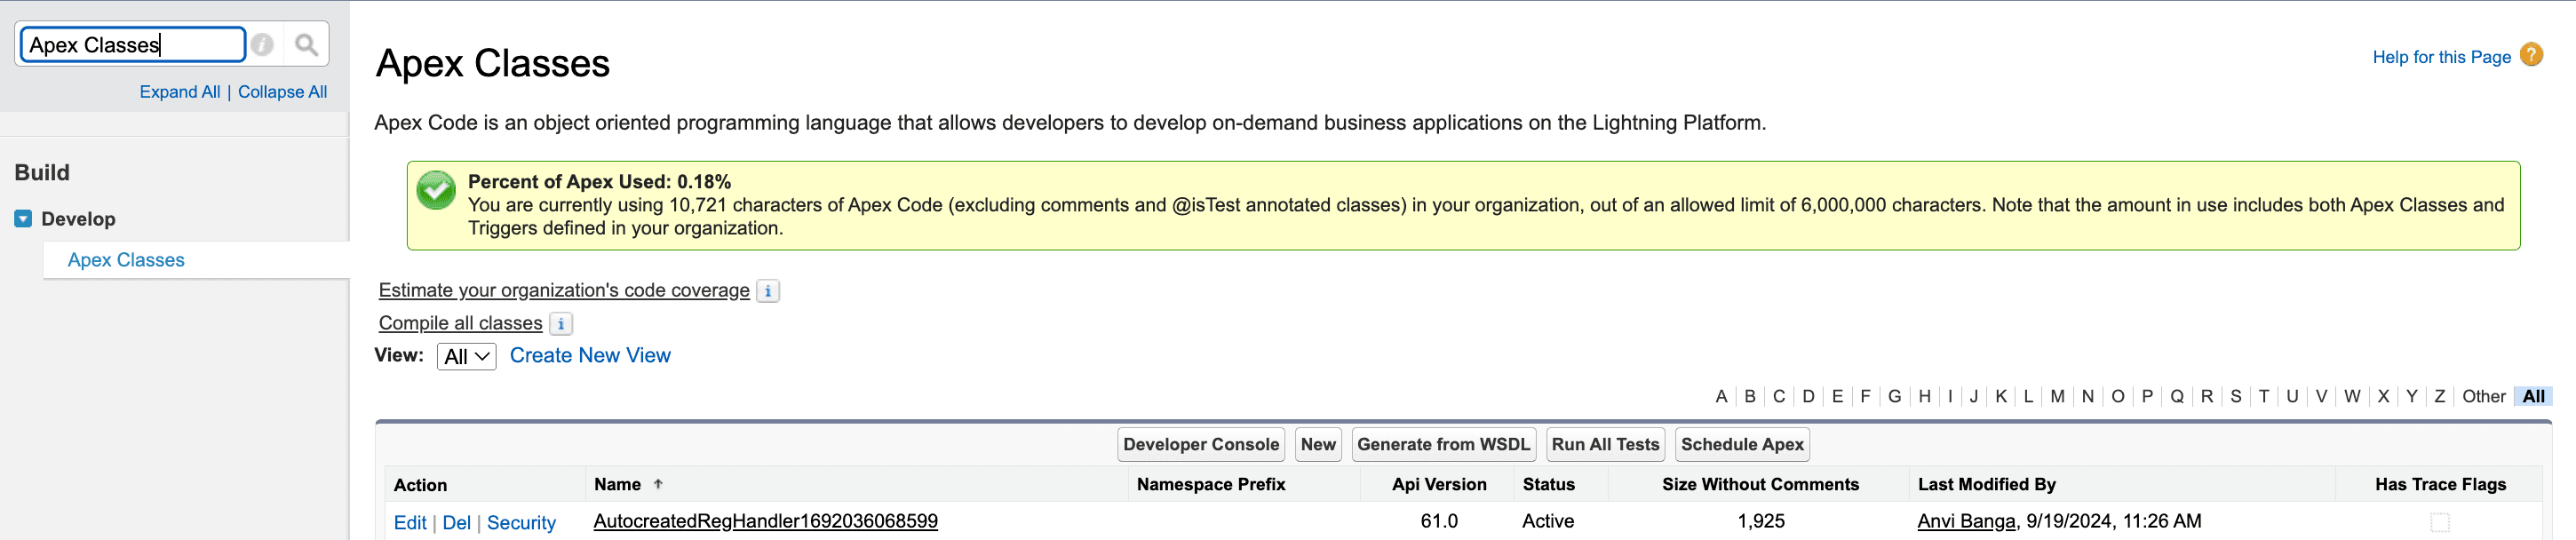
Search for Apex Classes under Setup in your Salesforce Org and select Edit next to the registration handler you just auto-created.
Copy the following snippet into the code editor and click Save.
global class AutocreatedRegHandler1692036068599 implements Auth.RegistrationHandler{
    global User createUser(Id portalId, Auth.UserData data){
        User u;

        // Try to find an existing user first
        List<User> existingUsers = [SELECT ID FROM User WHERE FederationIdentifier =: data.email];

        if (existingUsers.size() > 0) {
            u = existingUsers[0];
        } else {
            // If no user exists, create a new one
            u = new User();

            String[] names = data.attributeMap.containsKey('name') ? data.attributeMap.get('name').split(' ', 2) : new String[]{'DefaultFirst', 'DefaultLast'};
            String firstName = names.size() > 0 ? names[0] : 'DefaultFirst';
            String lastName = names.size() > 1 ? names[1] : 'DefaultLast';

            u.Username = 'DefaultUser' + '@example.com'; // Fill in your own username logic
            u.Email = data.attributeMap.containsKey('email') ? data.attributeMap.get('email') : 'default@email.com';

     u.FirstName = firstName;
            u.LastName = lastName;
            u.FederationIdentifier = data.email;
            u.Alias = (firstName + lastName).length() > 8 ? (firstName + lastName).substring(0, 8) : (firstName + lastName); // Alias logic
            u.ProfileId = '00eHu000002sq8b'; // Insert your own Profile ID
            u.TimeZoneSidKey = 'GMT';
            u.LocaleSidKey = 'en_US';
            u.EmailEncodingKey = 'UTF-8';
            u.LanguageLocaleKey = 'en_US';

            // If working with Communities or Portals, you might also need to set additional fields like AccountId, ContactId, etc.

            insert u;
        }

        return u;
    }

    global void updateUser(Id userId, Id portalId, Auth.UserData data){
        User u = [SELECT Id, Email, FirstName, LastName FROM User WHERE Id =: userId LIMIT 1];
	  // Update the user's information based on the incoming data
  if(data.attributeMap.containsKey('name')) {
            String[] names = data.attributeMap.get('name').split(' ', 2);
            u.FirstName = names.size() > 0 ? names[0] : u.FirstName;
            u.LastName = names.size() > 1 ? names[1] : u.LastName;
         }

         u.Email = data.attributeMap.containsKey('email') ? data.attributeMap.get('email') : u.Email;

        // Update other fields as necessary

        update u;
    }
}
Now your registration handler will be able to create and update users with the attributes listed in the code above.
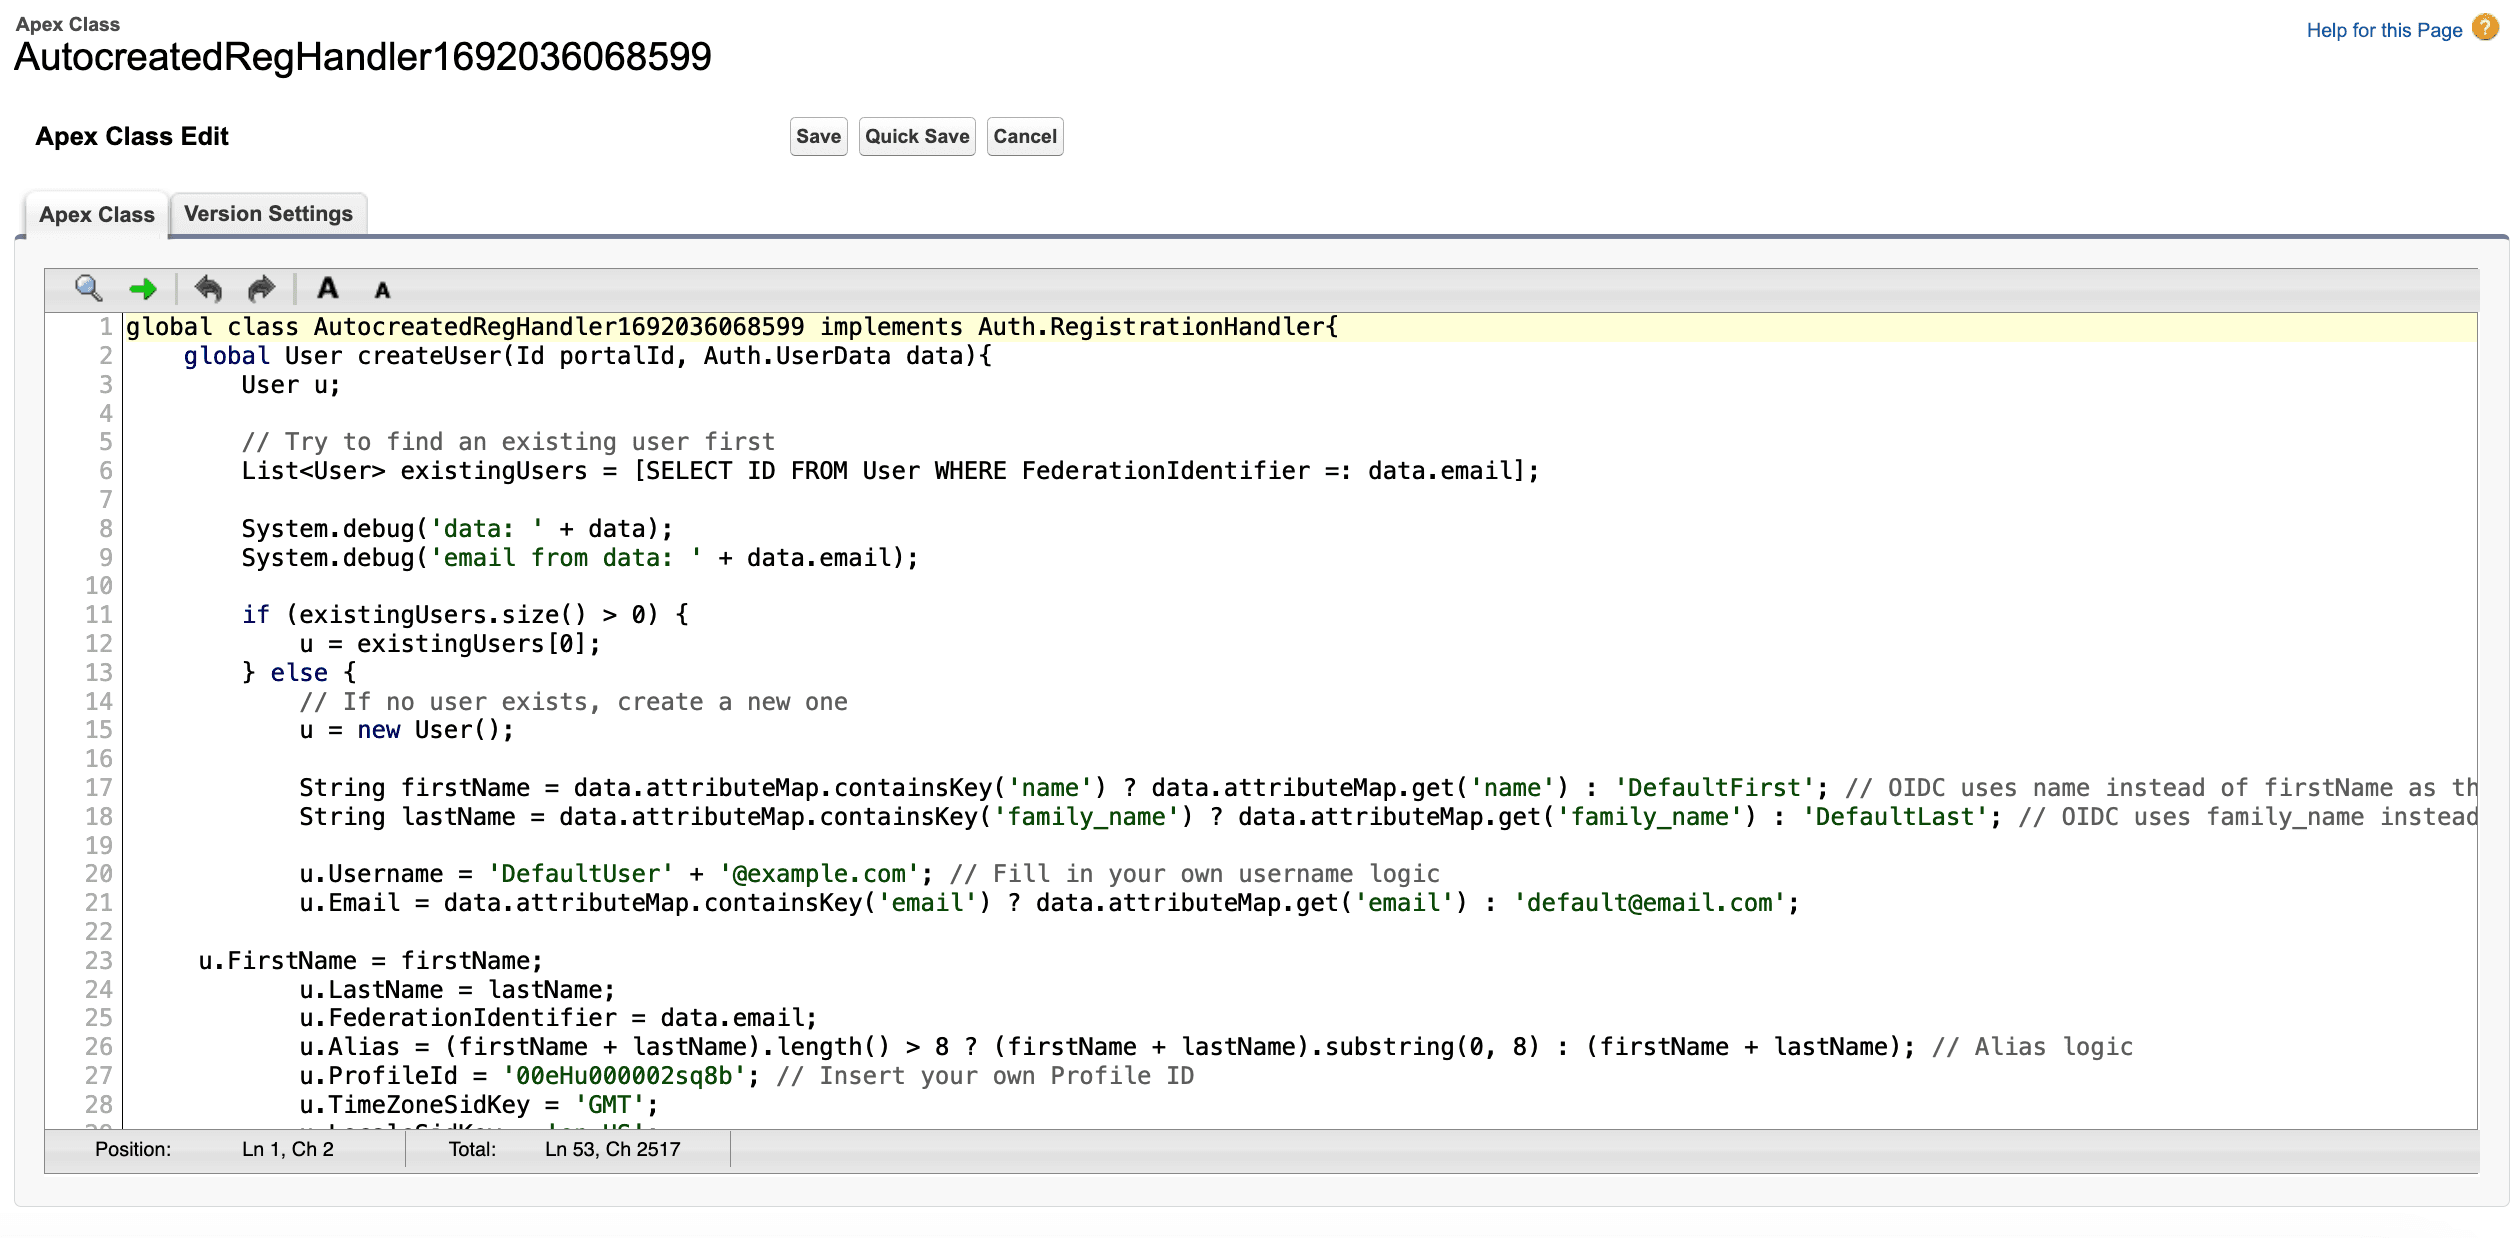
Refer to the comments in the code snippet above to see all the options that you can modify to match your specific implementation.
Mapping user attributes with OIDC
Custom attributes provide added flexibility for tailoring user data to fit specific business needs beyond the default fields in Salesforce or Descope. These attributes allow for a more personalized user experience. With the OIDC integration, Descope issues a JSON Web Token (JWT) containing user details, including both predefined and custom attributes.
To integrate these attributes within your Apex class, modify it to leverage the AttributeMap function from the UserData class. Just make sure you first create the user attribute within Salesforce, so the mapping is valid.
u.<your Salesforce attribute key> =
data.attributeMap.containsKey('<Descope custom claim key>') ? data.attributeMap.get('<Descope custom claim key>') : 'defaultValue';
Adding a Descope Flow to Salesforce Commerce Cloud
Now that you’ve finished setting up Descope as an Authentication Provider, you can add a Descope Flow to your Salesforce Commerce Storefront.
Integrating a Descope auth flow into your Salesforce Commerce Storefront enables seamless access to all Descope-supported authentication methods, including passwordless login, social logins, multi-factor authentication (MFA), single sign-on (SSO), and passkeys, ensuring a secure and frictionless user experience.
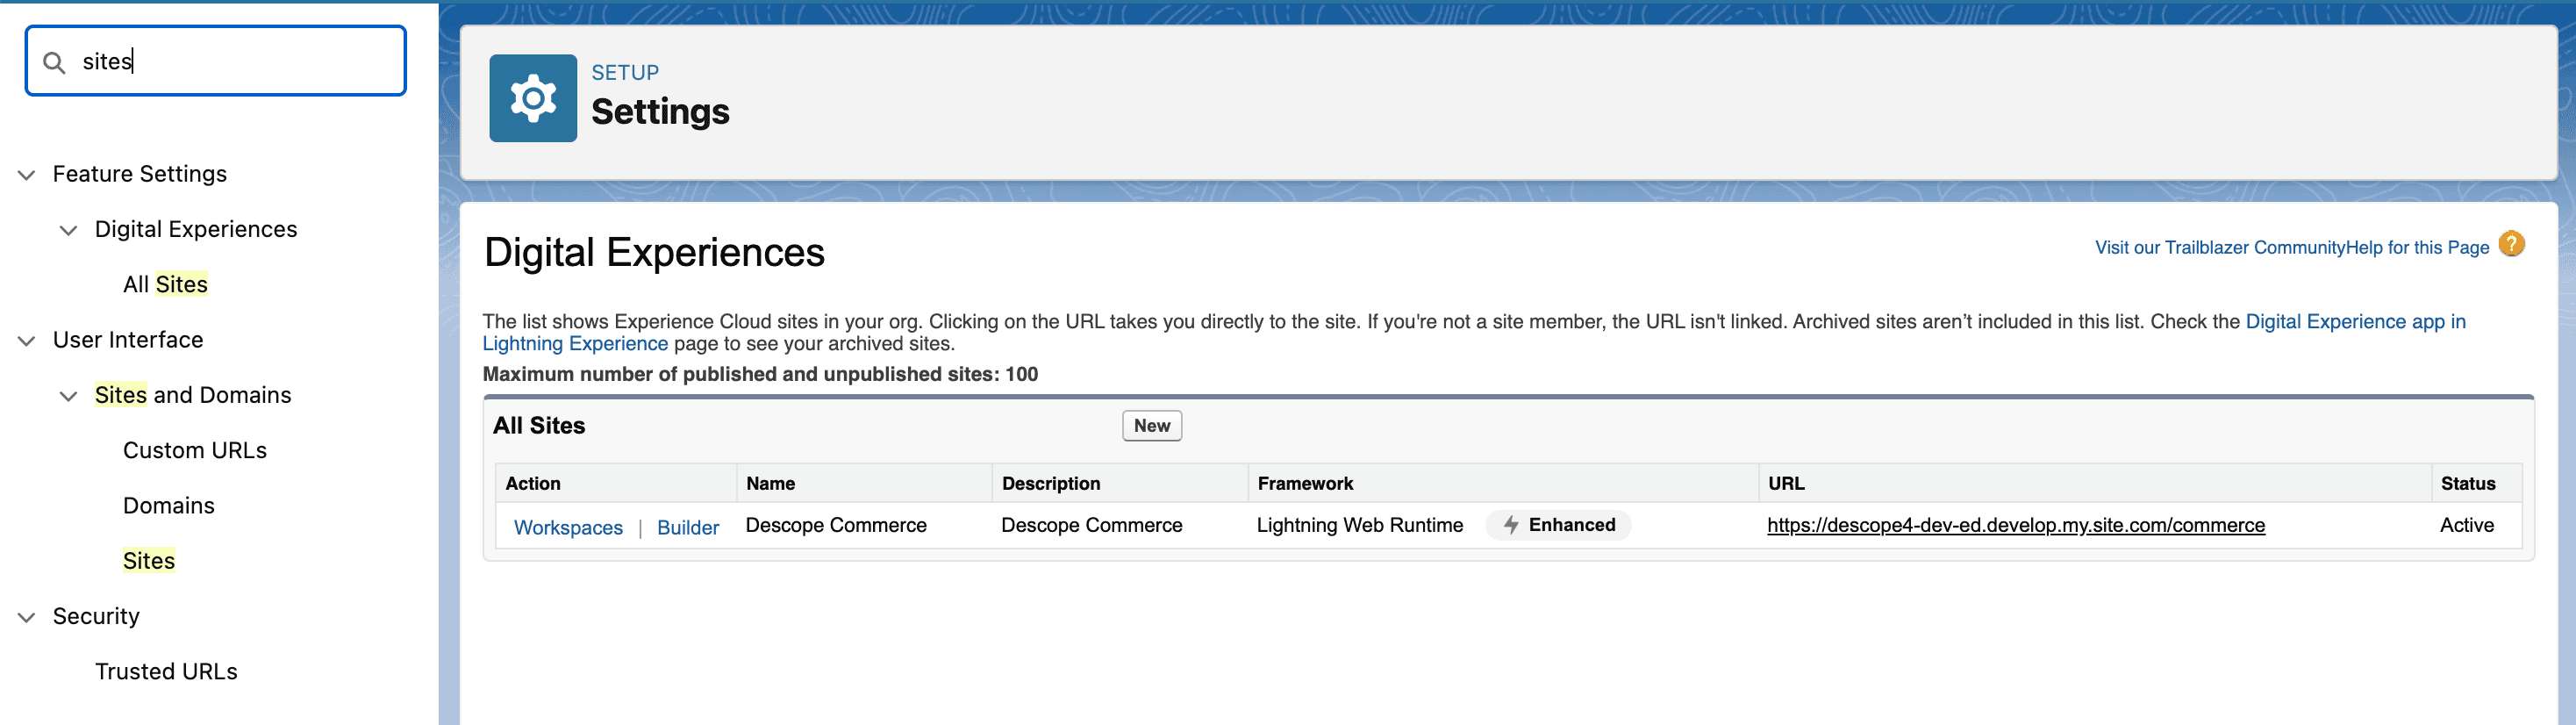
To add a Descope flow to your login page, first open up the Workspace for the site you are editing. Search for Sites under Setup within your Salesforce Developer Console, and select Customize > Digital Experiences > All Sites. Then, select Workspaces next to the site you want to add Descope Authentication to.
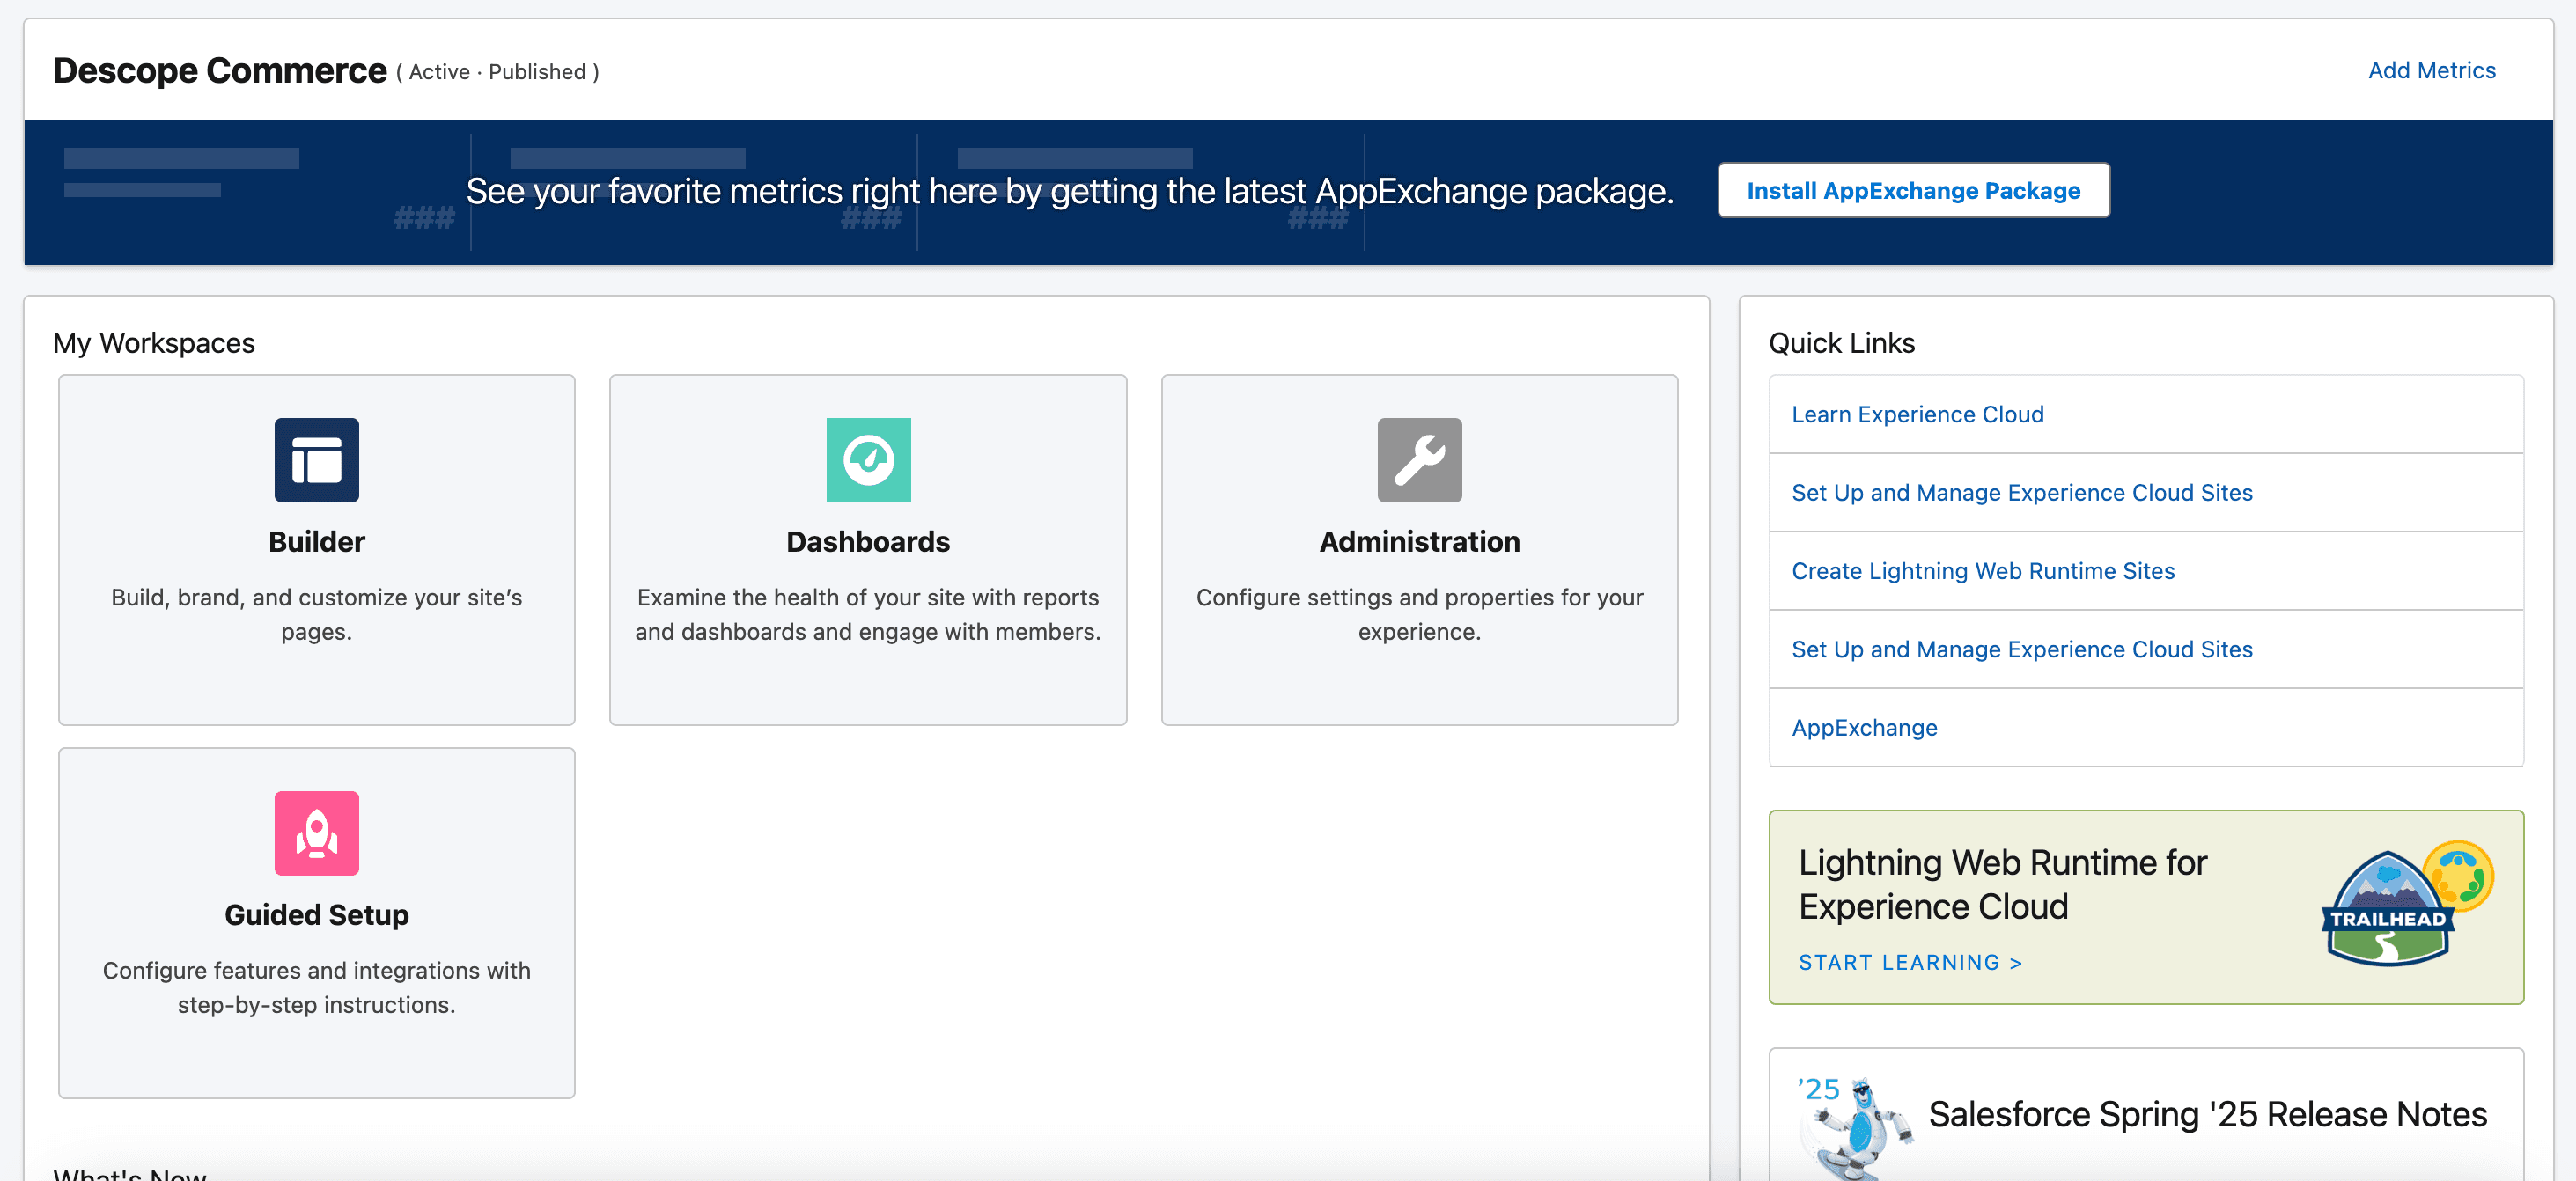
Choose Administration.
Now, select Login & Registration, and choose Descope (or whatever you named the Descope Auth. Provider you set up earlier) to display on the login page.
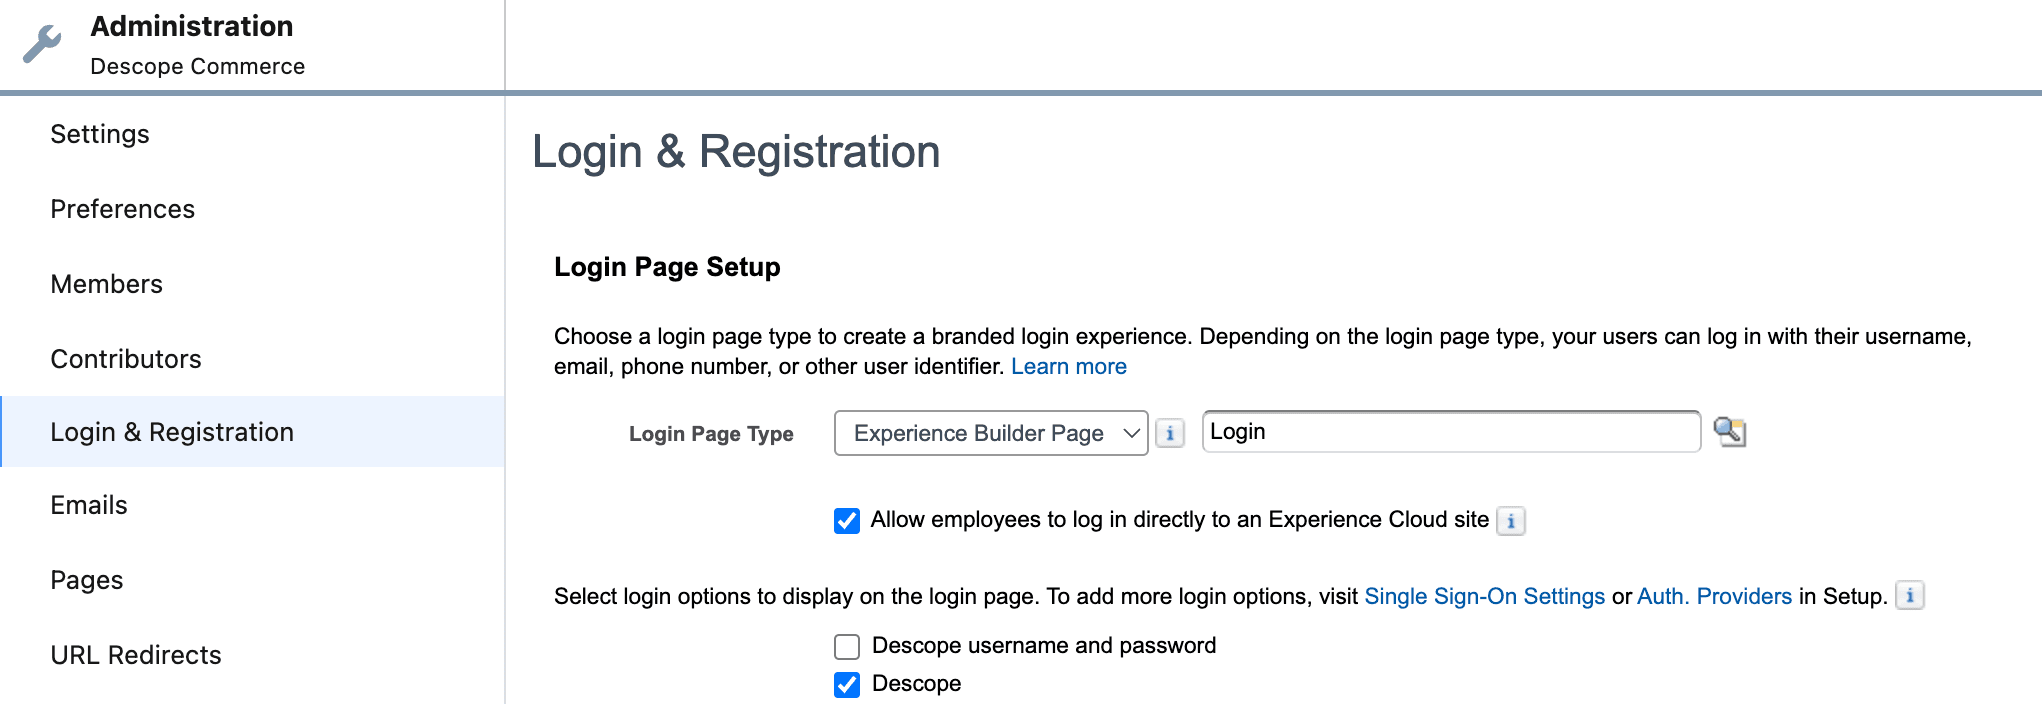
Now, after hitting Save, a button will appear on the login page of the website. To customize the text of the button, you can edit the name in the Auth. Provider set up.
When users click on the button, they will be redirected via OIDC to the hosted Descope authentication flow. Here’s how the process works:

User authentication
The user is directed to the Descope authentication flow, where they log in using your chosen authentication method. You can use connectors like our Salesforce Connector within your authentication flow to gather additional information about the user. Upon successful authentication, Descope generates a JWT containing user identity claims (e.g., email, name, roles).
Redirect back to Salesforce
After authentication, Descope redirects the user back to Salesforce Commerce Storefront, including the OIDC authorization code in the URL. Salesforce and Descope exchange tokens to validate the integrity of the JWT.
User session creation
Salesforce extracts user attributes from the JWT (such as email, name, and custom attributes). If the user exists in Salesforce, their session is created, granting them access. This allows existing users to seamlessly migrate to a passwordless login method. If the user is new, the Registration Handler (Apex Class) may create a new Salesforce user record before completing authentication.
User access and authorization
Once authenticated, the user is redirected to the storefront, now logged in with an active session.
Customizing the authentication flow
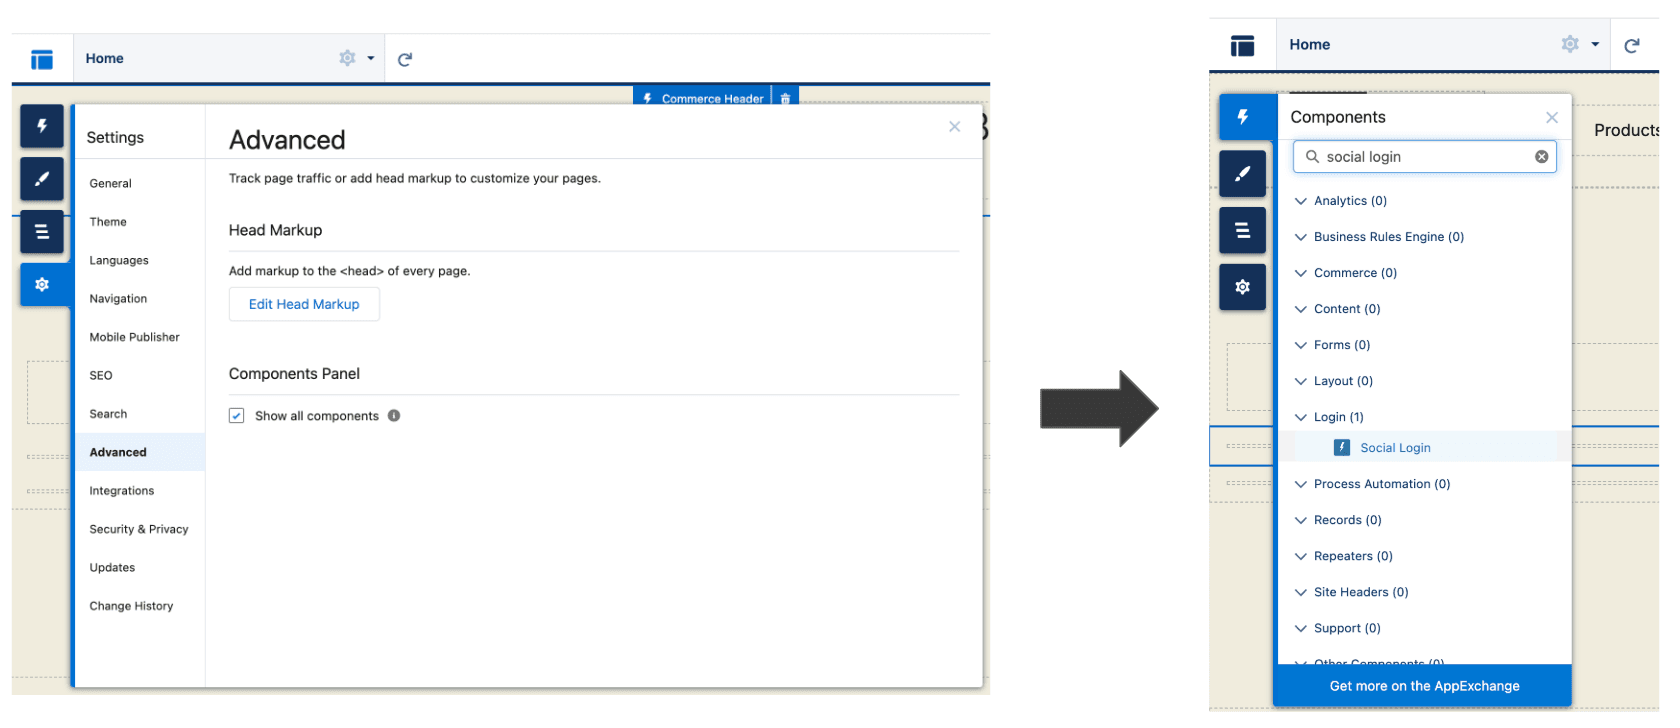
The Descope Authentication button will automatically display in the site’s defined styling, and headers, spacing, and visibility can be further customized using the Salesforce builder tool.
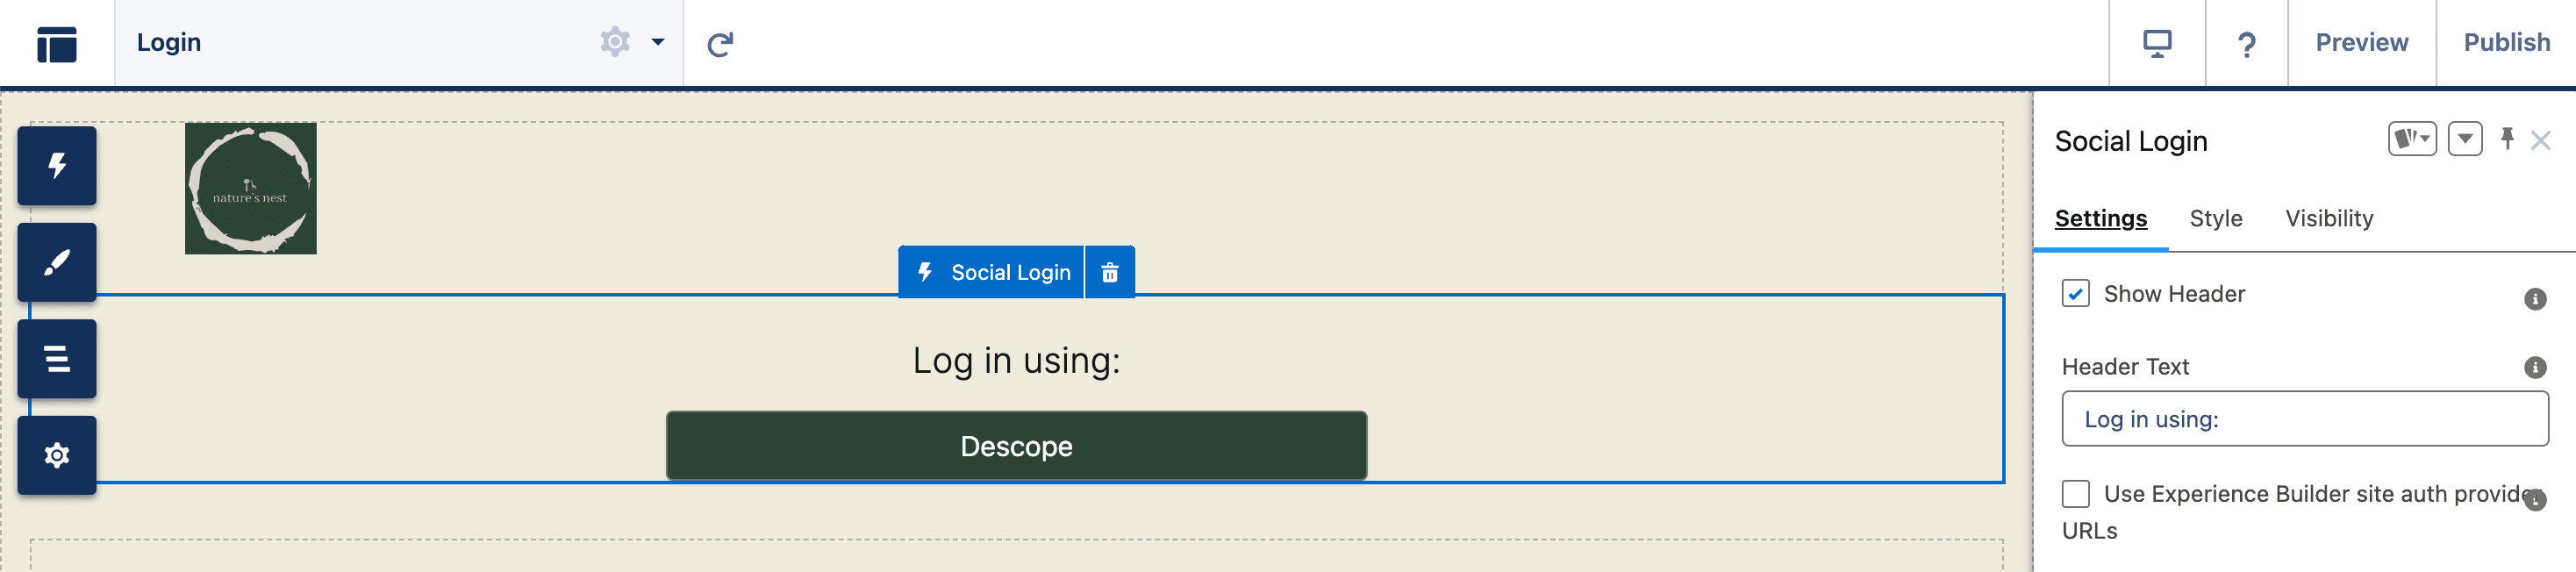
To add the Descope Authentication button on other pages, you must first select show all components in the task bar. Then you can drag and drop the “Social Login” component to wherever you’d like on the page.
When the user clicks on the Login button, they will be taken to your Descope authentication flow. You can use our built-in Auth Hosting Application, or for further customization options, you can host the app yourself. The Auth Hosting Application can be tailored to match the theme of your Salesforce Commerce Storefront to provide a seamless user experience. For more details on customizing the styling of the authentication flow itself, check out our styling documentation.
Use case: magic links & passkeys
A frictionless authentication experience improves conversion and retention rates. With Descope, SFCC customers can log in using passwordless methods like magic links and passkeys.
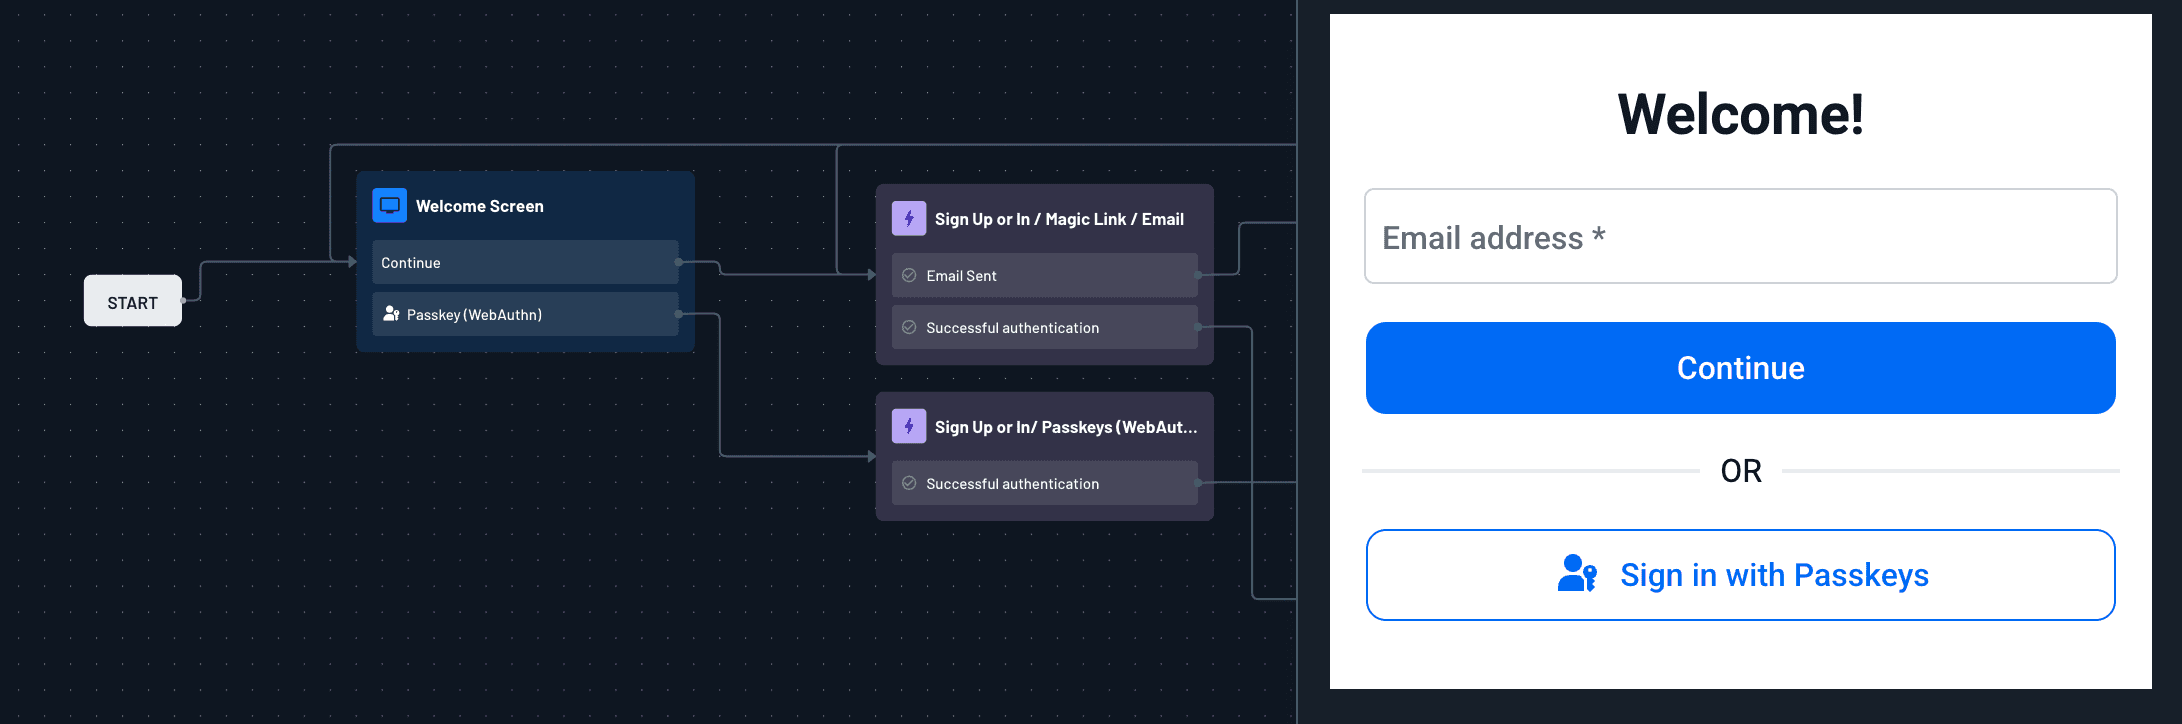
To enable this, create a Descope authentication flow that includes both magic link and passkeys authentication methods. Then, configure your SFCC store to use Descope as the OIDC provider and update your authentication flow URL to point to the newly created flow.
By implementing magic links, users can log in with a simple email-based link rather than remembering passwords, while passkeys allow them to authenticate using their device’s biometrics for a secure, phishing-resistant experience. This approach reduces cart abandonment by removing password friction and improves security by eliminating weak or reused credentials.
Use Case: A/B testing
Customer preferences evolve rapidly, and businesses may need to test different authentication methods to optimize the user journey. Descope allows you to experiment with various login experiences using A/B testing, helping you determine the best authentication flow for your users.
To implement A/B testing in Descope, create a condition within your flow that assigns users to different authentication experiences based on an A/B testing key. For example, you can direct 50% of users to a social login and the other 50% to a passkey-based login.
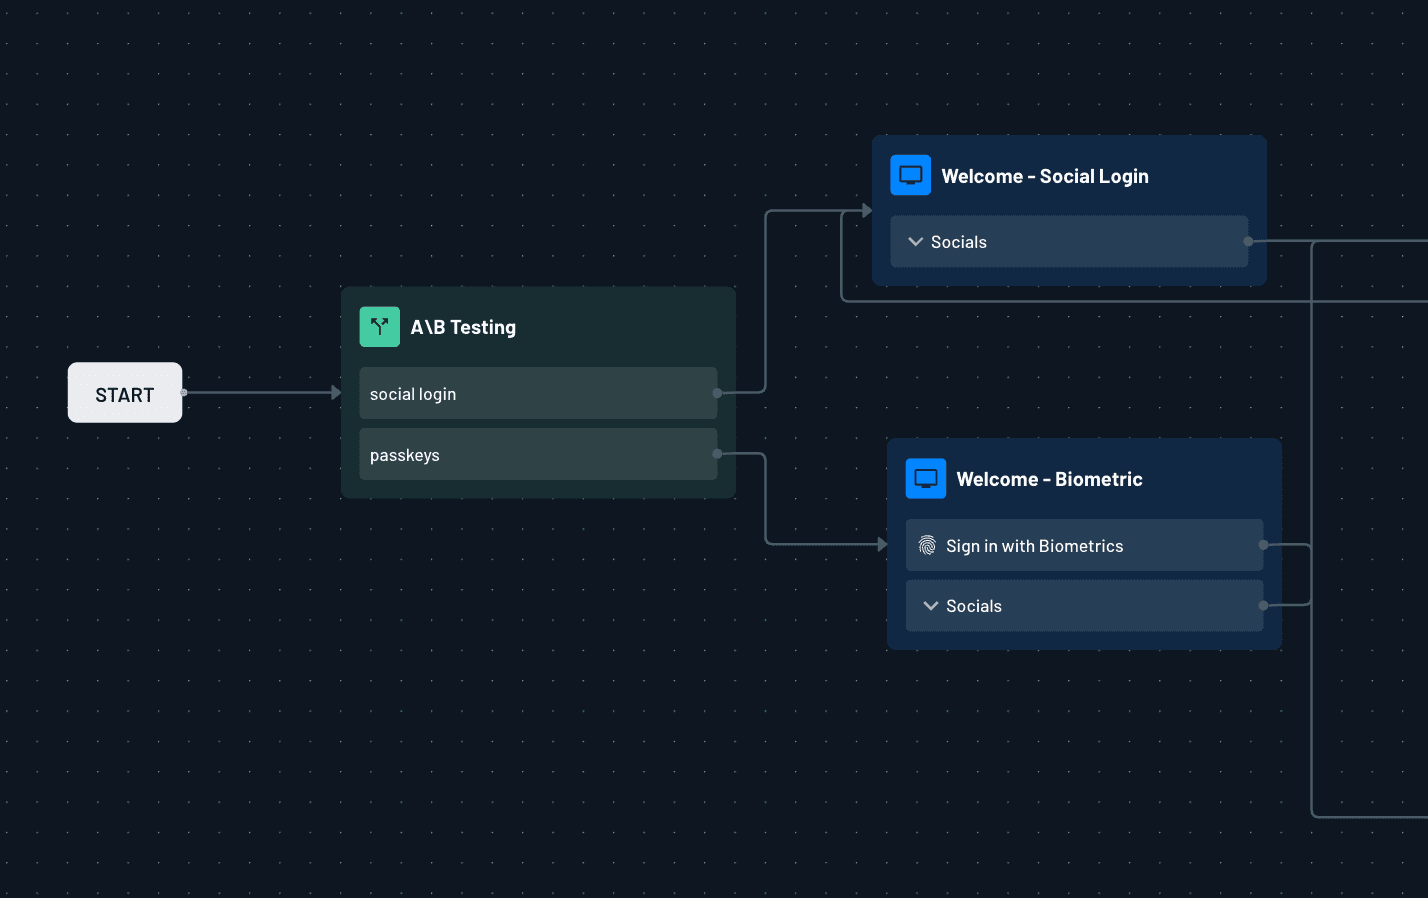
With Descope’s analytics dashboard, you can measure conversion rates for each authentication method and adjust the login experience accordingly. This data-driven approach ensures you’re using the most effective authentication method to maximize customer retention and sales.
Use Case: progressive profiling
Gathering customer information is essential for personalization and marketing, but lengthy registration forms can lead to drop-offs. Progressive profiling with Descope allows SFCC merchants to collect user data gradually over multiple interactions, reducing friction while still building a rich customer profile.
With Descope’s authentication flows, you can request minimal information during the initial sign-up (such as email or phone number) and then prompt users for additional details (e.g., name, preferences, shipping address) in future sessions. These custom attributes can be included in the APEX class to return the details back to SFCC.
By progressively collecting data, businesses can enhance personalization, improve targeted marketing campaigns, and ultimately drive higher customer engagement—all without overwhelming users at sign-up.
Boosting Salesforce Commerce conversions with Descope
By integrating Descope with your Salesforce Commerce Storefront, you gain a powerful, secure, and seamless authentication system that enhances user experience and simplifies identity management. Descope’s OIDC-based authentication flow provides flexibility with various login methods such as passwordless authentication, social logins, MFA, SSO, and biometrics, ensuring a frictionless and secure user experience.
For Salesforce Commerce Cloud merchants, modern authentication features and flows can dramatically influence conversion, drop-off, and retention rates:
Passwordless login: Eliminate friction from forgotten credentials and send customers directly back to their cart via secure, embedded links. Apply promos directly from marketing emails.
Progressive profiling: Lower the barrier for account creation by incrementally learning about customers. Gather the essentials on first signup, then gradually ask for more.
A/B testing: Experiment with different auth flows to determine which journeys offer the best conversion and retention rates—all without touching your code base.
Start leveraging Descope’s low-code authentication today to enhance security, improve customer retention, and simplify identity management in your Salesforce Commerce Storefront and all your ecommerce digital properties.
To get started with Descope, sign up for a free account or book a demo with our engineers to learn more.