
Table of Contents
This tutorial was written by Gideon Idoko, a solution-driven software engineer and technical writer. Connect with him on his website or X to see more of his work!
Streamlit makes it simple to turn Python scripts into shareable data apps. As these apps move from personal notebooks to team and company use, adding secure authentication and single sign-on (SSO) becomes essential. Authentication protects sensitive data and gates features by user identity. SSO lets people sign in once and move across apps without repeating logins.
In this tutorial, you’ll use Descope, a drag & drop CIAM platform to add:
Single sign-on
Social login
Role-based access control (RBAC) to a Streamlit app.
Prerequisites
Before diving into the integration process, ensure you understand the basics of Python and Streamlit. You also need a Descope account, but don’t worry if you don’t have one yet—you’ll learn how to set one up shortly. The free tier will be sufficient for you to follow along.
Creating a project in Descope
The first step is to connect your Streamlit app with Descope by creating a project in the Descope console.
Go to the Descope sign-up page and register for a free account (or log in if you already have one).
From the top-left menu in the console, select + Project to create a new project.
Your project dashboard is the hub where you’ll:
Create and manage projects
Assign user roles
Configure authentication flows
Adjust project-level settings
In Settings > Project, you’ll see your Project ID. This is a unique identifier that links your Streamlit app to Descope.
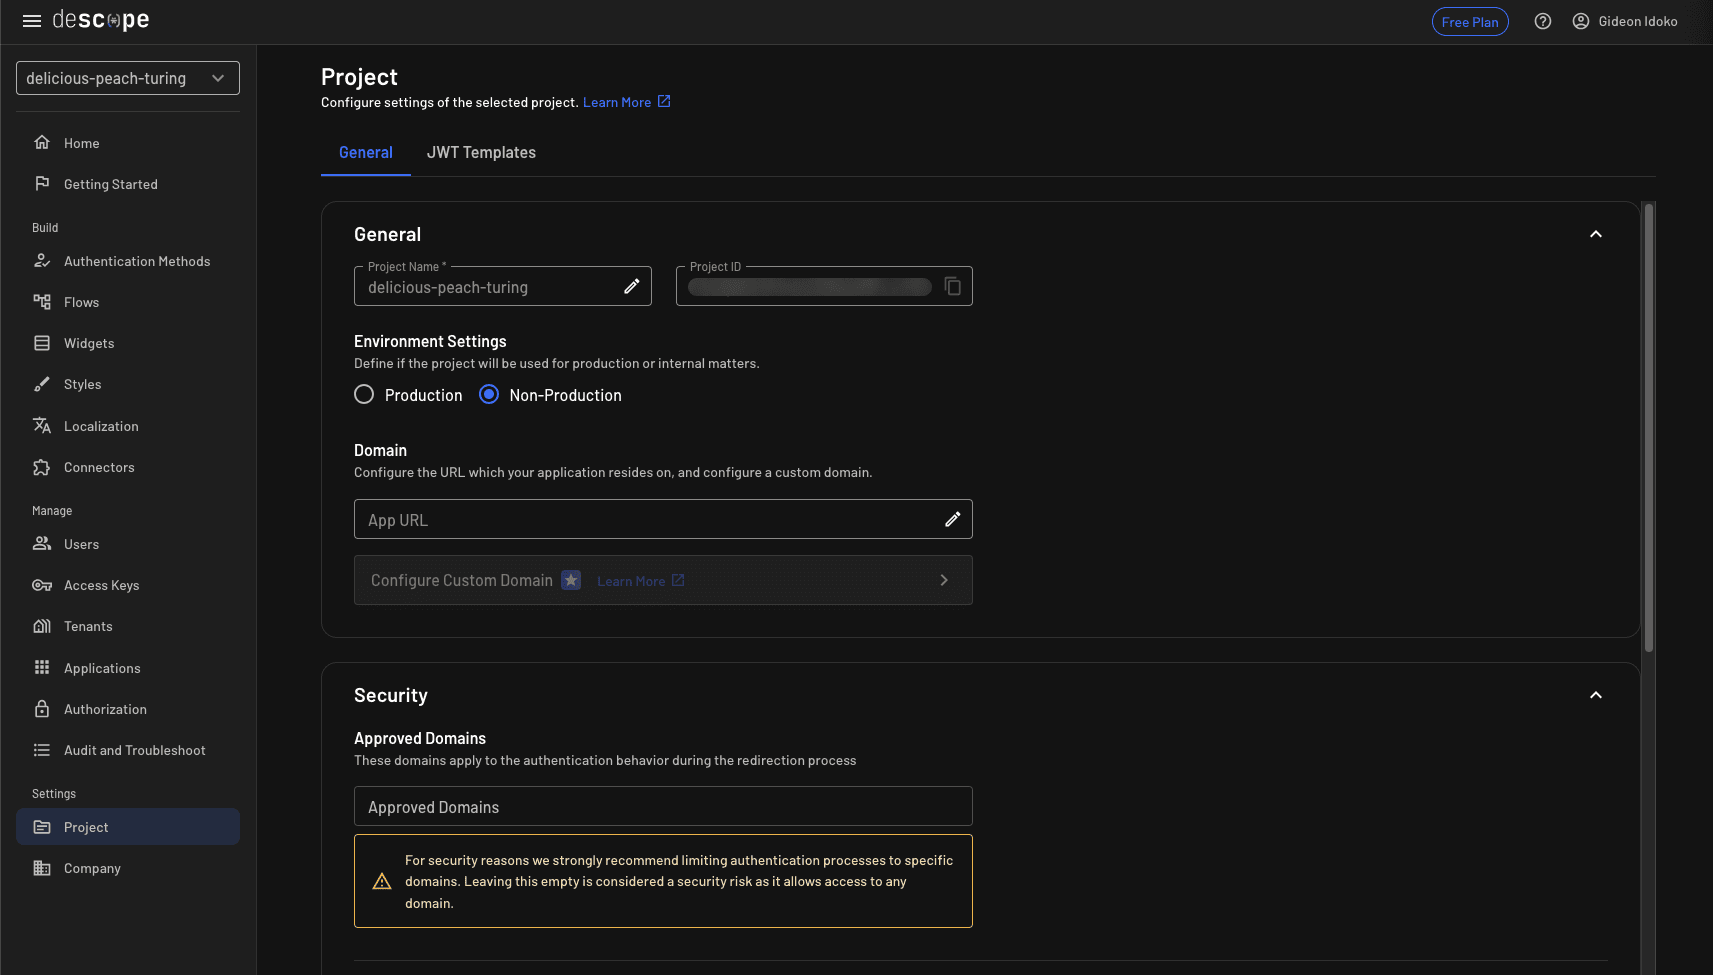
Best practice: Never paste this ID directly into your code. Instead, store it securely as an environment variable or in .streamlit/secrets.toml. Later in this tutorial, we’ll show you how to use it safely inside your app.
Creating a Streamlit app
With your Descope project set up, let’s move to the Streamlit side. We’ll start with a bare-bones app and then integrate authentication step by step.
Create a new directory for your app. Optionally, set up a Python virtual environment inside it.
Install Streamlit with the following command:
pip install streamlitIn the new directory, create a file called app.py and paste the following code:
import streamlit as st
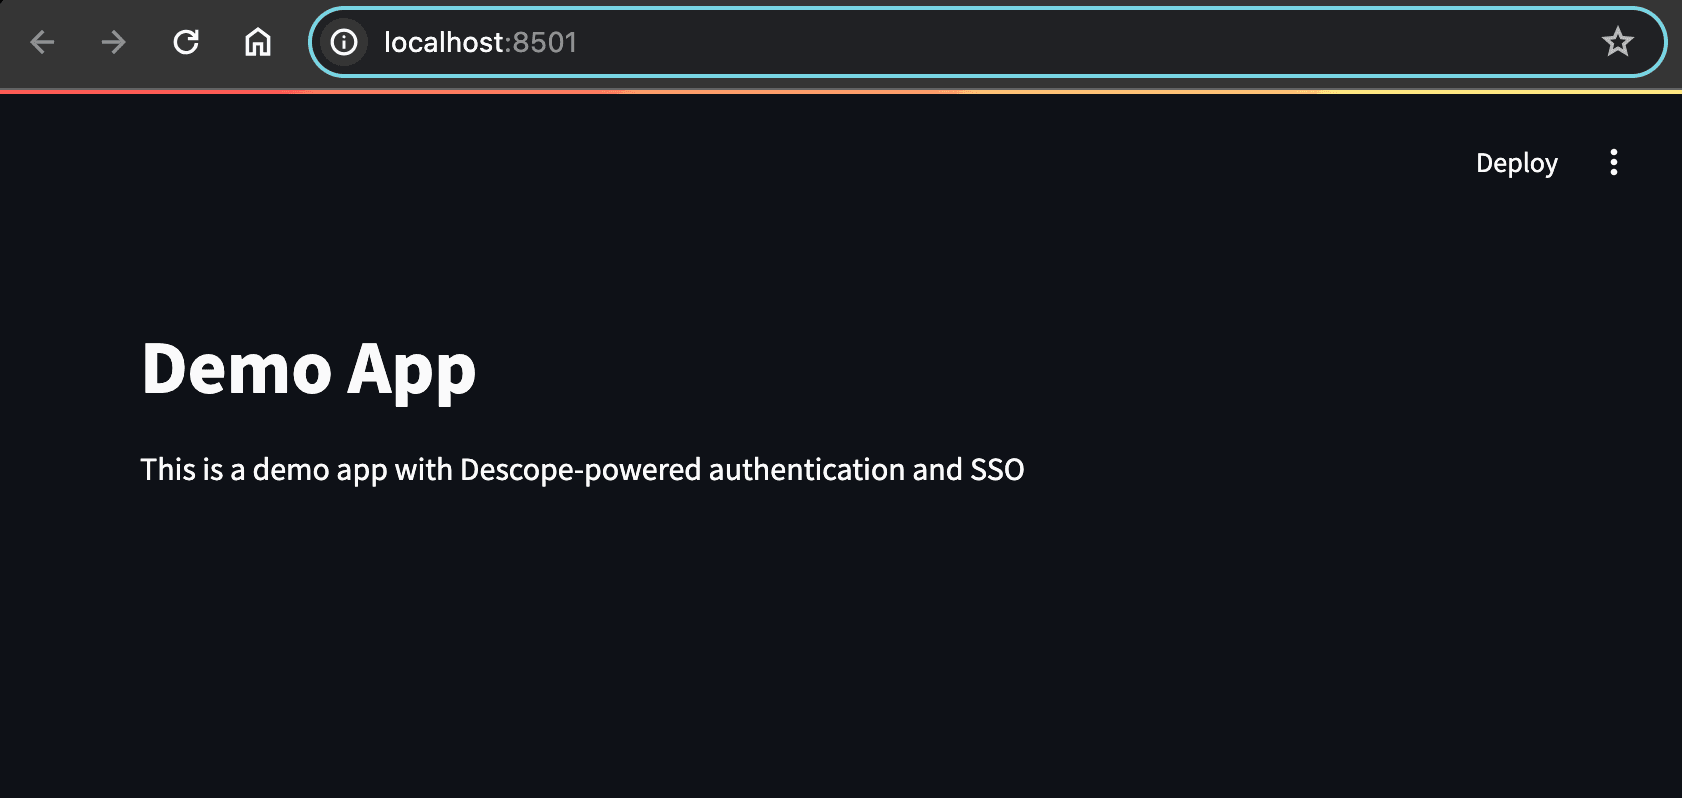
st.title("Demo App")
st.write("This is a demo app with Descope-powered authentication and SSO")You need a project ID to initialize Descope, so copy yours from the console settings, create a
.streamlit/secrets.tomlfile in the root directory of your app, and include the project ID, like this:
You should get an output like this:
Implementing OAuth social logins in Steamlit
Before diving into enterprise SSO, let’s start with something many users expect out of the box: social logins. OAuth providers like Google or GitHub let people sign in with accounts they already trust. This removes friction during signup and reduces the need to manage yet another password.
By adding OAuth, your Streamlit app instantly feels more professional and user-friendly—and when paired with SSO later, you’ll cover both casual and enterprise login scenarios.
Configuring Descope as a federated identity provider for Streamlit
In this section, we walk you through setting up Descope as a federated identity provider (IdP) for Streamlit and seamlessly integrating Google login with the application you created earlier.
In the Descope console, go to: Build > Authentication Methods > Social Login (OAuth/OIDC)
Here you’ll see a full list of supported providers. Select Google for this example:
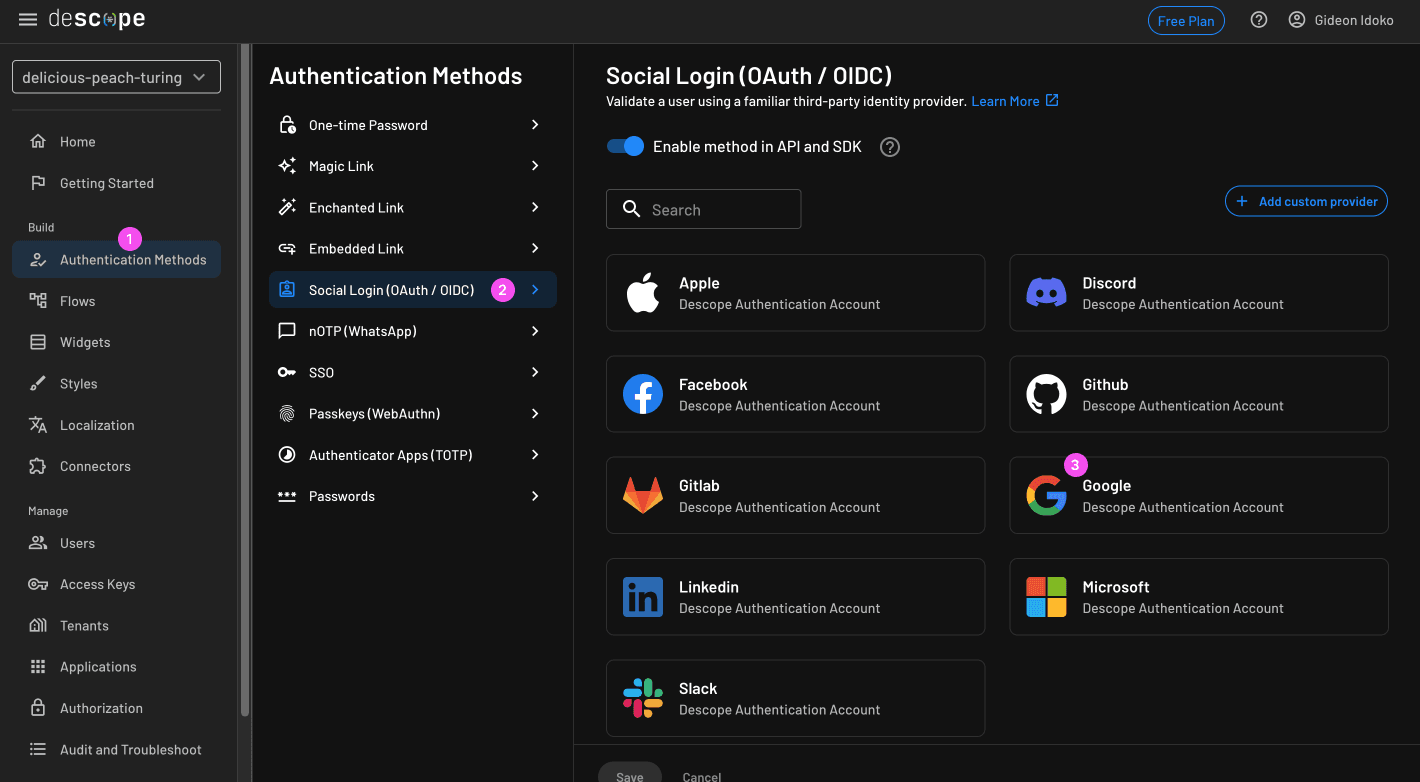
Note: The Descope console provides an authentication account for all common social logins. There’s also an option to specify a different account for authentication if you prefer.
Next, configure the redirect URL. This is the location users will return to after completing authentication. Since we’re working locally, set it to your app’s address, http://localhost:8501, in the configuration provided, like this:
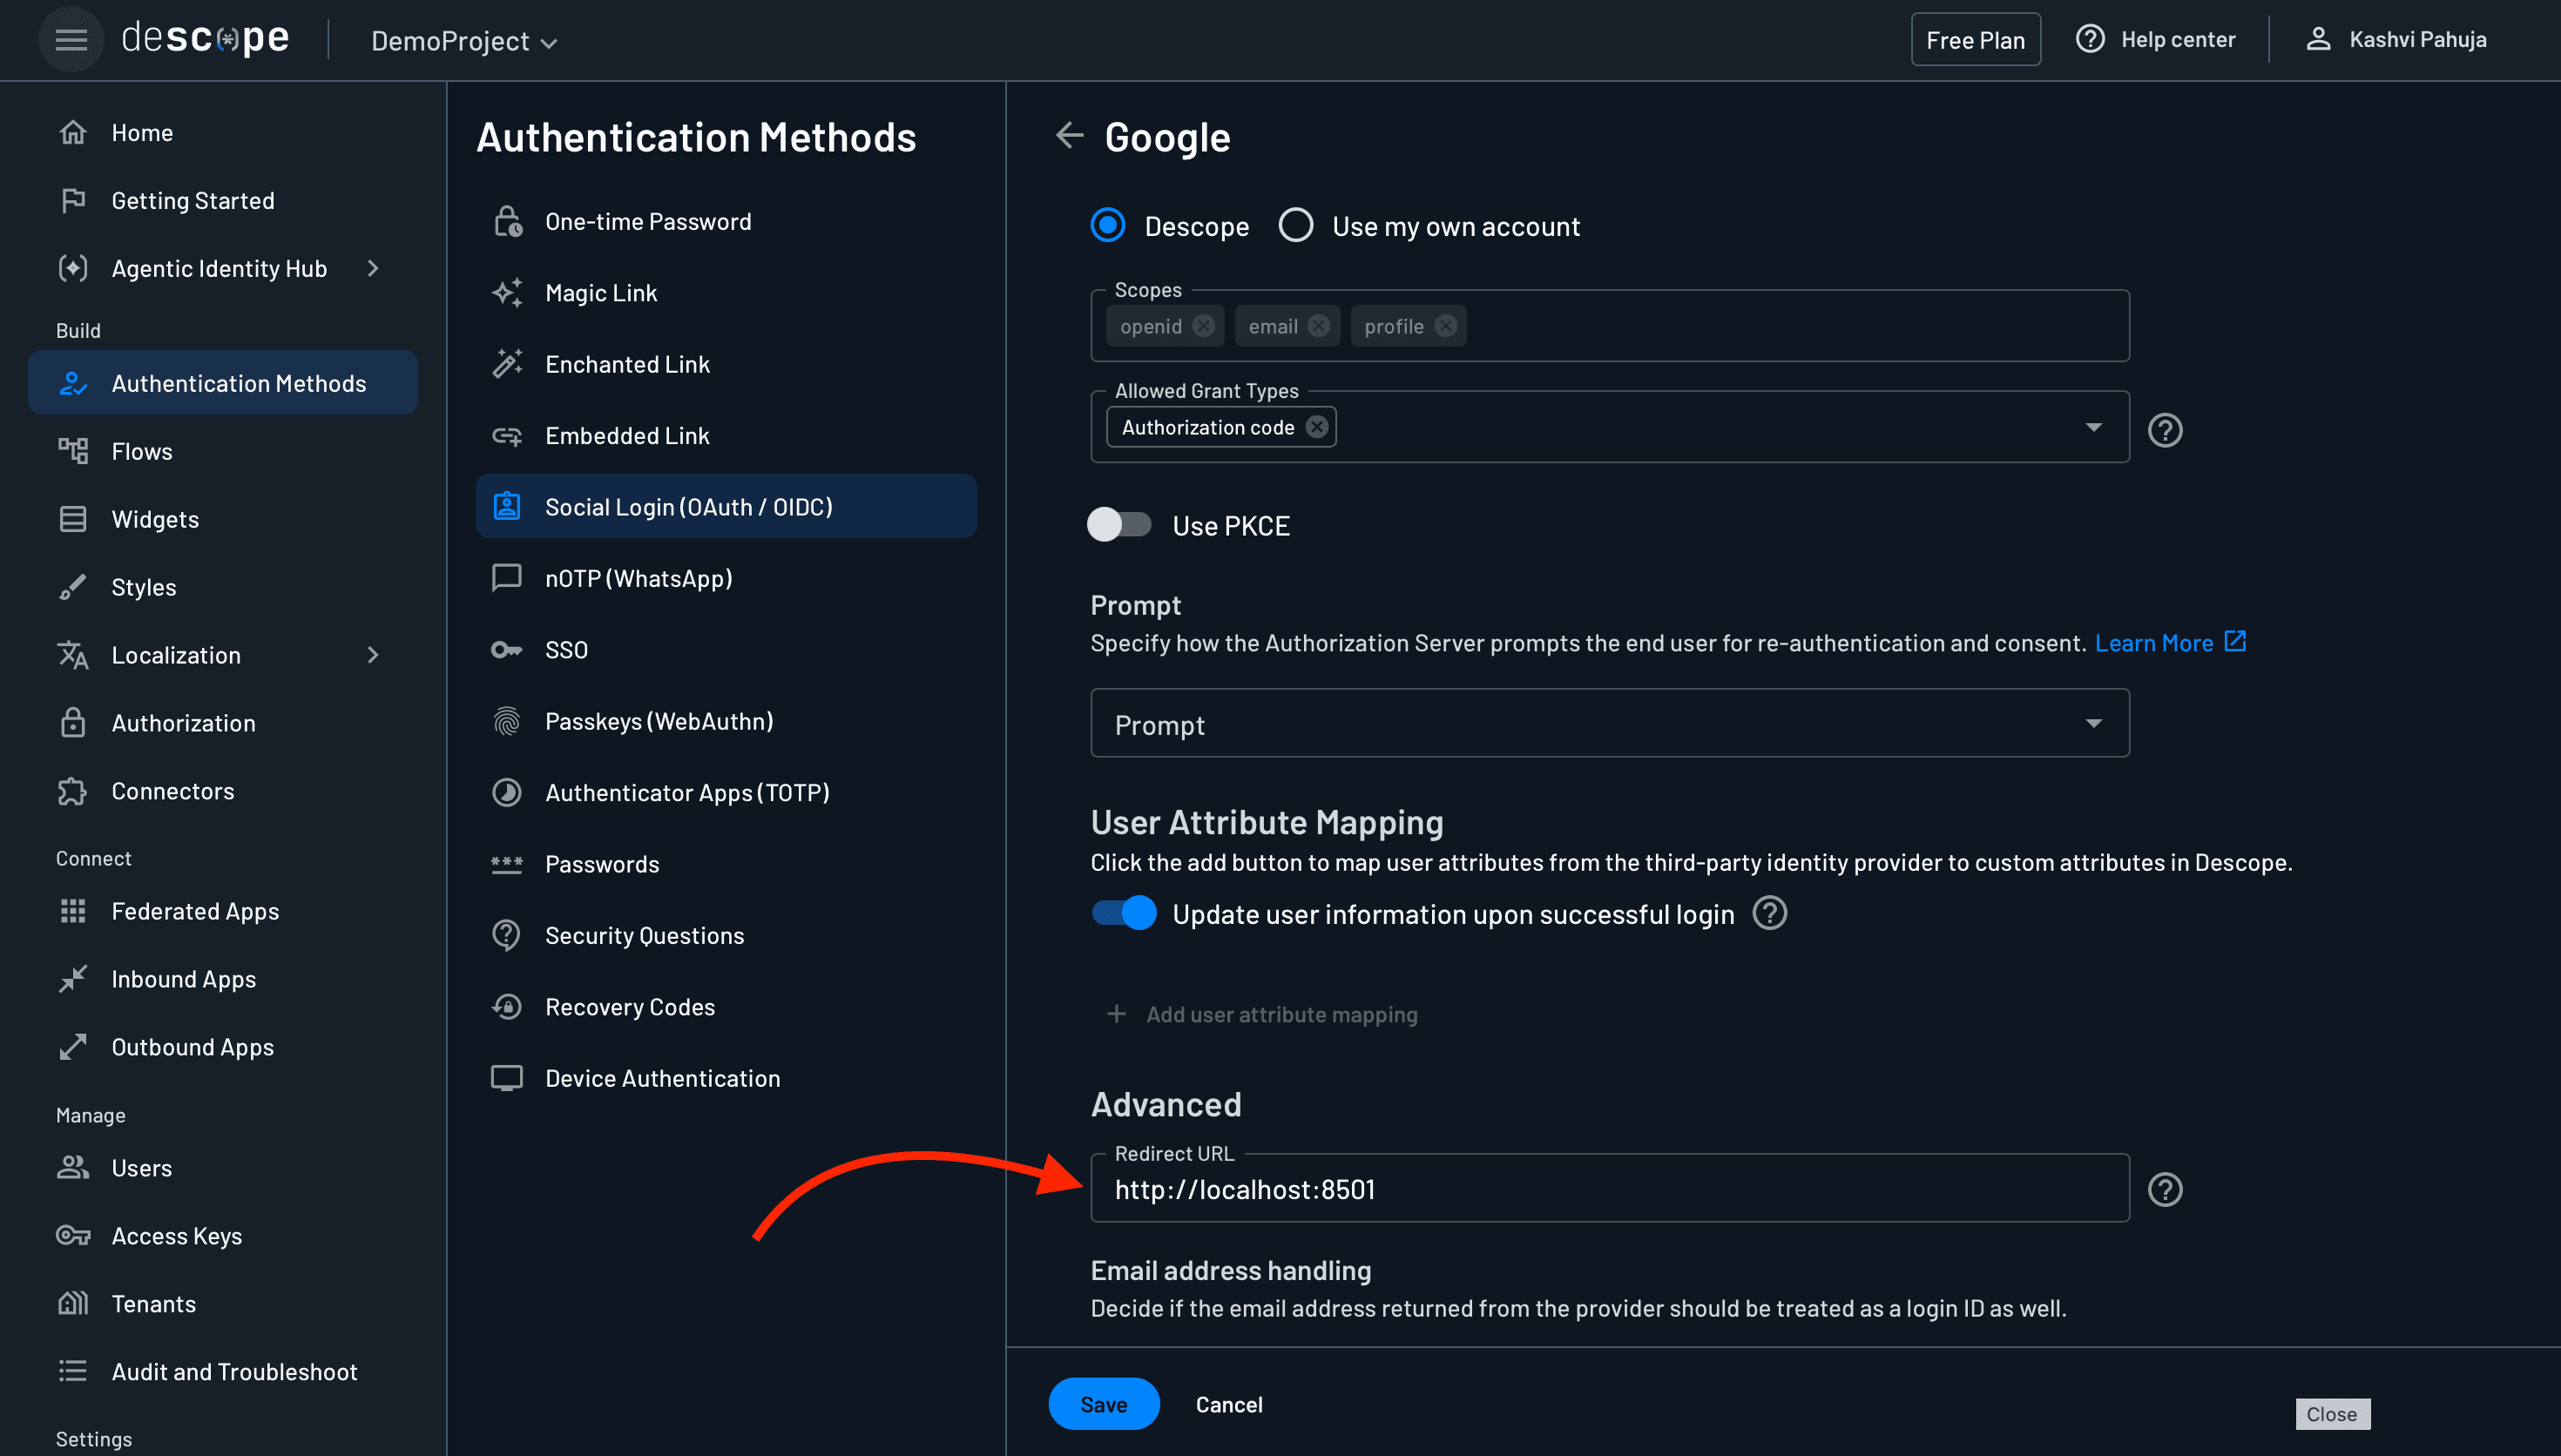
Remember, you can also provide the redirect URL programmatically in your Streamlit code for added flexibility later.
Integrating Descope with your Streamlit app as its OAuth provider
Now let’s wire your app to Descope so it can trigger the OAuth login flow and handle the response.
Install its Python SDK to facilitate the interaction:
pip install descopeYou need a project ID to initialize Descope, so copy yours from the console settings, create a
.streamlit/secrets.tomlfile in the root directory of your app, and include the project ID, like this:
DESCOPE_PROJECT_ID = "XXXXX"Initialize Descope in your app:
import streamlit as st
from descope.descope_client import DescopeClient

DESCOPE_PROJECT_ID = str(st.secrets.get("DESCOPE_PROJECT_ID"))

descope_client = DescopeClient(project_id=DESCOPE_PROJECT_ID)

st.title("Demo App")
st.write("This is a demo app with Descope-powered authentication and SSO")
Create a “Sign in with Google” button that launches the OAuth flow using the
descope_client.oauth.start()method:
# … collapsed repeated code
descope_client = DescopeClient(project_id=DESCOPE_PROJECT_ID)
st.warning("You're not logged in, pls login")
with st.container(border=True):
if st.button("Sign In with Google", use_container_width=True):
oauth_response = descope_client.oauth.start(
provider="google", return_url="http://localhost:8501"
)
url = oauth_response["url"]
# Redirect to Google
st.markdown(
f'<meta http-equiv="refresh" content="0; url={url}">',
unsafe_allow_html=True,
)
st.title("Demo App")
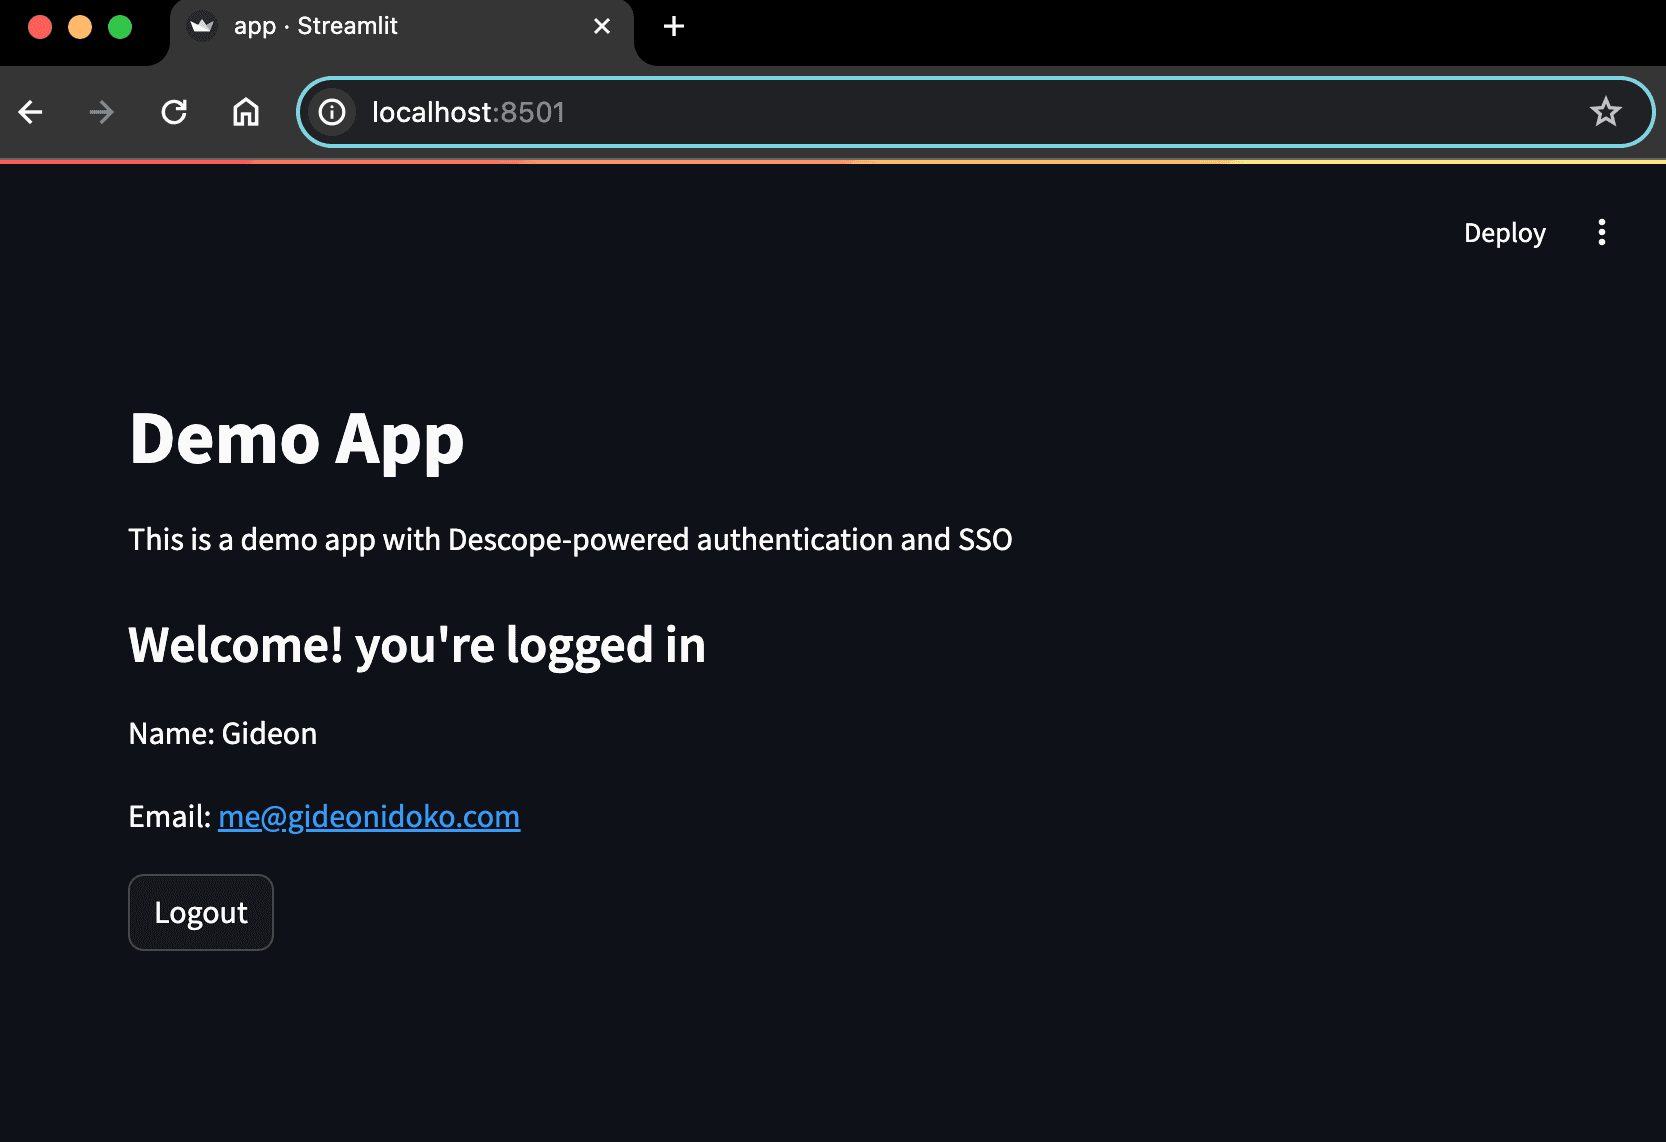
# …When clicked, this button triggers the OAuth flow. Descope generates a Google sign-in URL and redirects the user there.
Your Streamlit app should now look like this:
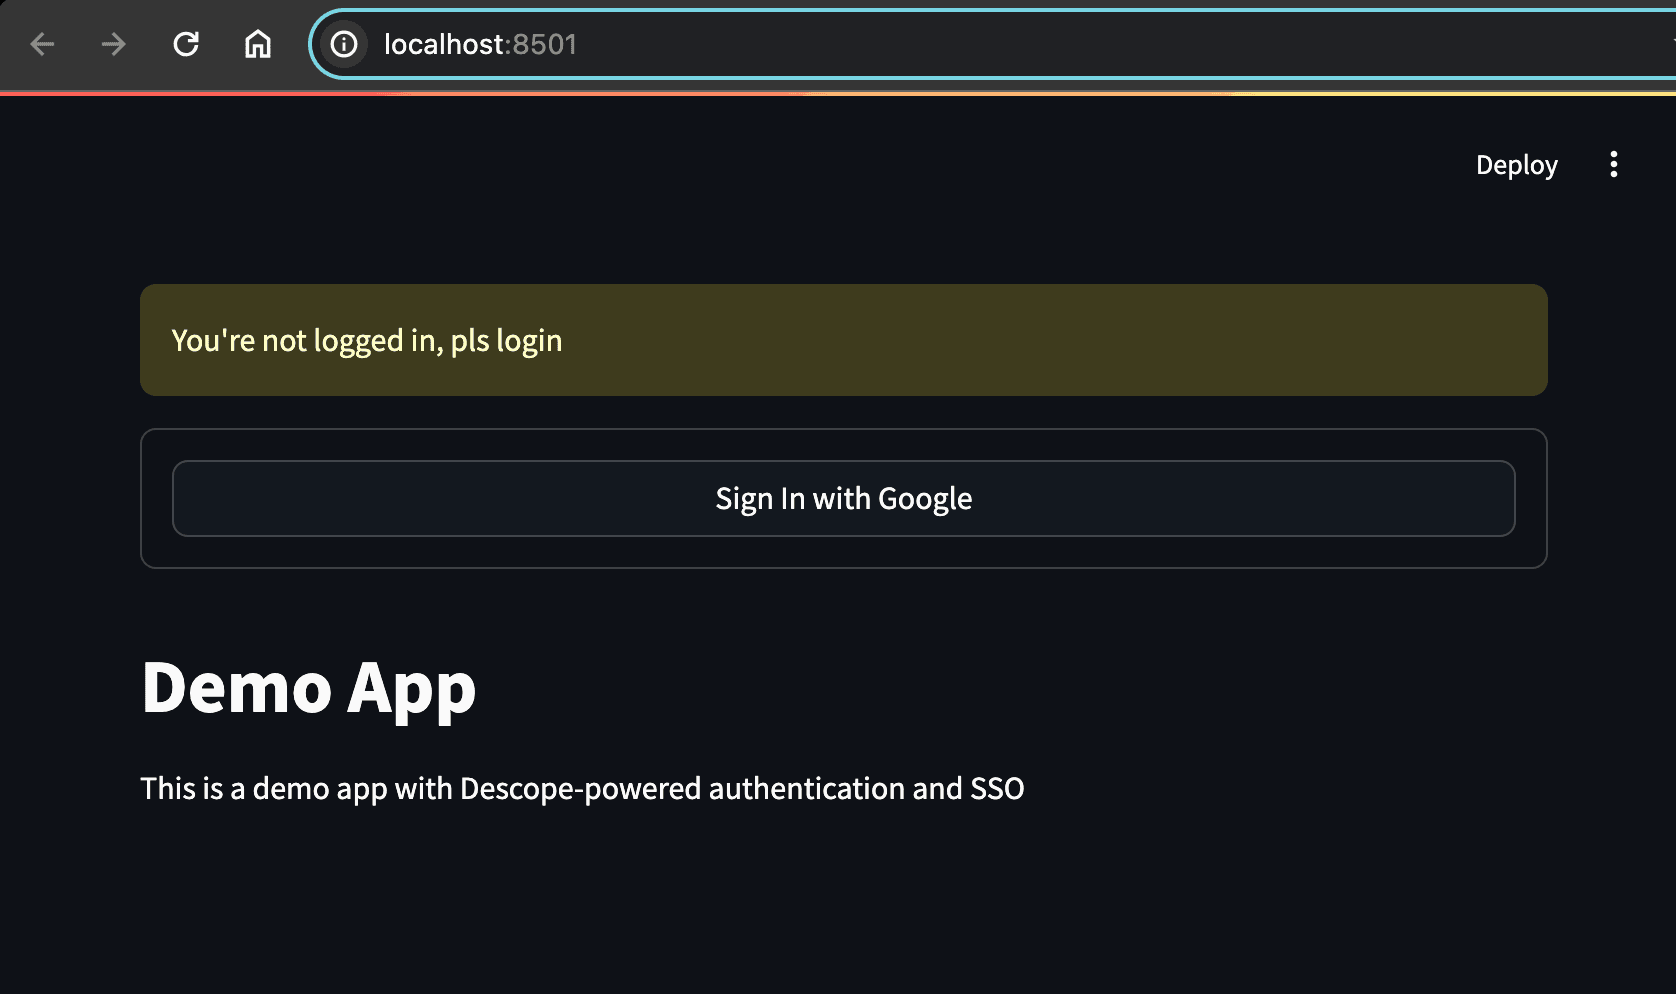
Click the Sign In with Google button, and you are redirected back to the app with a code query parameter after successfully authenticating via Google. This flow is known as the authorization code flow. In the next step, you’ll exchange the returned code for a token that authenticates your users.
You can use the Streamlit st.query_params method to capture the code from the URL, and the descope_client.sso.exchange_token() method to trade it for a token. Along with the token, Descope also provides user data and a refresh token that renews the short-lived session token. By storing this information in Streamlit’s session_state, you can persist authentication details across multiple runs and conditionally display your app’s content only when a valid token is present.
To persist tokens and user data, update your code as follows:
import streamlit as st
from descope.descope_client import DescopeClient
from descope.exceptions import AuthException
DESCOPE_PROJECT_ID = str(st.secrets.get("DESCOPE_PROJECT_ID"))
descope_client = DescopeClient(project_id=DESCOPE_PROJECT_ID)
if "token" not in st.session_state:
# User is not logged in
if "code" in st.query_params:
# Handle possible login
code = st.query_params["code"]
# Reset URL state
st.query_params.clear()
try:
# Exchange code
with st.spinner("Loading..."):
jwt_response = descope_client.sso.exchange_token(code)
st.session_state["token"] = jwt_response["sessionToken"].get("jwt")
st.session_state["refresh_token"] = jwt_response["refreshSessionToken"].get(
"jwt"
)
st.session_state["user"] = jwt_response["user"]
st.rerun()
except AuthException:
st.error("Login failed!")
st.warning("You're not logged in, pls login")
with st.container(border=True):
if st.button("Sign In with Google", use_container_width=True):
oauth_response = descope_client.oauth.start(
provider="google", return_url="http://localhost:8501"
)
url = oauth_response["url"]
# Redirect to Google
st.markdown(
f'<meta http-equiv="refresh" content="0; url={url}">',
unsafe_allow_html=True,
)
else:
# User is logged in
try:
with st.spinner("Loading..."):
jwt_response = descope_client.validate_and_refresh_session(
st.session_state.token, st.session_state.refresh_token
)
# Persist refreshed token
st.session_state["token"] = jwt_response["sessionToken"].get("jwt")
st.title("Demo App")
st.write("This is a demo app with Descope-powered authentication and SSO")
st.subheader("Welcome! you're logged in")
if "user" in st.session_state:
user = st.session_state.user
st.write("Name: " + user["name"])
st.write("Email: " + user["email"])
if st.button("Logout"):
# Log out user
del st.session_state.token
st.rerun()
except AuthException:
# Log out user
del st.session_state.token
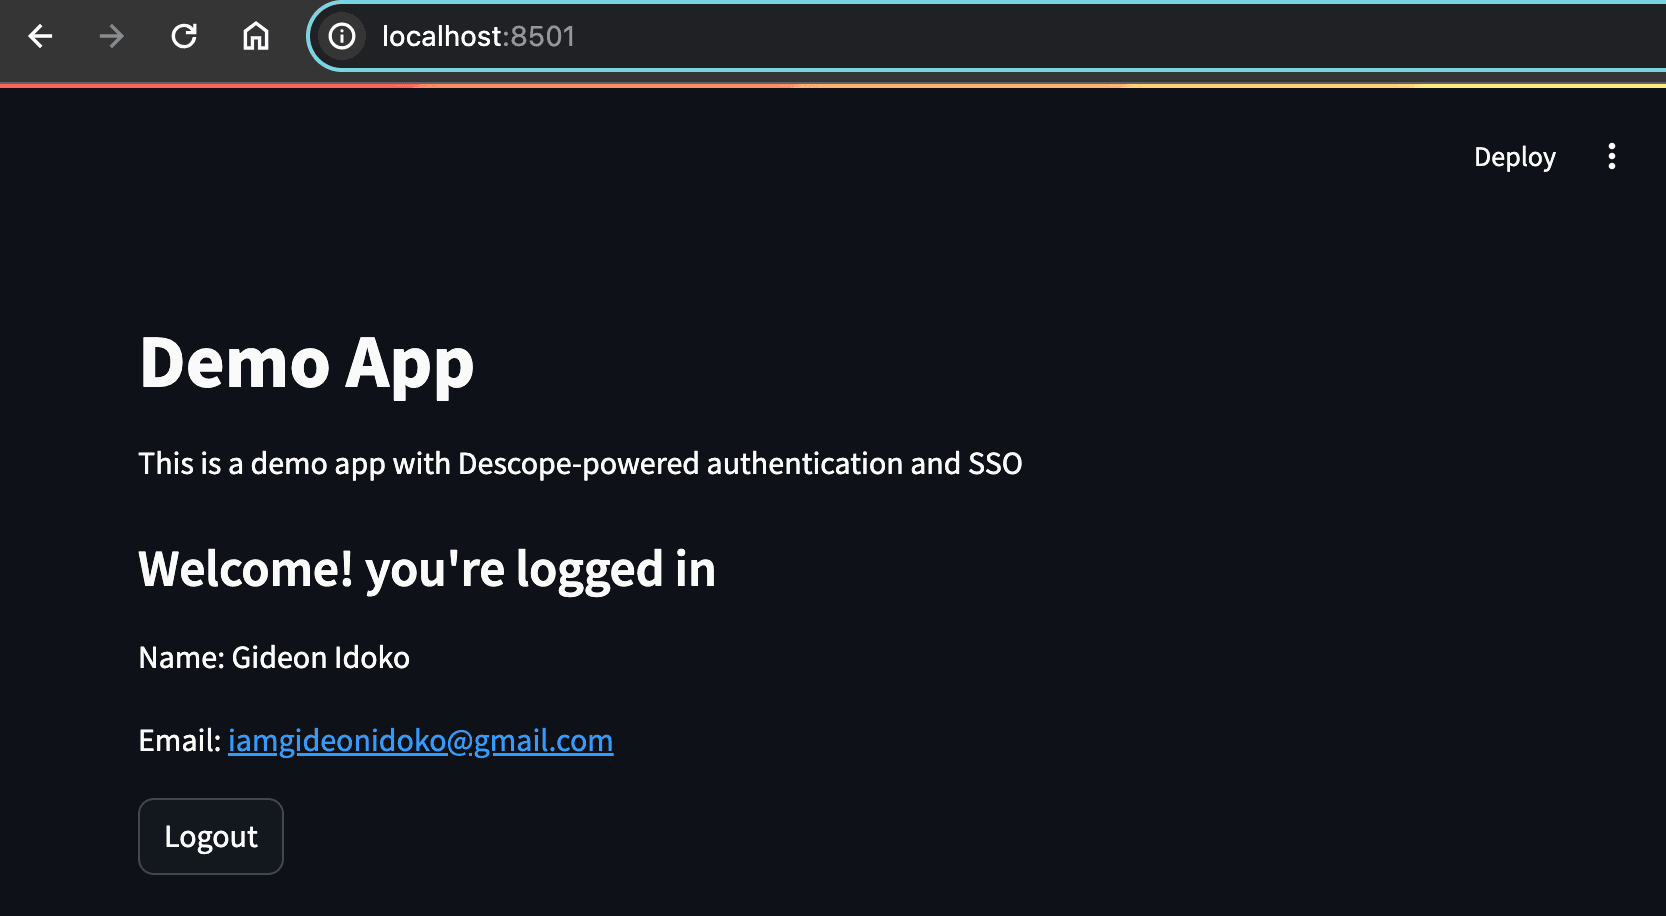
st.rerun()At this point, your app only displays content when a user is logged in. You’ve successfully implemented Streamlit authentication with OAuth, laying the foundation for full Streamlit SSO with enterprise providers like Okta in the next section.
Implementing SAML SSO in Streamlit
The Security Assertion Markup Language (SAML) is an open standard for exchanging authentication and authorization data between an IdP and a service provider (SP). In this setup, platforms like Okta act as the IdP, while your Streamlit app functions as the SP.
SAML SSO allows users to access multiple applications with a single login. This is especially valuable for organizations managing many apps, since it reduces friction for users and administrators alike.
In the SSO model, organizations that use your Streamlit app are represented as tenants. Each tenant groups users, permissions, and related configurations, giving you a way to handle enterprise customers with their own SSO setup.
Configuring Okta as the IdP and Descope as the SP
For this example, you’ll use Okta as the IdP while Descope acts as the SP that integrates with your Streamlit app.
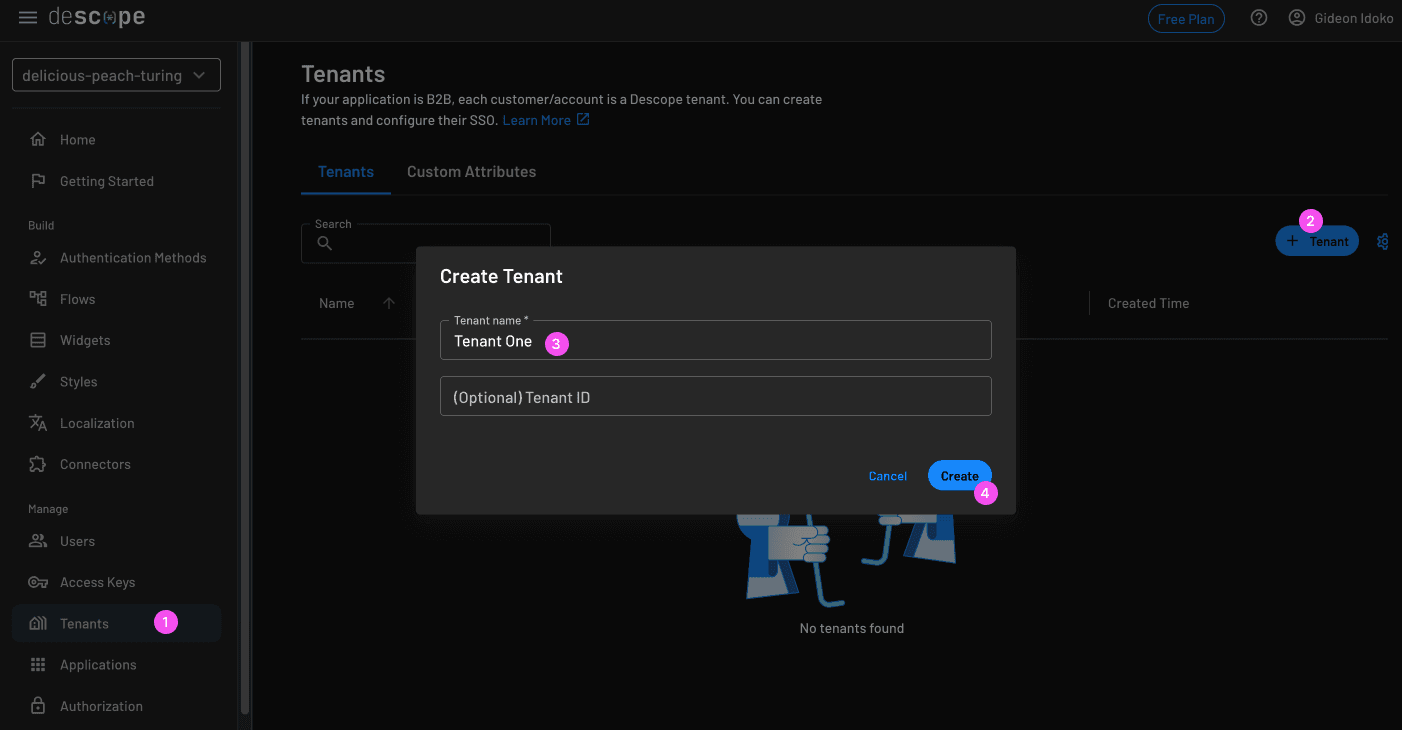
In the Descope console, create a new tenant: Go to the Tenants page and click + Tenant.
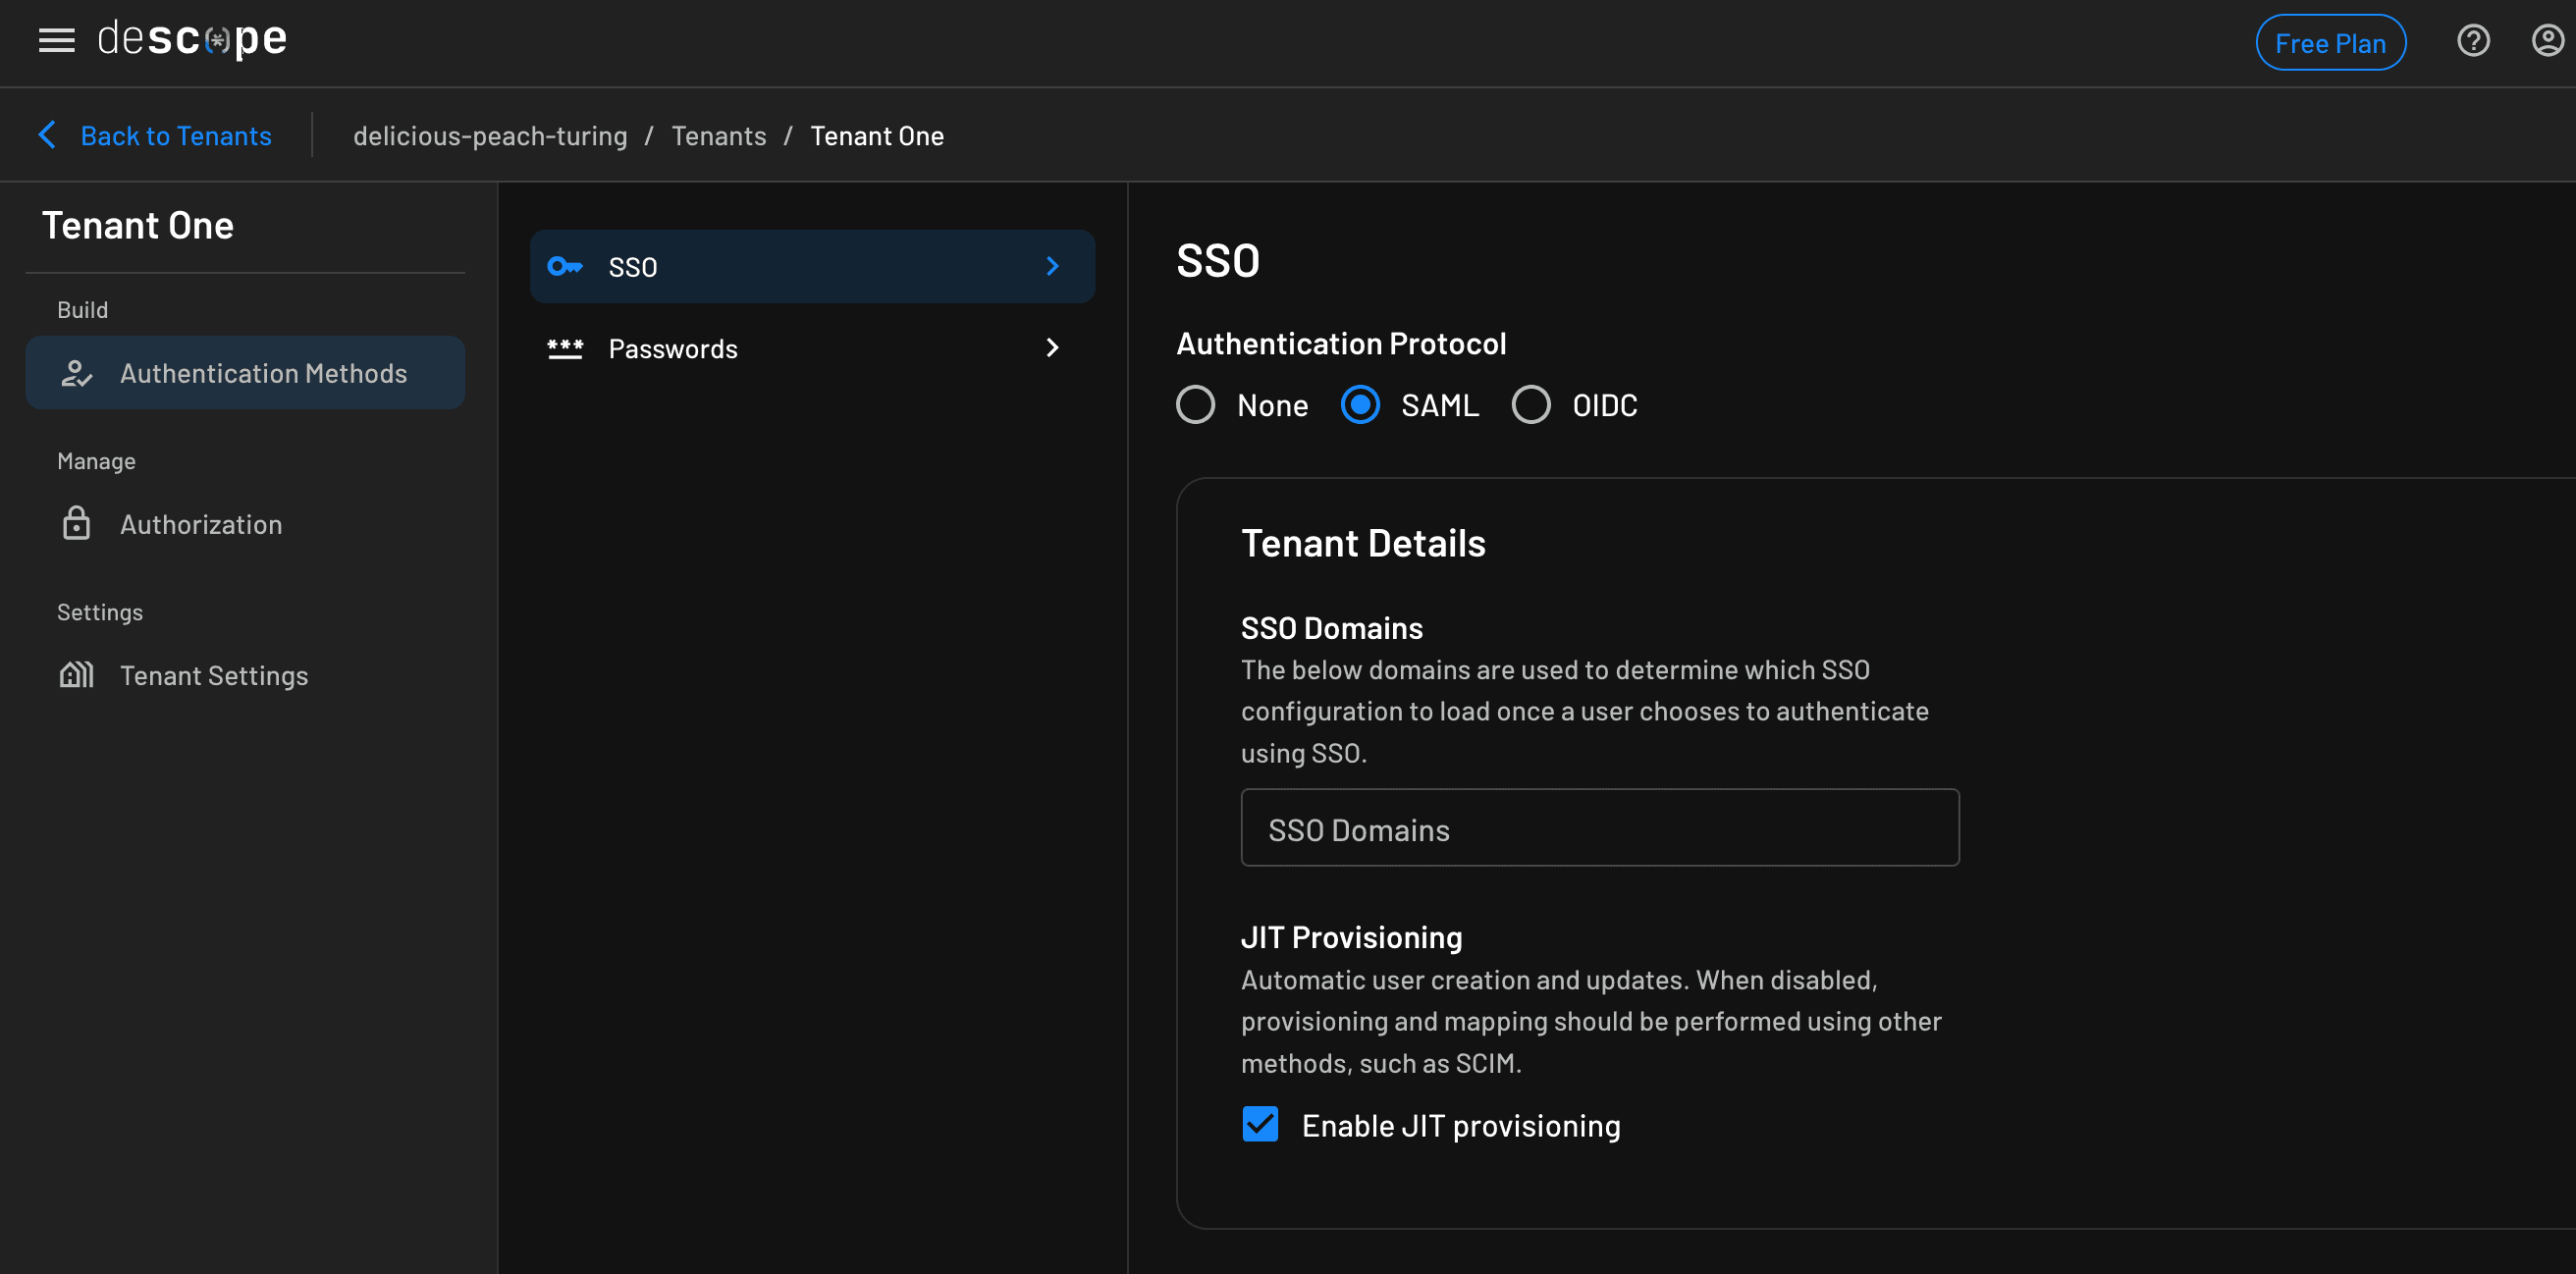
In the tenant Authentication Methods section, choose the SAML protocol. Enter your email domain in the SSO Domains field under Tenant Details.
Because Descope mediates communication between Okta and your app, the two need a secure, trusted connection. This connection is established by exchanging metadata XML documents between both platforms. The good news: Descope’s built-in Okta integration makes this process much simpler.
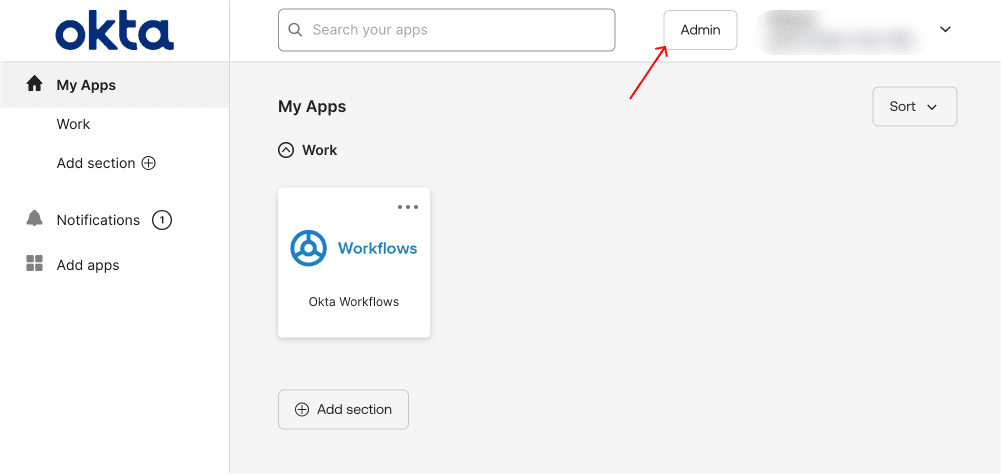
Go to your Okta account and click Admin to access your admin dashboard:
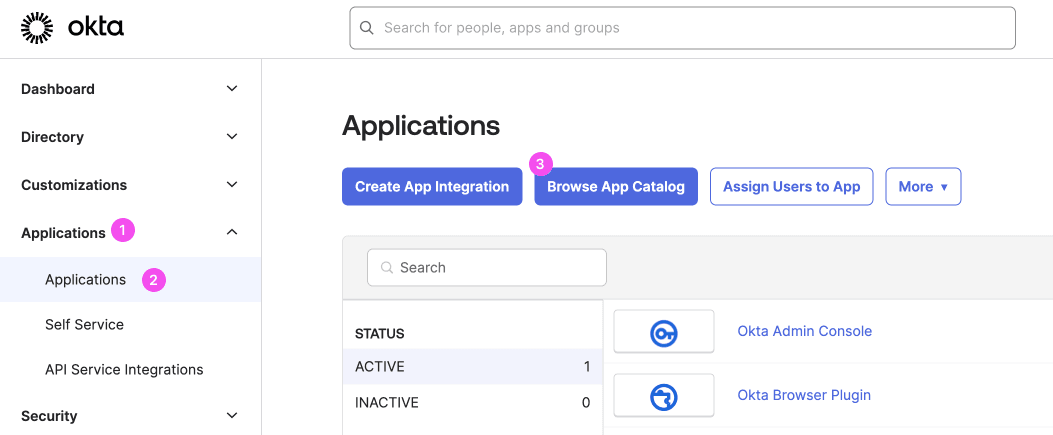
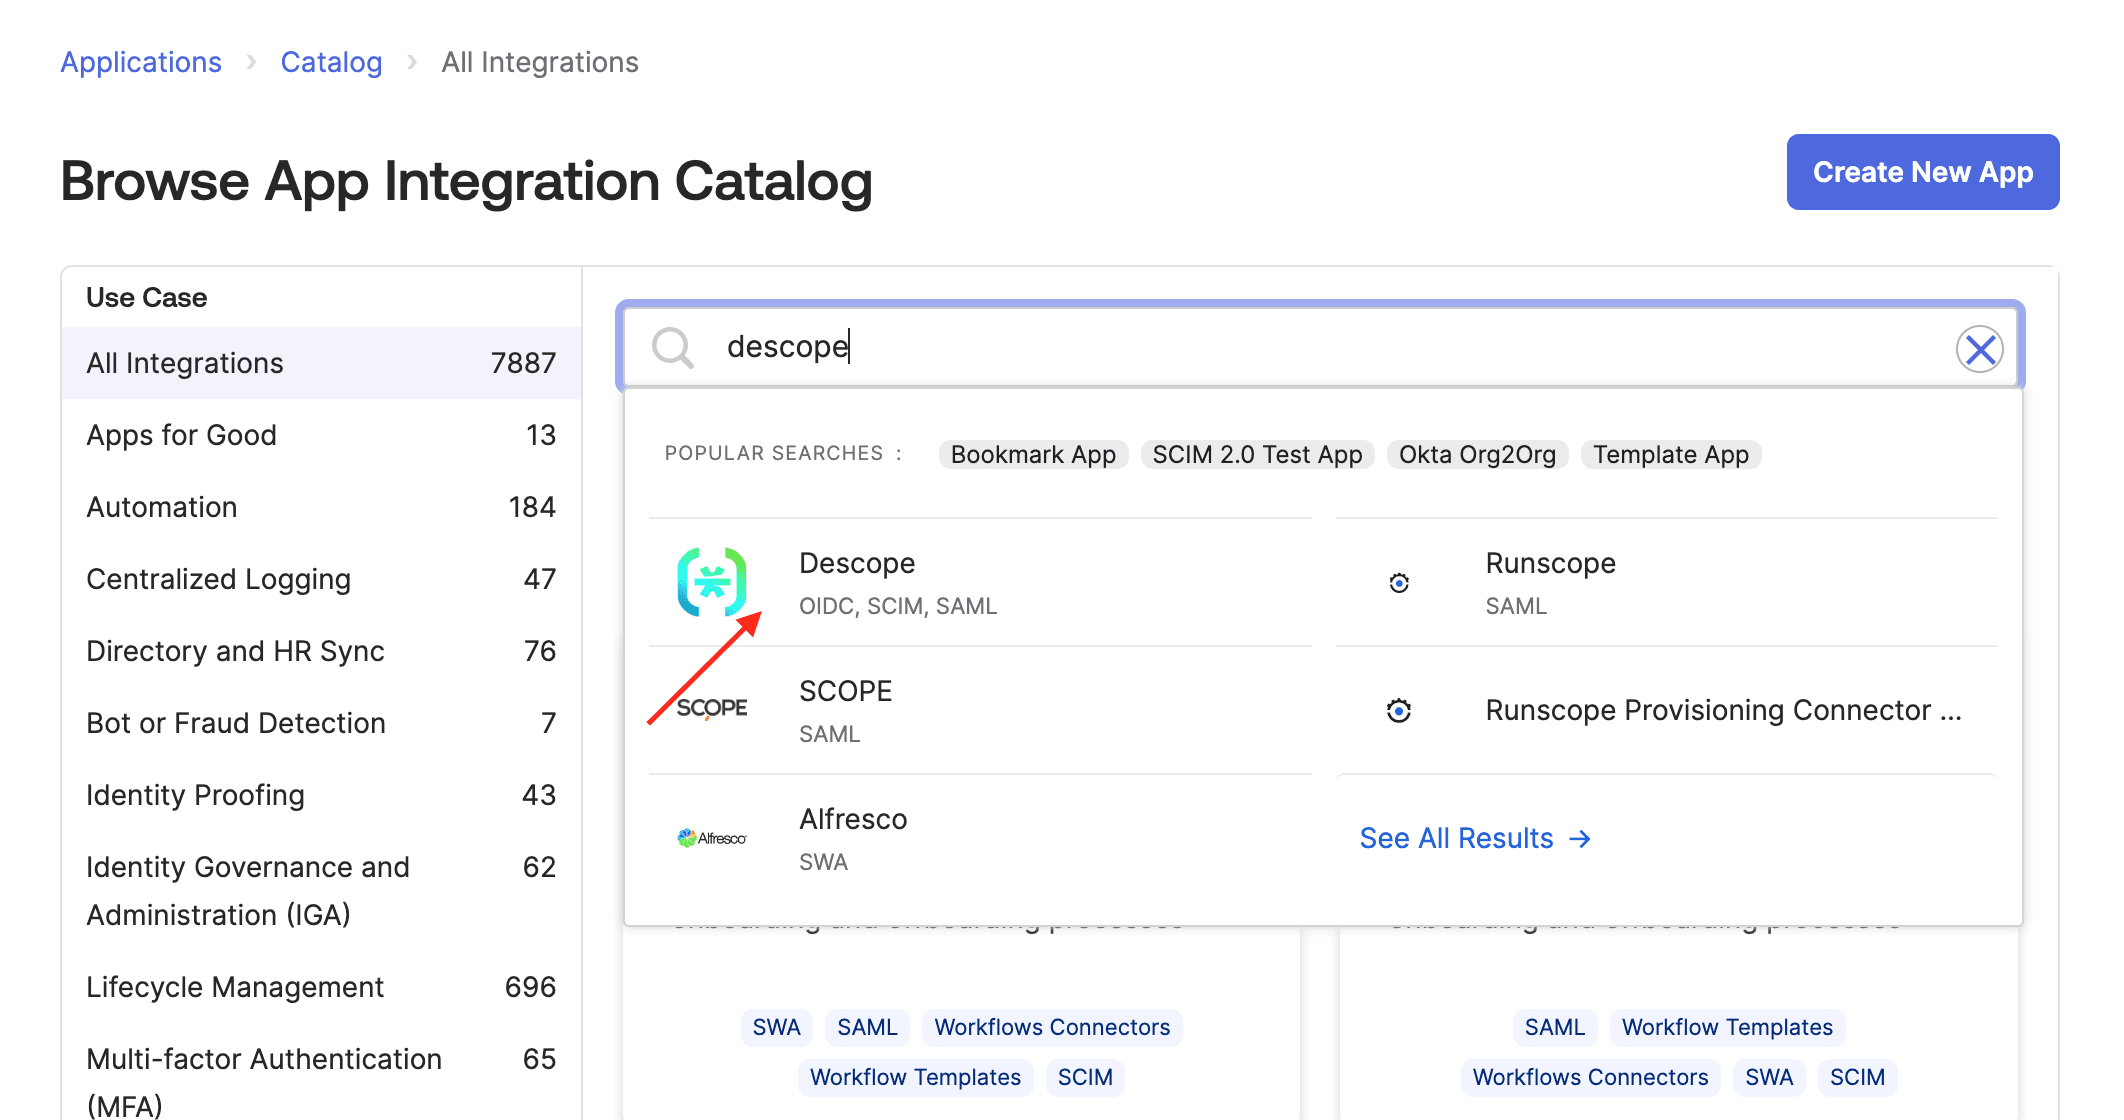
Navigate to Applications > Applications and click Browse App Catalog to explore a comprehensive list of available integrations:
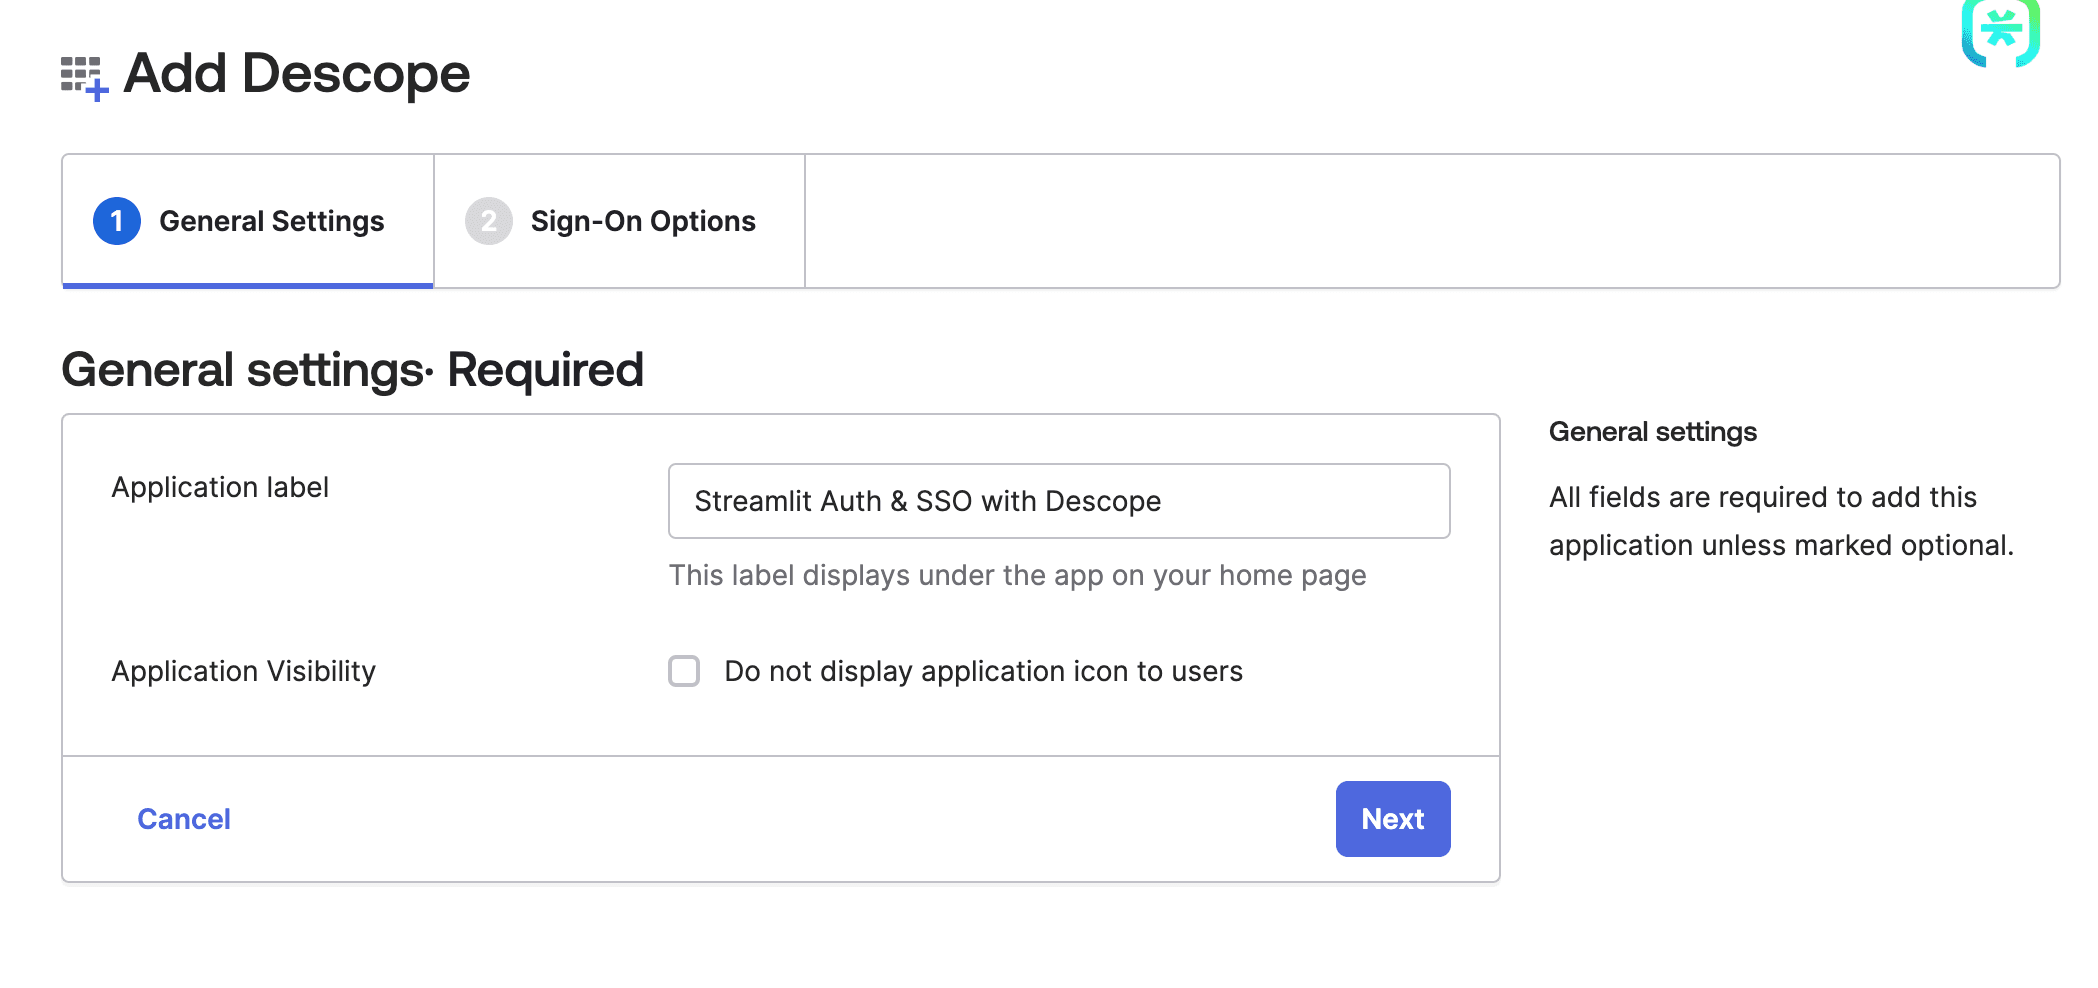
Search for Descope in the catalog and add the integration. This creates a new Okta app automatically.
In the General Settings tab, provide a label for your new Okta app.
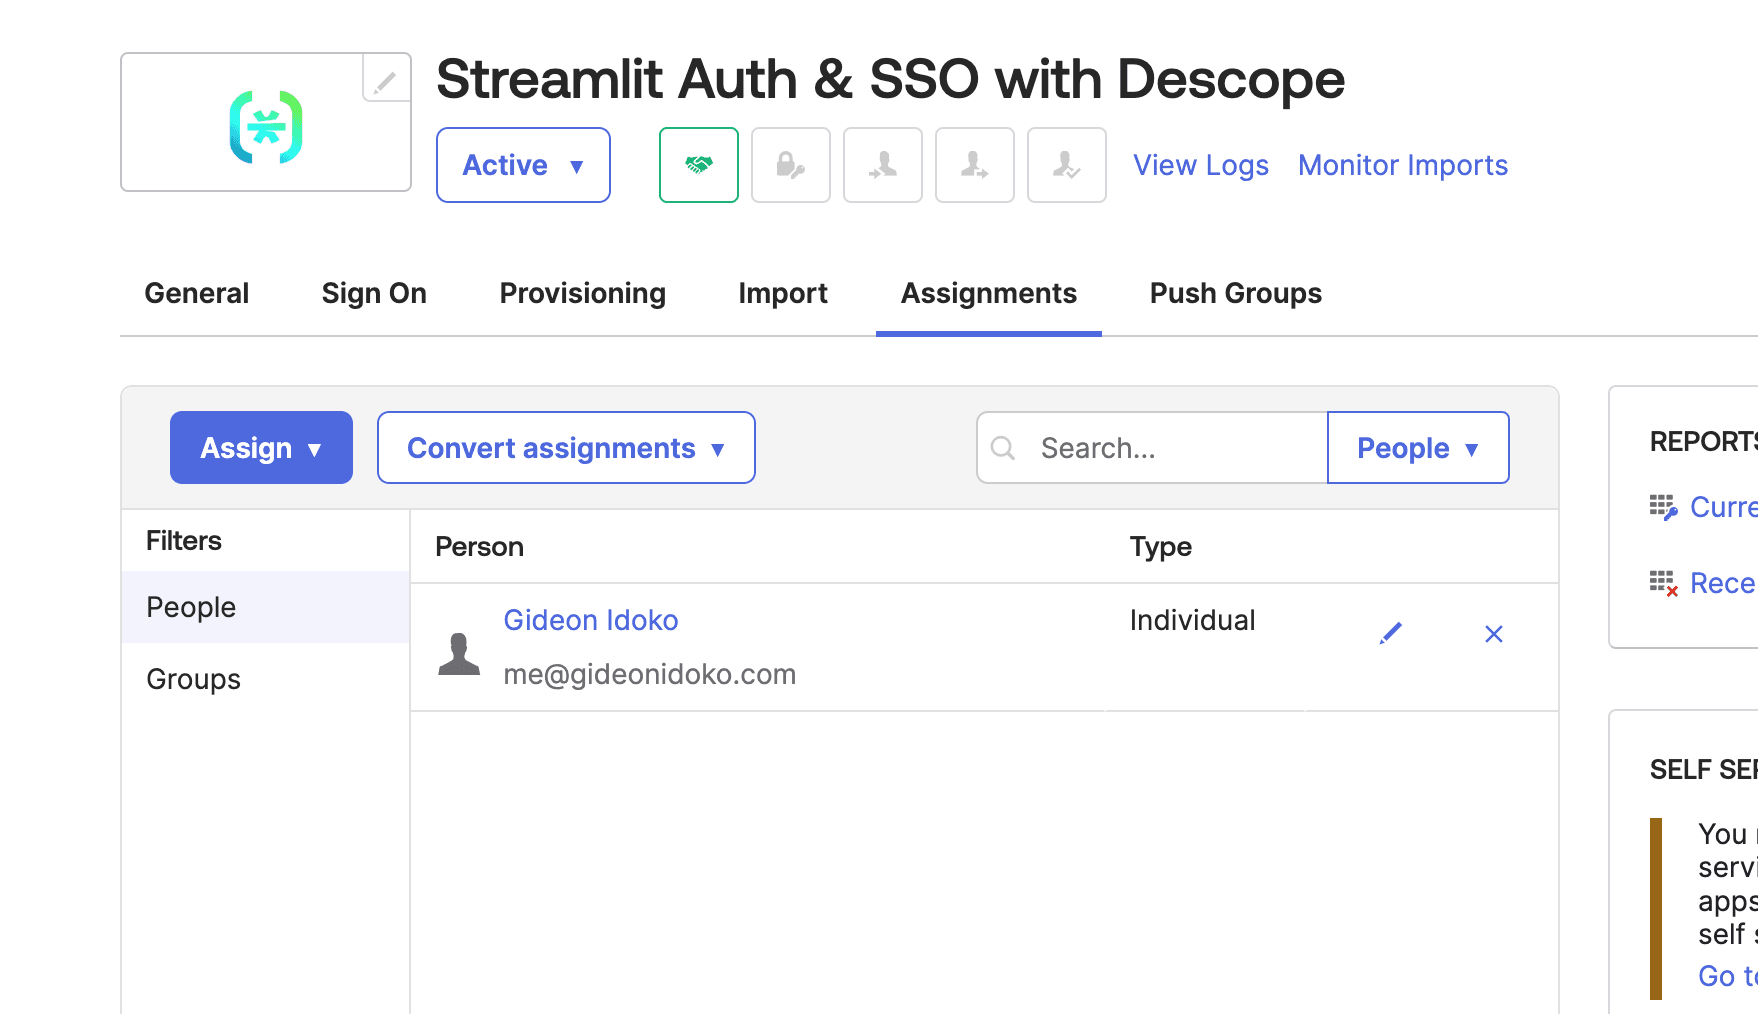
Switch to the Assignments tab and assign users who should have access to your Streamlit app via SSO:
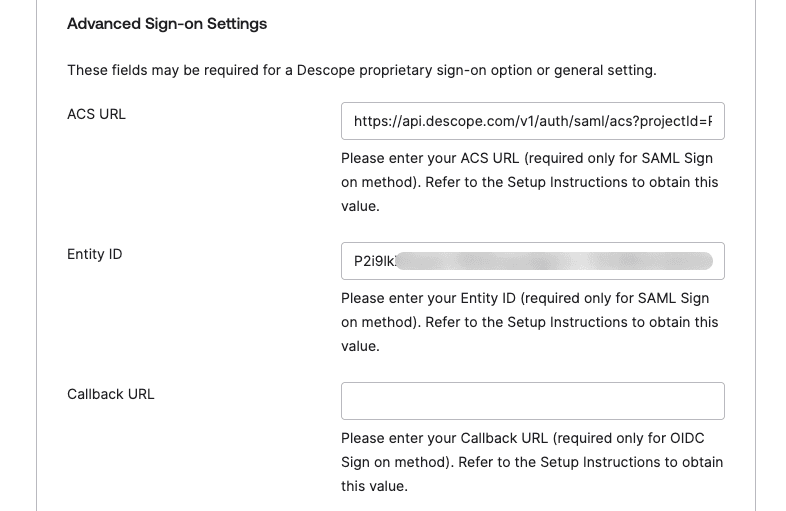
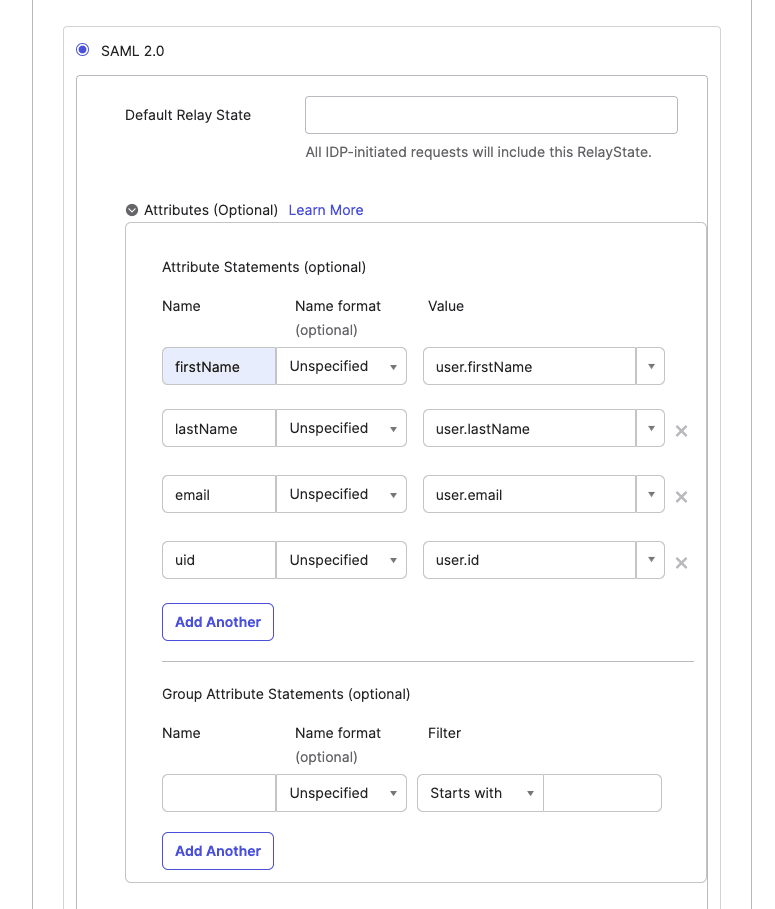
Switch to the Sign-On Options tab and select SAML 2.0. Copy the Metadata URL then paste it into your tenant’s SSO configuration in Descope. Next, copy the ACS URL and Entity ID from Descope into the Advanced Sign-on Settings in Okta:
Expand the Attribute Statements section in Okta. Map the following values:
firstName>user.firstNamelastName>user.lastNameemail>user.emailuid>user.id
These mappings define how user attributes are passed from Okta to Descope.
Back in Descope, update your tenant’s SSO Mapping settings so attributes from Okta align correctly with Descope’s schema.
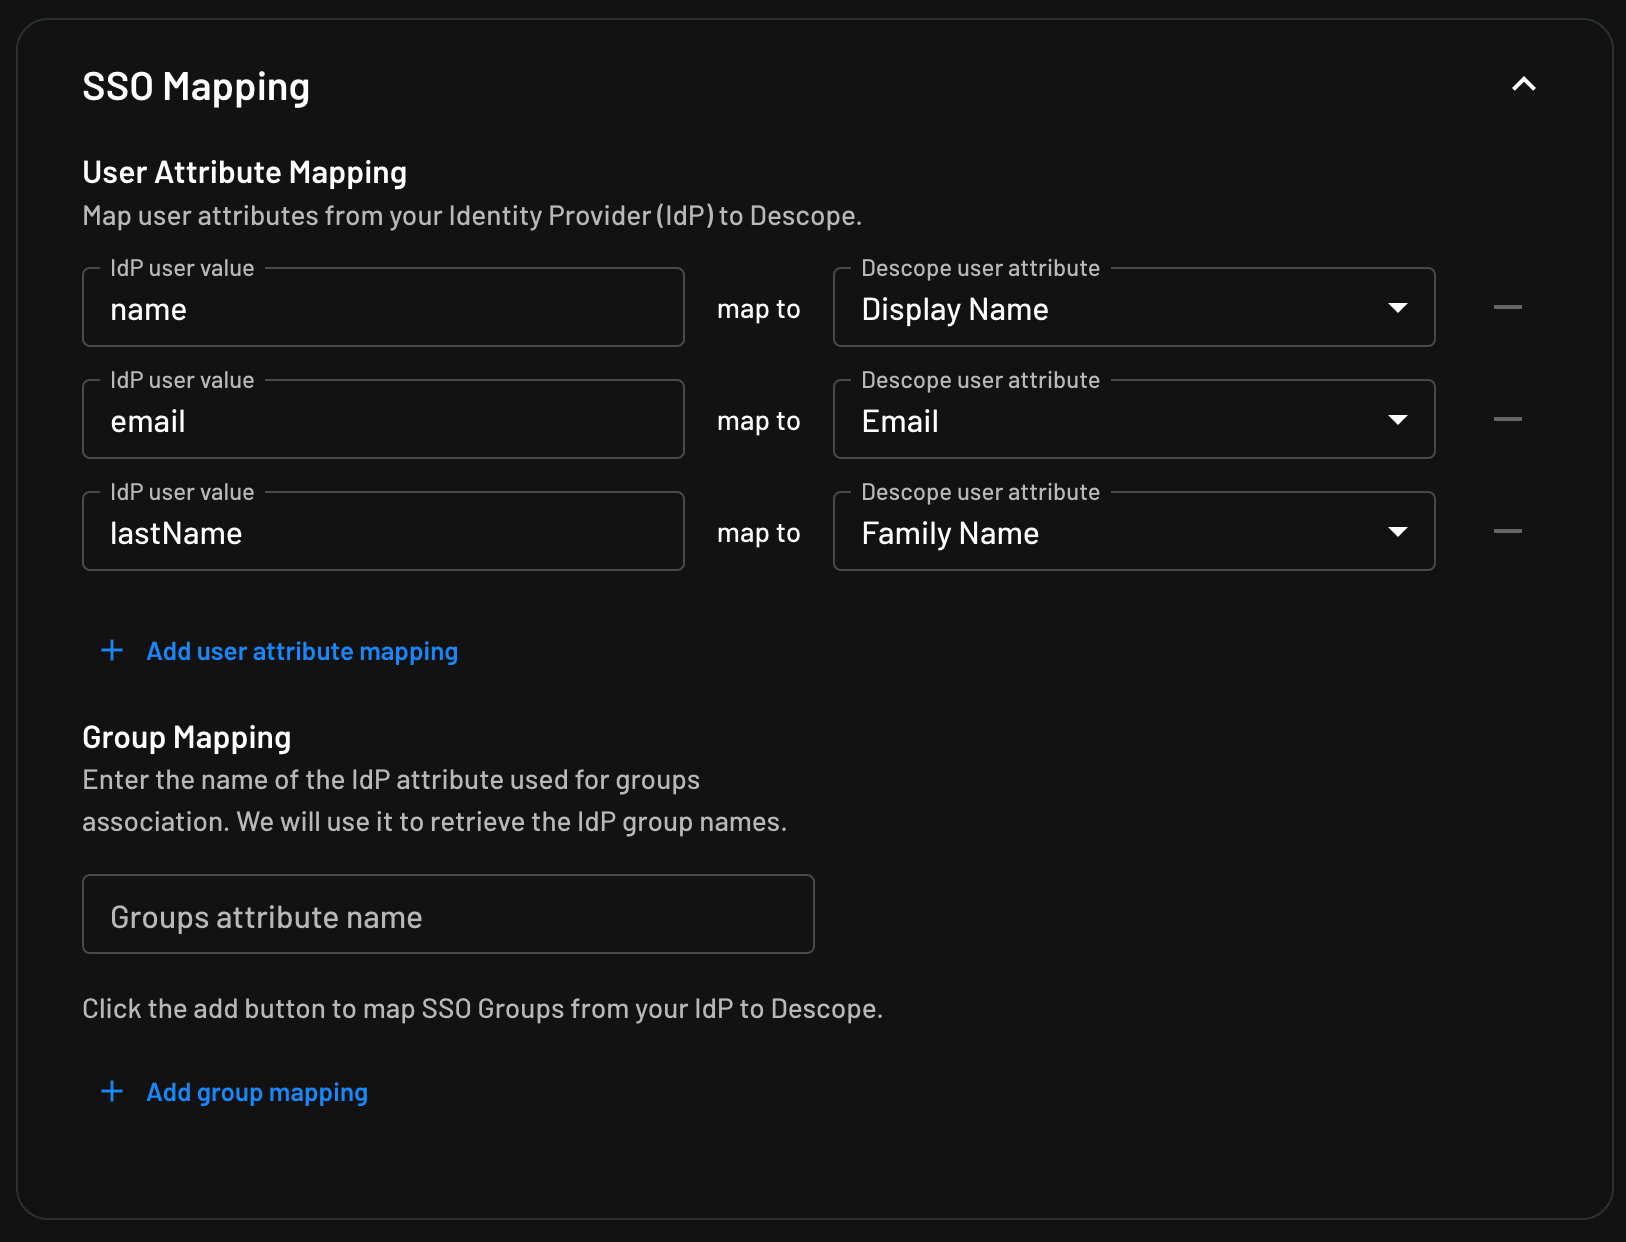
Once this is complete, you’ve established a working SAML SSO configuration between Okta, Descope, and your Streamlit app.
It’s worth noting that Descope also provides a self-service SSO configuration designed for multi-tenant environments. With this setup, each tenant can maintain its own SSO configuration, and tenant admins can manage their Descope SSO settings directly through your application.
To enable this, you can either:
Embed the out-of-the-box
sso-configflow into your app’s admin interface, orGenerate a configuration link that tenant admins can use directly.
For detailed implementation guidance, refer to the Descope documentation.
Implementing the SSO flow in Streamlit
Now that you’ve configured SAML SSO between Okta and Descope, the next step is to implement the flow inside your Streamlit app. This will let users authenticate through Okta and seamlessly return to your app. So let’s add another button under the Sign In with Google button that starts the SSO flow when clicked.
First, you’ll need your tenant ID from the Descope console:
Go to your tenant’s settings.
Copy the Tenant ID.
Add it to your
.streamlit/secrets.tomlfile with theDESCOPE_TENANT_IDkeyUpdate the
st.containerelement in your code like this:
# … collapsed repeated code
TENANT_ID = str(st.secrets.get("DESCOPE_TENANT_ID")) # Get tenant ID from secret

# …

    with st.container(border=True):
        # … google button here

        if st.button("Sign in with SSO", use_container_width=True):
            sso_response = descope_client.sso.start(
                tenant=TENANT_ID, return_url="http://localhost:8501"
            )
            url = sso_response["url"]
            # Redirect to Okta
            st.markdown(
                f'<meta http-equiv="refresh" content="0; url={url}">',
                unsafe_allow_html=True,
            )
# …
Your Streamlit app should now look like this:
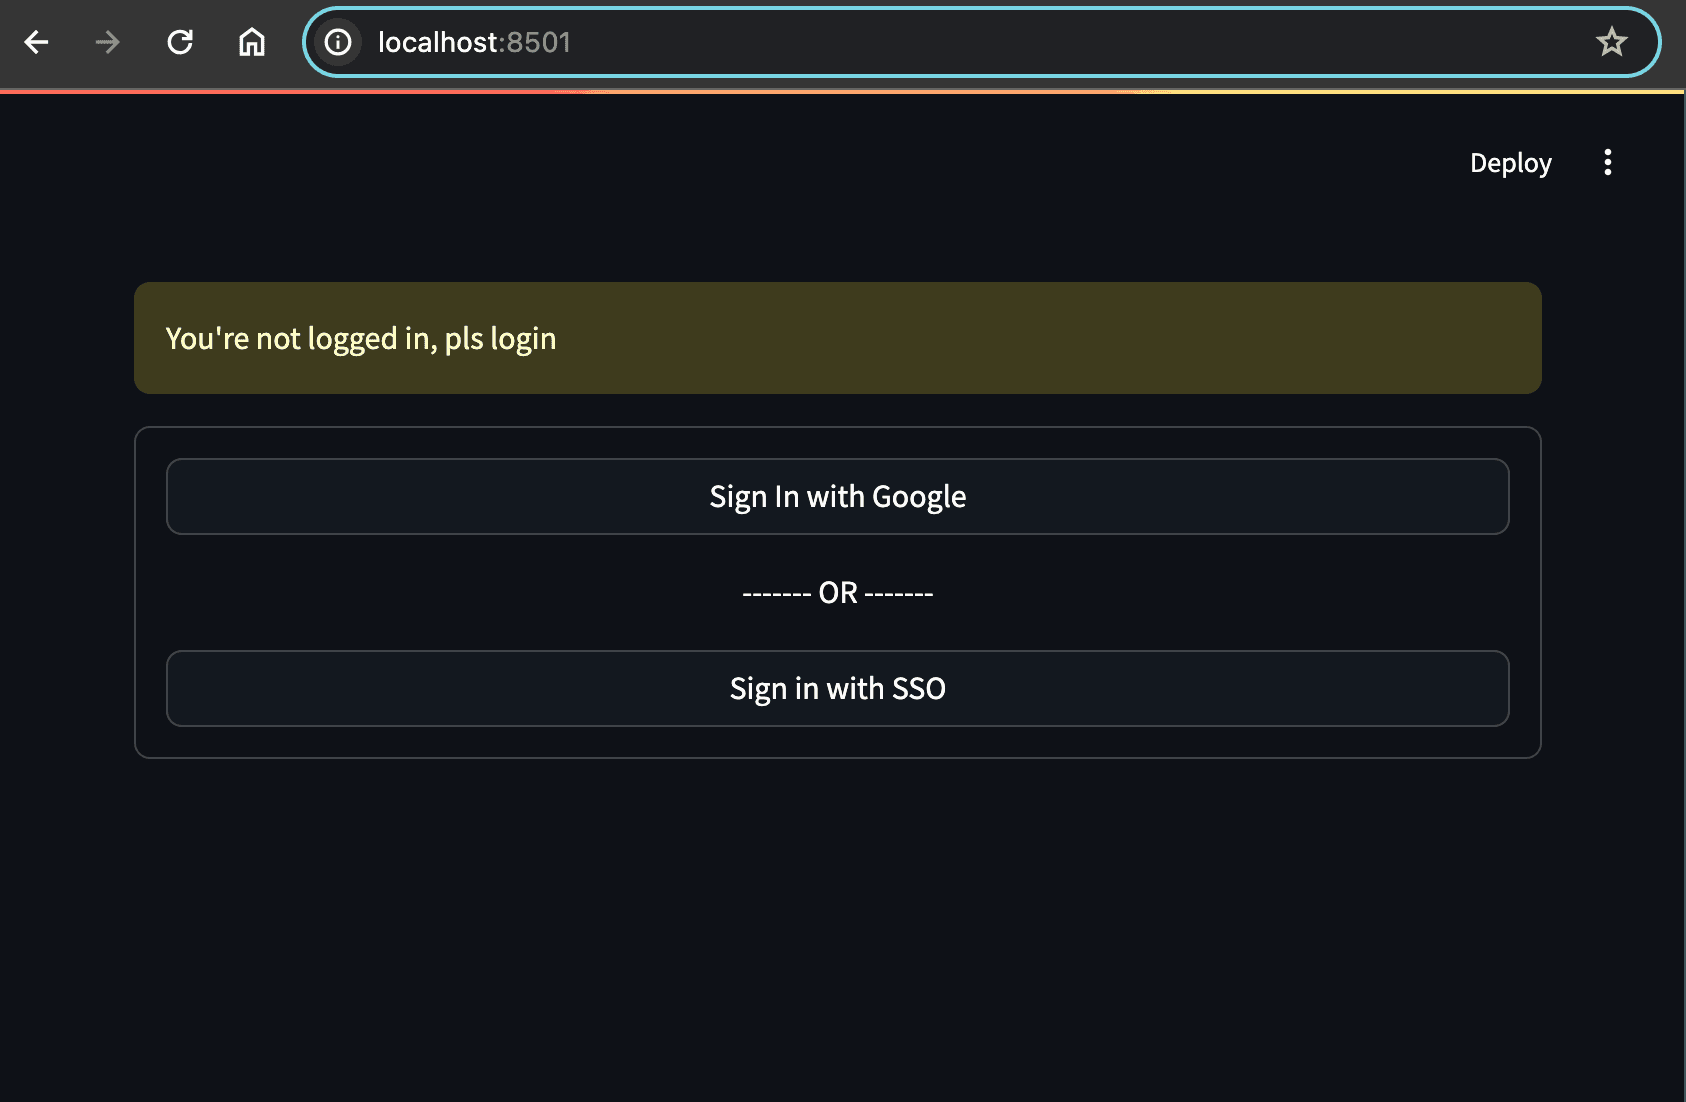
Click Sign In with SSO to go to Okta for verification. Sign in with one of the users you assigned earlier. After successful authentication, you’re redirected back to your Streamlit app with a code query parameter—just like in the OAuth flow. Since you already implemented the code exchange, you’ll be signed in automatically:
Managing authorization and user privileges
While authentication verifies the user’s identity, authorization controls their access to resources and features based on predefined roles and permissions. The Descope console includes tools to manage user roles and permissions so you can enforce access control in your Streamlit app. After login, Descope returns role information you can use to tailor the UI and gate functionality.
All roles and permissions live under the Authorization page. A Tenant Admin role is created by default. Let’s assign that role to a user and then conditionally display admin-only content in the app.
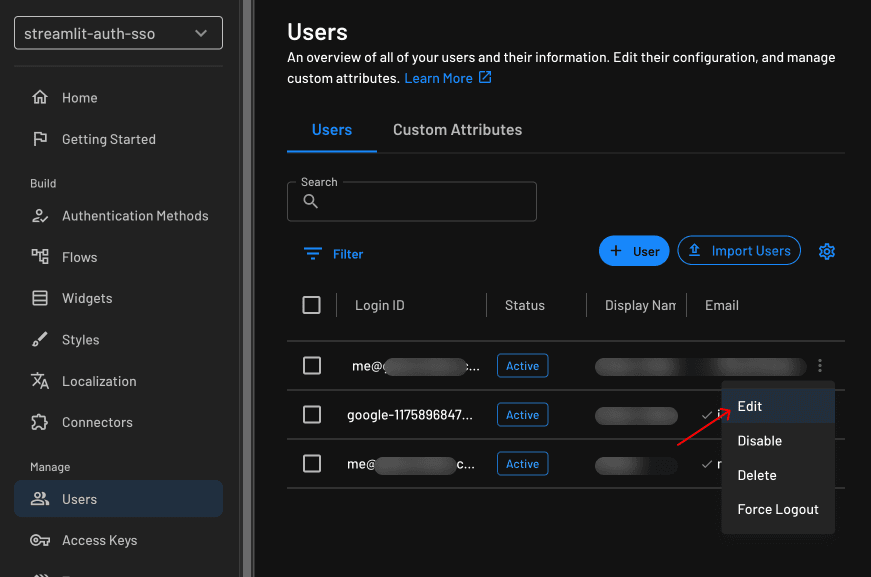
Go to the Users page, click the kebab menu of the user you want to update, and click Edit:
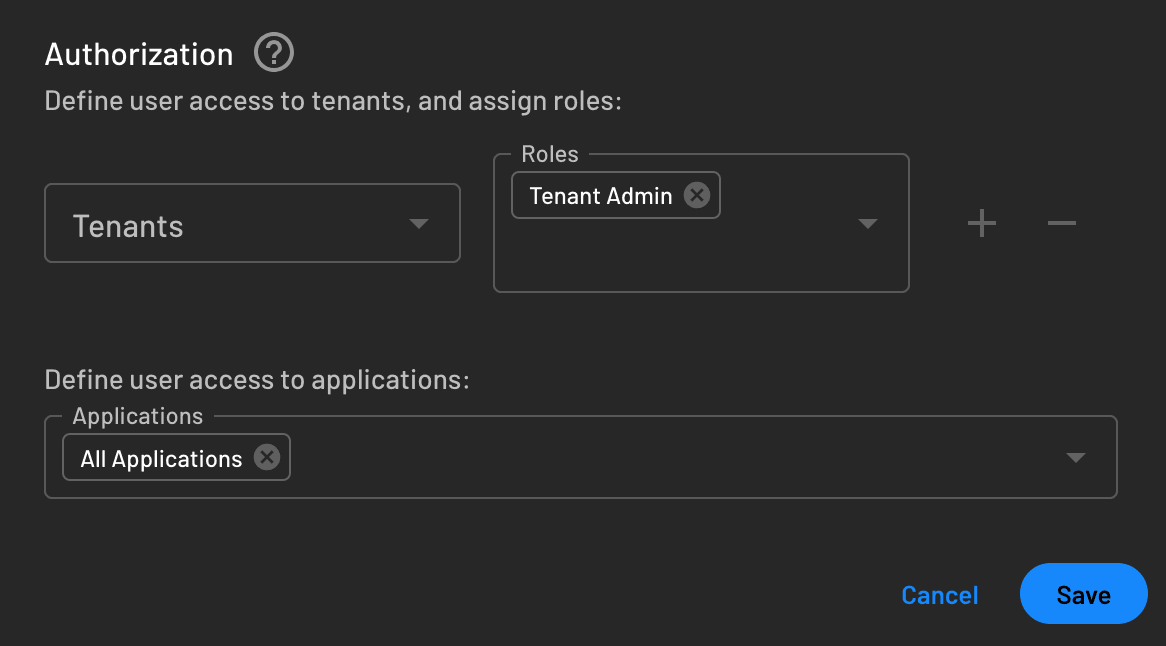
In the modal, select Tenant Admin in the Roles field and click Save:
Update your code to show an admin indicator:
# … collapsed repeated code
        if "user" in st.session_state:
            # …
            if "Tenant Admin" in user["roleNames"]:
                # Show admin-specific content
                st.success("ADMIN", icon="🤖")
# …
This should now be the view of the admin user when they’re signed in:
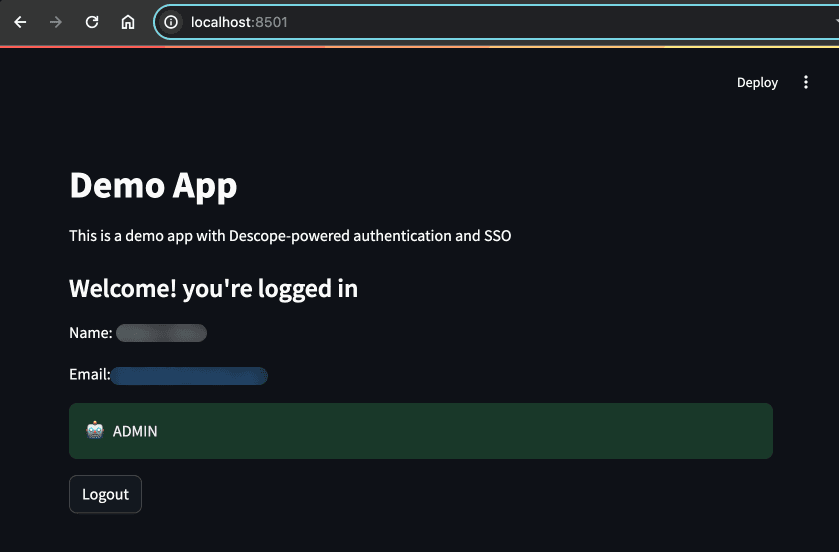
This approach ensures that only authorized users see privileged features, improving both the security and integrity of your app.
You can find the full code on GitHub.
Streamlit SSO and authentication with Descope
You just wired Streamlit SSO with Descope end to end: created a Descope project, added OAuth social login, implemented SAML SSO with Okta, and gated features with roles. You now have a secure pattern you can reuse across Streamlit apps, from personal dashboards to multi-tenant products.
Ready to keep going? Use your Free Forever account to extend your app with passwordless options, adaptive MFA, and SCIM provisioning. Have questions or edge cases to discuss? Book time with the team for a focused walkthrough.