
Table of Contents
This tutorial was written by Kevin Kimani, a passionate developer and technical writer who enjoys explaining complicated concepts in a simple way. Connect with him on his GitHub or X to see more of his work!
Panel is an open source Python library for creating interactive data visualization applications. As these applications grow, secure authentication becomes essential to protect the data, ensure compliance with security standards, and deliver a seamless user experience. Descope, a no-/low-code customer identity and access management (CIAM) platform, simplifies authentication by offering ready-to-use solutions for secure login, single sign-on (SSO), and user access control. Its support for OpenID Connect (OIDC), a widely adopted standard for secure and scalable user authentication, makes it an excellent choice for securing Panel apps, allowing developers to focus on building core features while relying on a trusted platform for authentication.
In this tutorial, you’ll learn how to integrate Descope into your Panel application by implementing secure user authentication, configuring access control, and providing a seamless SSO experience for your users. You will start by adding vanilla authentication with Descope via magic links, add support for social login, and lastly, implement SSO with Okta as the identity provider (IdP).
Why is adding SSO important for these types of apps?
SSO is often added to data visualization tools because these tools are typically designed for B2B use. Here are some of the advantages of integrating SSO into a data visualization tool:
Simplifying access for end users: B2B applications frequently cater to multiple companies with their own employees and systems. Each of these companies will have an IdP—such as Okta, Azure AD, or Google Workspace—which they use for secure access to tools and resources. Integrating SSO into your application allows users to sign in with their existing corporate accounts, which eliminates the need for another set of credentials.
Strengthening security and compliance: SSO ensures that authentication is handled through the organization’s IdP, which is often configured with advanced security features like MFA and conditional access policies. This reduces the risk of unauthorized access and strengthens compliance with industry standards such as GDPR and HIPAA, which are crucial for data-driven applications.
Simplified management for developers: From a developer’s perspective, SSO integration reduces the complexity of user account management. With SSO, developers can offload the responsibility of managing user credentials and access roles to the IdP, which not only saves time but also reduces the risk of mishandling sensitive user information.
Adding SSO to your application improves the user experience and future-proofs it to meet the needs of enterprise customers while maintaining high security standards.
Prerequisites
To follow along with this guide, you need to have the following:
Python 3 installed on your local machine
Git CLI installed on your local machine
A code editor and a web browser
Creating a Panel app
For simplicity, this tutorial uses a prebuilt application that you add authentication to. To clone the application to your local machine, launch your terminal and execute the following command:
git clone --single-branch -b starter-template https://github.com/kimanikevin254/descope-panel-auth-sso.gitCreate and activate a virtual environment for your application to run in:
cd descope-panel-auth-sso

python -m venv venv

source venv/bin/activate
Next, install all the dependencies using the command below:
pip install -r requirements.txtThe application is now set up. The two most important files in the application are admin.py and user.py. admin.py is used to set up an admin dashboard for a Panel application and will only be accessed by users with the appropriate roles after you have implemented auth and role-based access control. user.py sets up a Panel app that allows users to interact with a data set and view rolling averages and outliers for different variables. You can learn more about this application in the Panel docs.
Run the application using the following command:
panel serve admin.py user.py --devLaunch your browser and navigate to http://localhost:5006/. You’ll see that you have two Panel apps running:
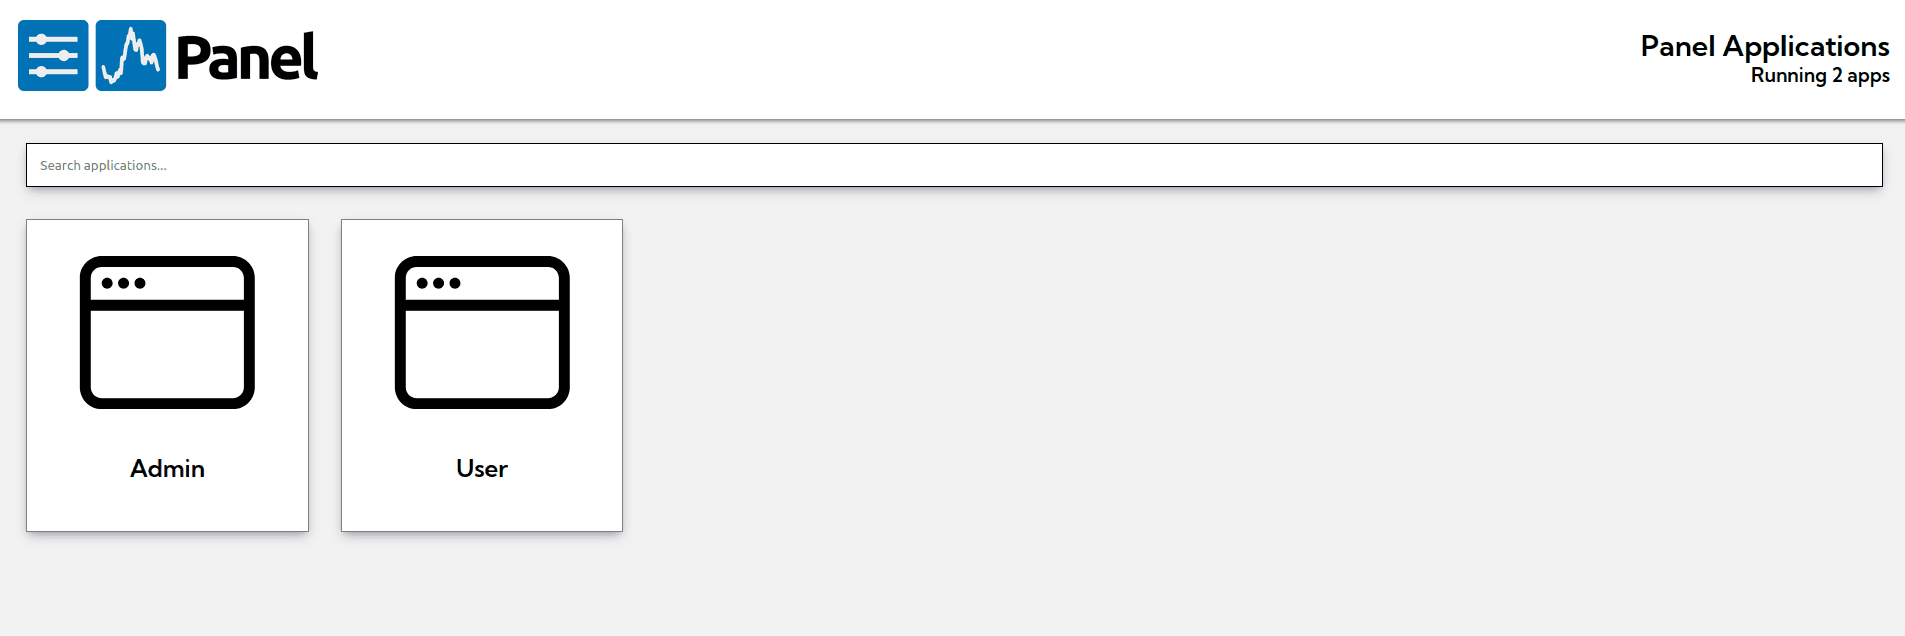
At the moment, you can open any application. However, later on, you will implement authorization to ensure that the “Admin” application can only be accessed by users with the appropriate roles.
Setting up Descope
Here, you will create a project on your Descope console and implement an authentication flow to set up your application’s authentication process. This flow will enable your users to authenticate using any of the three methods we discussed: magic links, social logins, and SSO.
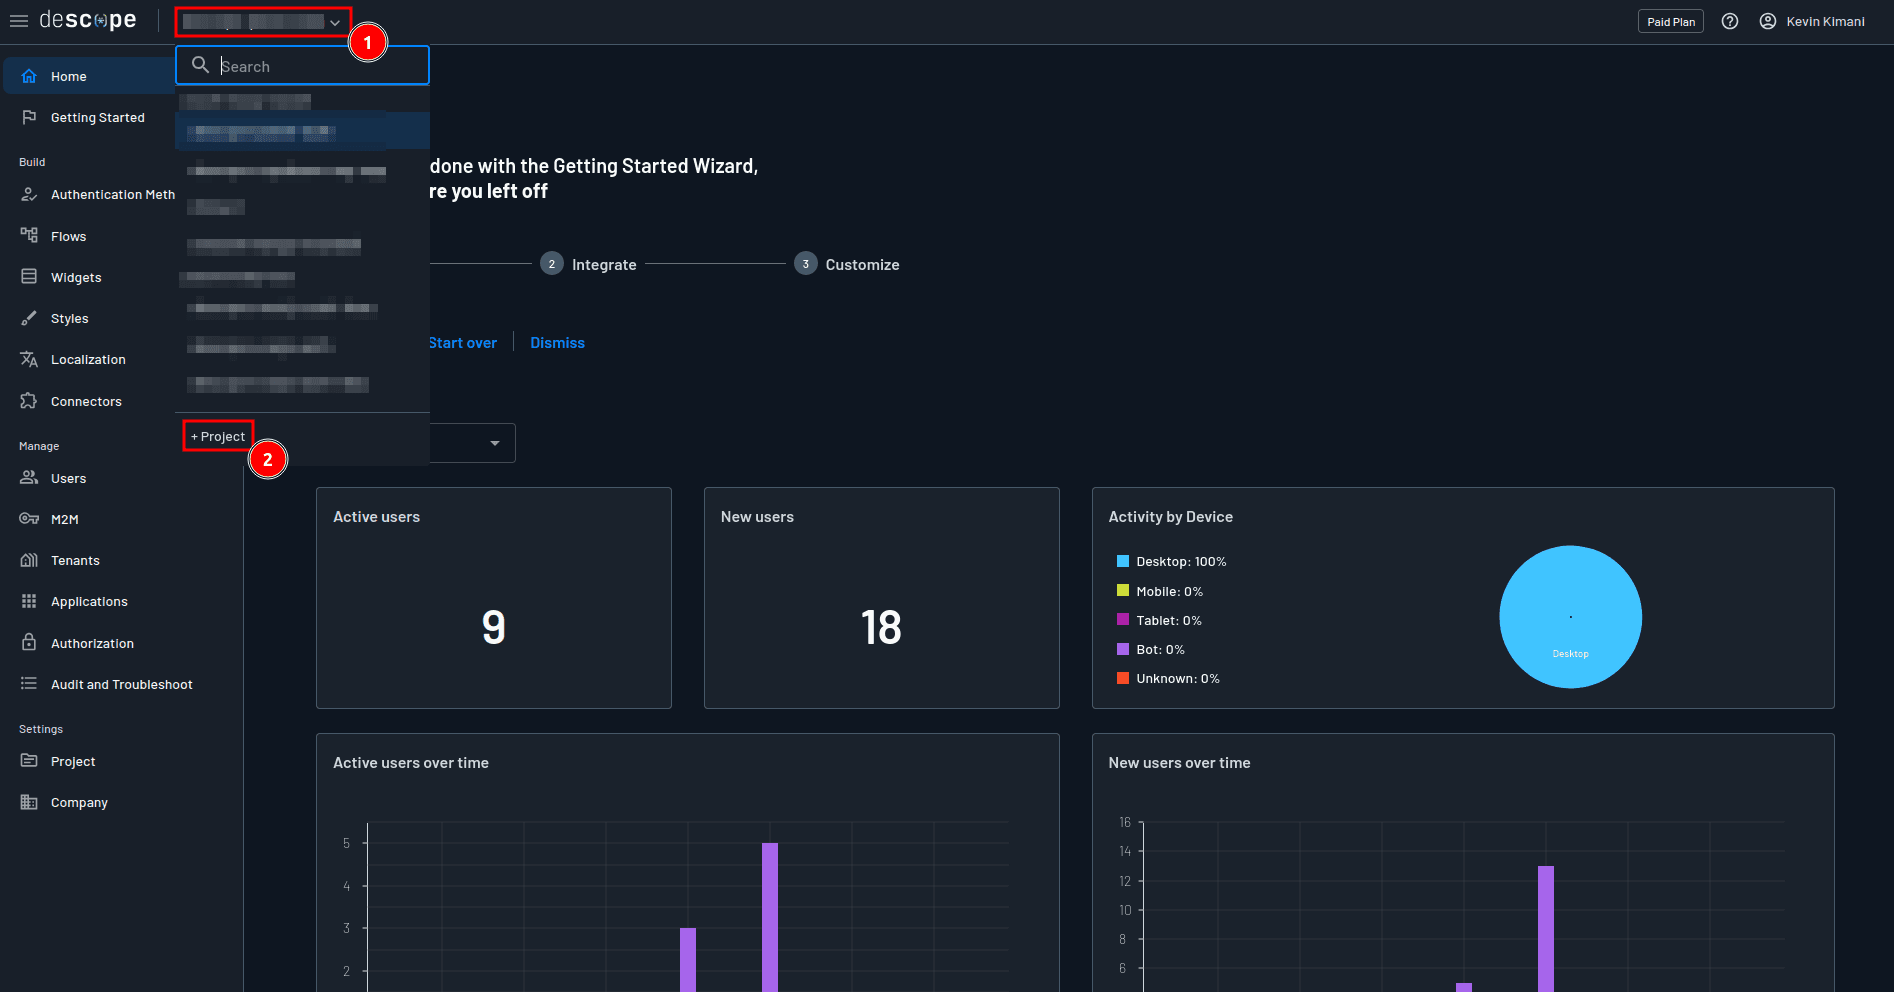
To get started, launch your Descope console and select + Project from the project dropdown to create a new project:
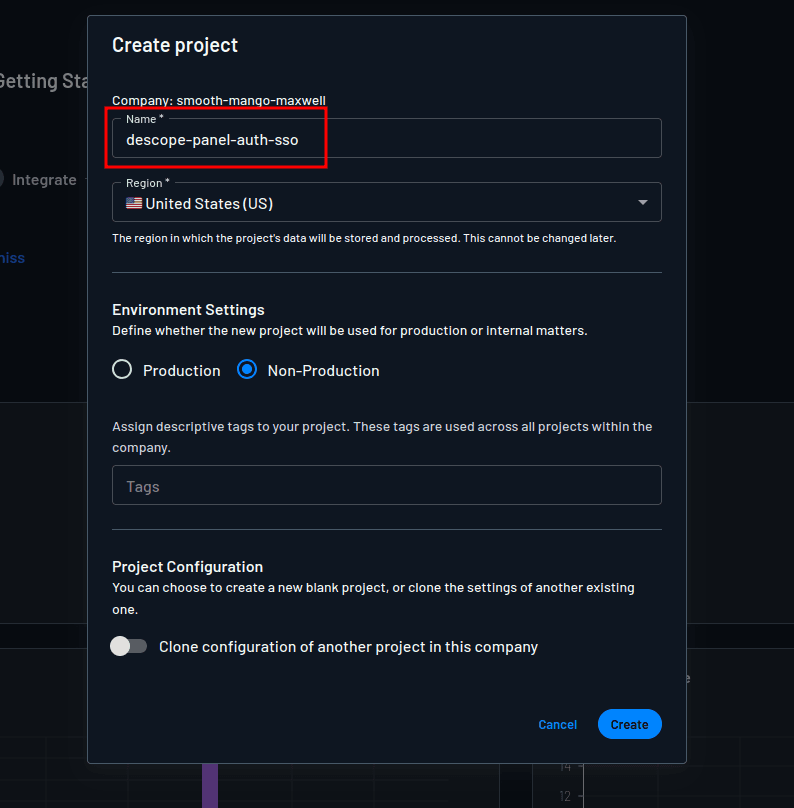
In the Create project modal, provide descope-panel-auth-sso as the project name and click Create to create the project:
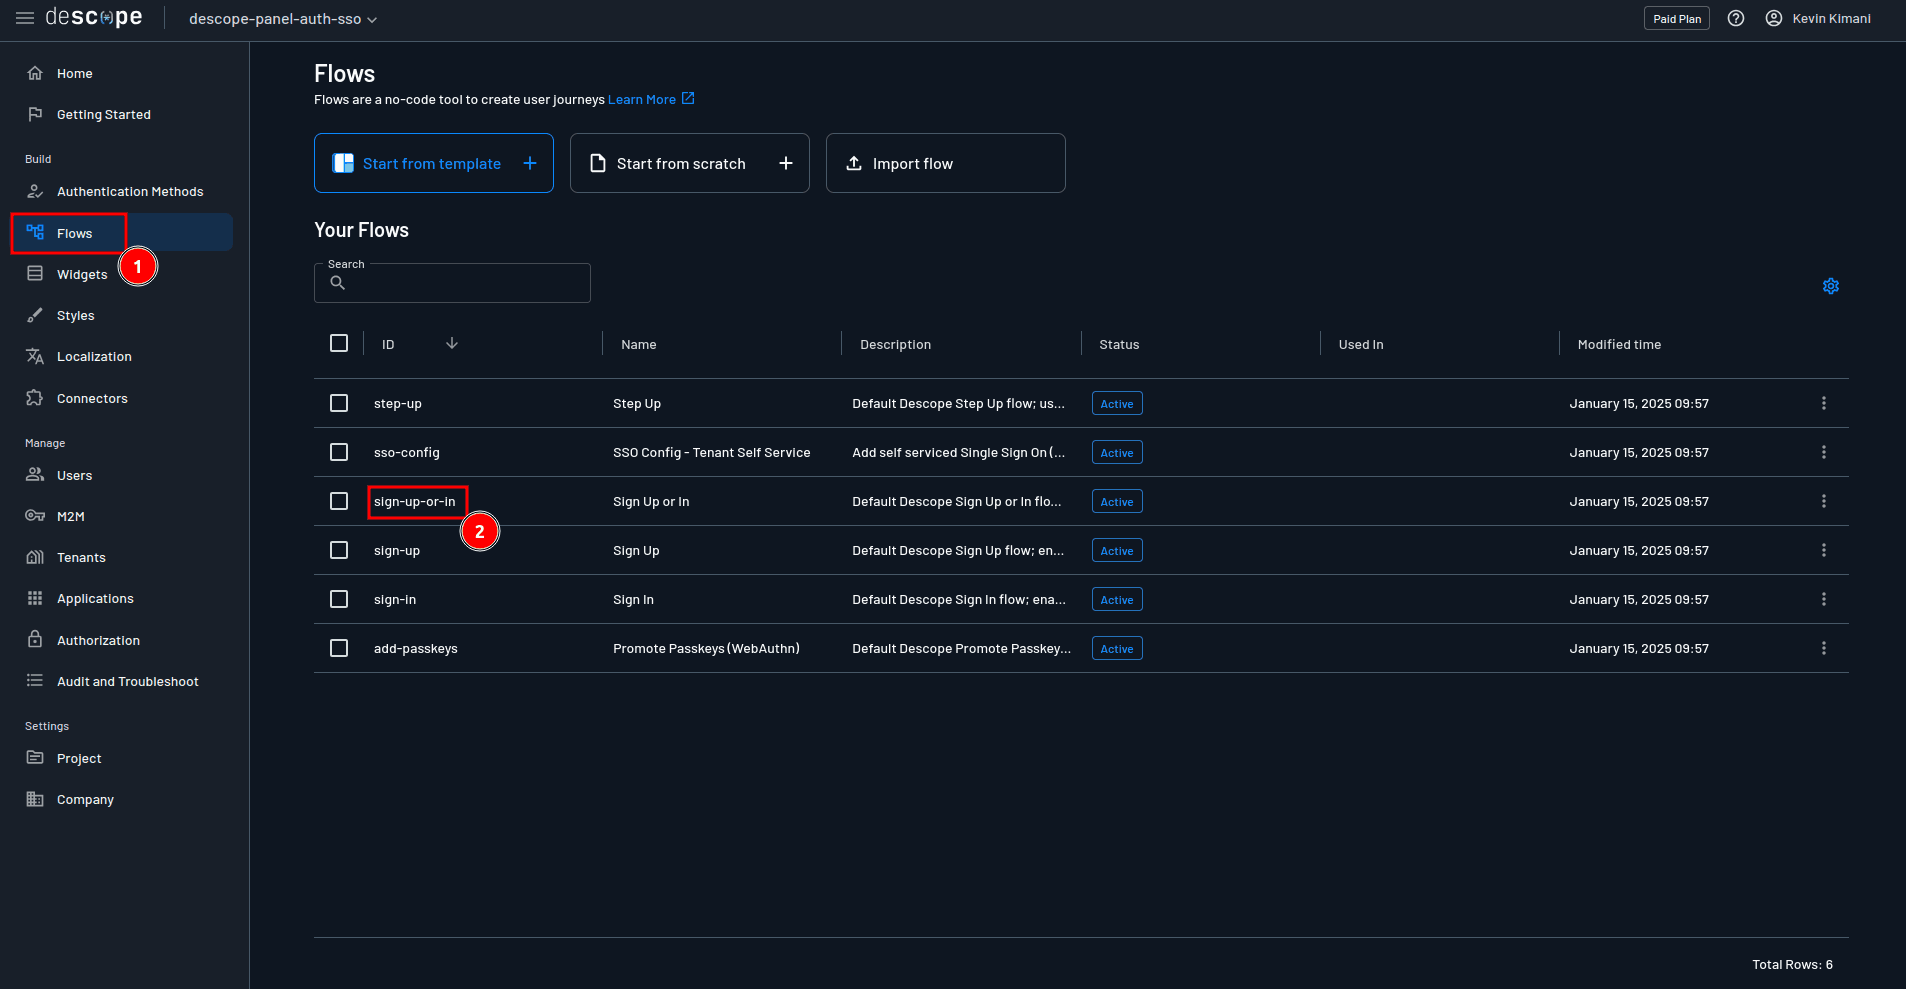
To create an authentication flow, select Flows > sign-up-or-in on the Descope console to open the default sign-up-or-in flow in the flow editor:
As mentioned earlier, you’re going to customize this flow to support three different authentication methods: magic links, social logins, and SSO login. This tutorial uses an already-prepared flow that you just need to import.
The project you set up earlier contains a file named sign-up-or-in.json, which is where you’ll find the flow logic. You can import it into the flow editor by selecting Import flow / Export flow > Import flow inside the editor and uploading the flow from your local machine:

The flow you just imported should now have all the authentication methods that you need:
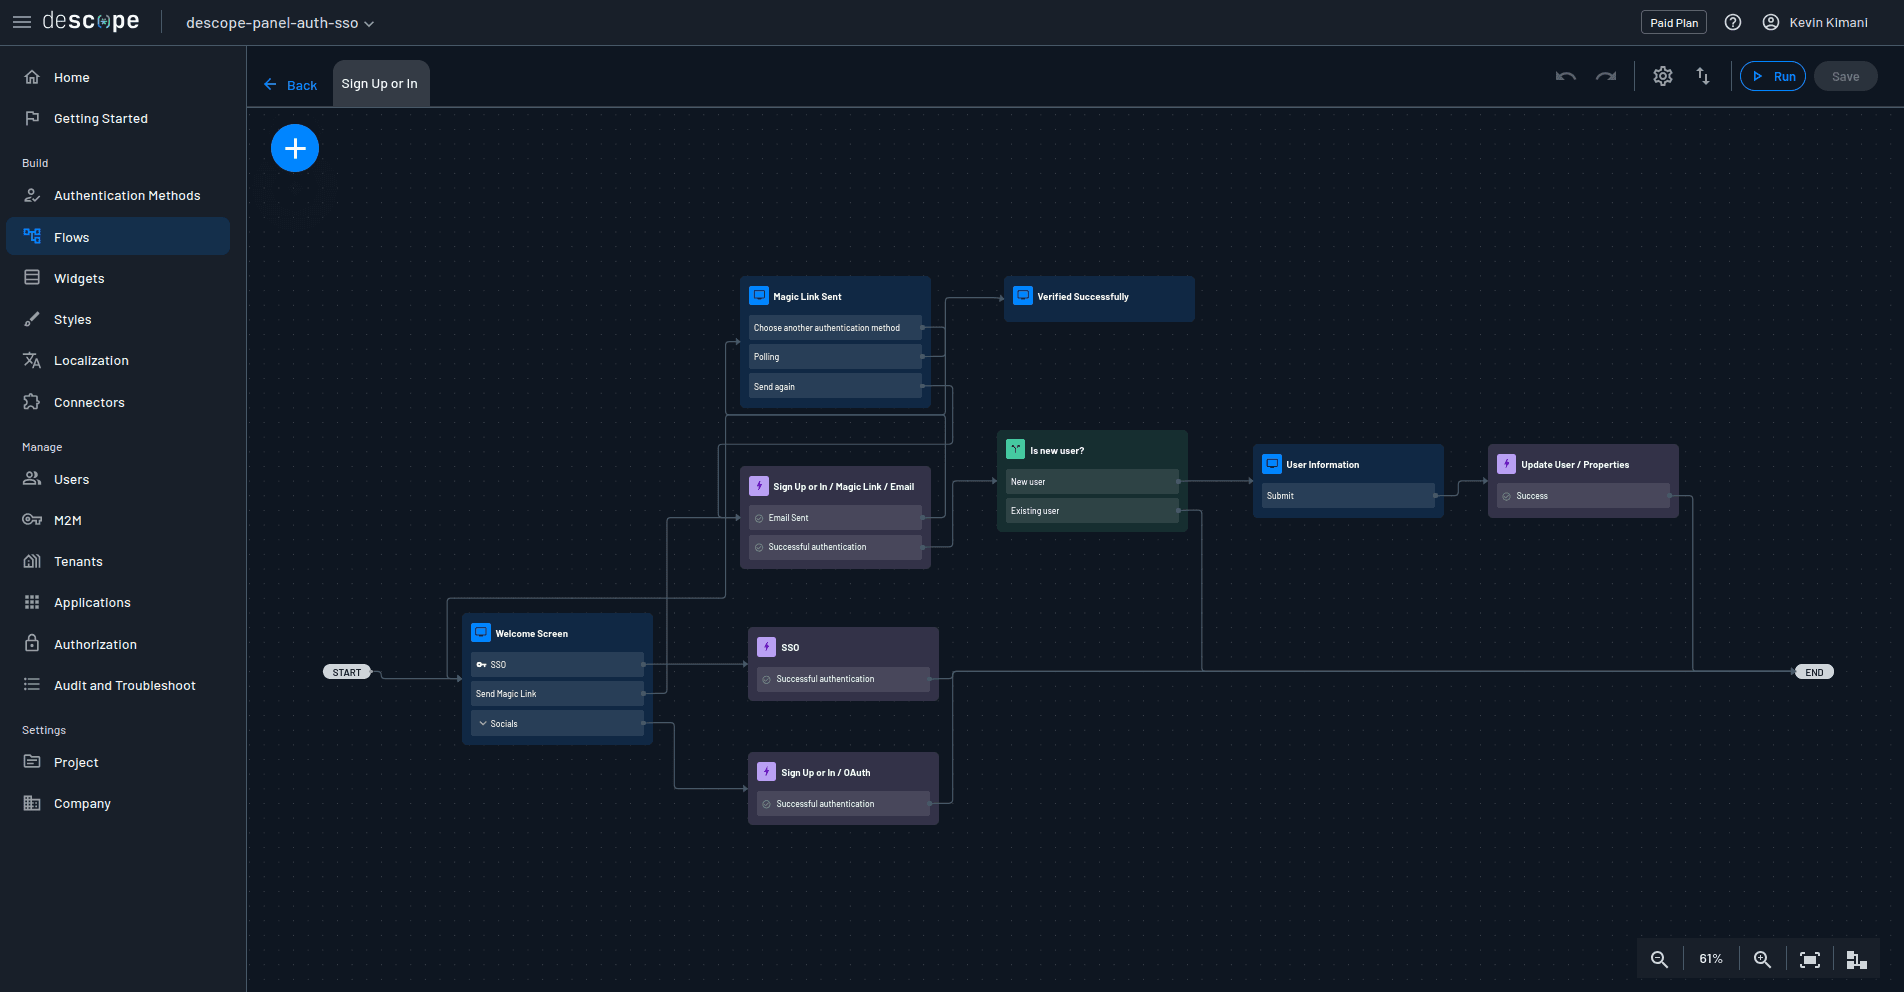
Magic links and social login authentication methods are now fully configured. You will configure SSO later.
Adding authentication with Descope
In this section, you’ll configure Descope as a generic OAuth provider for your Panel application.
Panel performs authentication through OAuth 2.0, a widely used protocol that delegates authentication to third-party providers, such as Google and GitHub. By default, Panel ships with support for various OAuth providers, but it also allows you to configure authentication via any Generic OAuth provider that has configurable endpoints, such as Descope.
To set up authentication with Descope, you need to configure specific settings. These can be passed through environment variables or via CLI arguments when you’re running the application. In this guide, we will use environment variables for simplicity.
Here are the required environment variables:
PANEL_OAUTH_KEY: A public identifier for the applicationPANEL_OAUTH_SECRET: A secret that is only known to the application and the authorization serverPANEL_OAUTH_AUTHORIZE_URL: The endpoint that initializes the authorization flowPANEL_OAUTH_TOKEN_URL: The endpoint that exchanges an authorization code for access tokensPANEL_OAUTH_USER_URL: The endpoint that retrieves the authenticated user’s informationPANEL_COOKIE_SECRET: A random, unguessable string for encrypting cookiesPANEL_OAUTH_REDIRECT_URI: The URL where the user is redirected to after authenticationPANEL_OAUTH_ENCRYPTION: For encrypting user information and access tokensPANEL_OAUTH_SCOPE: Defines the scope of permissions requested from the authorization server
You will obtain some values for these environment variables from the Descope console and generate others on the terminal.
Create a new file named .env in the project root folder and add the content below. You will assign values for each environment variable as you proceed.
PANEL_COOKIE_SECRET=
PANEL_OAUTH_REDIRECT_URI="http://localhost:5006"
PANEL_OAUTH_ENCRYPTION=
PANEL_OAUTH_SCOPE=
PANEL_OAUTH_KEY=
PANEL_OAUTH_SECRET=
PANEL_OAUTH_AUTHORIZE_URL=
PANEL_OAUTH_TOKEN_URL=
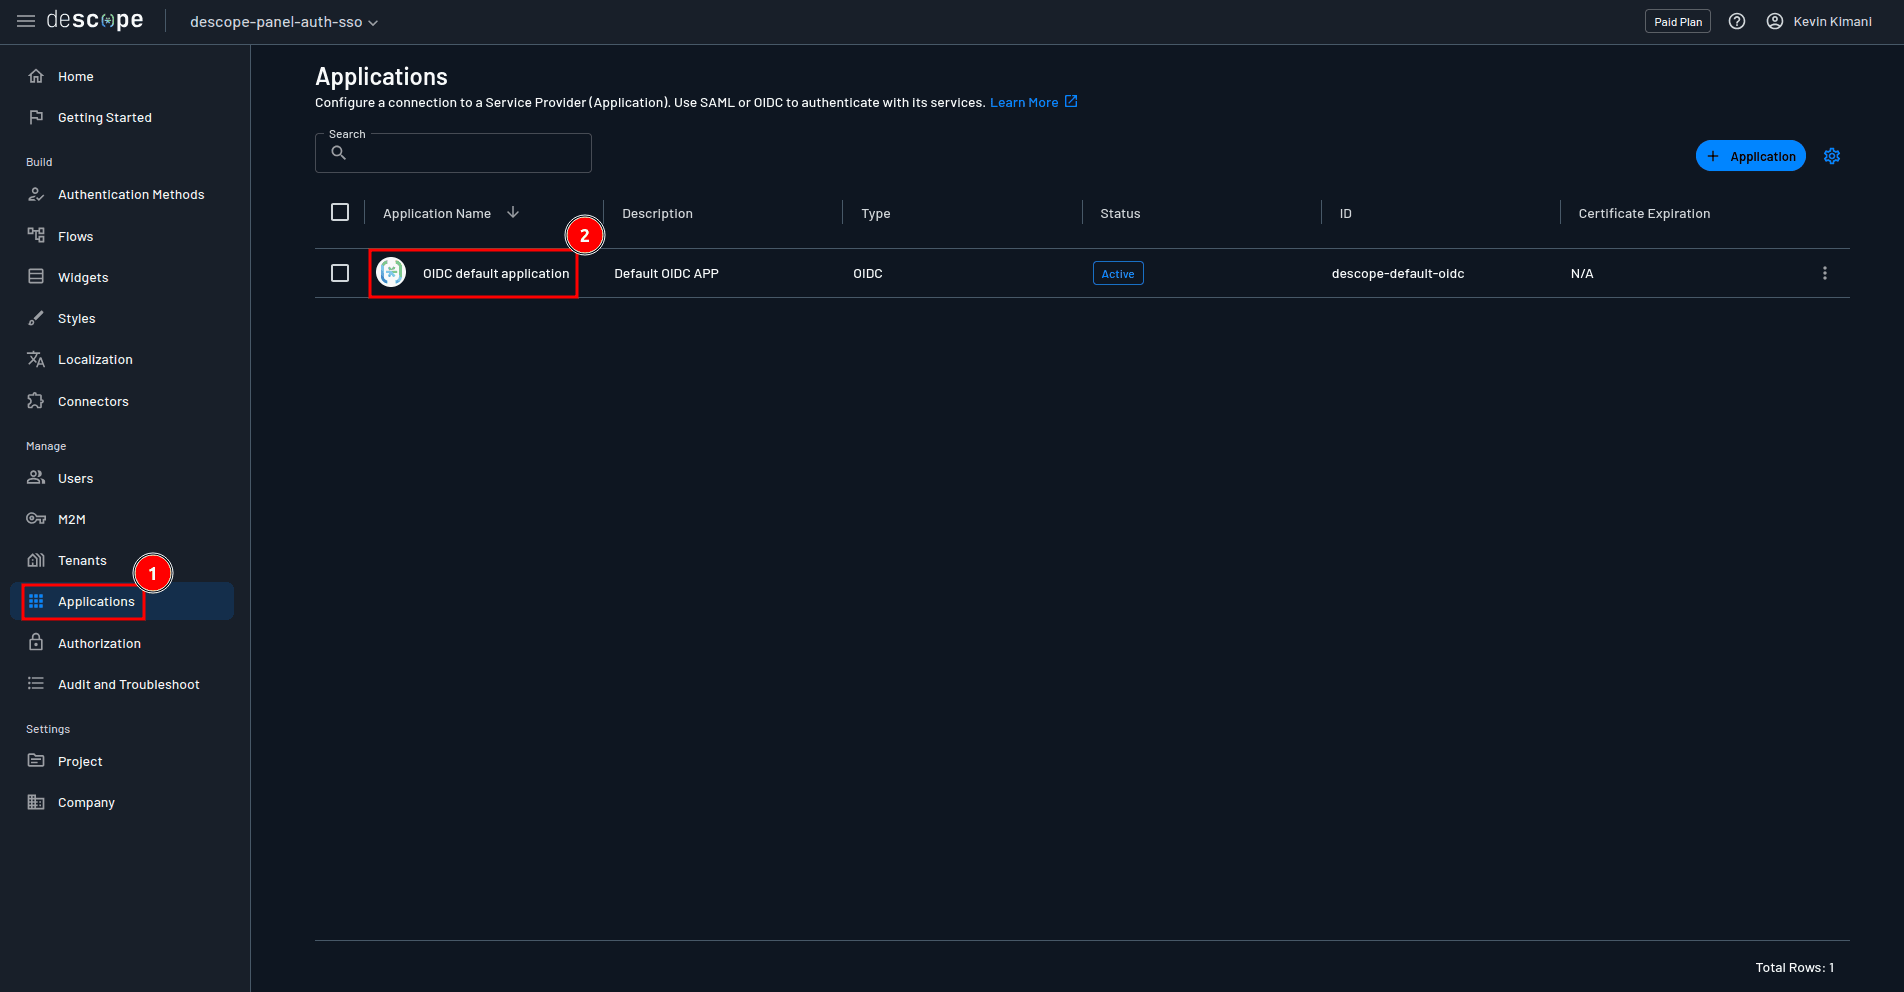
PANEL_OAUTH_USER_URL=To integrate Descope as your authentication provider, you first need to configure an OIDC app in the Descope dashboard. This configuration provides the necessary endpoints and credentials for your Panel application. You could choose to create a new OIDC application for this integration, but in this example, you can simply use the default OIDC application that ships with Descope. Access the application by navigating to Applications > OIDC default application on the Descope console:
In the OIDC app’s details page, scroll down to the SP Configuration section, take note of the Client ID, Authorization URL, and Access Token URL, and assign them to the PANEL_OAUTH_KEY, PANEL_OAUTH_AUTHORIZE_URL, and PANEL_OAUTH_TOKEN_URL environment variables in the .env file, respectively.
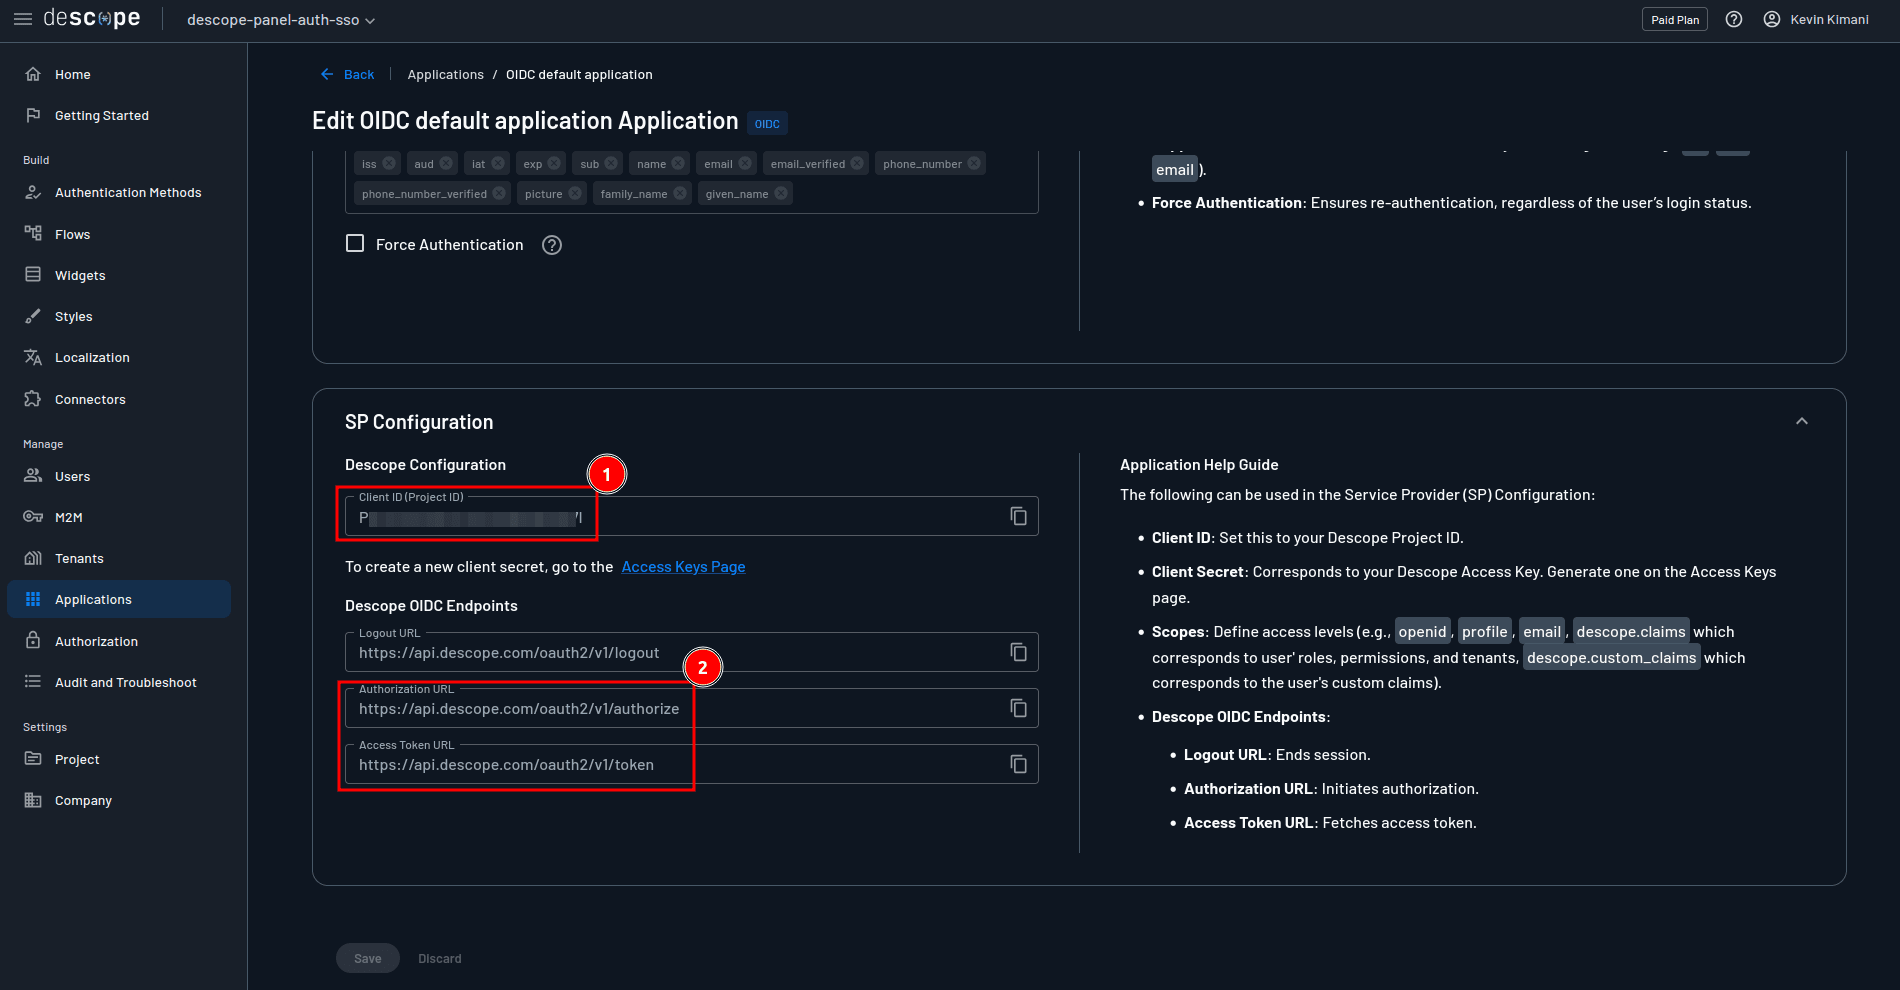
For the PANEL_OAUTH_USER_URL environment variable, assign the value https://api.descope.com/oauth2/v1/userinfo.
For the PANEL_OAUTH_SCOPE environment variable, provide the value openid email profile descope.claims descope.custom_claims. The openid email profile scopes request basic user information, while the descope.claims descope.custom_claims scopes request the user roles, permissions, tenants, and custom claims from the IdP. However, for the descope.claims descope.custom_claims scopes to be provided, you need to go back to your OIDC application and add them to the Supported Claims list under IdP Configuration:
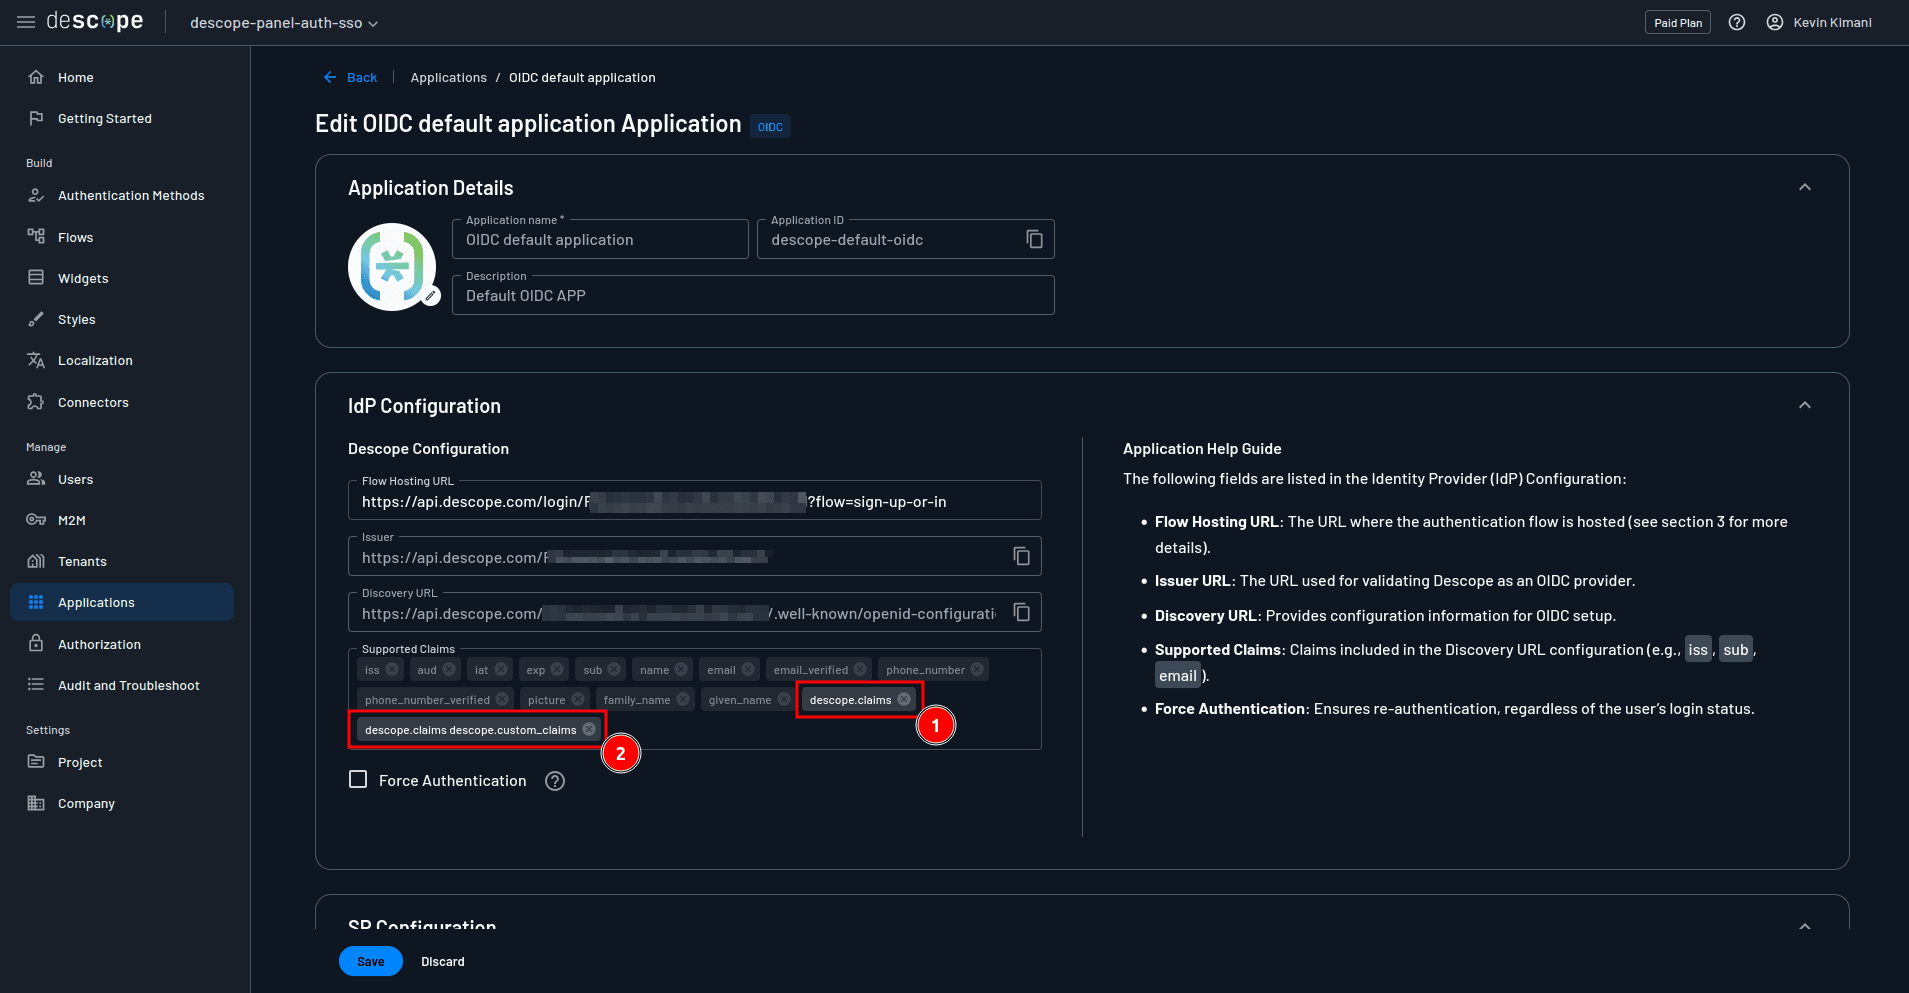
Remember to save the changes.
To obtain the value for the PANEL_OAUTH_SECRET environment variable, create an access key by navigating to M2M > + Access Key on the Descope console. Name the key whatever you like and click Generate Key:
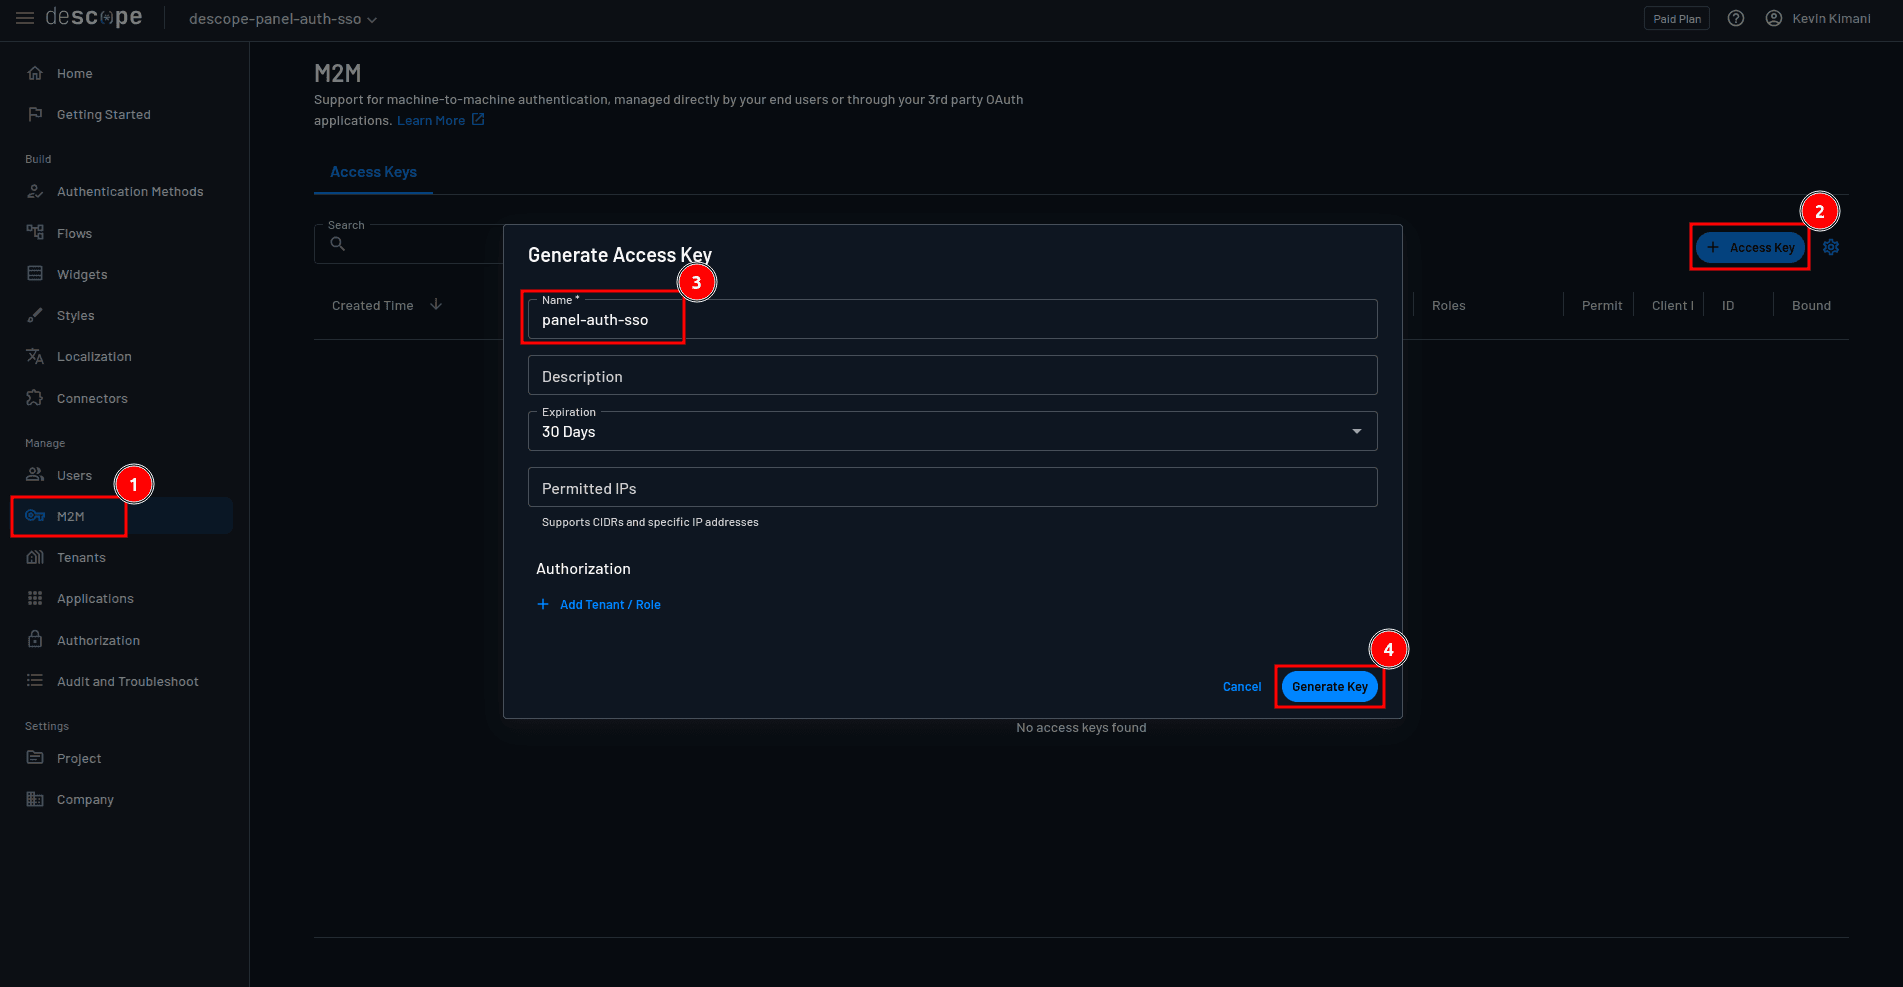
Copy the value of the generated key, and assign it to the PANEL_OAUTH_SECRET environment variable in the .env file.
Make sure your virtual environment is activated, and then execute the following command in your terminal to generate a value for the PANEL_COOKIE_SECRET environment variable:
panel secretLastly, activate the Python shell by executing the command python in your terminal, and execute the following code to generate a value for the PANEL_OAUTH_ENCRYPTION environment variable:
from cryptography.fernet import Fernet

key = Fernet.generate_key()
print(key.decode())
Now Descope is fully configured as a generic OAuth provider for Descope. At this point, you can run the application using the command panel serve admin.py user.py --oauth-provider=generic --dev and test if authentication is working as expected.
Keep in mind that only magic links and social login authentication methods should be working at this point. You will work on SSO in the next section.
Implement SSO with OAuth using Descope
OAuth 2.0 is an industry-standard protocol for authorization that enables applications to securely access user resources without requiring them to share their credentials. OAuth acts as a “middleman” that allows users to grant limited access to their information stored on an IdP to the Service Provider (SP), such as your application. When combined with OIDC, which is built on top of OAuth, this protocol also enables SSO, which allows users to log in once with their existing credentials and gain access to multiple applications or systems without having to log in again.
In this section, you’ll configure Okta as the IdP and Descope as the OAuth service to integrate authentication and SSO into your Panel application.
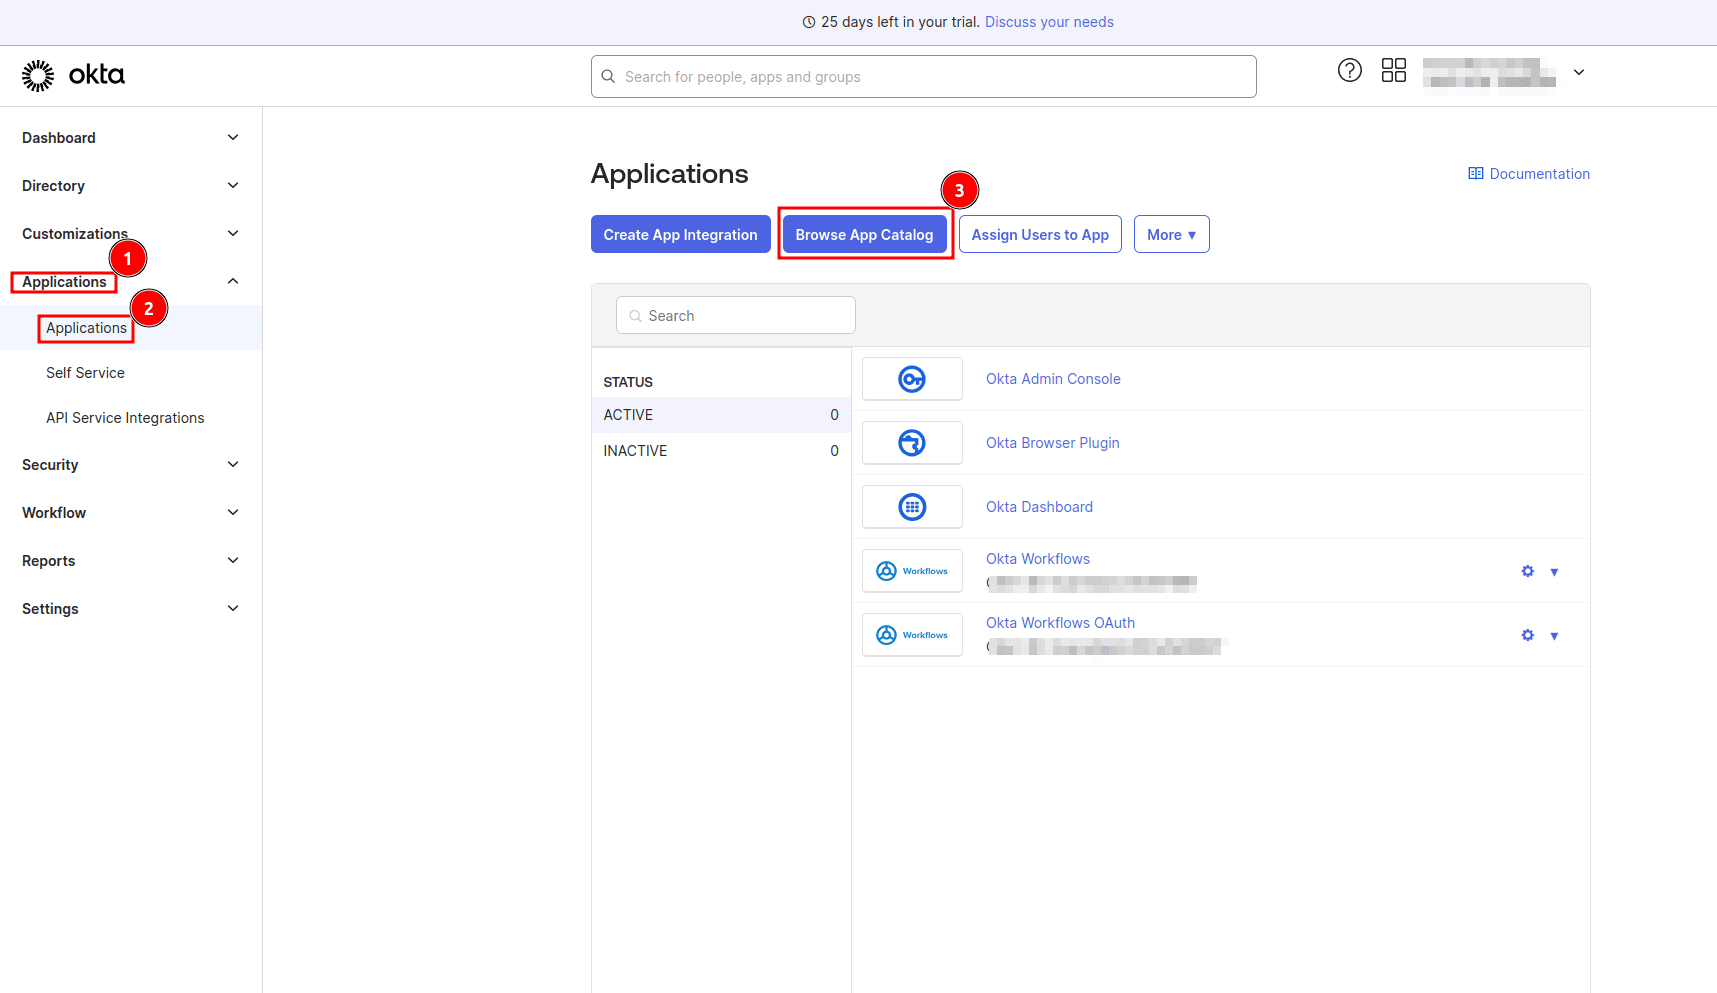
To get started, go to your Okta admin dashboard and navigate to Applications > Applications > Browse App Catalog:
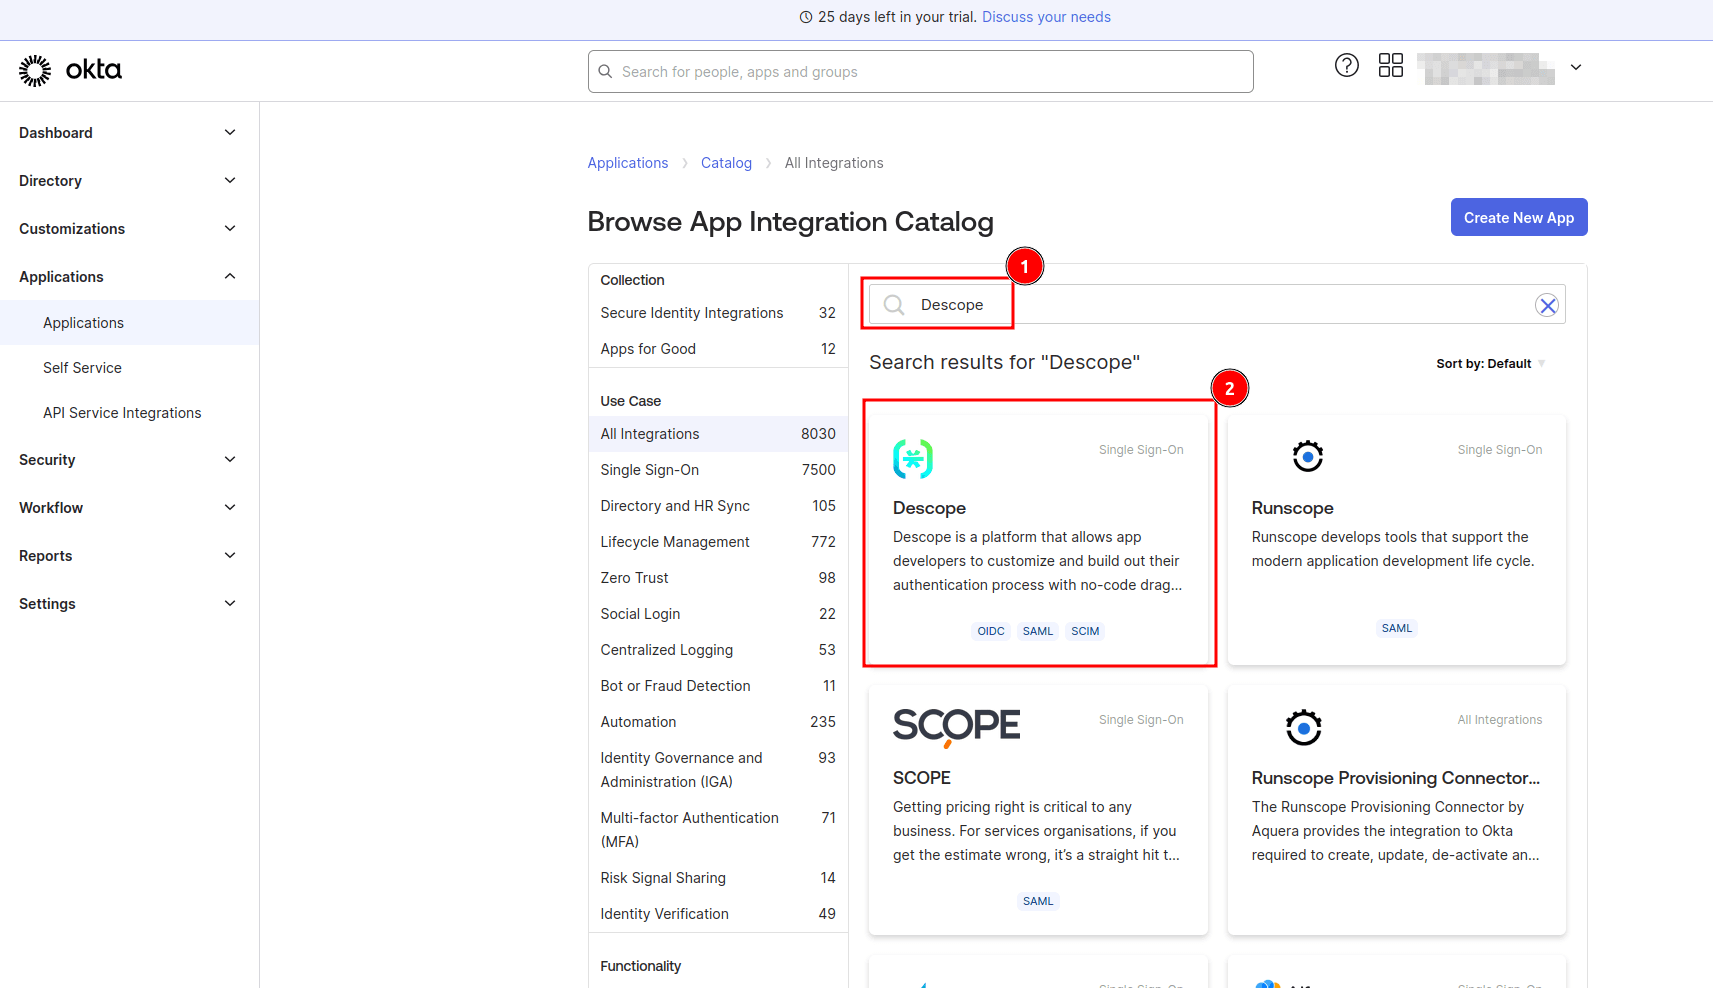
On the Browse App Integration Catalog page, search for “Descope” and select the Descope application:
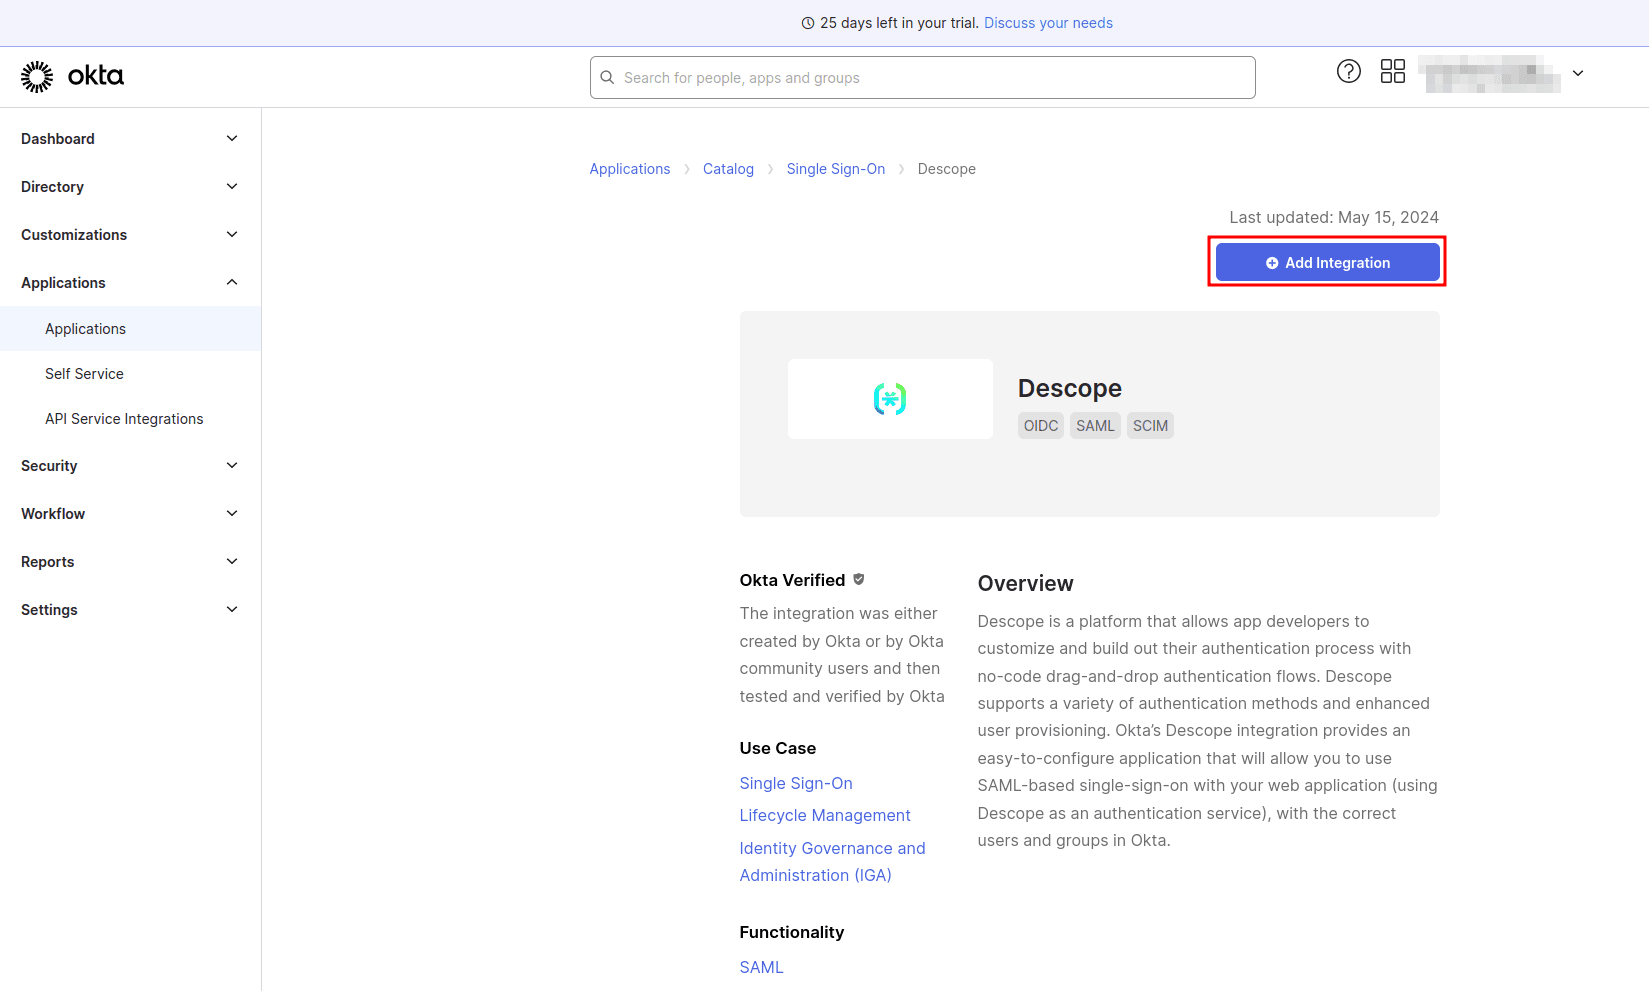
Next, on the application details page, select + Add Integration:
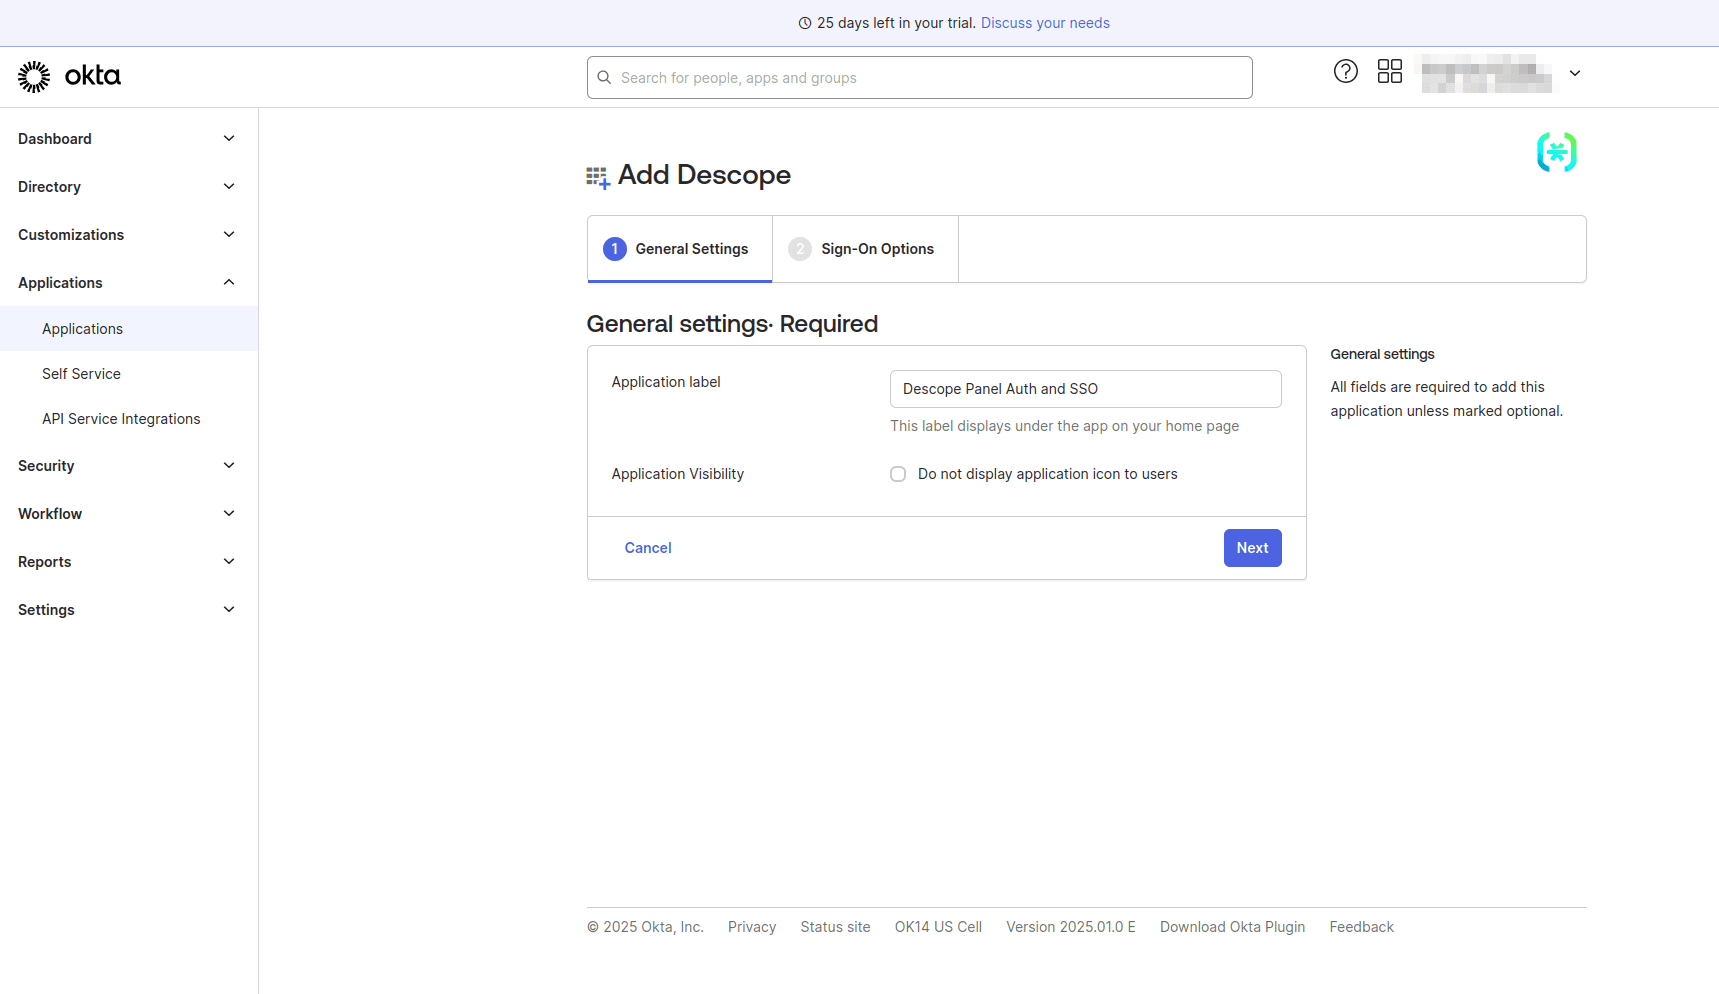
On the Add Descope page, under General Settings, provide Descope Panel Auth and SSO as the Application label and click Next:
On the Sign-On Options page, select OpenID Connect as the sign-on method, and under Advanced Sign-on Settings, in the Callback URL field, provide the value https://api.descope.com/v1/oauth/callback. This is the URL the user will be redirected to after successful authentication by the IdP.
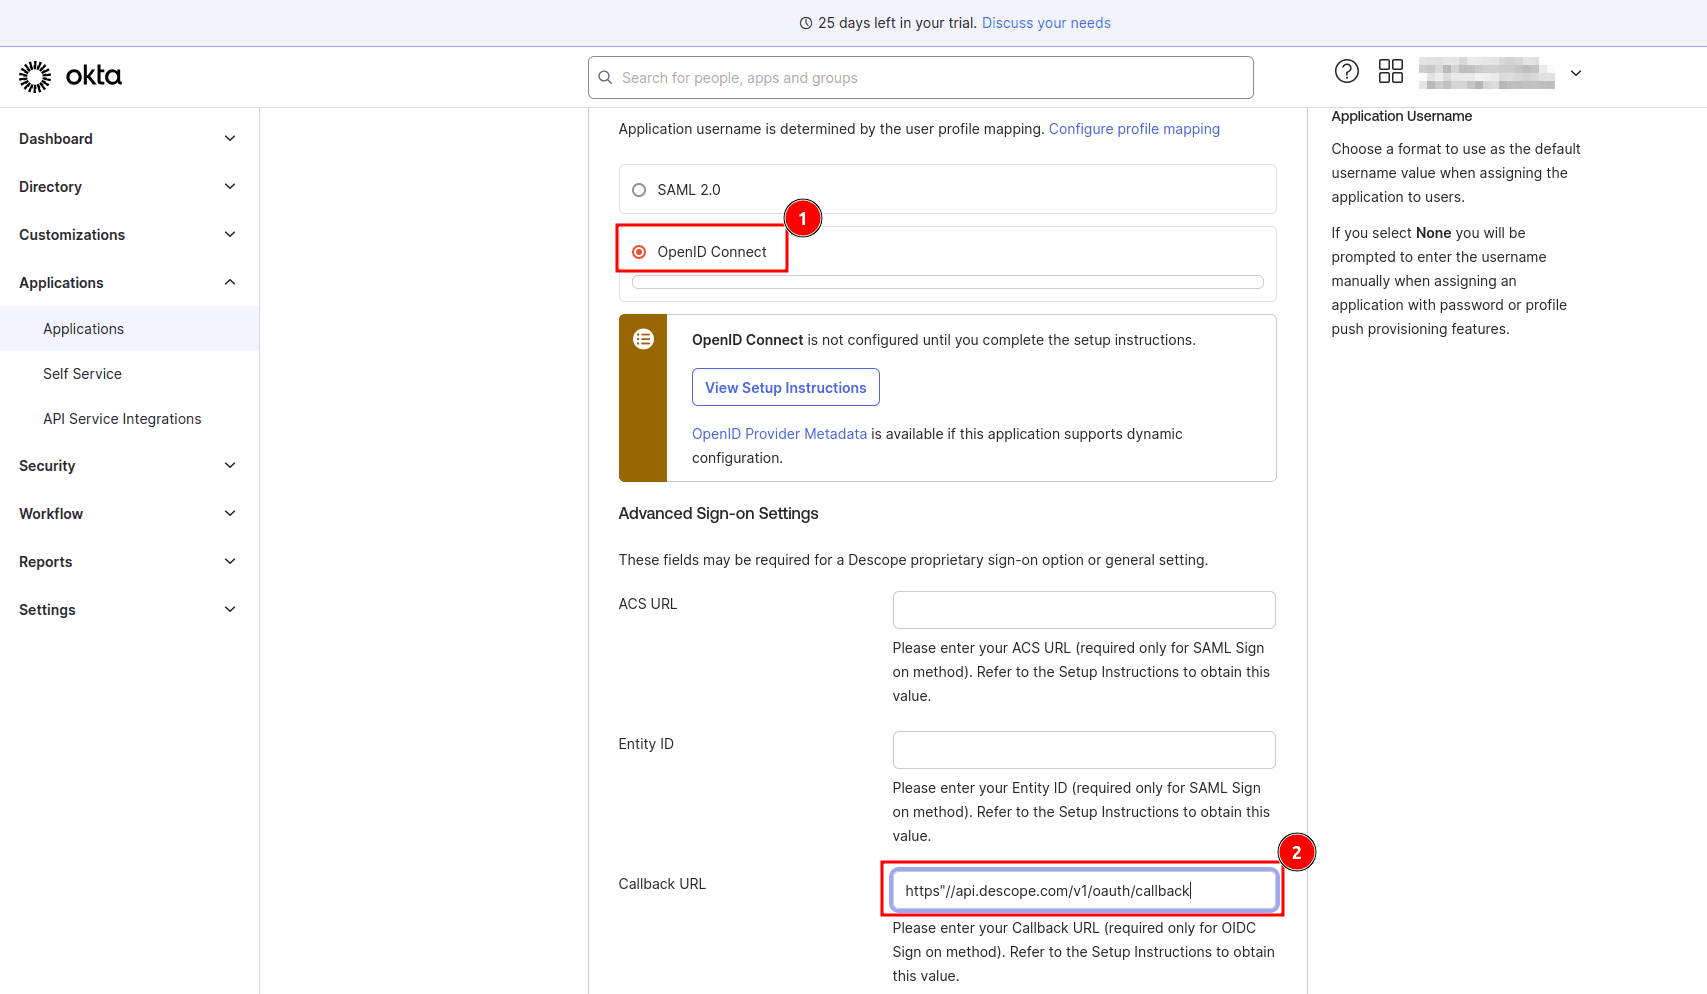
Scroll down to the bottom of the page and select Done.
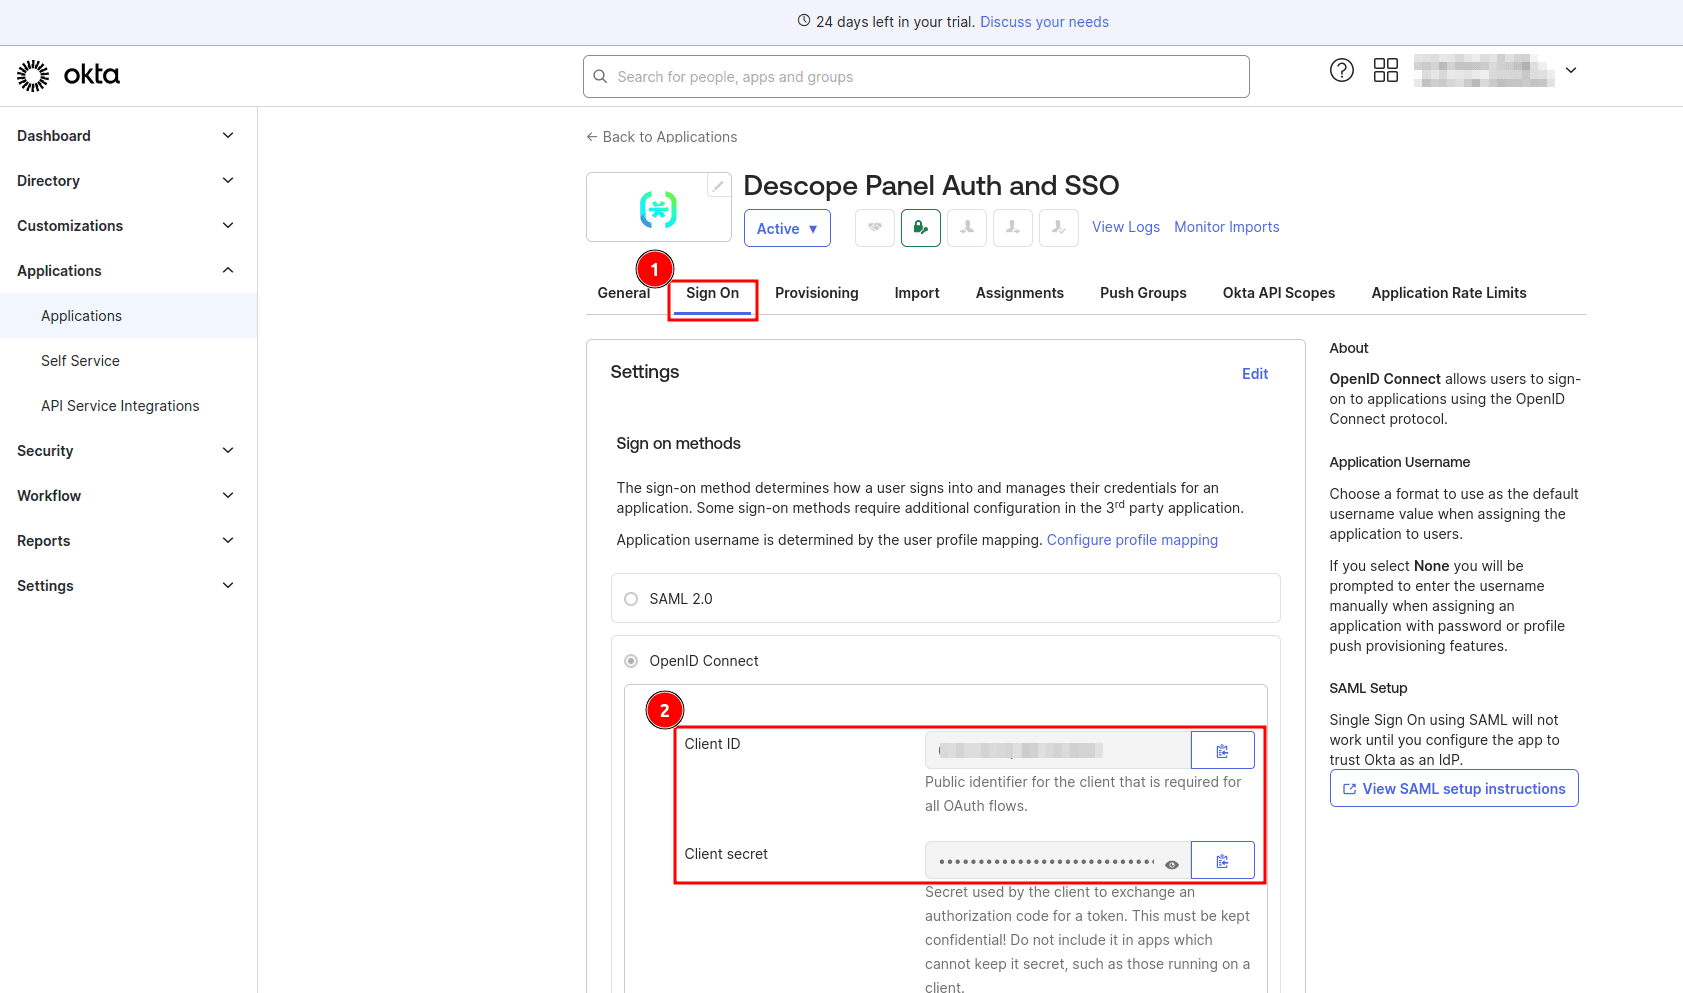
On the app details page, select the Sign On tab and take note of your client ID and client secret:
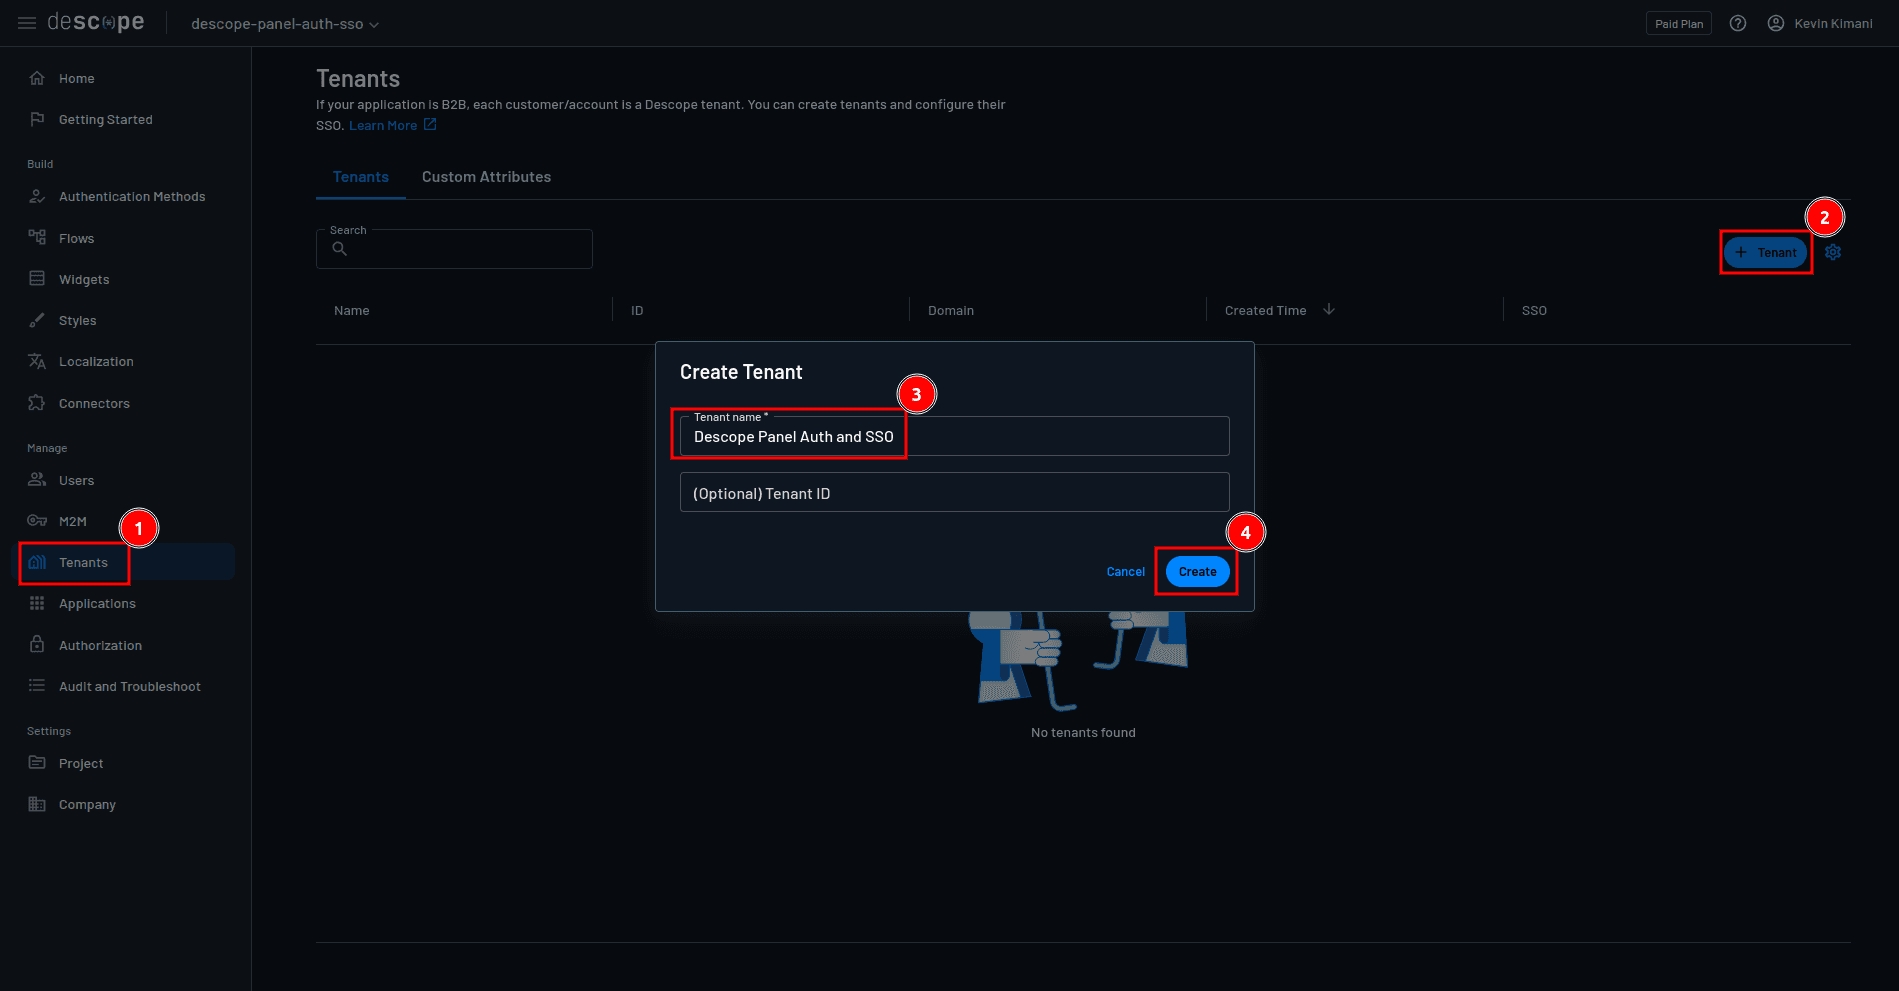
Head back to the Descope console and select Tenants > + Tenant to create a new tenant. On the Create Tenant modal, provide Descope Panel Auth and SSO as the tenant name and click Create:
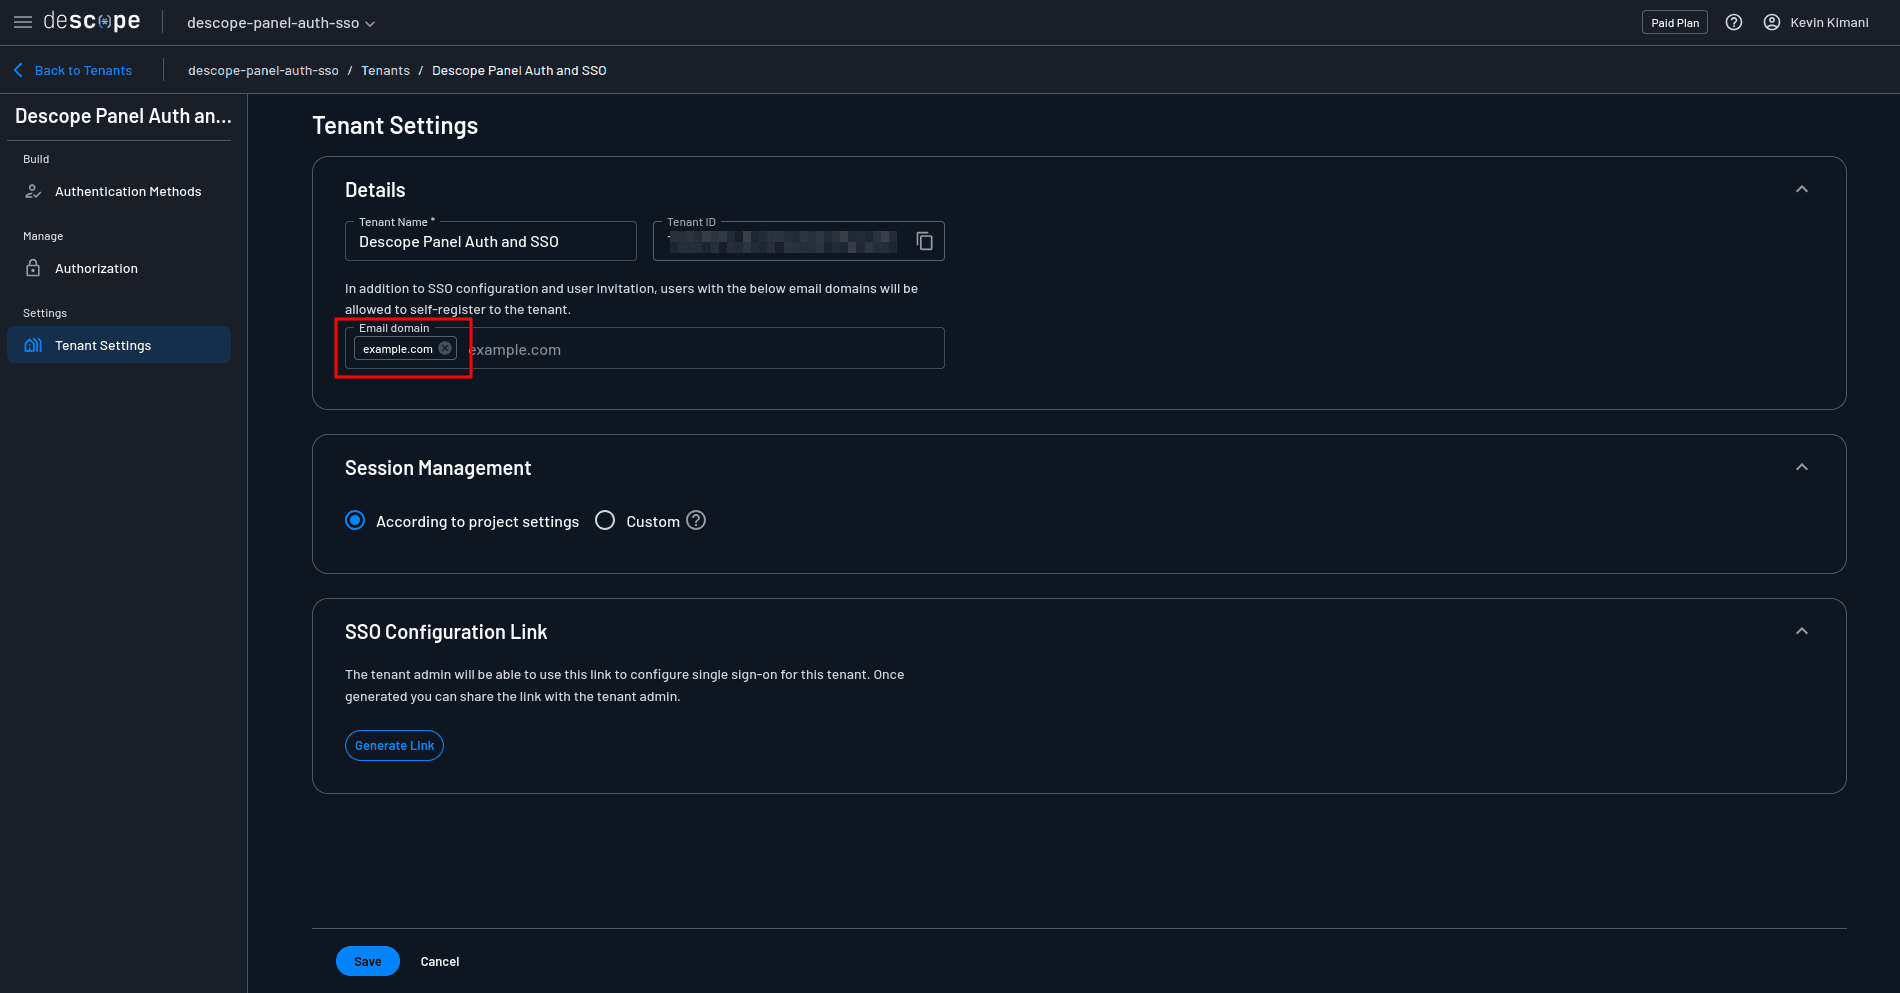
Open the tenant details page, and under Tenant Settings, add your email domain to the list of allowed domains and save the changes:
Still on the tenant details page, navigate to Authentication Methods > SSO and select OIDC. Under Tenant Details, add your email domain, which will help to determine the SSO configuration to load when a user chooses to authenticate with SSO:
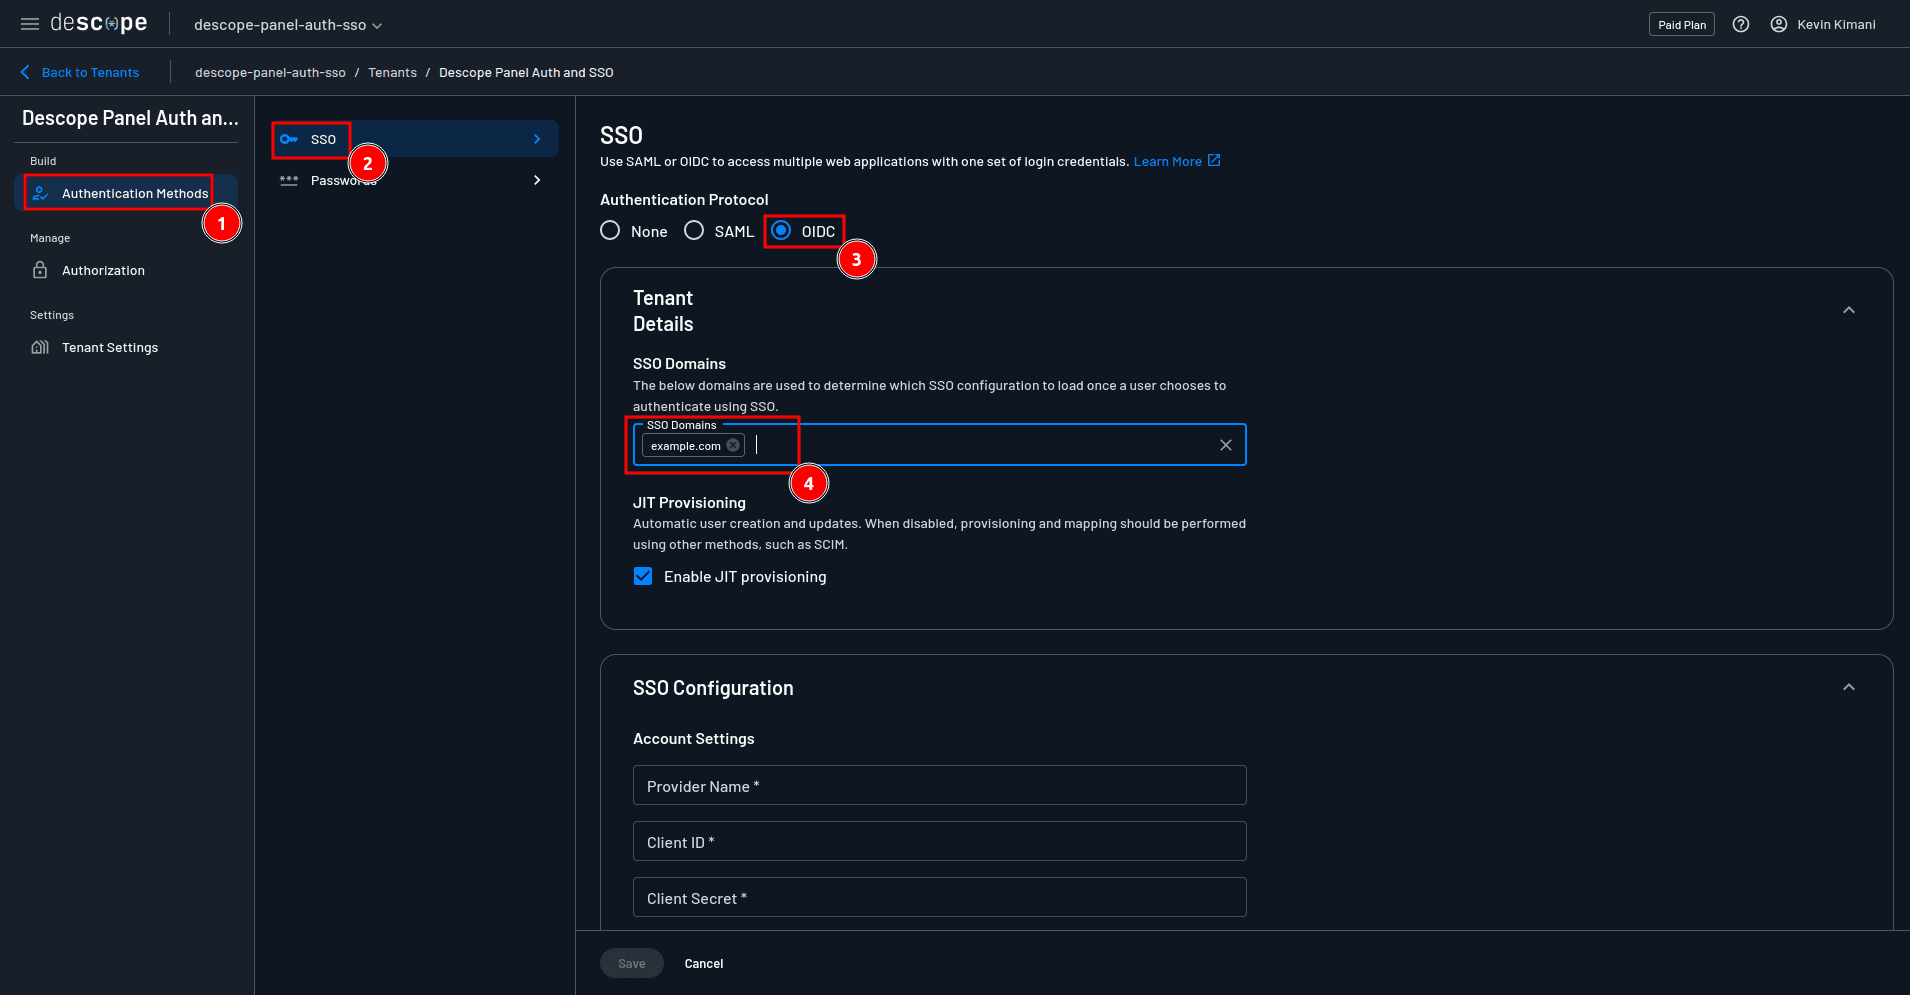
Scroll down to the SSO configuration > Account Settings section and provide the required values as follows:
Provider Name:
OktaClient ID: The Client ID you obtained from the Okta dashboard
Client Secret: The client secret you obtained from the Okta dashboard
Scope:
openid profile emailGrant Type:
Authorization code
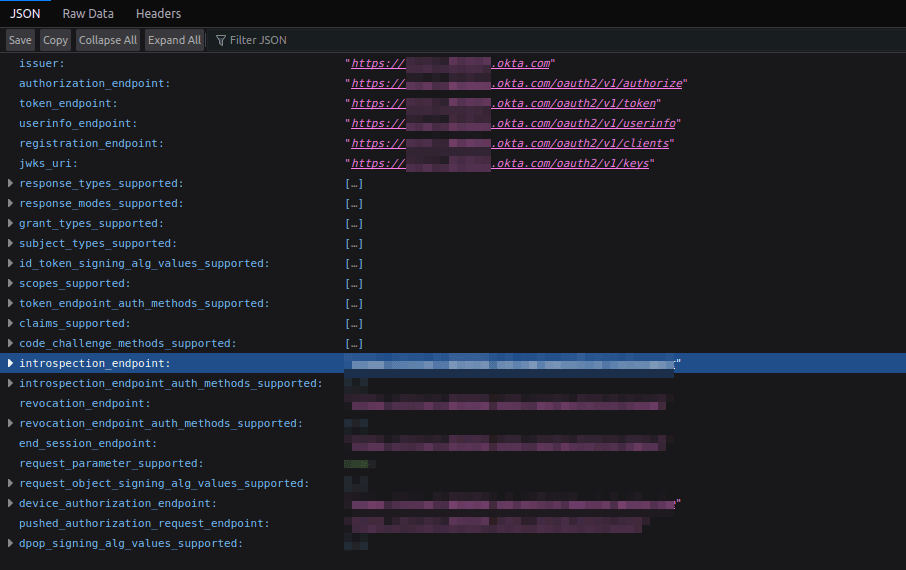
You also need to provide the values for the SSO configuration > Connection Settings section. For these, you’ll need to obtain OAuth endpoints from the Okta “well-known” configuration. To obtain this, navigate to https://<YOUR-OKTA-INSTANCE>.okta.com/.well-known/openid-configuration on your browser and take note of the issuer and authorization, token, user info, and JWKS endpoints.
Make sure to replace <YOUR-OKTA-INSTANCE> with the correct value, which is your organization’s Okta instance ID.
Head back to the Descope console, input these values in their respective endpoints under SSO configuration > Connection Settings, and save the changes.
Under SSO Mapping > User Attribute Mapping, you can choose to configure how attributes from Okta will be mapped to Descope, but we will not be doing so in this guide. The default mapping is sufficient for this example. For more information on how to add custom claims to your Okta OIDC tokens, check out the official docs.
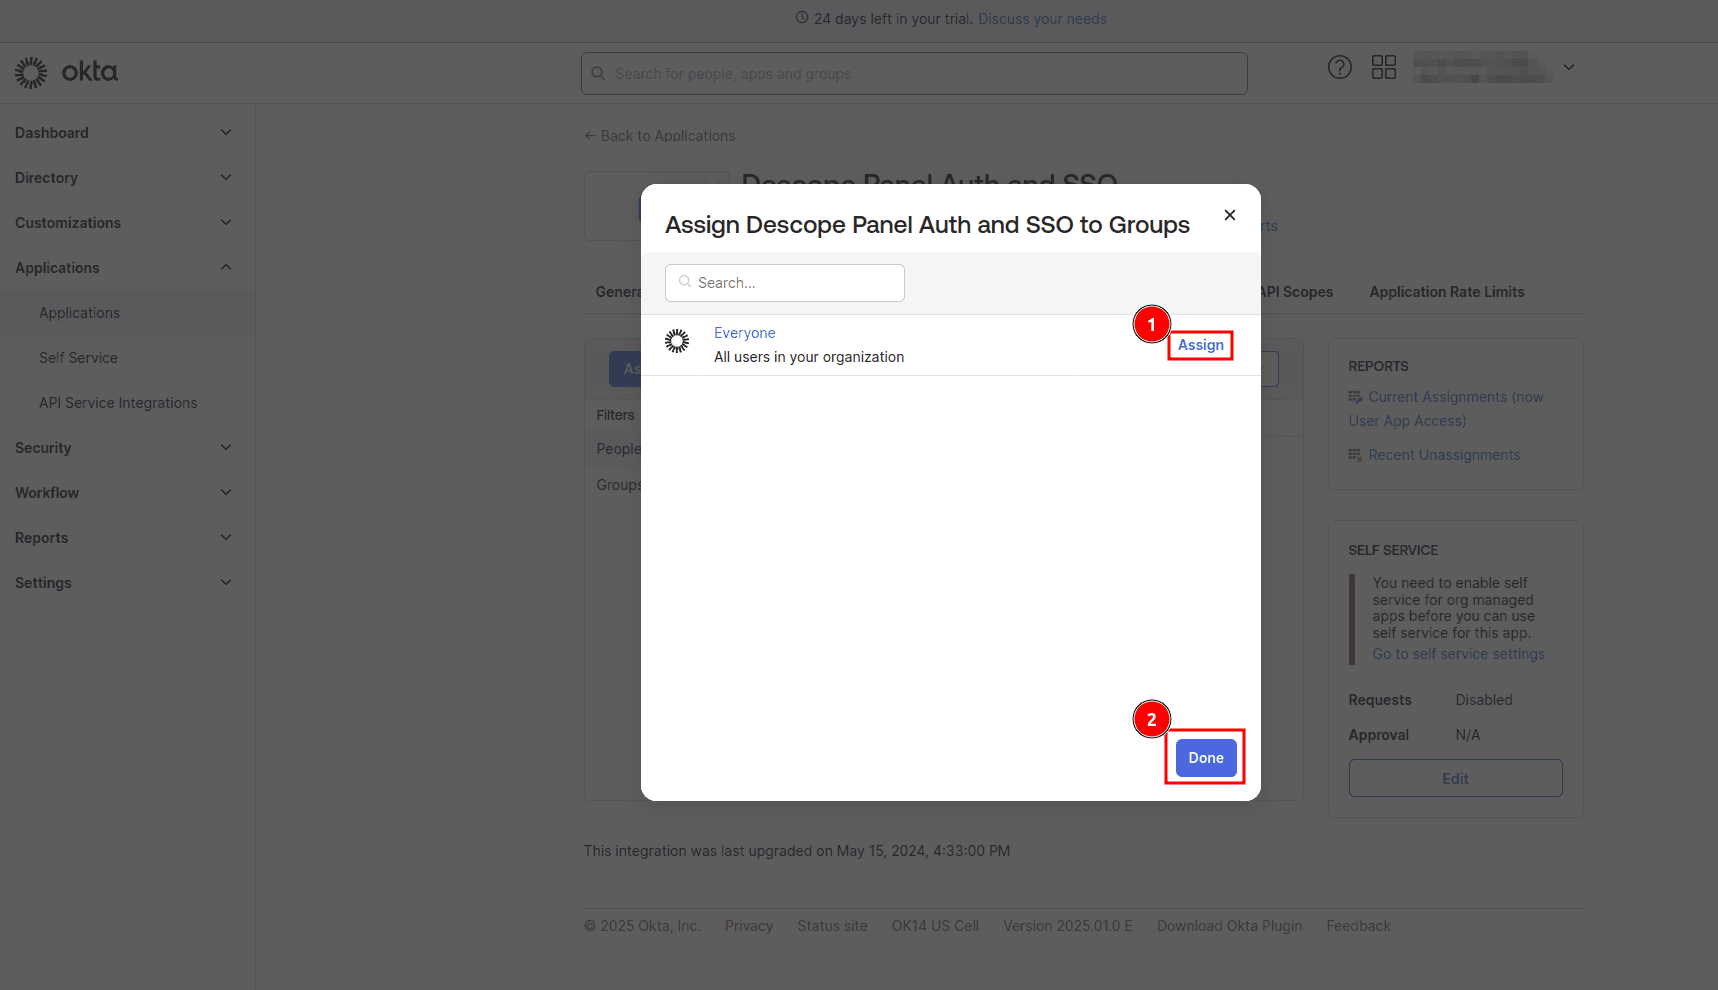
You also need to assign users to the Descope app in Okta to grant them access. This step ensures that only authorized users can authenticate via the app and access your Panel application. To do this, open the app details page in Okta and select the Assignments > Assign > Assign to Groups:
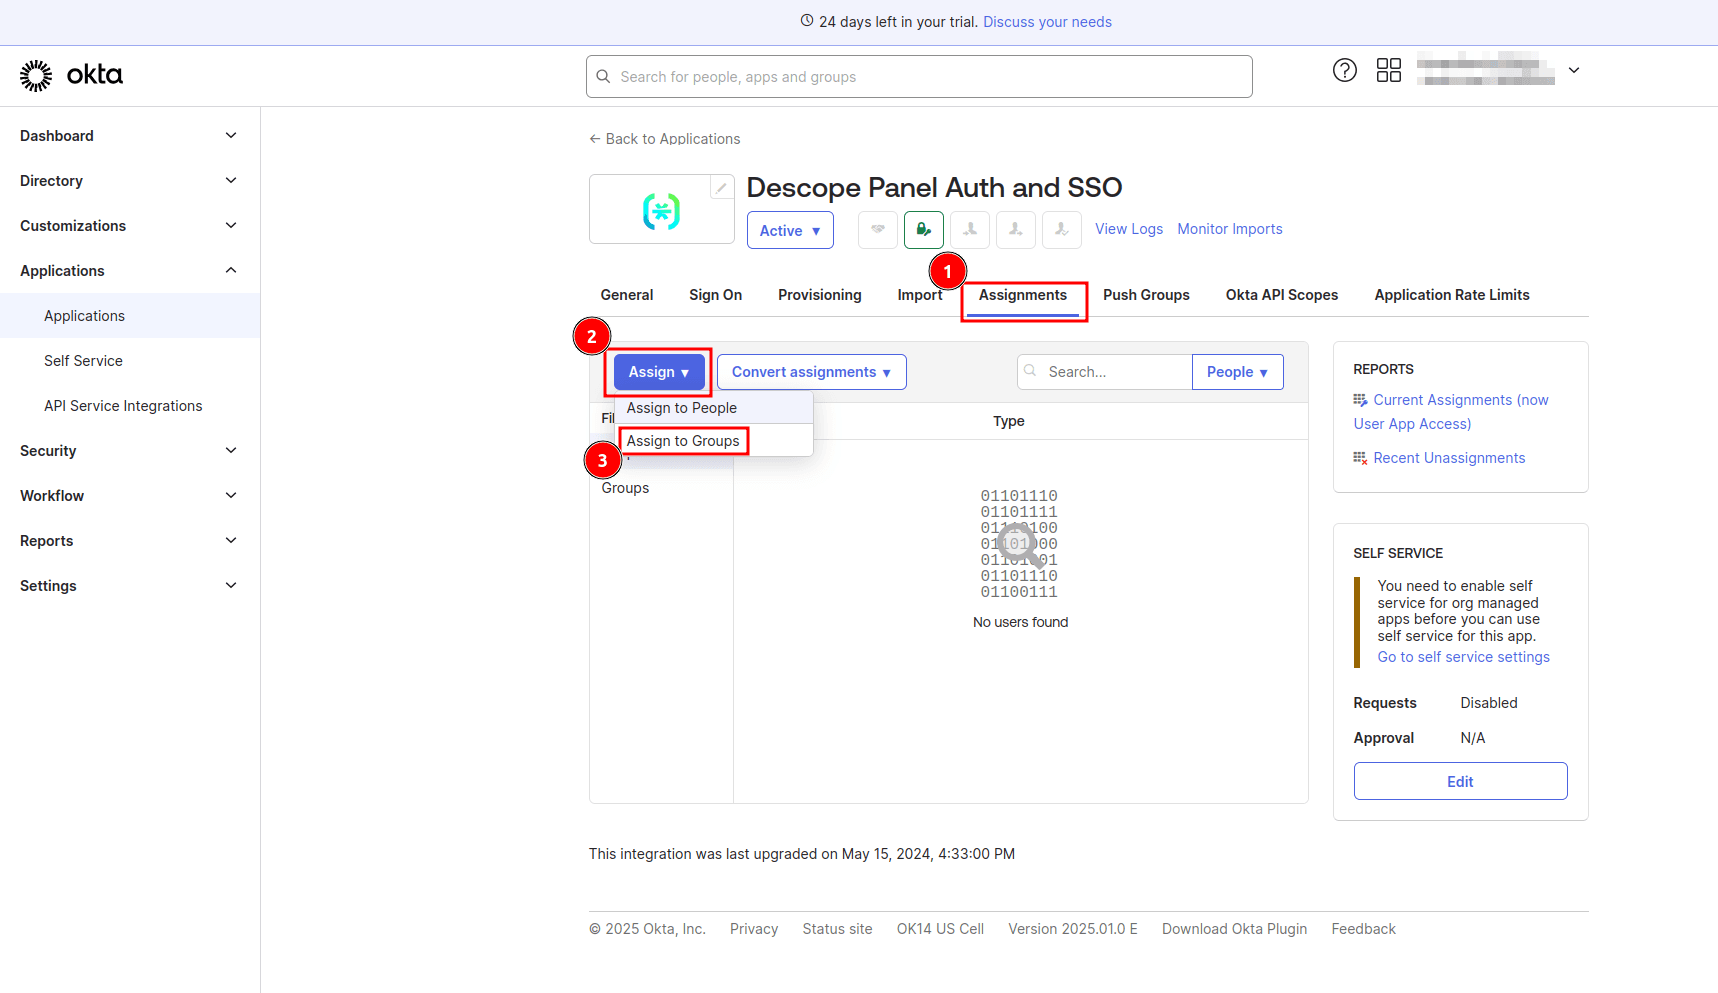
On the Assign Descope Panel Auth and SSO to Groups page, select the Assign button beside the Everyone group to allow all users in your organization to log in via SSO and click Done to save the changes.
Add authorization
Authorization allows your app to determine what actions an authenticated user can perform and the data they can access. For example, in your Panel application, administrators might have access to advanced analytics and management tools, while regular users can only view specific dashboards.
At the moment, any user can access any dashboard in your application. Let’s limit what dashboard a user can access based on their roles.
To do this, create a new file named main.py in the root project folder and add the following code, which retrieves user roles and redirects them to the appropriate dashboard:
from dotenv import load_dotenv
import os
import panel as pn

# Load env variables
load_dotenv()

# Enable Panel extension
pn.extension(sizing_mode="stretch_width")

# Define the authorization callback
def authorize(user_info):
    """
    Authorization callback to redirect users based on roles.
    """
    # Extract user roles from the user_info dict
    roles = user_info.get('tenants', {}).get(os.getenv('DESCOPE_TENANT_ID'), {}).get('roles', [])

    if "Tenant Admin" in roles:
        return "/admin"
    else:
        return "/user"

# Assign the authorization callback
pn.config.authorize_callback = authorize
The authorize function checks the user’s roles from the user_info dictionary, which includes details about their roles in a specified tenant (retrieved from an environment variable). Depending on whether the user has the Tenant Admin role, they are redirected to either the admin dashboard (/admin) or the user dashboard (/user).
You’ll also need to protect the admin dashboard so that users don’t try to manually navigate to the /admin endpoint on their browser. To do this, Open the admin.py file and replace the existing code with the following:
from dotenv import load_dotenv
import os
import panel as pn
load_dotenv()
# Enable Panel extension
pn.extension(sizing_mode="stretch_width")
# Extract roles and permissions
tenant_data = pn.state.user_info.get('tenants', {}).get(os.getenv('DESCOPE_TENANT_ID'), {})
roles = tenant_data.get('roles', [])
permissions = tenant_data.get('permissions', [])
# Admin dashboard content
admin_content = f"""
# You're an admin. You have access to more data and functionality.
#### Your Roles:
<ul>
{"".join(f"<li>{role}</li>" for role in roles) if roles else "<li>No roles assigned</li>"}
</ul>
#### Your Permissions:
<ul>
{"".join(f"<li>{permission}</li>" for permission in permissions) if permissions else "<li>No permissions assigned</li>"}
</ul>
"""
# Authorization callback for the admin dashboard
def authorize_admin(user_info):
if "Tenant Admin" in roles:
return True
return "/user"
# Assign the authorization callback
pn.config.authorize_callback = authorize_admin
# Create and configure the Material template
template = pn.template.MaterialTemplate(
site="Panel",
title="Admin Dashboard",
main=[admin_content]
)
# Serve the admin dashboard
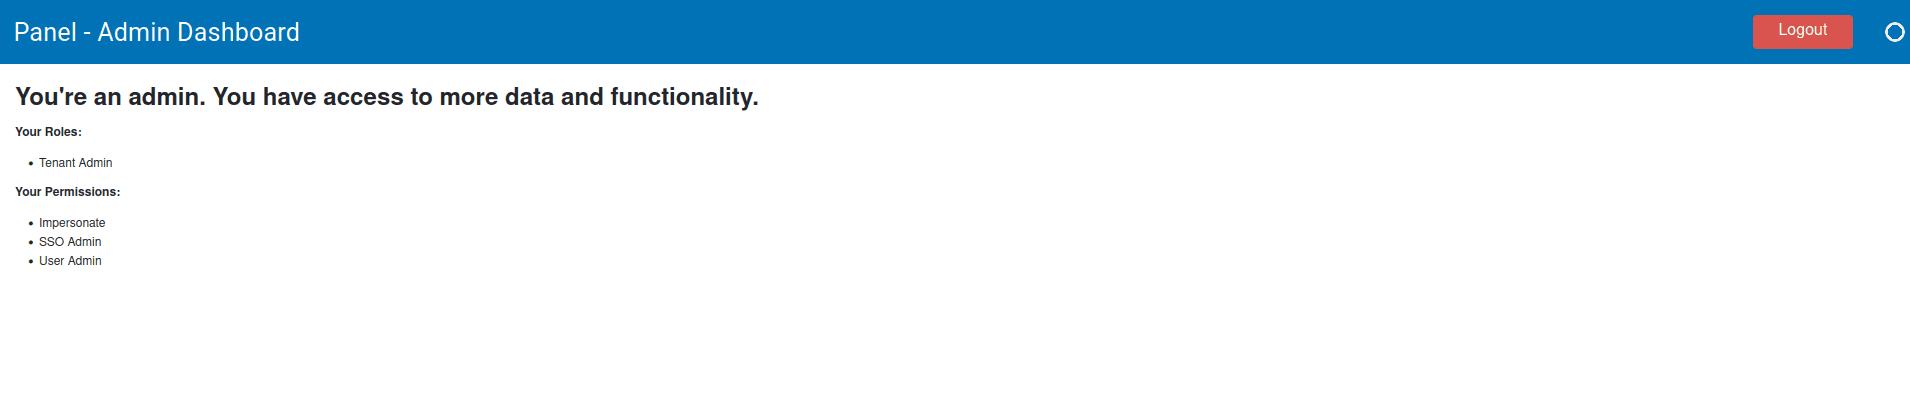
template.servable()This code sets up the admin dashboard where the user roles and permissions are displayed and also checks if the user has the Tenant Admin role. If not, they are redirected to the user dashboard.
Open the .env file in the project root folder and add the following content, replacing the placeholder value with the ID of the tenant you created earlier on the Descope console:
DESCOPE_TENANT_ID="<YOUR-DESCOPE-TENANT-ID>"At this point, if you run the application using the command panel serve admin.py user.py --oauth-provider=generic --dev and authenticate successfully, you’ll be redirected to the default Panel landing page, which lists all the running applications. You need to add a function that automatically redirects the user to the appropriate app. To do this, create a new file named index.html in the project root folder and add the following code:
<!DOCTYPE html>
<html lang="en">
    <head>

        <meta http-equiv="Refresh" content="0; url='/main" />
    </head>
    <body>

        <p>Redirecting...</p>
    </body>
</html>
This HTML file acts as a redirect page for your Panel application. After successful authentication, users are redirected to http://localhost:5006, where this file automatically navigates them to the /main route. The /main route loads the main.py file, which determines whether users should be redirected to the admin or user dashboard based on their roles.
Refreshing the access tokens
In Panel, access tokens are cached as cookies. Depending on the OAuth provider you’re using, these tokens may eventually expire. For example, Okta access tokens expire after thirty days. This means a user might remain logged into your application even though their access token has expired since it is cached.
To ensure you always have access to a valid access token, open the .env file in the project root folder and add the following line:
PANEL_OAUTH_REFRESH_TOKENS=1This ensures that if a user tries to access your application with an expired token, the application will automatically fetch a new access token using the saved refresh token. If no refresh token is available, the user will be prompted to reauthenticate. As long as the user’s session is active, the application will also schedule token refreshes ten seconds before the access token expires.
Adding a logout feature
Allowing users to log in to your Panel application is as simple as adding a widget and configuring the widget to redirect the user to the /logout endpoint.
First, open the admin.py and add the following code below the admin_content variable:
# Logout button
logout_widget = pn.widgets.Button(name="Logout", button_type="danger", width=100, align="end")

# Configure logout functionality
logout_widget.js_on_click(code="""window.location.href = '/logout'""")
This code creates a Logout button that redirects the user to the /logout URL when clicked.
Add this button to the dashboard’s header by replacing the code that creates the Material template with the following:
template = pn.template.MaterialTemplate(
    site="Panel",
    title="Admin Dashboard",
    header=[pn.Row(pn.layout.Spacer(), logout_widget)],
    main=[admin_content]
)
You also need to do the same to the user.py file. Open the file and add the following code below signma_widget = pn.widgets.Button(...):
# Logout button
logout_widget = pn.widgets.Button(name="Logout", button_type="danger", width=100, align="end")

# Configure logout functionality
logout_widget.js_on_click(code="""window.location.href = '/logout'""")
Lastly, modify the code that creates the Material template, like this:
# Configure the template with the logout button in the header
template = pn.template.MaterialTemplate(
    site="Panel",
    title="User Dashboard",
    header=[pn.Row(pn.layout.Spacer(), logout_widget)],
    sidebar=[variable_widget, window_widget, sigma_widget],
    main=[bound_plot]
)
Testing the application
Now that everything is fully configured, you can test the application. To do this, make sure your virtual environment is still active and execute the following command in the terminal:
panel serve main.py admin.py user.py --oauth-provider=generic --index index.html --devNavigate to http://localhost:5006 on your browser, and you should be navigated to a sign-in page that is powered by the Descope flow you configured earlier:
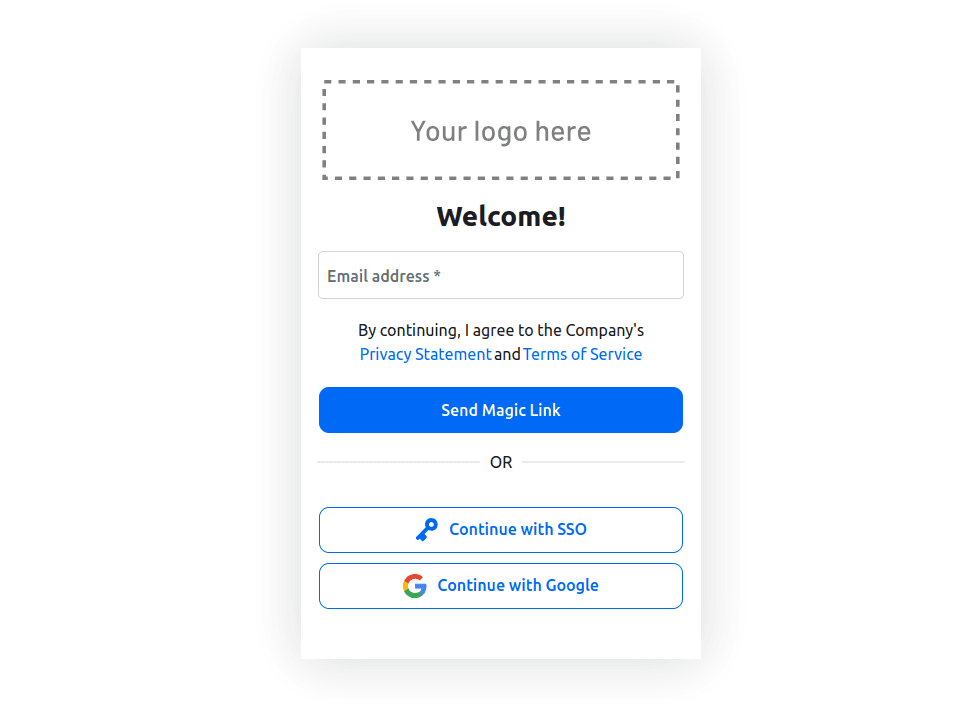
On this page, you can choose to authenticate using any method. After successful authentication, you will be redirected to the user dashboard:
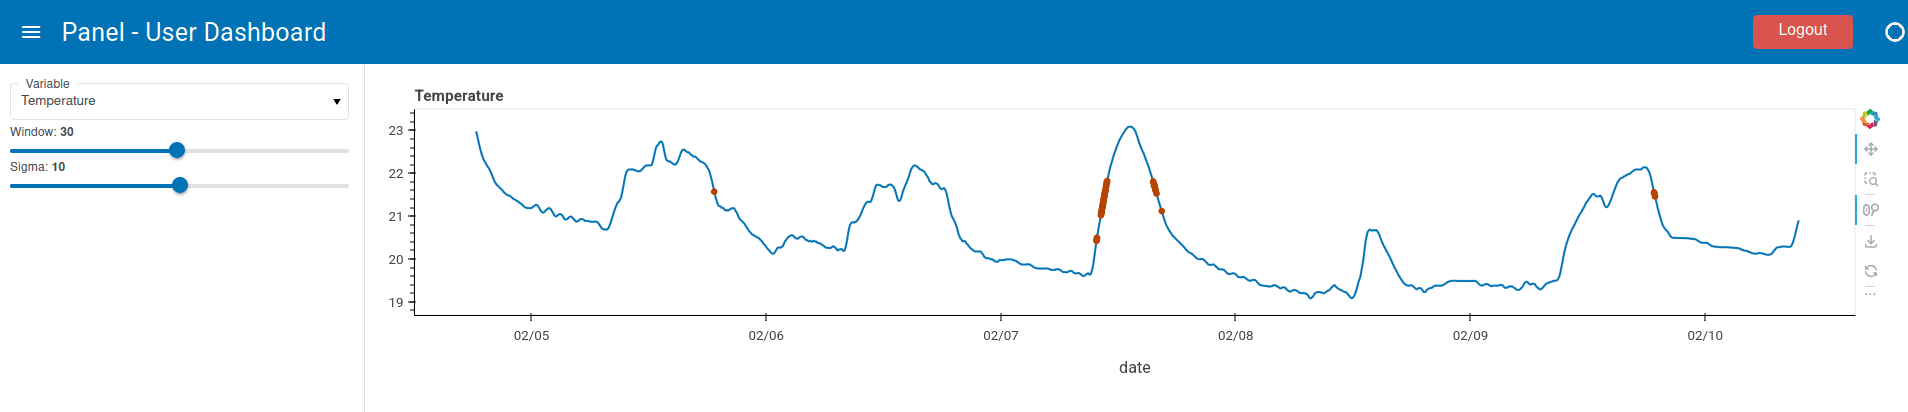
This shows that the authorization callback is working as expected as the user was not redirected to the admin dashboard.
Sign out of the app by clicking the Logout button. Go to the Descope console and navigate to the Users page. Here, identify the user you just signed in with, assign them the Tenant Admin role, and save the changes:
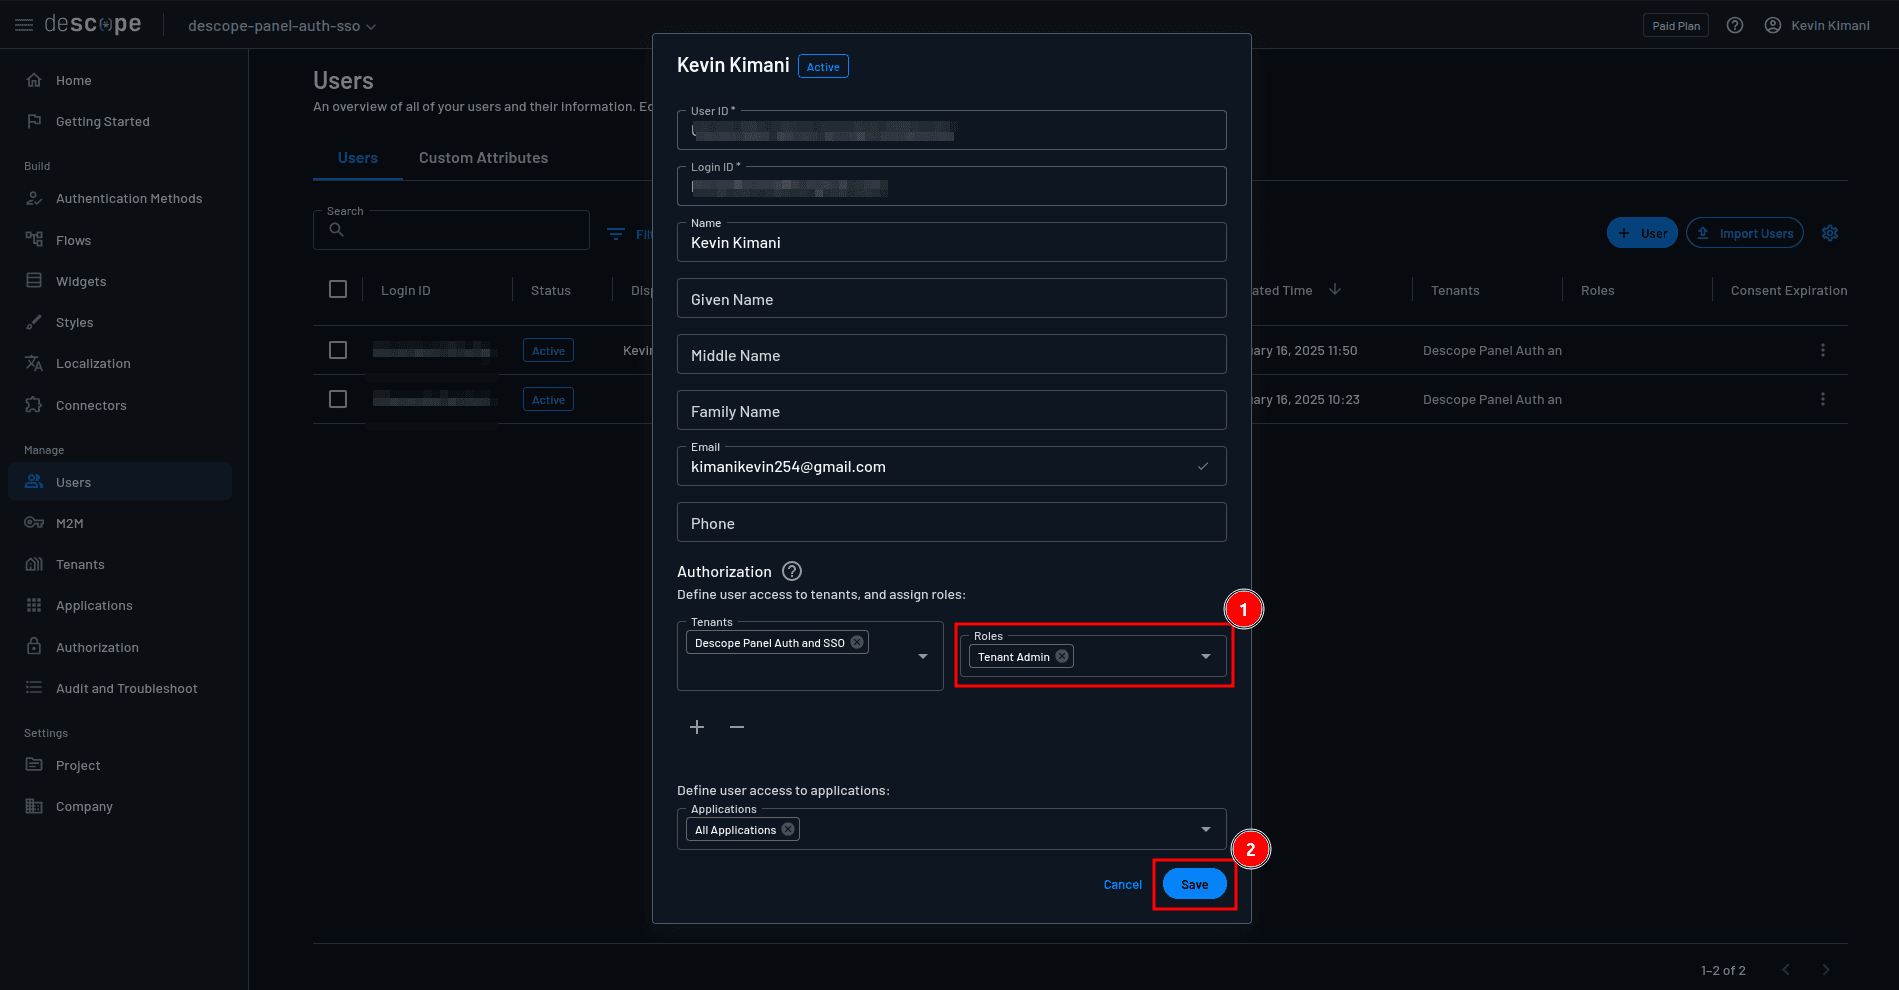
Go back to http://localhost:5006 on your browser and sign in again with the same credentials, and you’ll now have access to the admin dashboard:
Conclusion
In this guide, you learned how to integrate secure authentication and SSO into a Panel application using Descope. From implementing secure authentication flows on the Descope console to integrating Okta as an IdP and implementing role-based access control, you now have the essential skills to enhance both security and user experience in your Panel apps. As a next step, you can explore additional features like multifactor authentication (MFA) and support for multiple SSO providers.
Descope is a drag-and-drop customer authentication and identity management platform. Our no-/low-code CIAM solution helps hundreds of organizations easily create and customize their entire user journey using visual workflows—from authentication and authorization to MFA and federated SSO. Customers like GoFundMe, Navan, You.com, and Branch use Descope to reduce user friction, prevent account takeover, and get a unified view of their customer journey.
To learn more, join our dev community, AuthTown, and explore the Descope documentation.