
Table of Contents
This tutorial was written by Kumar Harsh, a software developer and devrel enthusiast who loves writing about the latest web technology. Visit Kumar's website to see more of his work!
If you work in the open source LLM space, you are probably already aware of Open WebUI, the popular open source, self-hosted interface for LLMs. While designed to run completely offline (integrating with a locally hosted LLM), Open WebUI can also integrate with OpenAI models to give you everything you need behind the same chat box.
As is the case with most AI chat interfaces, Open WebUI instances often handle sensitive (company) data. Allowing access to the instance without authentication can result in malicious actors accessing AI models and stored conversations. Using secure authentication can help prevent platform misuse and protect user data. Descope is a no-code/low-code authentication platform that supports passwordless login, social logins, and enterprise SSO. It also provides easy integration with Open WebUI instances without needing to build or manage authentication from scratch.
In this article, you will learn how to integrate Descope authentication into an Open WebUI instance. You will learn how to set up user authentication and single sign-on (SSO) and secure access to AI interactions. You’ll also explore some user management features that such an authentication setup can provide out of the box with Open WebUI.
Why adding SSO is important for these types of apps
Open WebUI already offers a traditional username- and password-based authentication setup. However, considering that technologies like Open WebUI are inherently meant to be used internally in an organization, using such an auth setup can introduce a lot of problems.
A username- and password-based authentication setup has risks associated with the strength and safe storage of the passwords chosen by the users. It also adds yet another username and password pair to the already long list of credentials that users need to remember. On top of all this, using Open WebUI’s inbuilt authentication setup means that you cannot centralize user management via your organization’s authentication suite.
To solve these problems, you can use SSO authentication. SSO allows users (most often grouped under the same organization) to log in once and gain access to multiple applications without needing to enter credentials again. This can offer significant advantages:
Reduce the risk of weak or reused passwords
Eliminate the need for multiple passwords
Allow faster access to Open WebUI without repeated authentication
Make it possible for IT teams to manage user access centrally
Make it easier to onboard and offboard users without handling credentials manually
Even supports multitenant access for different teams or organizations
In this tutorial, you’ll learn how to implement all of this using Descope. You’ll use Descope to set up Okta-based SSO login and social auth. You’ll then turn Descope into an SSO identity provider (IdP) to integrate with Open WebUI and delegate access management from Open WebUI to Descope.
Prerequisites
To follow along, you will need the following:
A Descope account, which you can sign up for here
Docker Desktop installed on your system, which you’ll use to run Open WebUI locally
Setting up Descope
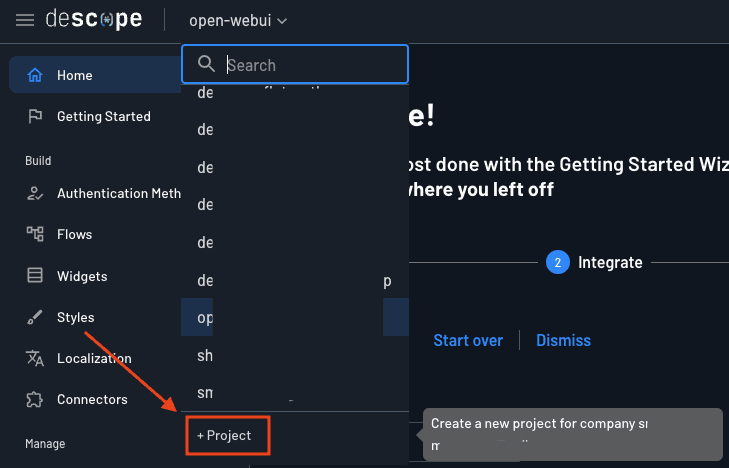
Let’s start by setting up Descope. Head over to your Descope account and start by creating a new project:
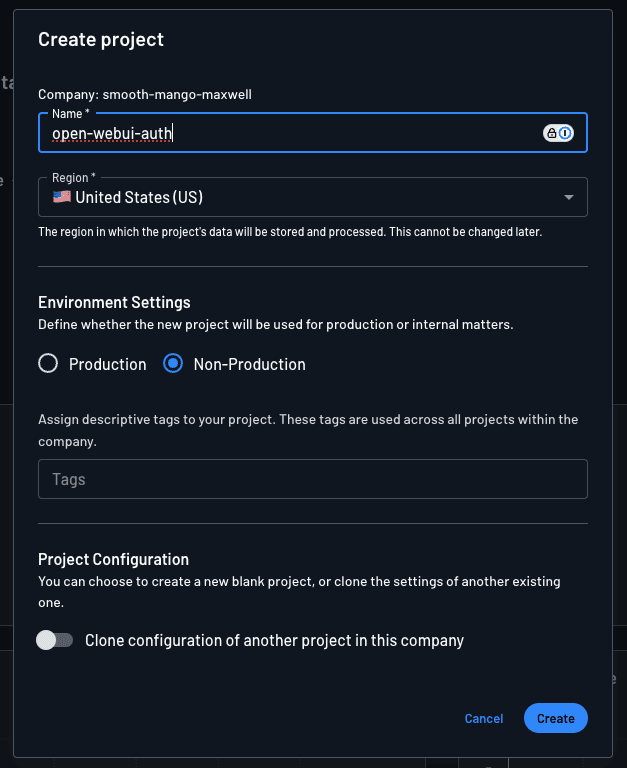
Name it anything you like and choose Non-Production as the environment. Click the Create button to create the project.
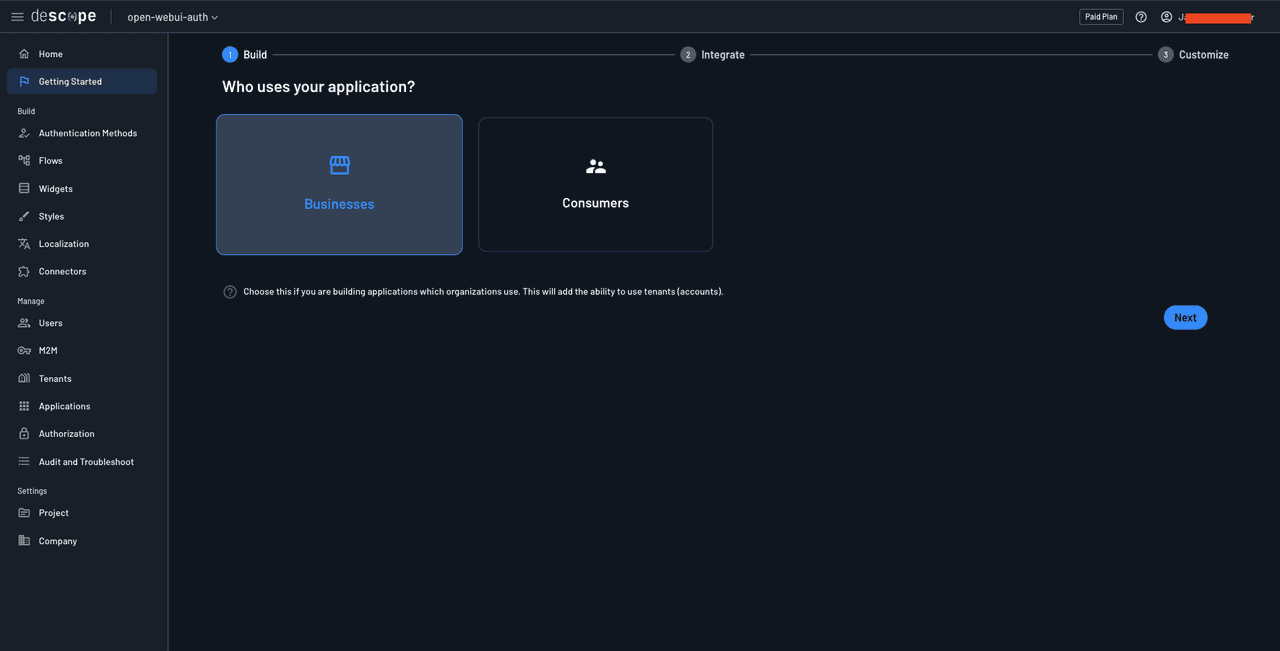
Click Get Started to start creating the auth flows for your Open WebUI app.

Choose Businesses on the Who uses your application page to be able to create tenants and add organization-level SSO if needed in the future:
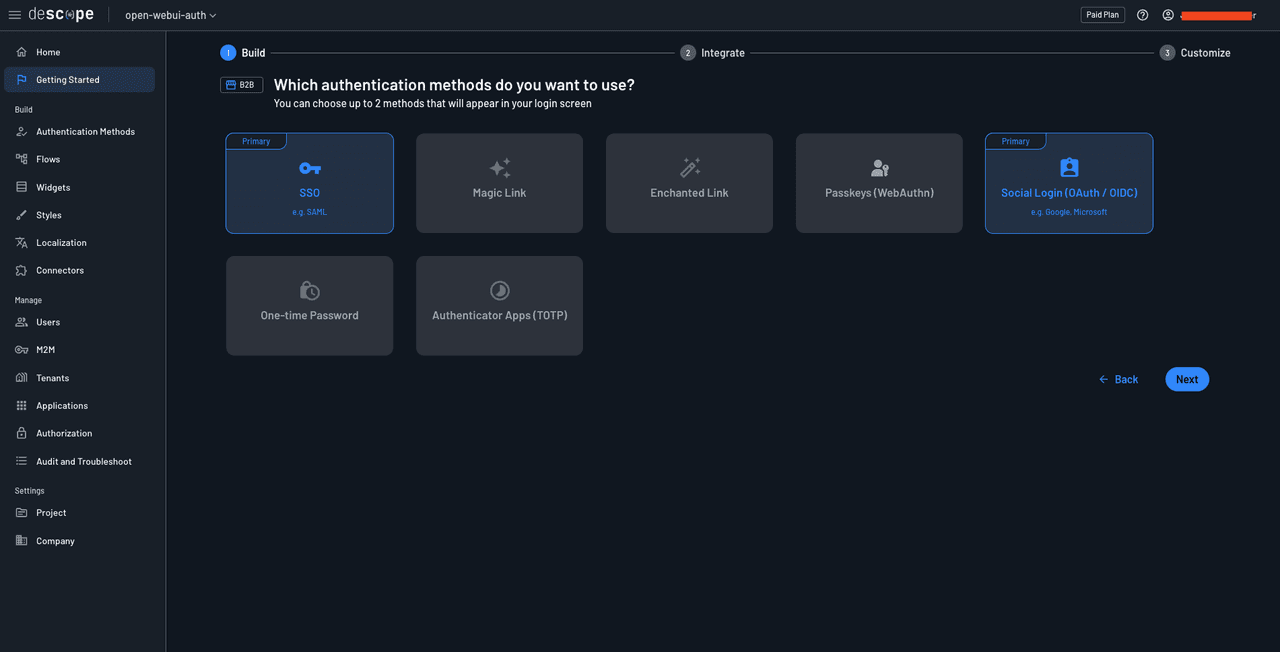
On the Which authentication methods do you want to use? screen, choose social login and SSO and click Next.
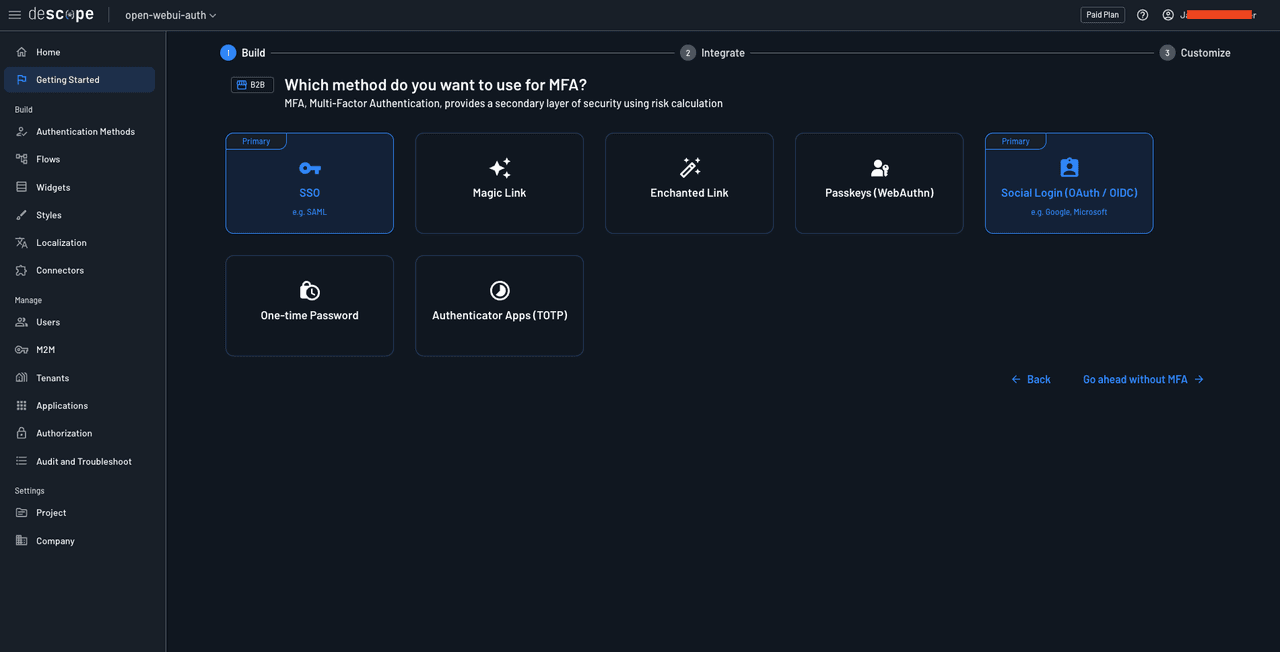
On the Which method do you want to use for MFA? page, click the Go ahead without MFA button:
On the next page, choose the first login screen as it contains both SSO and social login buttons:
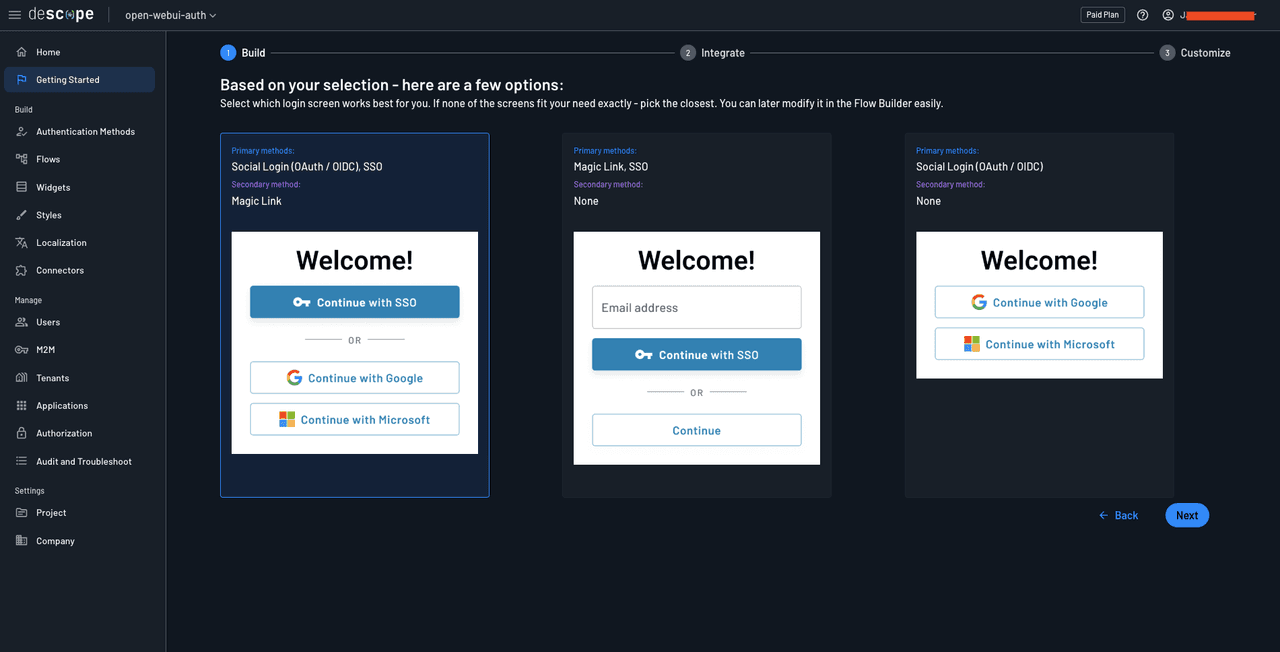
Click the Next button. You’re now ready to create your authentication flows.
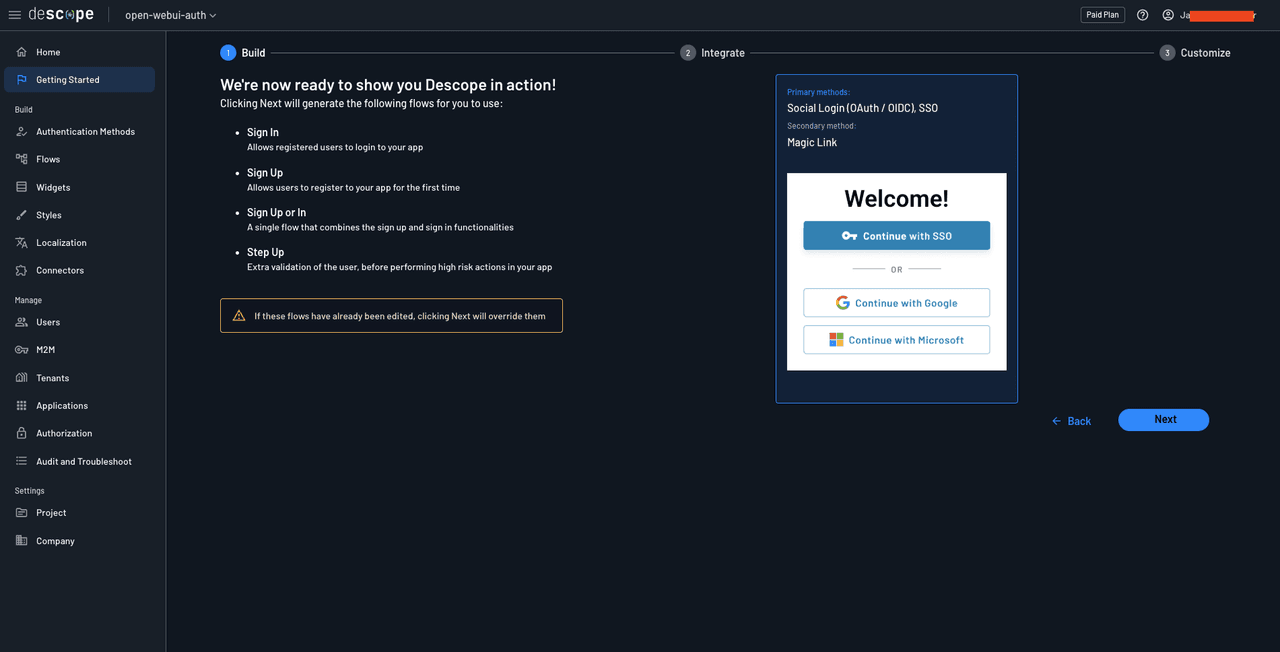
Click Next to create the authentication flows. The following page will present instructions on how to integrate the flows in your application. This means that you’ve successfully set up the authentication flows.
For the next steps, you need to do two things: configure an SSO tenant (through a third-party service like Okta) and configure Descope to be used as an SSO IdP in Open WebUI through OpenID Connect (OIDC). Let’s do them one by one.
B2B Enterprise Readiness Checklist
Score your tech stack on enterprise readiness pillars - from dev and IT experience to security and architecture.
Download
Setting up an SSO connection in Descope
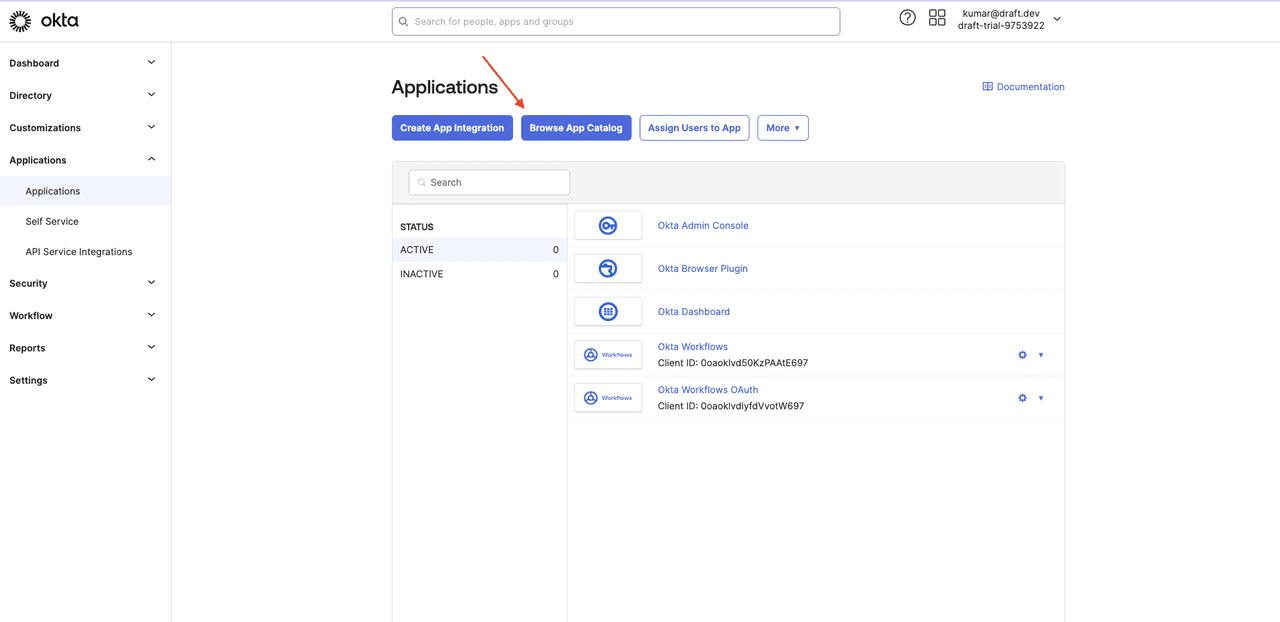
To set up an SSO tenant and connection in Descope, you first need to create one in Okta. To do that, log in to your Okta admin account, navigate to Applications > Applications, and click Browse App Catalog:
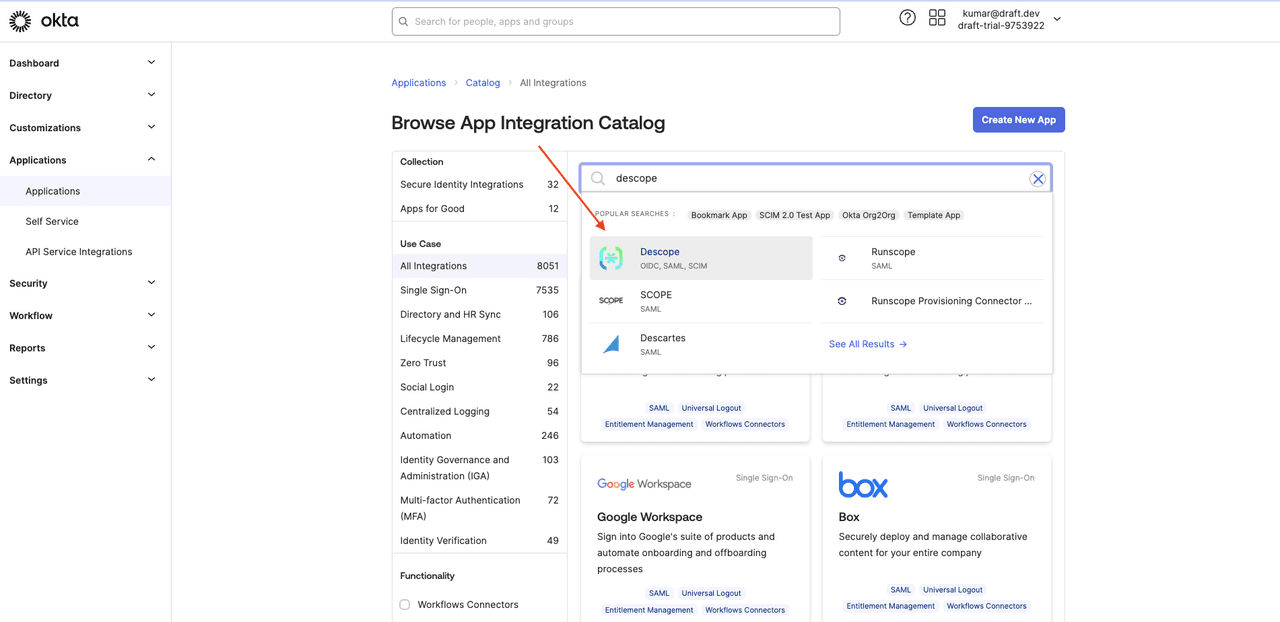
Search for Descope and select the Descope application:
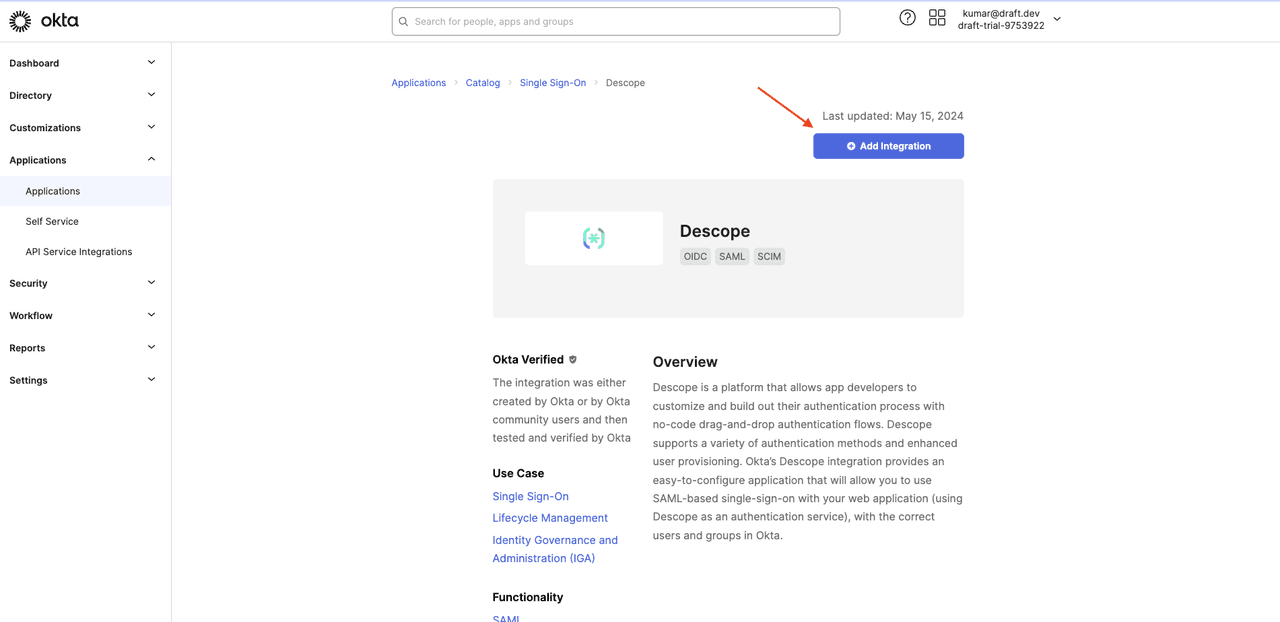
Select + Add Integration:
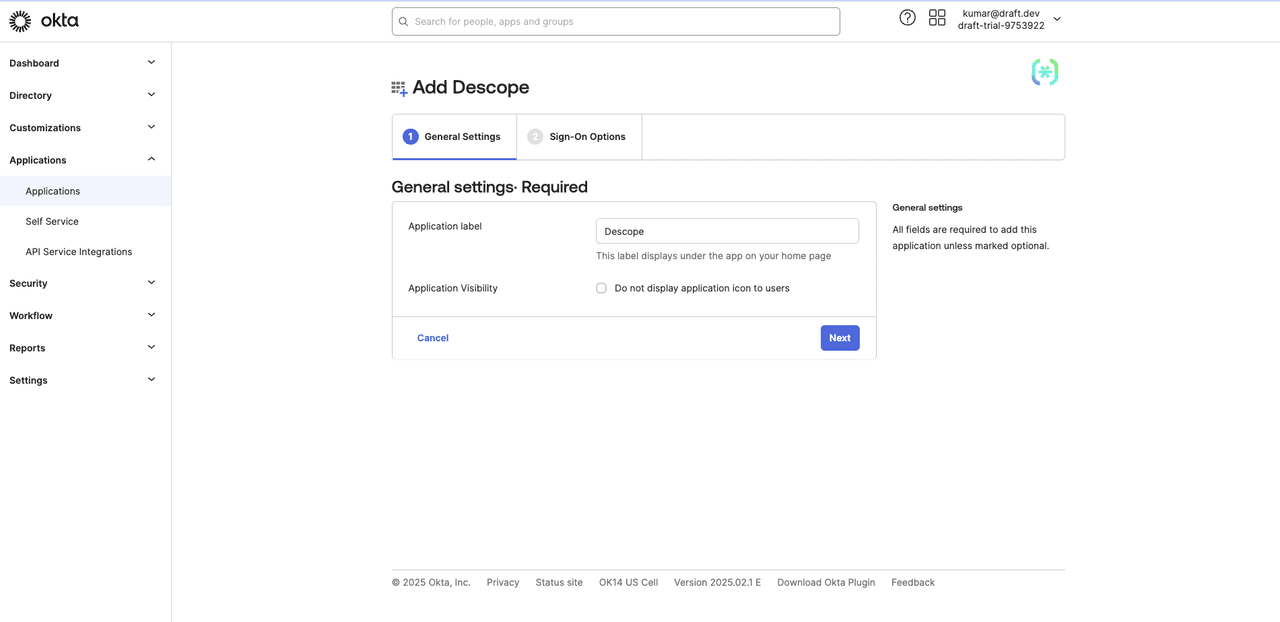
Provide a name for the integration, such as Descope, and click Next.
Select OpenID Connect as the sign-on method, and paste https://api.descope.com/v1/oauth/callback in the Callback URL field:
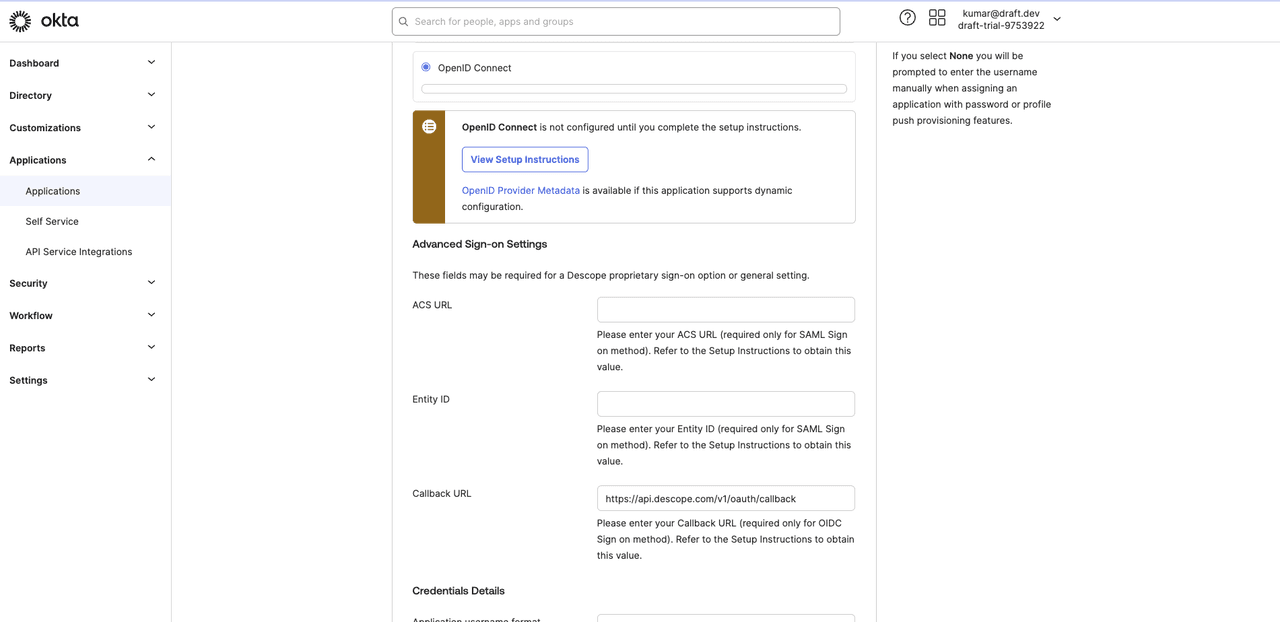
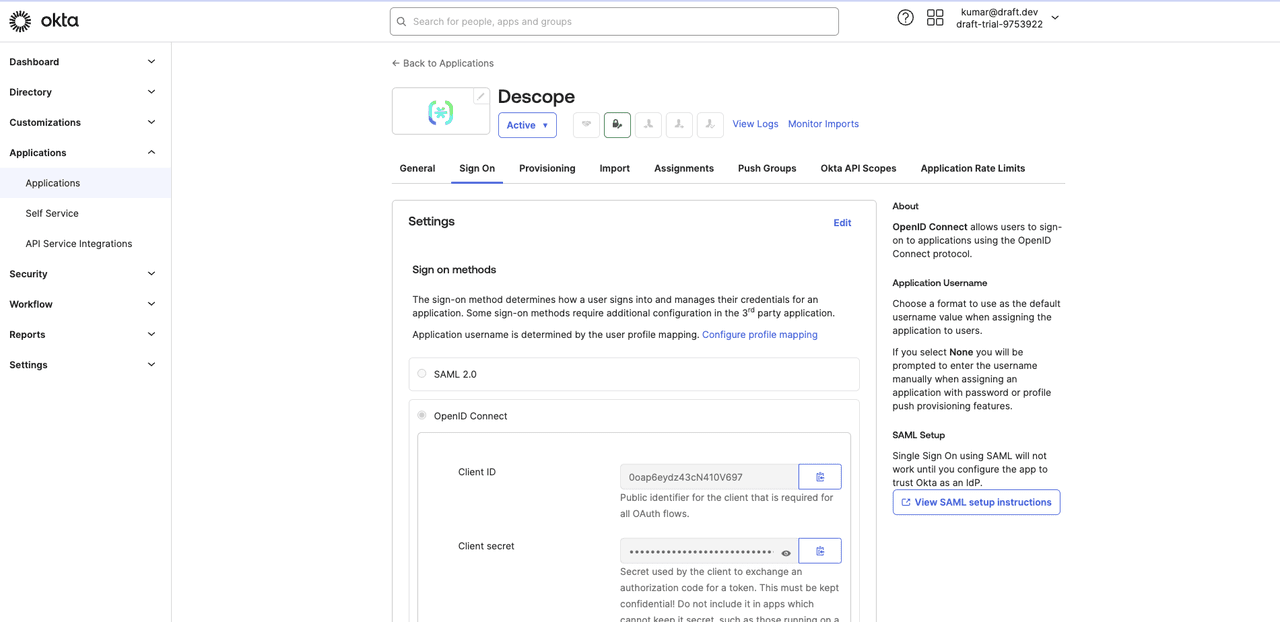
Click Done to save the changes. On the app details page, go to the Sign On tab and copy your client ID and client secret:
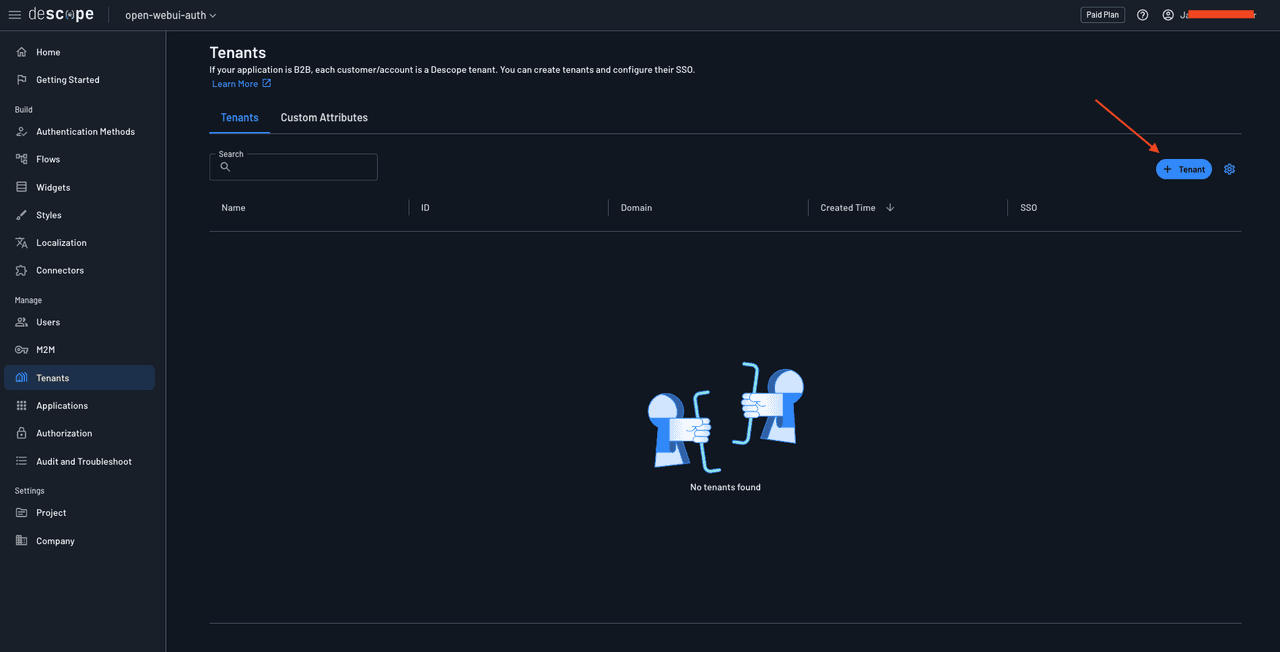
In the Descope console, head over to Manage > Tenants from the left navigation page and click the +Tenant button.
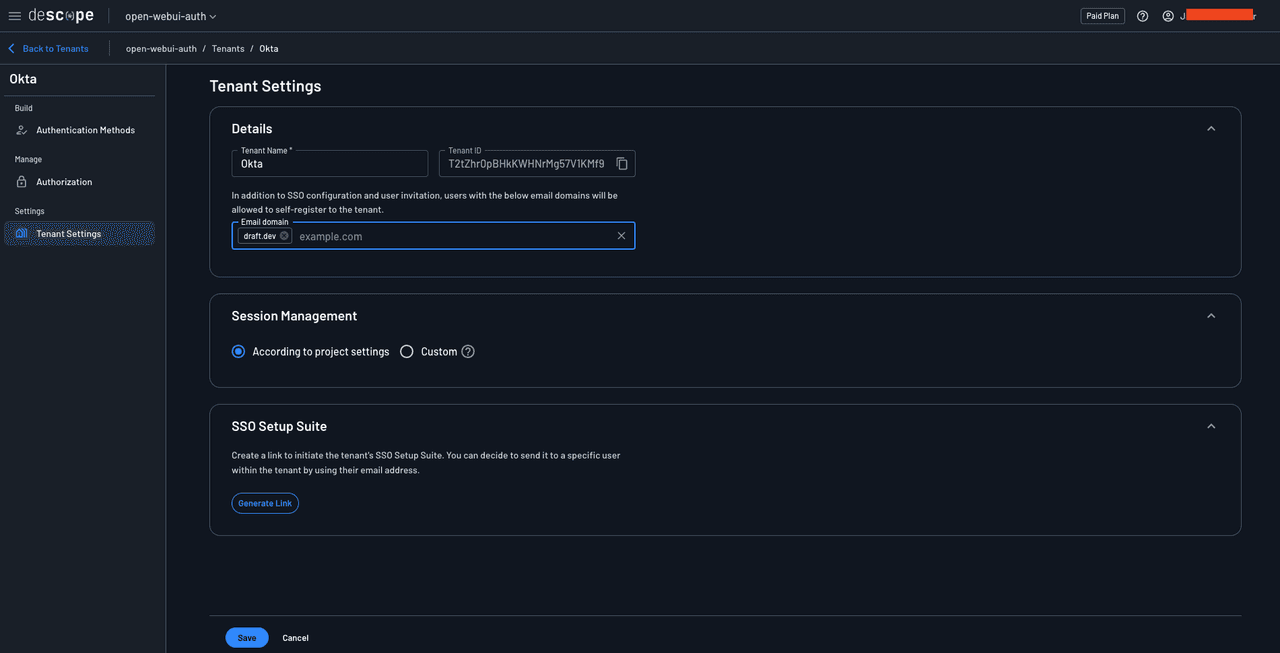
Give the tenant a name, such as Okta, and click Create. Select the tenant to open the tenant details page, add your email domain to the list of allowed domains, and save the changes.
Navigate to Authentication Methods > SSO and select OIDC as the authentication method. Under Tenant Details, add your email domain.
Scroll down to the SSO configuration > Account Settings section and provide the values as follows:
Provider Name:
OktaClient ID: The client ID you obtained from the Okta dashboard
Client Secret: The client secret you obtained from the Okta dashboard
Scope:
openid profile emailGrant Type:
Authorization code
To find out the values for the Connection Settings section, you will need to come back to the Okta application setup and find the following notice that provides a link to the metadata values for your Okta instance:
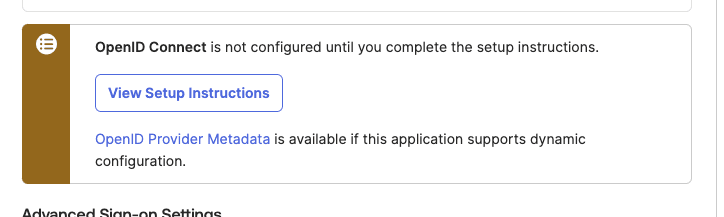
Click the OpenID Provider Metadata link to open the OpenID configuration page. You’ll need the issuer, authorization_endpoint, token_endpoint, userinfo_endpoint, and jwks_uri values.
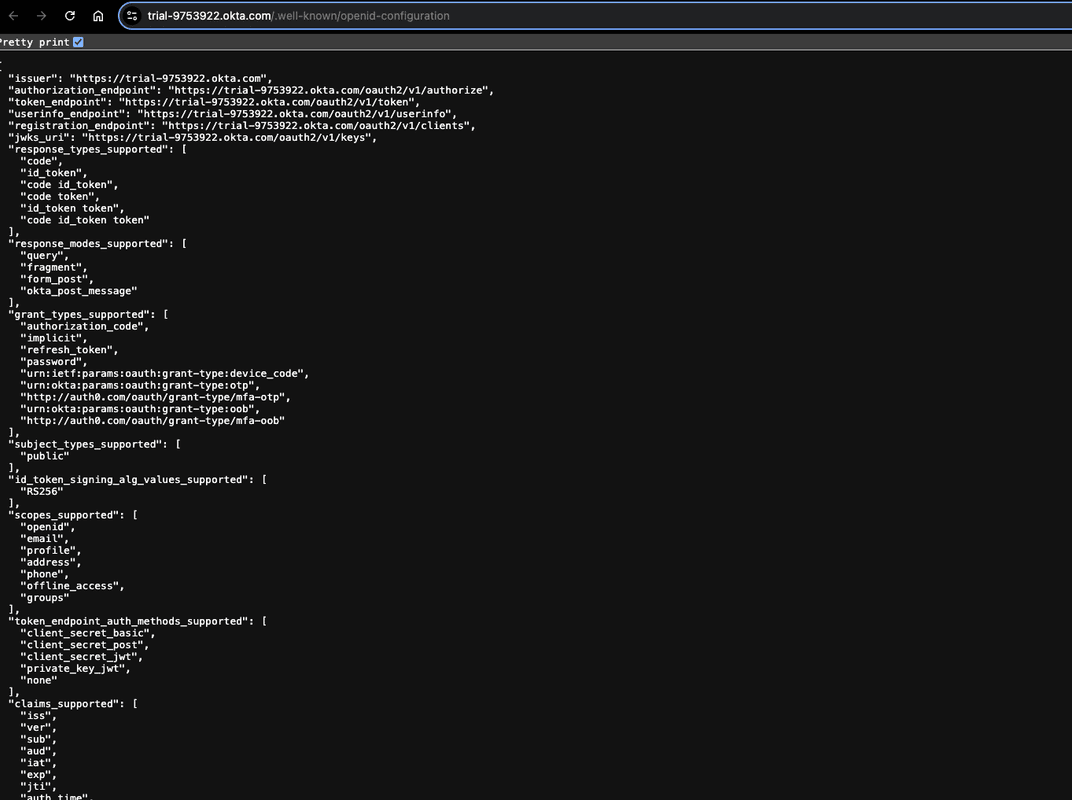
In the Descope console, enter these values in their respective fields and save the changes.
![Screenshot of the Descope tenant SSO configuration page for Okta. The breadcrumb shows open-webui-auth, Tenants, and Okta, with a Back to Tenants link. The left sidebar displays the tenant name Okta at the top, with SSO and Passwords options showing expandable arrows, and below that Build section with Authentication Methods, Manage section with Authorization, and Settings section with Tenant Settings. The main content area shows Account Settings with the following form fields: Provider Name containing Okta; Client ID containing 0oap6eydz43cN410V697; Client Secret showing masked dots; Scopes showing three tags for openid, profile, and email each with X icons to remove; Grant Type dropdown set to Authorization code with a help icon. The Connection Settings section has the subtext Provide information on the connection to the provider and contains: Issuer field with value https://trial-[redacted]2.okta.com (partially obscured); Authorization Endpoint with value https://trial-[redacted]2.okta.com/oauth2/v1/authorize; Token Endpoint with value https://trial-[redacted]2.okta.com/oauth2/v1/token; User Info Endpoint with value https://trial-[redacted]2.okta.com/oauth2/v1/userinfo; JWKs Endpoint with value https://trial-[redacted]2.okta.com/oauth2/v1/keys with a help icon. The Prompt section includes the text Specify how the Authorization Server prompts the end user for re-authentication and consent with a dropdown set to Prompt. Save and Cancel buttons appear at the bottom.](/_next/image?url=https%3A%2F%2Fimages.ctfassets.net%2Fxqb1f63q68s1%2F3ORO6Bz224yn9NXXCTrSY%2F130a6dc19f070aed07691c1a41e4c172%2FfatKDt0.png&w=3840&q=75)
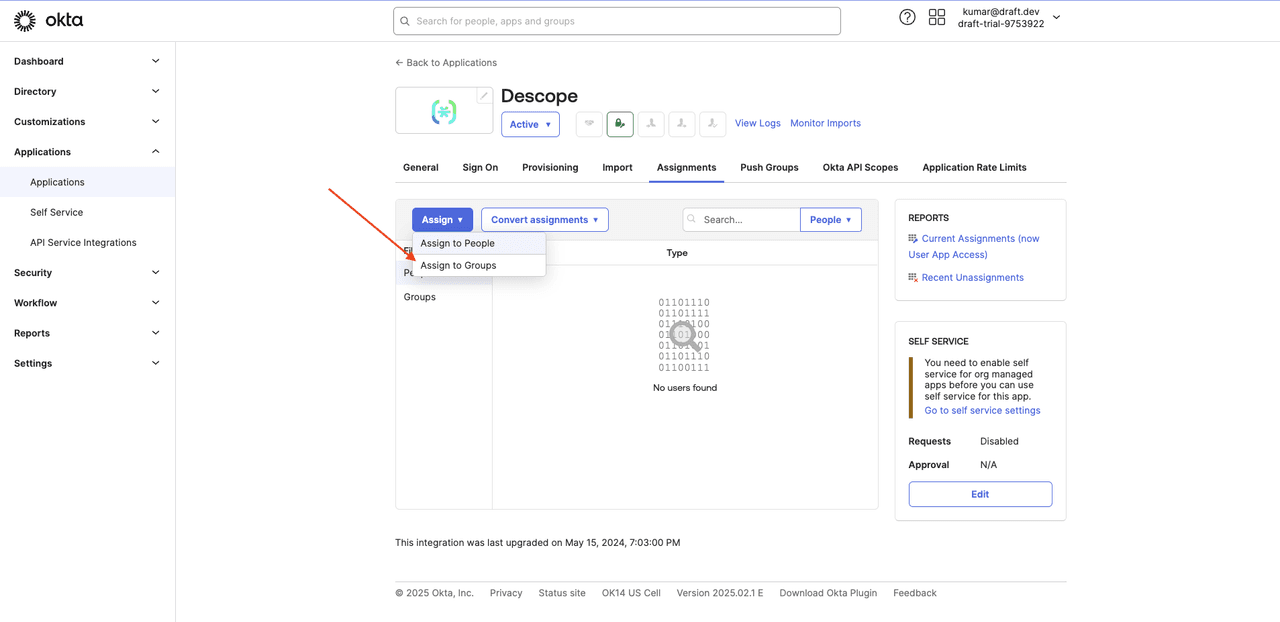
To grant users access to the Okta app, you need to assign users to the Descope app. To do this, open the app details page in Okta and select Assignments > Assign > Assign to Groups:
Click the Assign button next to the Everyone group to allow all users to log in via SSO, and click Done to save the changes.
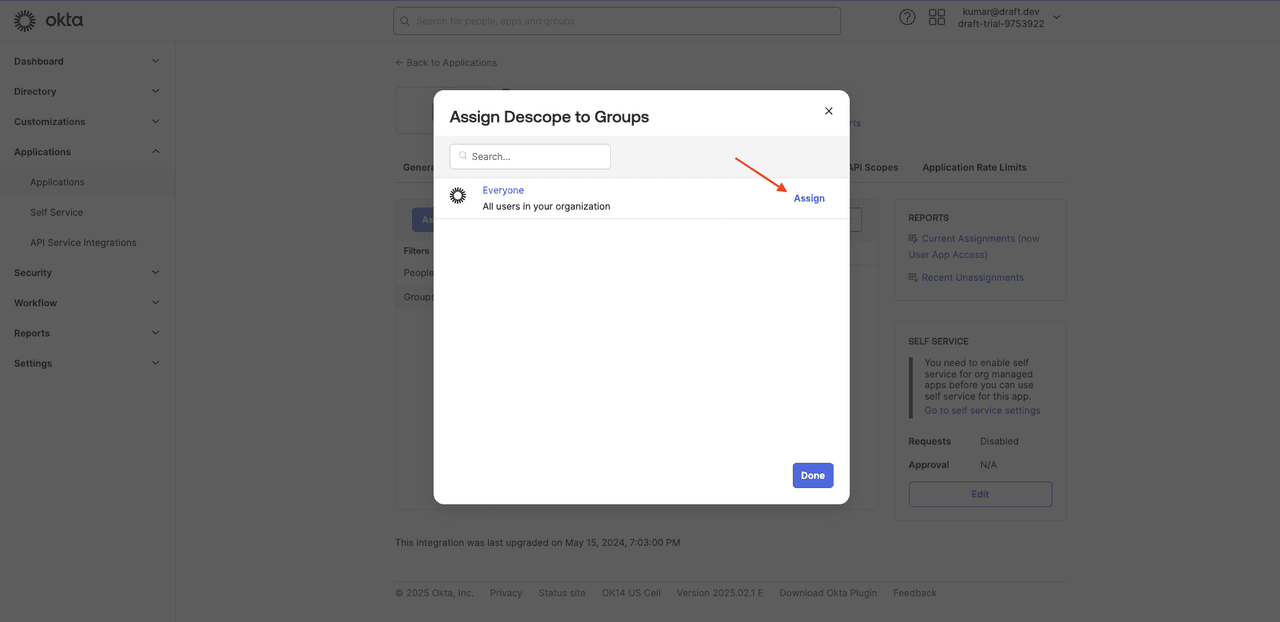
This tutorial uses the Everyone group for simplicity. In a real-world application, you should not use the Everyone group. Instead, you should create a group with only those members who need to access the app and assign the app to this group.
Setting up Descope as an SSO IdP through OIDC
To configure Descope as an SSO IdP with your Open WebUI instance, navigate to Applications from the left navigation pane.
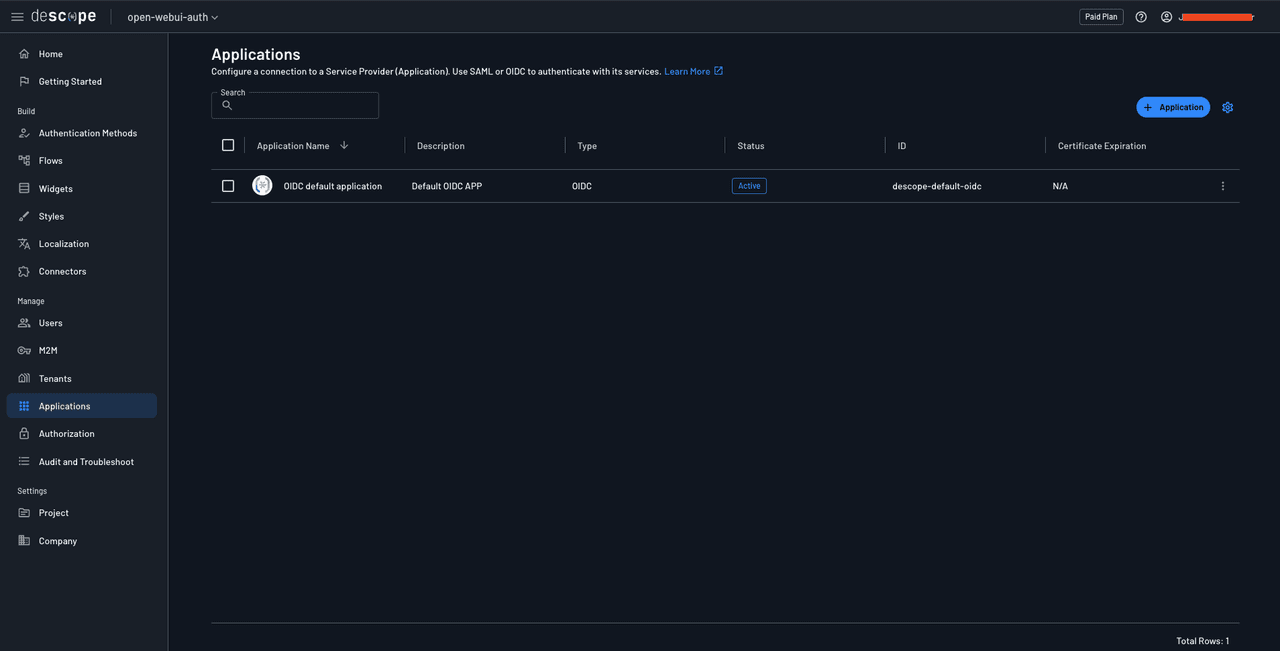
You’ll see a list of applications attached to your Descope project. You should notice that a default OIDC application has been created for you automatically. You’ll use this Descope application to turn your Descope project into an SSO identity provider for your Open WebUI instance. Click the default application to view its details:
![Screenshot of the Descope console showing the Edit OIDC default application Application page with an OIDC badge. The breadcrumb shows Back, Applications, and OIDC default application. The Application Details section is expanded, displaying the Descope connected nodes logo icon, Application name field containing OIDC default application, Application ID field containing descope-default-oidc with a copy icon, and Description field containing Default OIDC APP. The IdP Configuration section is expanded with the subheading Descope Configuration. It contains: Flow Hosting URL field showing https://api.descope.com/login/P[redacted]?flow=sign-up-or-in; Issuer field showing https://api.descope.com/P[redacted] (partially obscured with orange redaction) with a copy icon; Discovery URL field showing https://api.descope.com/[redacted]/.well-known/openid-configur (truncated) with a copy icon. The Supported Claims section displays multiple claim tags including iss, aud, iat, exp, sub, name, email, email_verified, phone_number, phone_number_verified, picture, family_name, and given_name, each with X icons to remove. An unchecked Force Authentication checkbox appears with a help icon. The right side shows an Application Help Guide panel explaining each field: Flow Hosting URL is described as The URL where the authentication flow is hosted (see section 3 for more details); Issuer URL is The URL used for validating Descope as an OIDC provider; Discovery URL Provides configuration information for OIDC setup; Supported Claims lists Claims included in the Discovery URL configuration (e.g., iss, sub, email); and Force Authentication Ensures re-authentication, regardless of the user's login status. Save and Discard buttons appear at the bottom.](/_next/image?url=https%3A%2F%2Fimages.ctfassets.net%2Fxqb1f63q68s1%2F5iqJDZiWVtw2mdg675cPgx%2Fe83e67e3d028f3513c62f335c6499378%2FmsY2jZF.png&w=3840&q=75)
This page contains all the credentials you need to configure your Open WebUI instance to integrate this Descope project as the SSO identity provider through Open ID Connect (OIDC).
Setting up Open WebUI
Now that Descope has been set up, it’s time to fire up an Open WebUI instance. This tutorial uses a Docker Compose file to set up the Open WebUI instance and simplify environment variable management. You can use the same environment variables through the Python method as described in the Open WebUI docs.
Create a docker-compose.yml file on your system and save the following contents in it:
version: '3'
services:
  openwebui:
    image: ghcr.io/open-webui/open-webui:main
    ports:
      - "3000:8080"
    volumes:
      - open-webui:/app/backend/data
volumes:
  open-webui:
Run the command docker compose up in the same directory as this YML file to start up a docker container with the Open WebUI app in it.
Once it starts, you should be able to navigate to http://localhost:3000 and access the app:

Click Get started at the bottom of the page, and you’ll be asked to create an admin account for the instance:
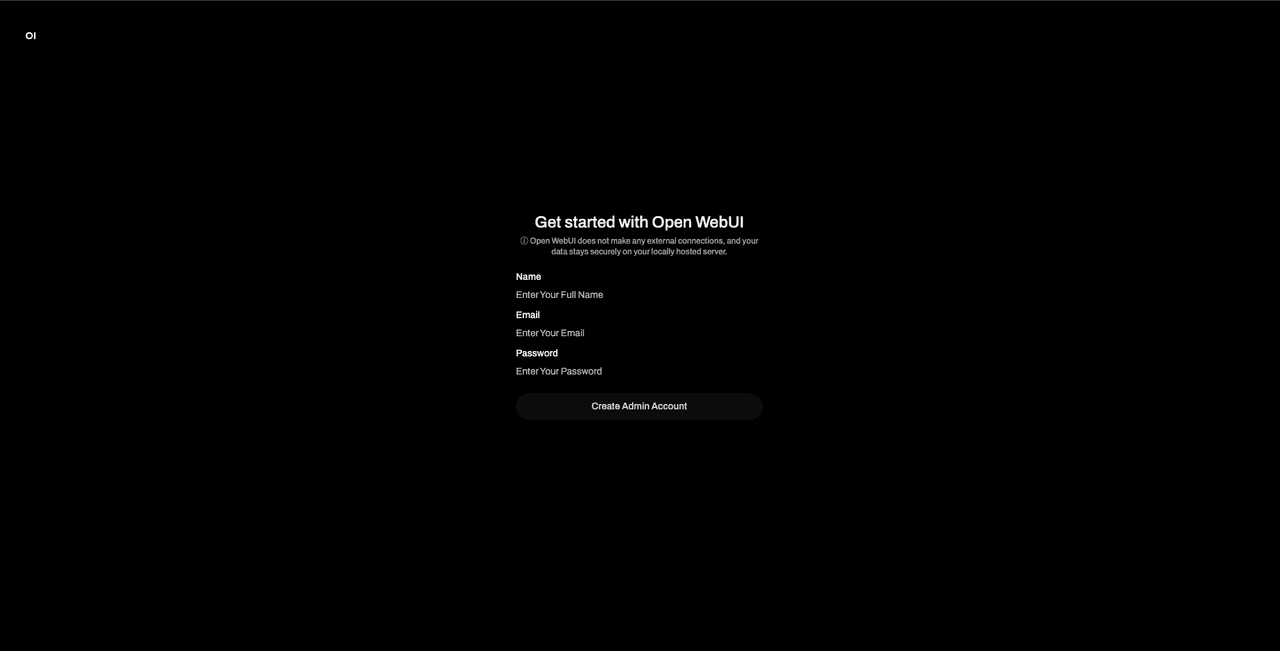
Create an admin account by providing your name and email address and setting a password. Make sure to remember its credentials as you will need this account to approve any new user accounts that sign up for your instance. You will later see how to control this through Descope directly without having to manually approve user accounts.
Once done, you’ll be taken to the chat page.
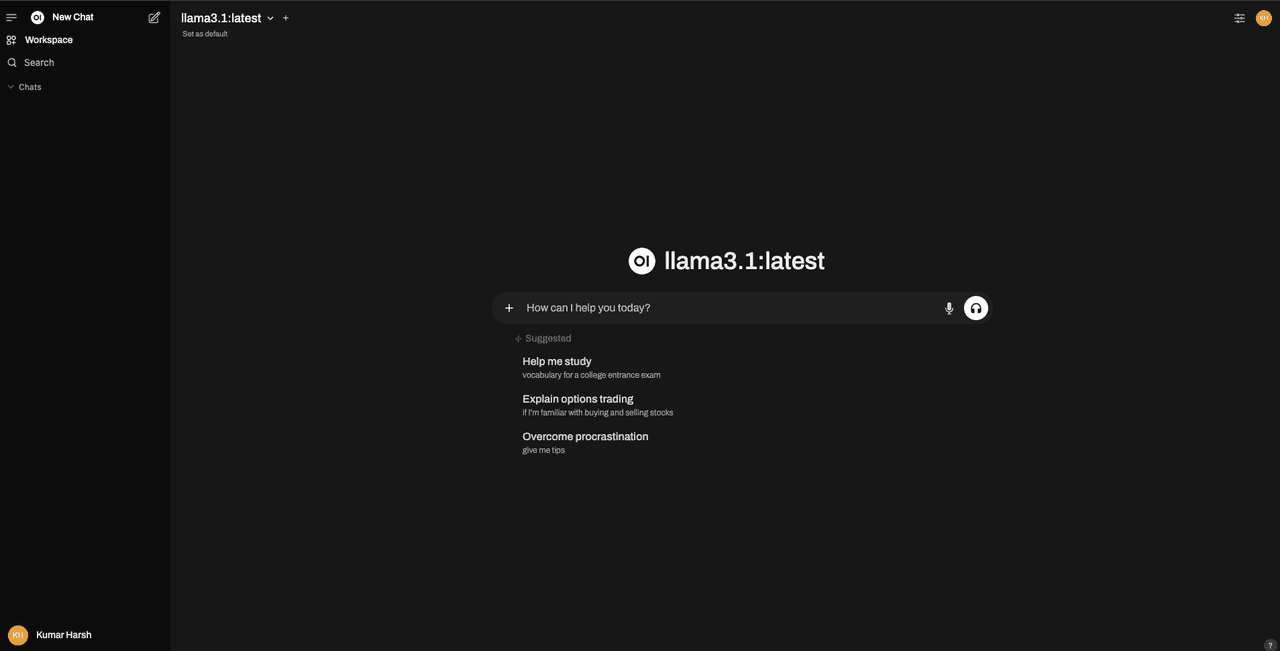
This means that you have set up Open WebUI correctly.
Implementing SSO with OIDC using Descope
As mentioned earlier, Open WebUI offers support for federated authentication through OIDC. To implement that, you need to stop your running Open WebUI instance, configure some environment variables in your Docker Compose file (or through your Python commands), and then run the instance once again.
Open the docker-compose.yml file you created earlier and update it to match the following:
version: '3'
services:
  openwebui:
    image: ghcr.io/open-webui/open-webui:main
    ports:
      - "3000:8080"
    volumes:
      - open-webui:/app/backend/data
    # Add the following `environment` node and the environment variables listed below
     environment:
         - ENABLE_OAUTH_SIGNUP=True
         - ENABLE_LOGIN_FORM=True
         - OAUTH_CLIENT_ID=<your Descope project ID>
         - OAUTH_CLIENT_SECRET=K2sanYIxha9VyfsHaq17x22cn7an5G7rKClr0ZgyfvXaZ5lk00oeL2V5mPkHGsc7fK0taBD
         - OPENID_PROVIDER_URL=https://api.descope.com/P2samMUcHcMXRJ3LVsxB0cKvRUfZ/SA2samXA6WdlKCh2nz0NZAVfztdfx/.well-known/openid-configuration
         - OAUTH_PROVIDER_NAME=Descope
volumes:
  open-webui:
This code snippet adds the following environment variables to the Open WebUI app:
ENABLE_OAUTH_SIGNUP: Setting this to True enables signing up via OAuth in Open WebUI’s login form.ENABLE_LOGIN_FORM: This variable controls whether or not you can sign in via username and password into the Open WebUI instance. As you created the admin account with a username and password, setting it to true ensures you can log in as admin with those credentials.OAUTH_CLIENT_ID: This is where you supply the client ID from the Descope OIDC app configuration page. The value for this variable will be the same as your Descope project ID.OAUTH_CLIENT_SECRET: To provide this value, you will need to create a new access key in your Descope project. To do that, navigate to M2M under the Manage section of the left navigation pane of the Open WebUI panel and click the + Access Key button to create a new access key. Paste the key’s value in this variable.OPENID_PROVIDER_URL: You will get the value for this from the OIDC app’s config page under Discovery URL.OAUTH_PROVIDER_NAME: This is the name that will be displayed on the Sign in with SSO button on the Open WebUI auth page. Setting it to Descope will make the button’s title say Continue with Descope.
Once you have configured these values, run docker compose up --force-recreate to run the Open WebUI instance.
Your auth page should now have a new Continue with Descope button along with the usual email password login option.
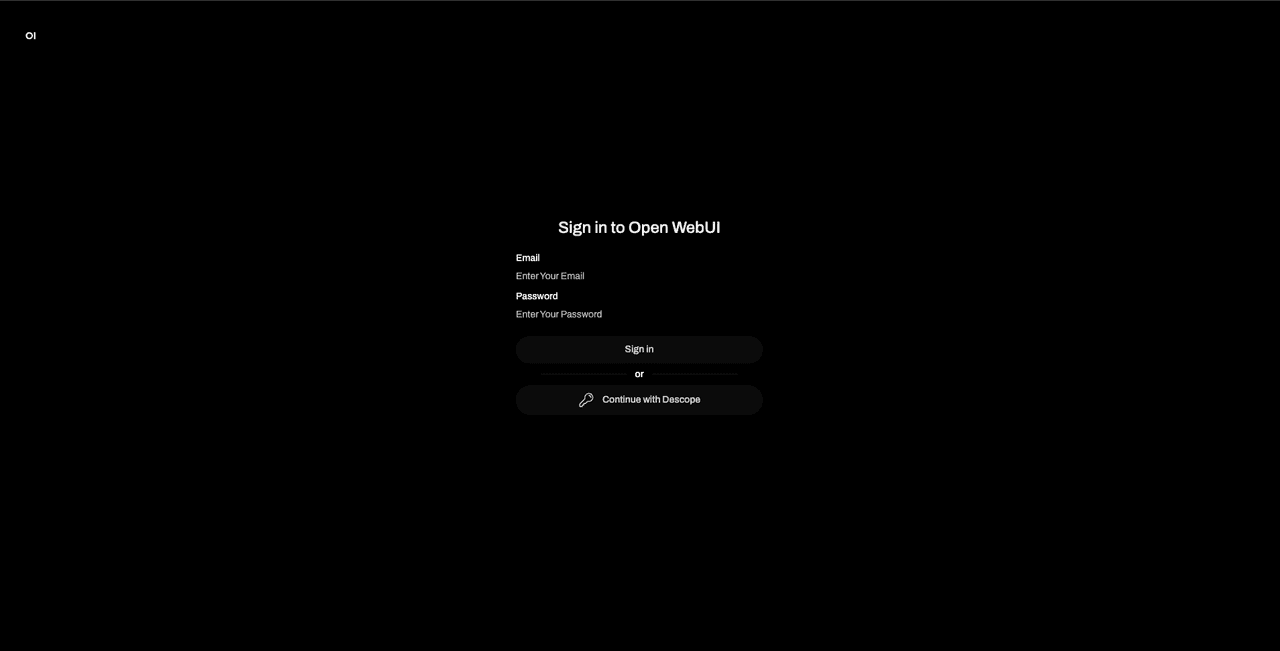
Click Continue with Descope to use Descope to sign into the app:
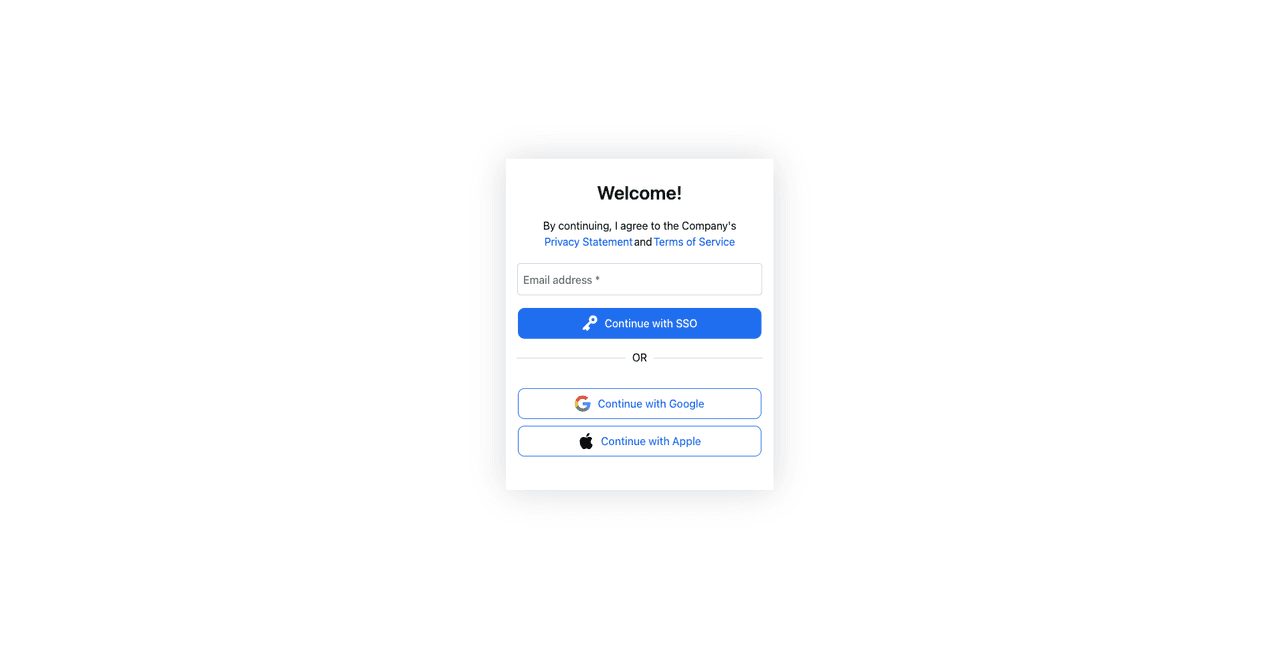
Since you configured social login and enchanted links as the authentication methods, you can use either of those two to log in to your Open WebUI instance.
Once you’re logged in, you should see the following screen saying that your account is pending activation from an Open WebUI admin:
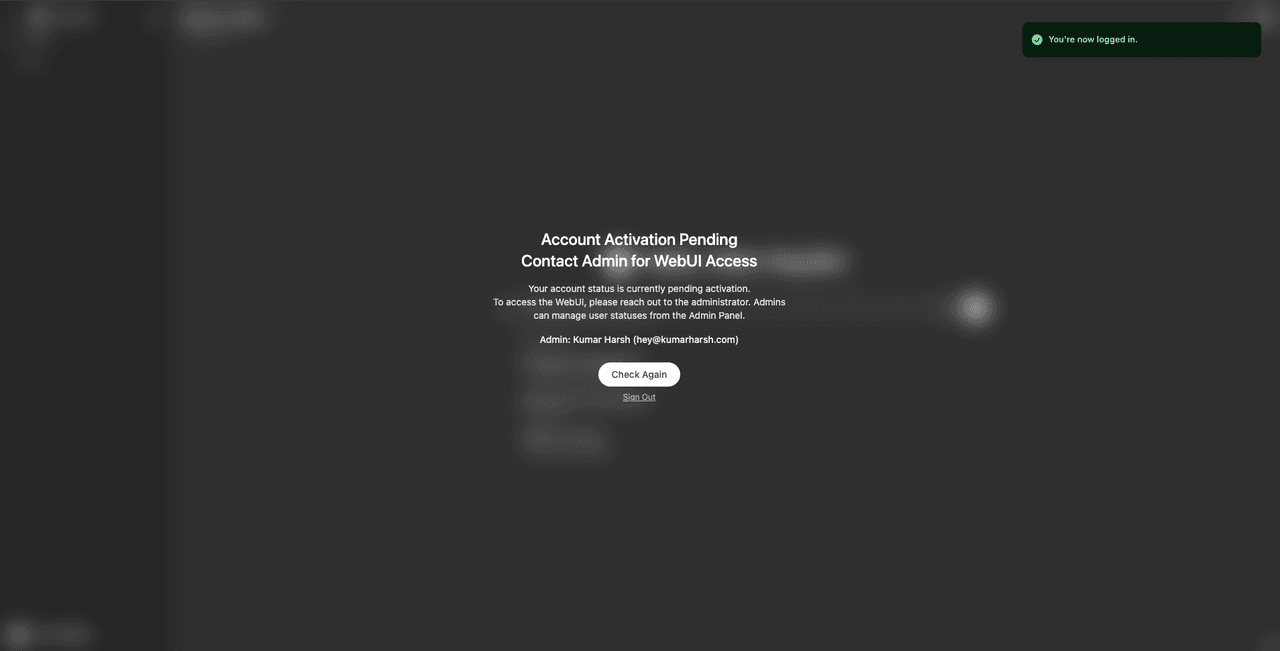
This means that you’ve logged in successfully, but your Open WebUI account is in the “pending” state, waiting for an admin to approve it. You’ll also notice the details of the admin on the screen.
You can now try signing out from this account and signing in with the admin account to see the newly created user in the admin panel:
![Screenshot of the Open WebUI admin panel showing the Users management page. The top navigation bar displays tabs for Users (currently selected), Evaluations, Functions, and Settings. The left sidebar shows Overview and Groups navigation options. The main content area has the heading Users with a count of 2, along with a Search field and plus icon in the top right. A table displays user information with columns for Role, Name, Email, Last Active, Created At, and OAuth ID. The first row shows a user with a green ADMIN badge, name Kumar Harsh with avatar, email hey@[redacted] (partially obscured with orange), Last Active showing a few seconds ago, Created At showing February 07, 2025, and an edit icon. The second row shows a user with a yellow PENDING badge, name Alex Hayden with an A avatar, email alexha[redacted].com (partially obscured with orange), Last Active showing a minute ago, Created At showing February 07, 2025, OAuth ID showing oidc@U2sIADExDpW5vDhI4XRxvFBoDQEg, and three action icons for chat, edit, and delete. Below the table is pagination showing page 1 with navigation arrows, and helper text reading Click on the user role button to change a user's role. The left sidebar also shows the logged-in user Kumar Harsh at the bottom.](/_next/image?url=https%3A%2F%2Fimages.ctfassets.net%2Fxqb1f63q68s1%2F2PbAe2d9R1uoFbisienn74%2F5df06b48e4d73c96663b4f084a61c66e%2FSnoqija.png&w=3840&q=75)
Once you click the PENDING chip under the Role column for the new user account, it will turn to USER. This indicates that the account has now been assigned the USER role, which allows them access to the instance. Try logging in via Descope once again to check if you can access the Open WebUI instance via the new user account.
Apart from the USER role, Open WebUI allows you to set a user as PENDING (which you’ve already seen) and ADMIN. Users with the admin role can access the admin panel, which you saw above, and can change the instance settings. You can try clicking on the role chips to cycle through all these three options for any user.
Implementing role management via OAuth claims
By default, when a new user signs up for an account on Open WebUI, they must wait for an admin to approve it. This approval step must also be completed separately within the Open WebUI instance. Since you’re using a federated authentication provider, it’s best to handle role management in Descope. This will allow users to sign in and access the Open WebUI instance directly without needing manual approvals.
You can use custom claims to manage the roles. OAuth claims are key value pairs that contain information about a user. These are shared by the identity provider (here, Descope) with the service provider (here, Open WebUI). The discovery URL of the identity provider includes these claims, which are picked up by the service provider during integration.
Descope includes the following user information by default as claims in the discovery URL:
{
  "claims_supported":["iss", "aud", "iat", "exp", "sub", "name", "email", "email_verified", "phone_number", "phone_number_verified", "picture", "family_name", "given_name"]
}
Descope allows you to add custom claims to expose additional user information based on your requirements. This feature will come in handy here as it allows you to expose the role assigned to users in your Descope project (either user or admin) and map them to the USER and ADMIN roles supported by Open WebUI. This will allow you to tag users as user or admin in your Descope user directory to allow them access as a USER or an ADMIN role in the Open WebUI instance without having to go through the hassle of manual account creation and approval.
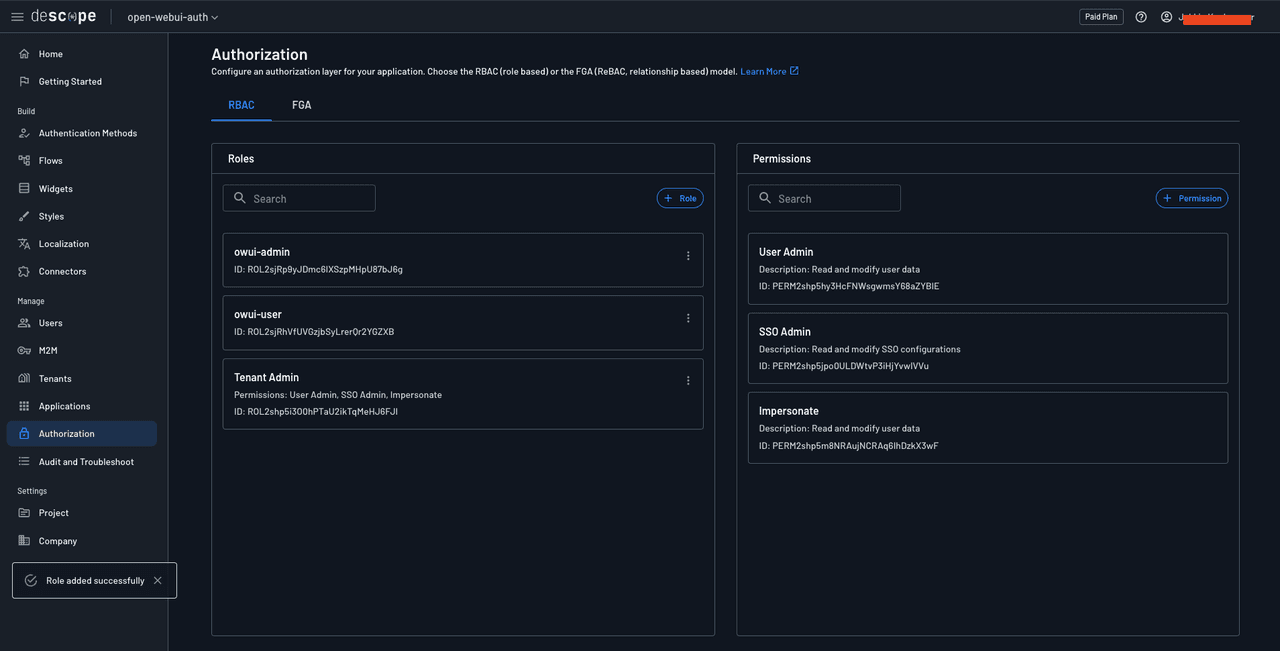
To do this, you need to create two roles in Descope. Head over to Authorization under Manage in the left navigation pane on the Descope dashboard and click the + Role button to add a new role:
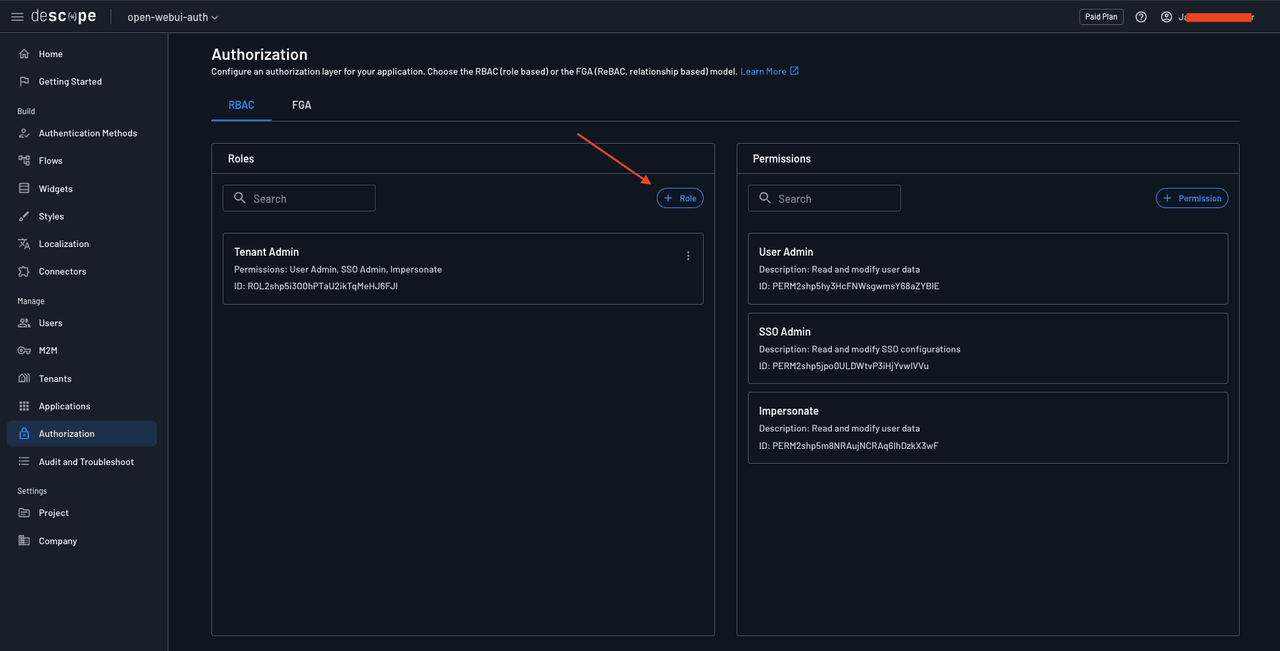
Name the role owui-user and click add to create the role. Similarly, create another role named owui-admin. Once done, you should have three roles: owui-admin, owui-user, and Tenant Admin.
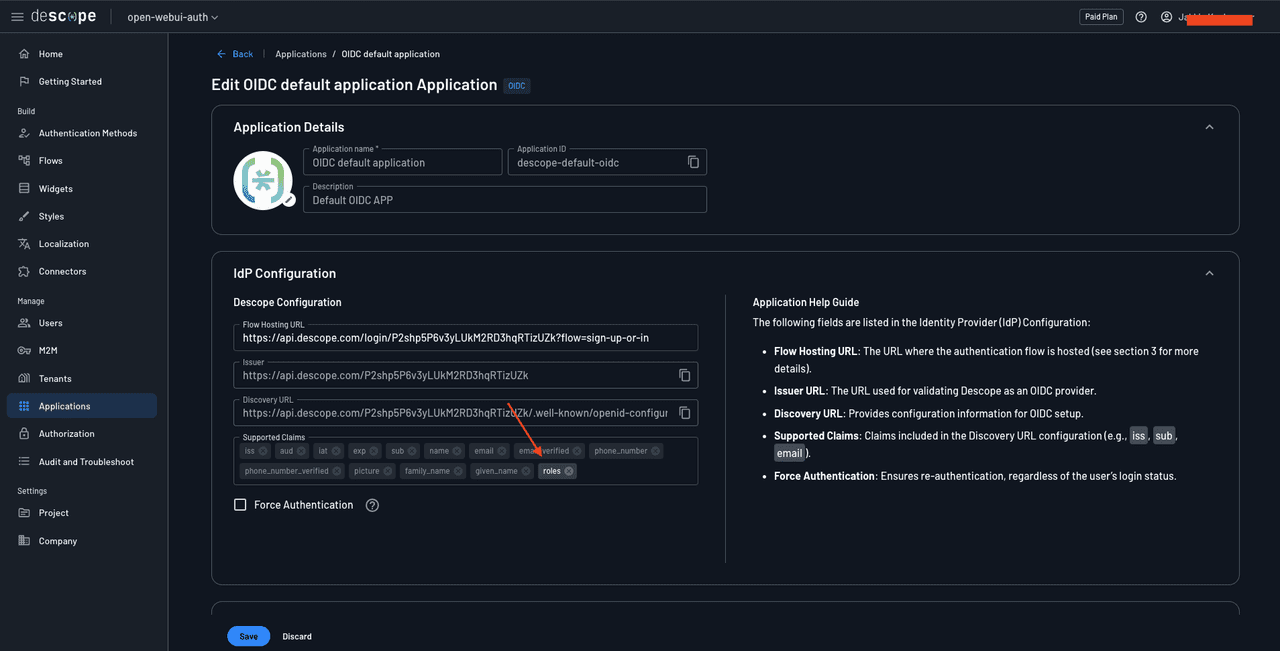
Head over to Application in the left navigation pane and navigate to the OIDC default application’s details page. Here, in the Supported Claims input field, add a custom claim named roles.
You also need to configure the Open WebUI instance to recognize this new claim and its possible values. To do that, add the following environment variables to the docker-compose.yml file for the Open WebUI instance:
version: '3'
services:
  openwebui:
    image: ghcr.io/open-webui/open-webui:main
    ports:
      - "3000:8080"
    volumes:
      - open-webui:/app/backend/data
     environment:
         - ENABLE_OAUTH_SIGNUP=True
         - ENABLE_LOGIN_FORM=True
         - OAUTH_CLIENT_ID=<your Descope project ID>
         - OAUTH_CLIENT_SECRET=K2sanYIxha9VyfsHaq17x22cn7an5G7rKClr0ZgyfvXaZ5lk00oeL2V5mPkHGsc7fK0taBD
         - OPENID_PROVIDER_URL=https://api.descope.com/P2samMUcHcMXRJ3LVsxB0cKvRUfZ/SA2samXA6WdlKCh2nz0NZAVfztdfx/.well-known/openid-configuration
         - OAUTH_PROVIDER_NAME=Descope

        # Add the following environment variables
        - ENABLE_OAUTH_ROLE_MANAGEMENT=True
        - OAUTH_SCOPES=openid email profile descope.claims descope.custom_claims
        - OAUTH_ROLES_CLAIM=roles
        - OAUTH_ALLOWED_ROLES=owui-user
        - OAUTH_ADMIN_ROLES=owui-admin
volumes:
  open-webui:
Setting ENABLE_OAUTH_ROLE_MANAGEMENT to True delegates role management to the OAuth identity provider. The default value for OAUTH_SCOPES is openid email profile. You’ve added descope.claims descope.custom_claims above to allow the Open WebUI instance to access the default and custom claims supplied by Descope. OAUTH_ROLES_CLAIM allows you to define the claim that contains the value for the role to be assigned to the OAuth users. OAUTH_ALLOWED_ROLES allows you to define the Descope roles that will be mapped to the USER Open WebUI role. Similarly, OAUTH_ADMIN_ROLES allows you to define the Descope roles that will be mapped to the ADMIN Open WebUI role.
With all these variables configured, you can now try running docker compose up --force-recreate to rerun the Open WebUI instance and test it out.
Before trying to sign in to your Open WebUI instance, try creating a new user in Descope and assigning it the role owui-admin, for instance:
![Screenshot of the Descope console showing a Create Users modal dialog overlaying the Users page. The modal heading reads Create Users with subtext Create one or more users and determine whether sending them an invitation message is necessary. The Login IDs field shows a tag with a partially obscured email address (ku[redacted]dev) with an X to remove, and helper text below reads Supports emails and phone numbers. The User Attributes section is expanded with the subtext Add details about your user(s). It contains Name field with value Kumar Harsh, Email field with a partially obscured value (k[redacted]v) and an Add as Login ID link, and an empty Phone field. The Authorization section is expanded with a help icon and subtext Define user access to tenants, and assign roles:. A Tenants dropdown appears on the left, and a Roles dropdown on the right shows owui-admin as a selected tag with an X to remove, highlighted by an orange box around it. Plus and minus icons appear to the right for adding or removing tenant-role pairs. Below is Define user access to applications: with an Applications dropdown showing All Applications as a selected tag with an X. A User Invitations section heading is partially visible at the bottom. Cancel and Create buttons appear in the bottom right corner of the modal. The background shows the dimmed Users page with a list displaying alexhayden141@gma... as a visible user entry.](/_next/image?url=https%3A%2F%2Fimages.ctfassets.net%2Fxqb1f63q68s1%2F6QCmi9Utf7sgWxFDCaBexC%2Fc781c77fe9a432d990c78fabce629c10%2FbfjWbJA.png&w=3840&q=75)
Now, when you try logging in with this user into Open WebUI using Descope, you will observe that it is directly promoted to an ADMIN:
![Screenshot of the Open WebUI admin panel Users page showing a newly created admin user. The Users count now shows 3. The table displays three user rows: the first row shows a green ADMIN badge, name Kumar Harsh with avatar, email h[redacted] (obscured with orange), Last Active showing 2 hours ago, Created At showing February 07, 2025, and an edit icon. The second row shows a yellow PENDING badge, name Alex Hayden with an A avatar, email a[redacted]m (obscured with orange), Last Active showing 11 hours ago, Created At showing February 07, 2025, OAuth ID showing oidc@U2sIADExDpW5vDhI4XRxvFBoDQEg, and three action icons. The third row shows a green ADMIN badge highlighted by an orange arrow pointing to it, name Kumar Harsh, Tech Ed with an avatar, email k[redacted]v (obscured with orange), Last Active showing a few seconds ago, Created At showing February 08, 2025, OAuth ID showing oidc@U2sjUAtHB9x0Vw1c7c7tuvWeeMx2, and an edit icon. The left sidebar shows the logged-in user Kumar Harsh, Tech Ed at the bottom, indicating the new admin user is now authenticated and active.](/_next/image?url=https%3A%2F%2Fimages.ctfassets.net%2Fxqb1f63q68s1%2F3kZKKvL7iAuK26GTC7Rx16%2F452eacf1b197e42418d4e6dbd089653d%2FHHxZqdT.png&w=3840&q=75)
You can also try assigning a Descope user the role owui-user to have them get assigned the USER role in Open WebUI.
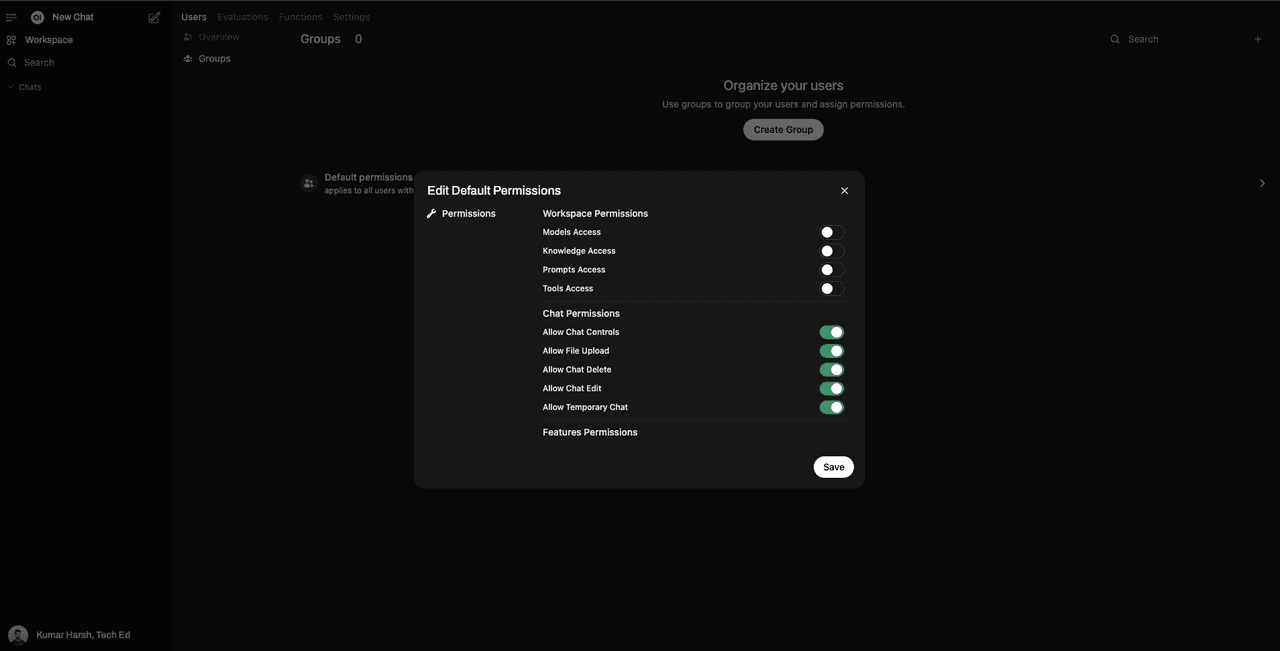
Managing Open WebUI user permissions
Normally, OAuth IdPs should be able to allow you to manage permissions associated with user roles as well. However, Open WebUI does not provide mappings or configurations to allow setting permissions at the OAuth IdP level. You only get two roles: USER and ADMIN. For users with the role USER, Open WebUI allows you to configure platform permissions via its users page (/admin/users). You can edit permissions—such as turning on or off the chat ability—and allow file uploads, chat deletion, chat edits, and temporary chats, among others.
You can either set these permissions for all USERs, or create “groups” of users that are assigned a specific set of permissions. A group of users in Open WebUI is a collection of users with a specific set of permissions assigned to them. You can create and manage user groups through the Open WebUI admin panel.
Open WebUI also allows you to use the ENABLE_OAUTH_GROUP_MANAGEMENT environment variable to allow delegating group assignments to OAuth IdPs and the OAUTH_GROUP_CLAIM to define the claim that contains the value for the group to be assigned to the OAuth users. You can try these out for yourself to configure user access on a more granular level through your Descope project.
Conclusion
SSO has become a staple in modern organizations of all sizes because it simplifies user access to multiple applications while reducing the risk of password-related vulnerabilities. SSO helps organizations significantly improve user experience, increase productivity, and reduce IT costs associated with password management and security breaches.
In this tutorial, you learned how to create a new Descope project and use it as an SSO identity provider to integrate it into an Open WebUI instance through OIDC. You also saw how to delegate role management to Descope and learned how Open WebUI makes it possible to create user groups that you can assign via Descope to your Open WebUI users.
With Descope’s seamless SSO integration, you can make your Open WebUI instance more secure, scalable, and user-friendly. By centralizing authentication and access management, you can enhance both security and convenience for your users while reducing the overhead of handling credentials. Make sure to try it out for yourself!