Table of Contents
Why is SSO important in a Dash app?
This tutorial was written by Aniket Bhattacharyea, a developer advocate and mathematics postgraduate with more than 150 technical articles published. Connect with him on his website to see more of his work!
Dash is a low-code framework by Plotly for building data science and machine learning web apps in Python. Built on top of Plotly.js, React, and Flask, Dash makes it easy to build reactive web apps in Python. But as the application grows, authentication becomes necessary.
Descope simplifies authentication with its safe and secure architecture and Descope Flows, a visual no-code platform for designing your authentication flows. Descope also supports OpenID Connect (OIDC), which makes it easy to add authentication to a Dash app.
In this tutorial, you’ll learn how to add authentication and single sign-on (SSO) to your Dash app using Descope. You’ll configure OIDC with Descope and add magic link authentication and social login to your Dash app. You’ll then add SSO with Okta as the identity provider (IdP).
Why is SSO important in a Dash app?
A Dash app is often used to share sensitive data visualizations among stakeholders of a company, and it is typically designed for B2B use. As such, Dash applications cater to multiple companies that have their own identity providers, such as Okta, Azure AD, or Google Workspace. Adding SSO in your Dash app ensures users can sign in with their existing corporate accounts, which saves them from having to create another set of credentials.
A typical Workspace IdP is often augmented with security systems specific to the organization. These systems include features like MFA, password policies, and access rules. SSO allows organizations to use their own IdP, which ensures these security features are applied to the Dash app.
Finally, SSO simplifies the development process because developers can offload the authentication and management of credentials to the IdP. This helps save critical development time and significantly reduces the risk of critical vulnerabilities or mishandling of sensitive data.
Adding authentication and SSO to your Dash app
In this section, you’ll learn how to add authentication and SSO using Descope. First, you’ll add magic link authentication and social login. Then, you’ll add SSO with Okta.
Prerequisites
To follow along with this tutorial, you need to have the following:
Setting up a Dash app
For simplicity, a Dash app has already been created and shared on GitHub. To follow along, you need to clone the app on your local machine:
git clone https://github.com/heraldofsolace/descope-dash-sso.git
cd descope-dash-sso
Create and activate a virtual environment:
python -m venv venv
source venv/bin/activate
Next, install all the dependencies:
pip install -r requirements.txtThe entry point of the app is defined in app.py, which sets up a simple Dash app with no authentication. There are two route definitions in the pages directory: public.py defines the public home route, and private.py defines a route at /private. In the absence of authentication, both routes are accessible by anyone. In the later sections, you’ll add authentication to protect the private route.
Run the app with the following command:
python app.pyVisit http://127.0.0.1:8050/ on your browser and you’ll be greeted with the home page:

Click the link to visit the private page:
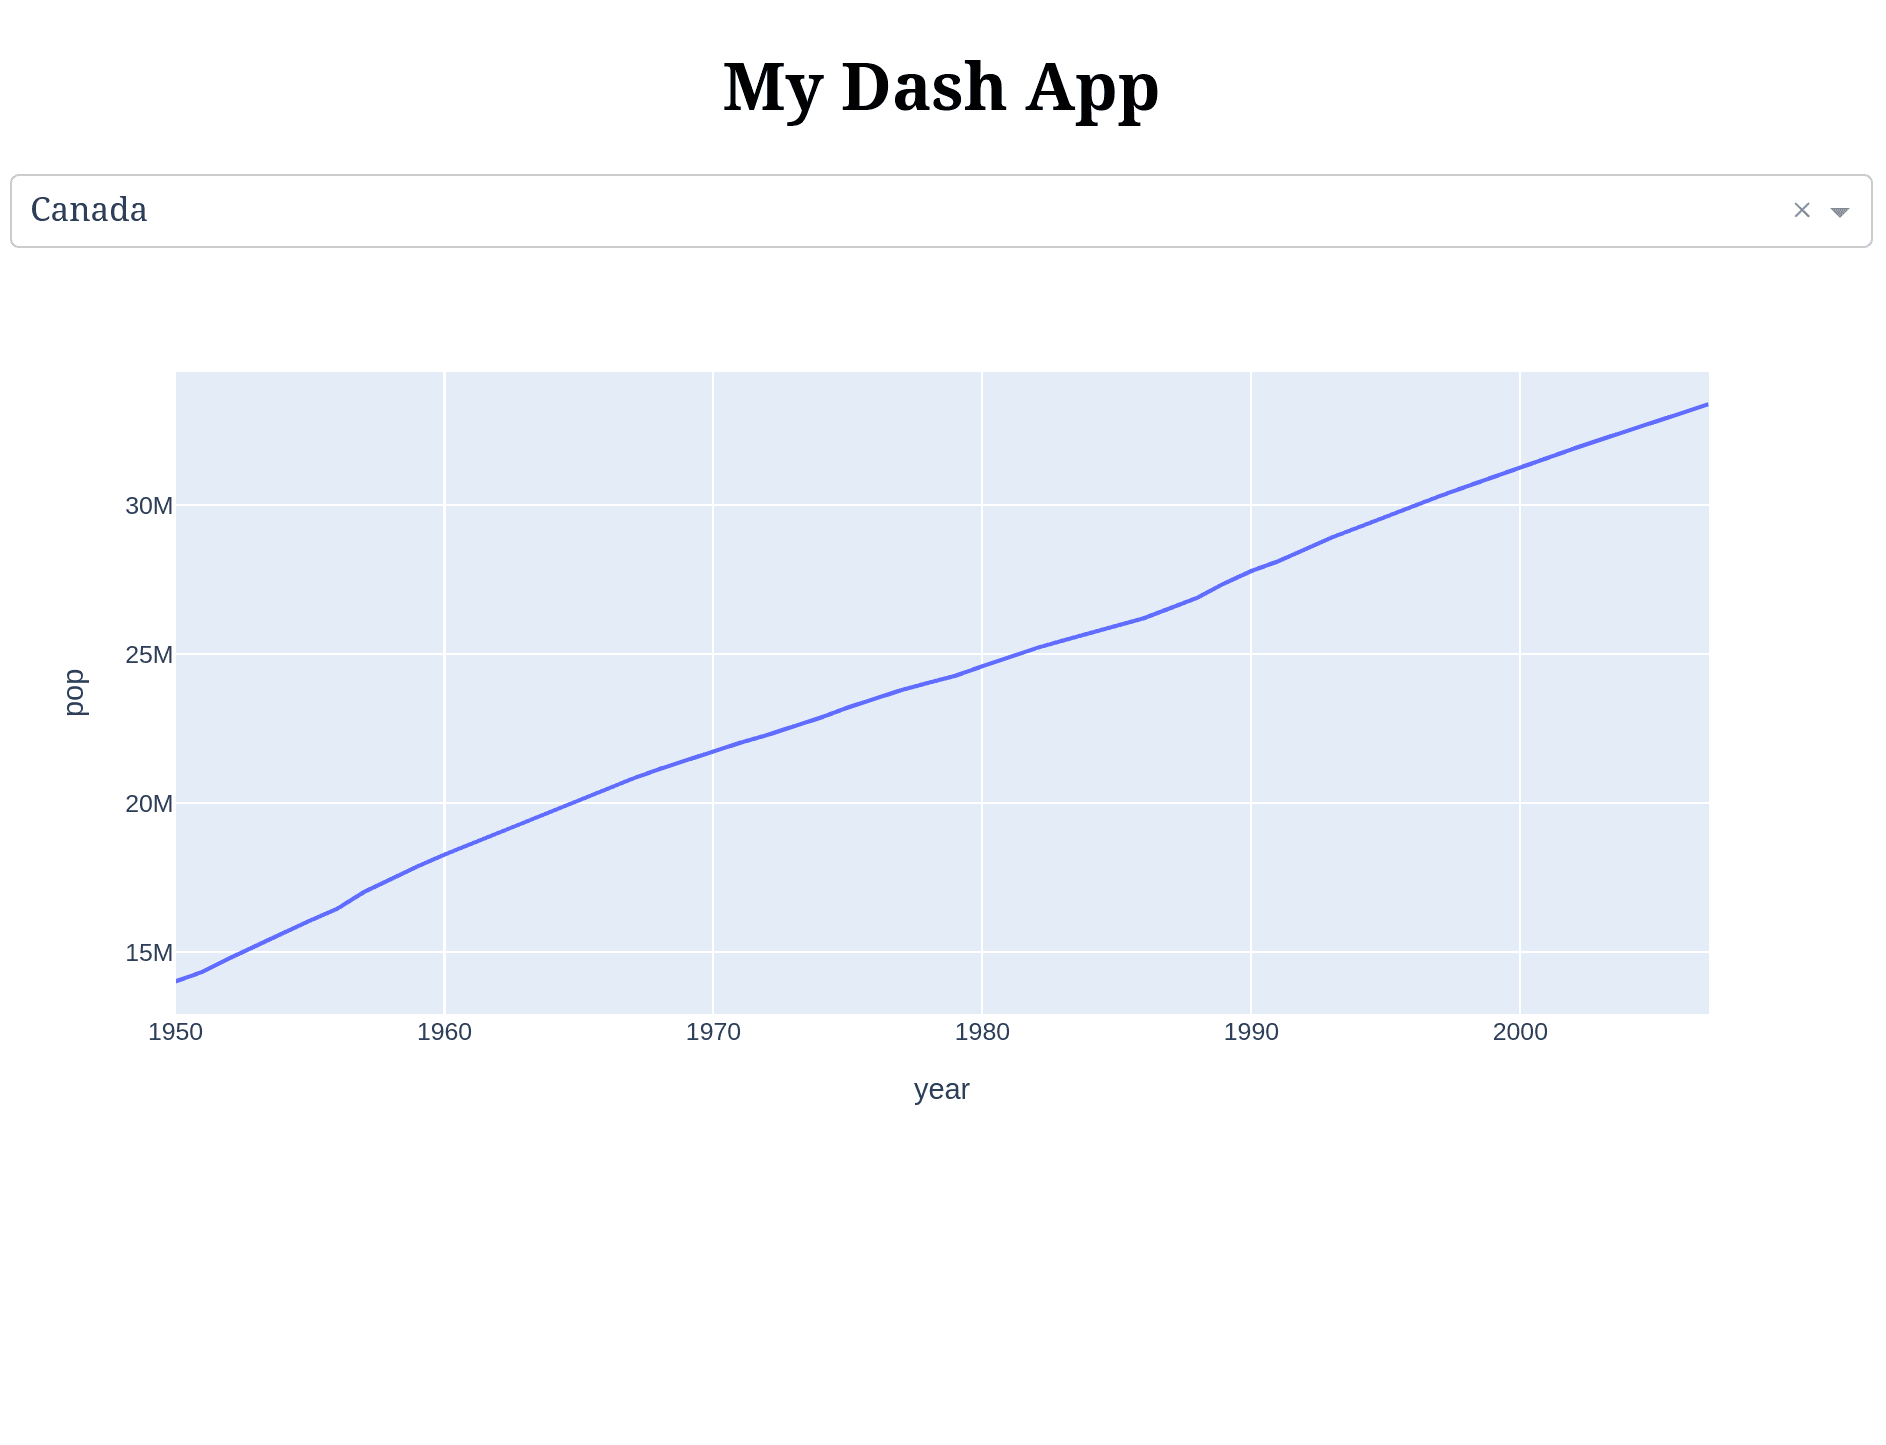
In the next section, you’ll add authentication with Descope.
Setting up Descope
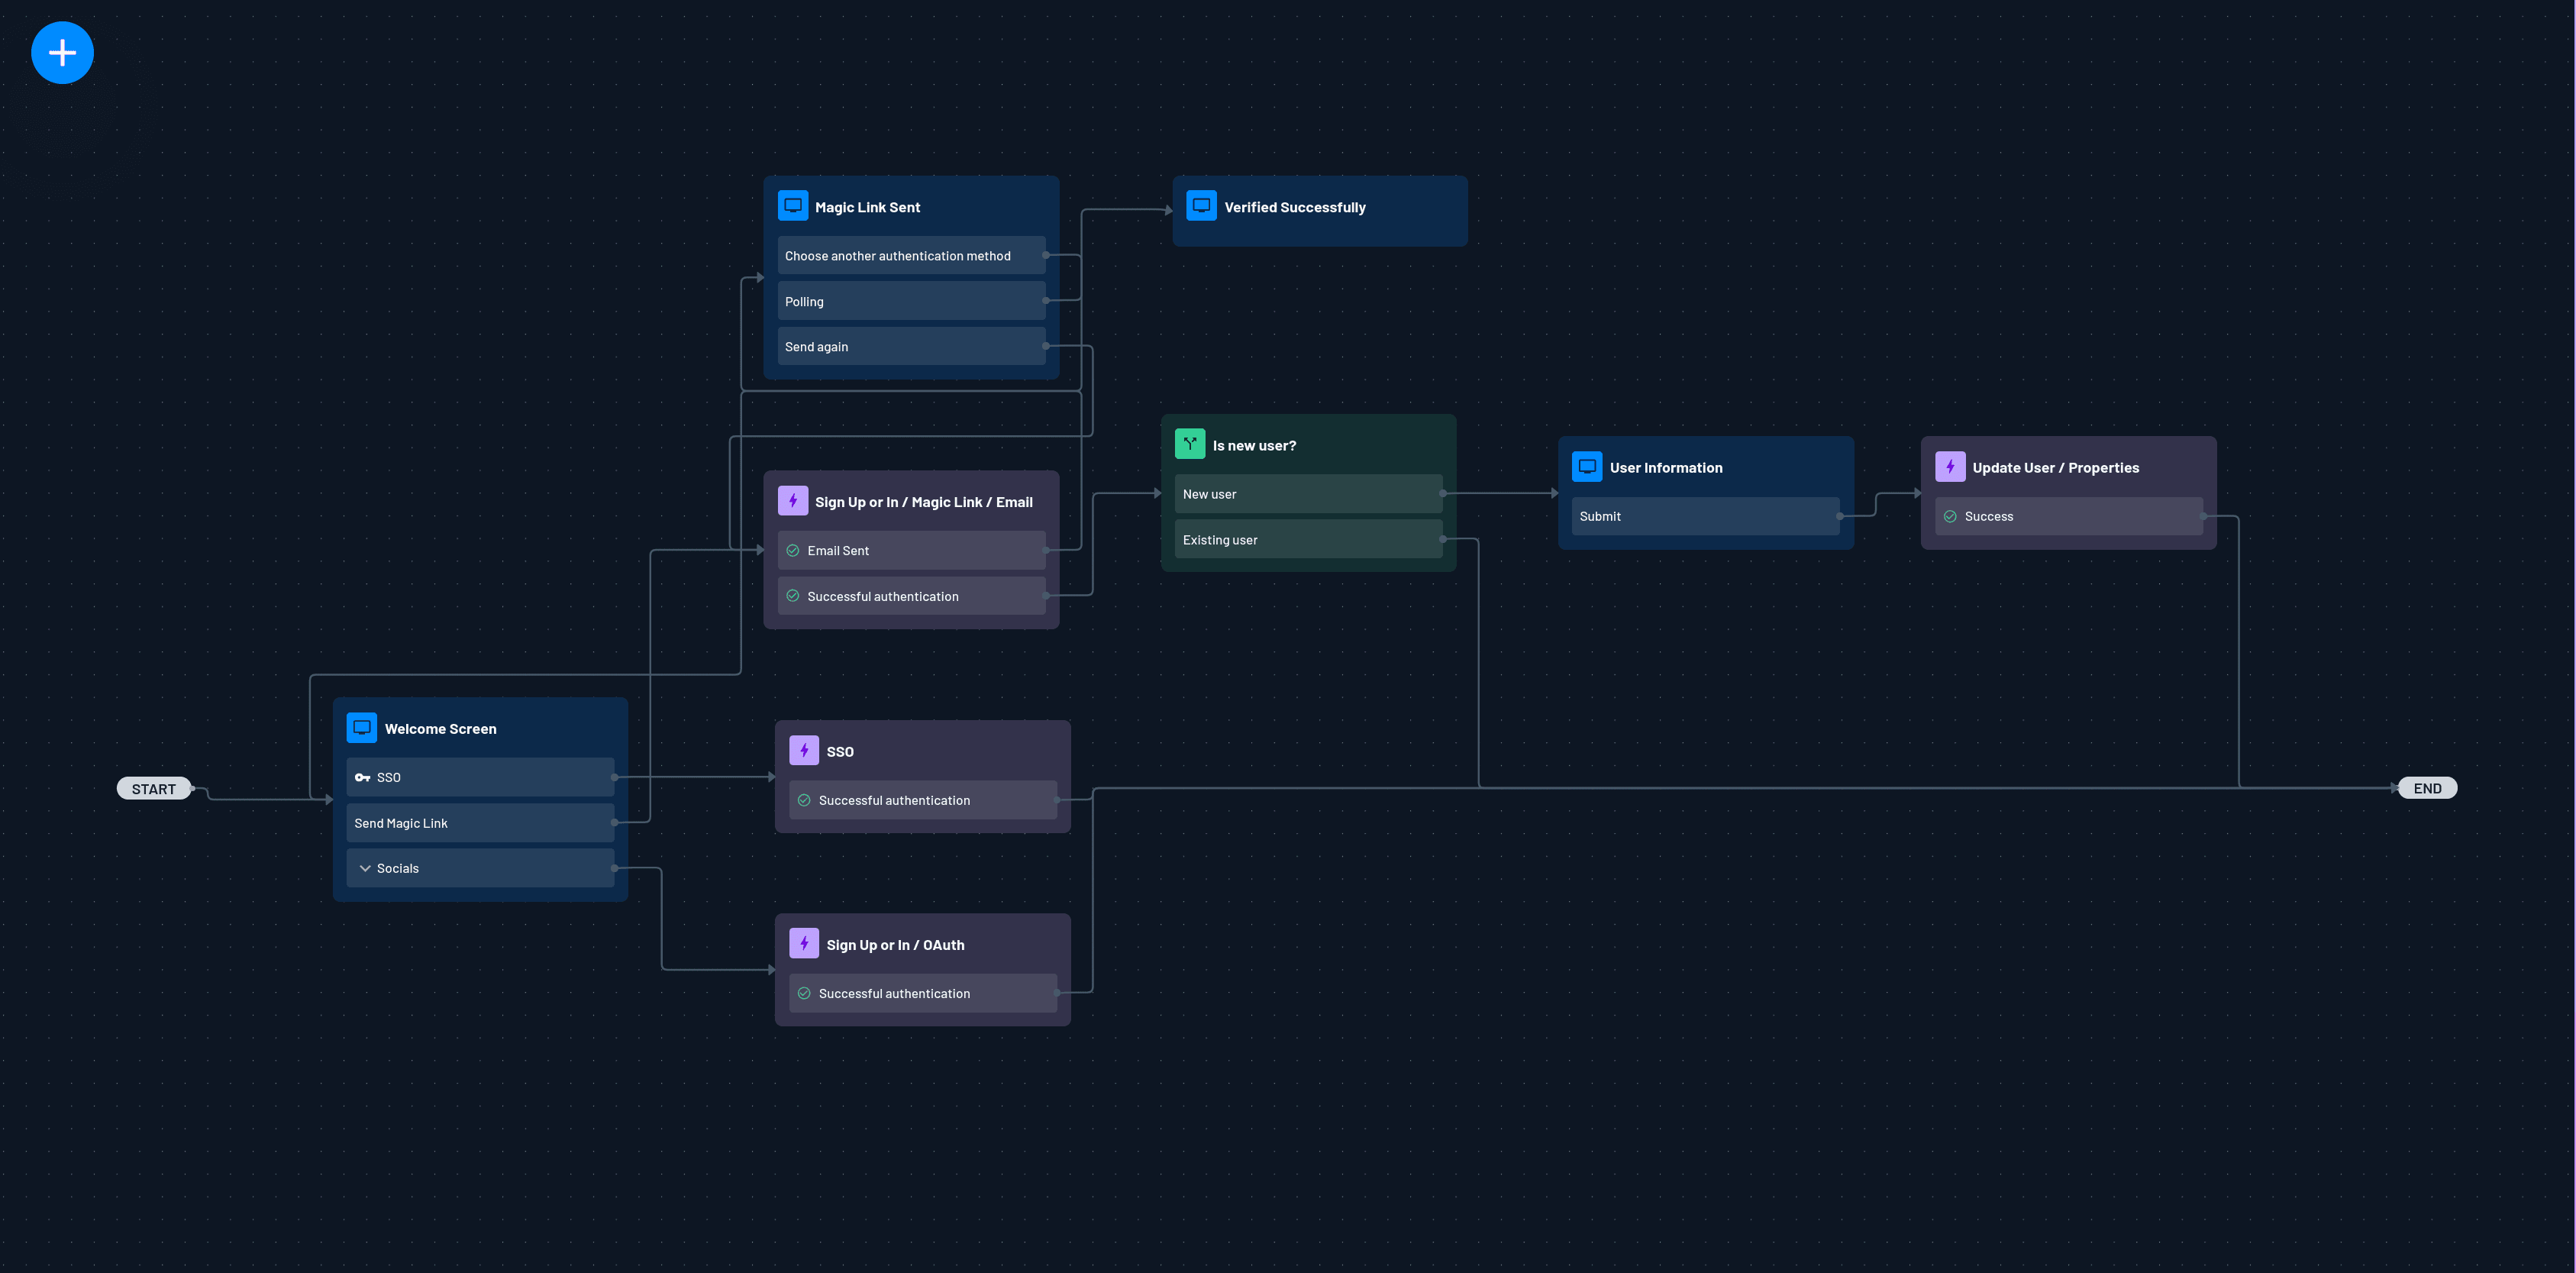
Now, you’ll create a project on your Descope console and implement an authentication flow to set up your application’s authentication process. This flow will enable your users to authenticate using any of the three methods discussed: magic links, social logins, and SSO.
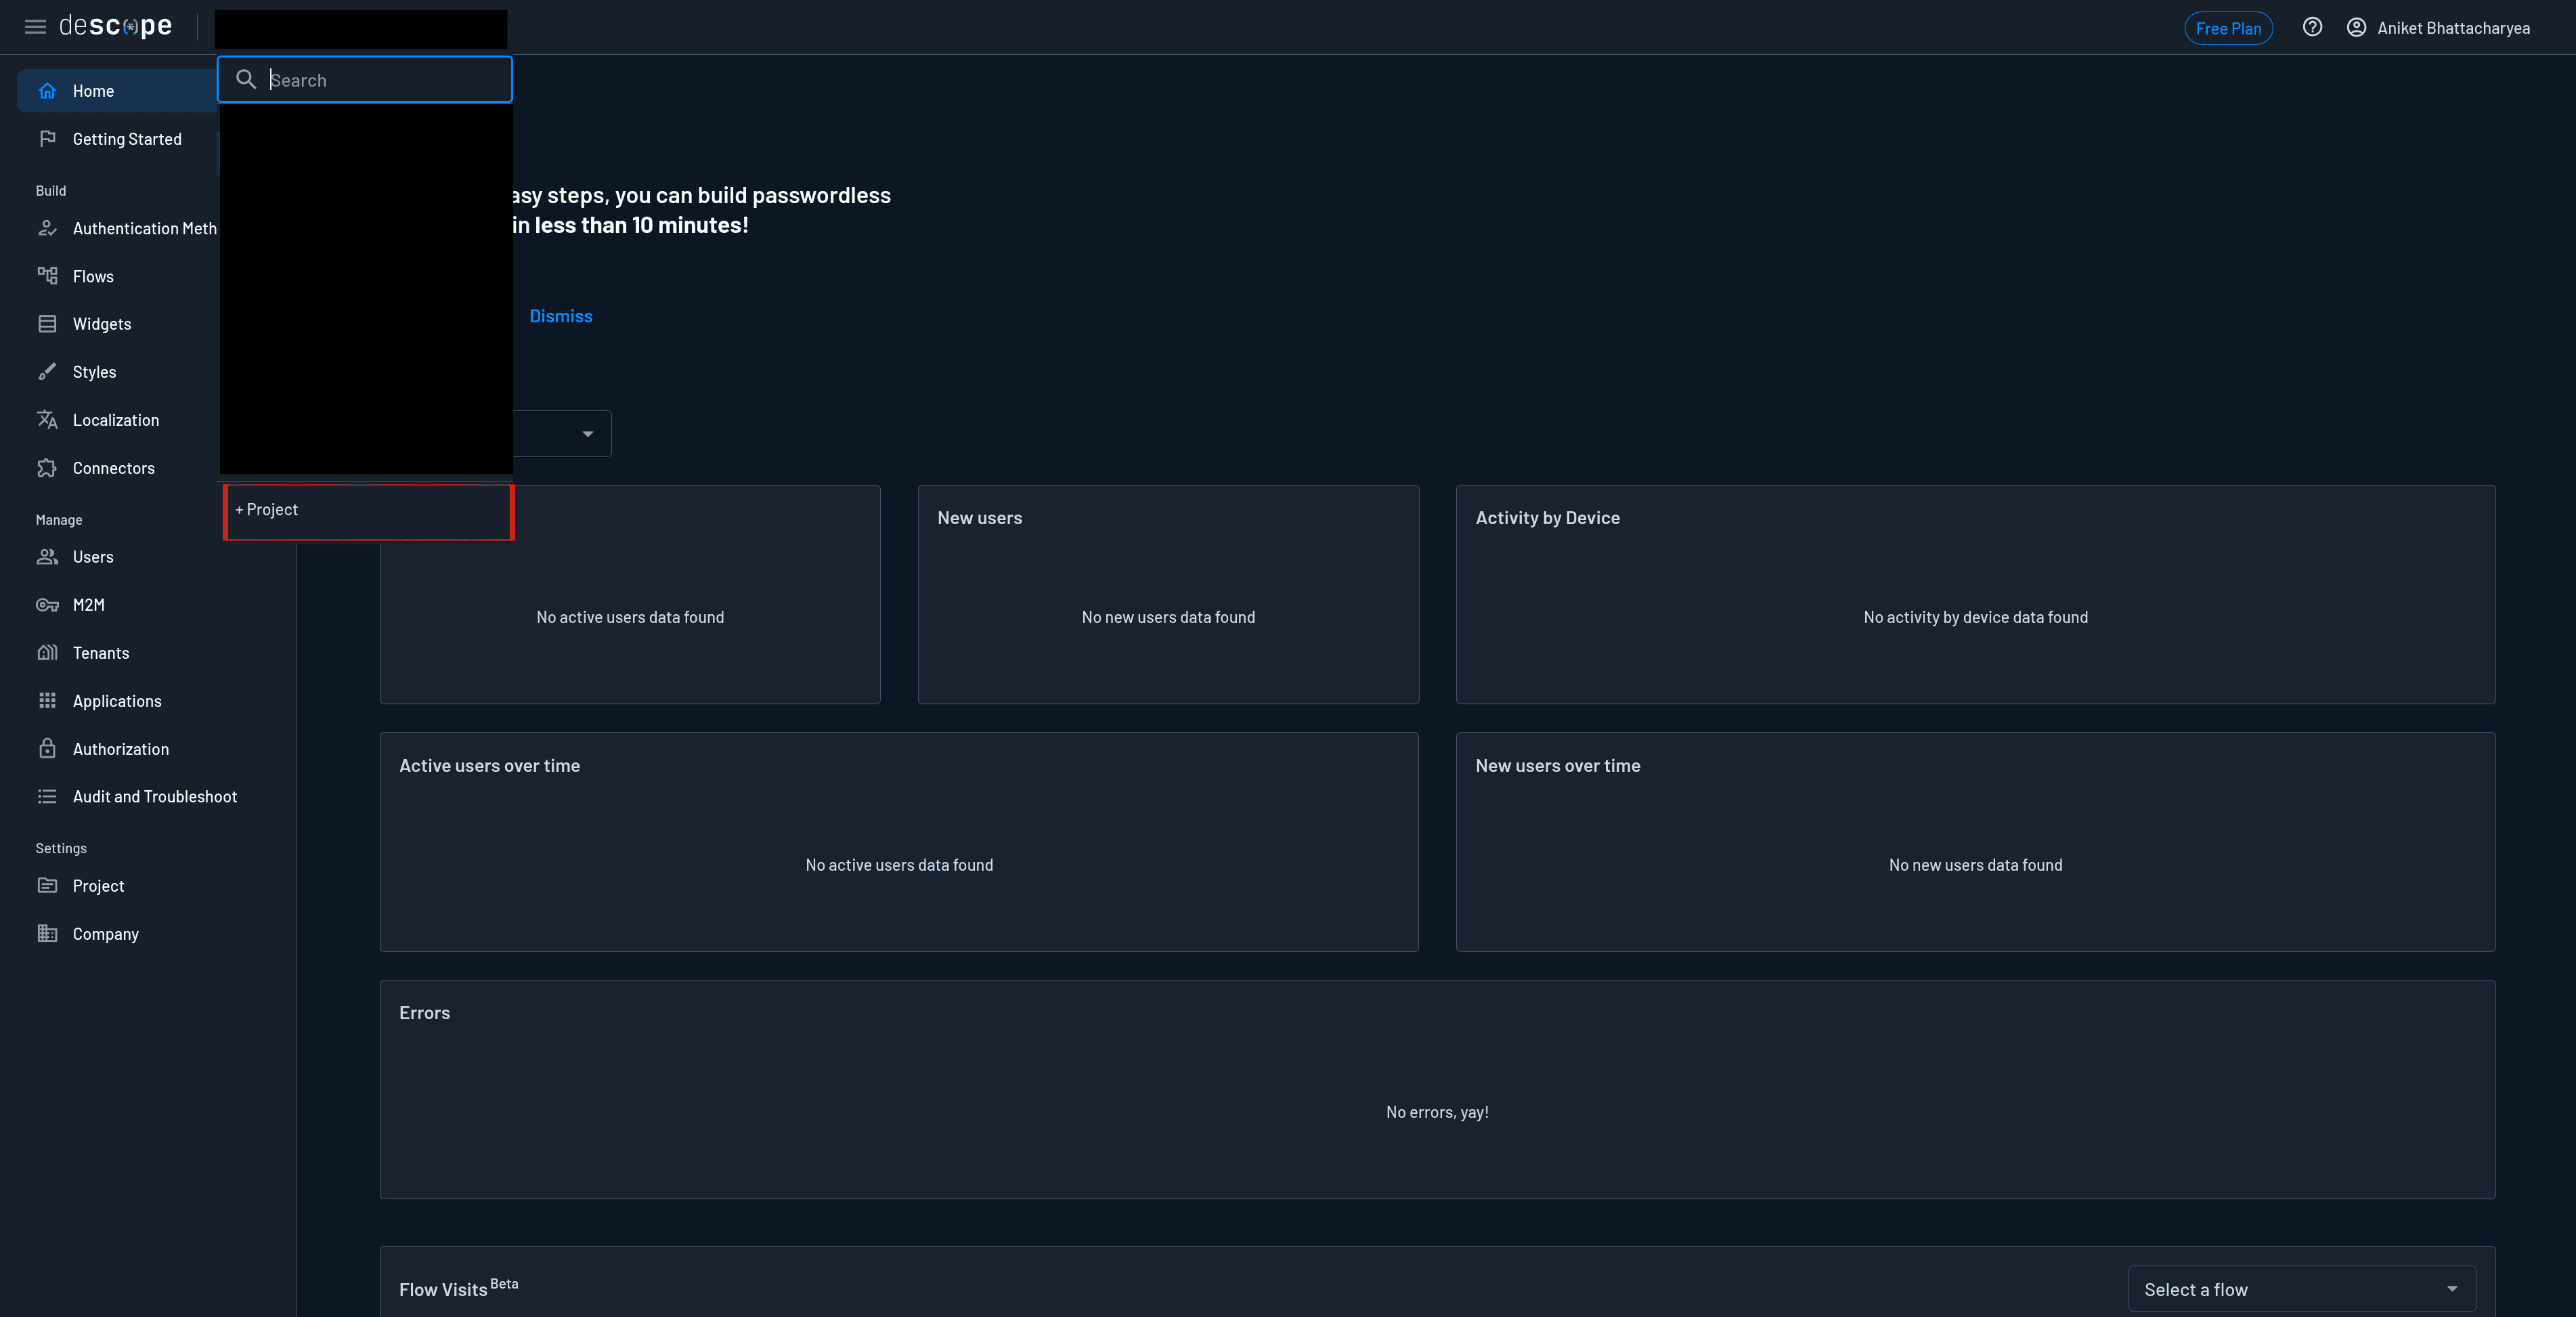
Go to the Descope console and select + Project from the project dropdown:
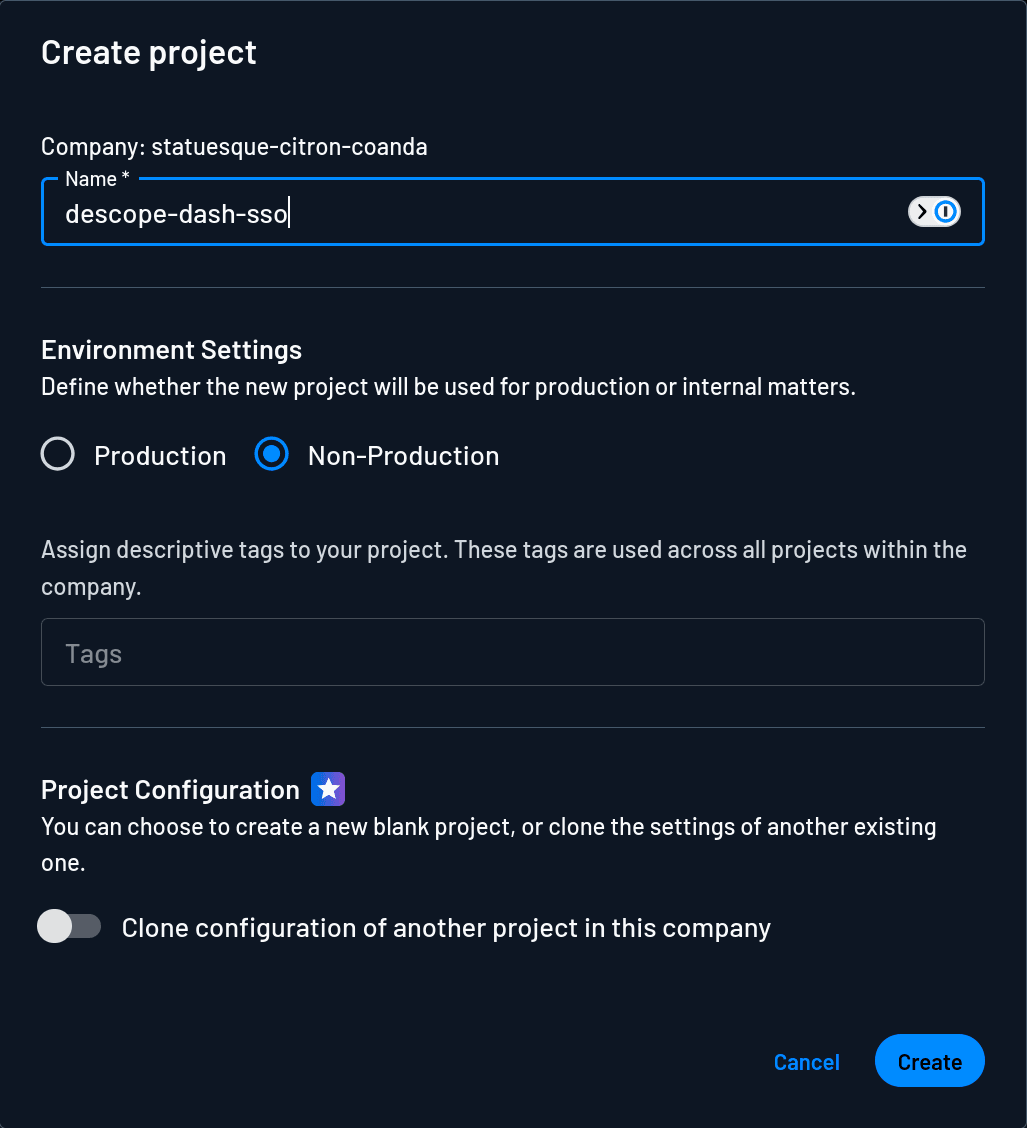
In the dialog, give a name to your project, such as descope-dash-sso, and click Create to create the project:
The project comes with some prebuilt flows that provide a visual interface for designing the authentication flow of your application. Click Flows in the left sidebar to see the existing flows. The sign-up-or-in flow is the one of particular interest. This flow lets an existing user log in or register an account if one doesn’t exist.
You can click the sign-up-or-in flow to explore how it works, but you’re going to customize this flow to support magic links, social login, and SSO. A flow has already been created for you in the sign-up-or-in.json file in the repo. Click the two arrows in the top bar and click Import flow to import the file from the repo.
This will overwrite the flow with the modified version.
Adding Descope authentication to the Dash app
Dash provides the dash-auth library to add authentication to your Dash app. The library supports two methods of authentication:
Username- or password-based basic authentication
OIDC authentication
OIDC is an authentication protocol built on top of the OAuth 2.0 protocol. OAuth enables two applications to share information without compromising user data. Additionally, OIDC enables authentication, which verifies that users are who they say they are. OIDC enables SSO as organizations can use an identity and access management (IAM) platform like Okta to let users sign in and pass that information via OIDC to another application. This way, users can use a single set of credentials to sign in to multiple applications. To set up authentication with Descope, you need to set Descope up as an OIDC provider and connect it to dash-auth.
First, create a .env file in the project directory and define two variables in it:
DESCOPE_CLIENT_ID=
DESCOPE_CLIENT_SECRET=
You’ll now obtain these values from Descope. When you create a project on Descope, it sets up an OIDC application by default. You can access it by navigating to Applications > OIDC default application on the Descope console and clicking the OIDC default application entry.
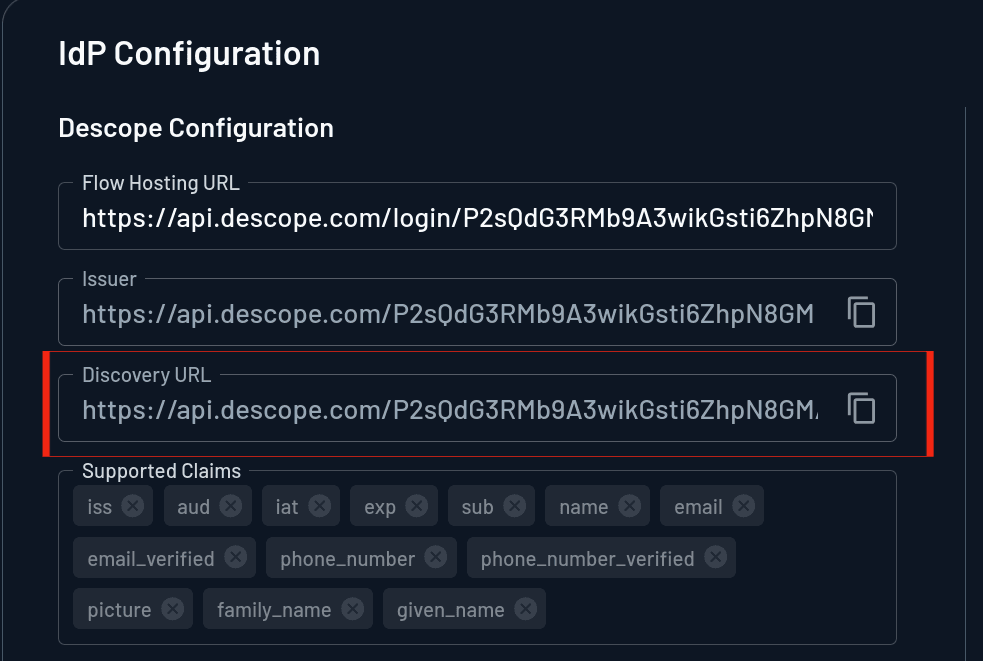
In the OIDC app’s details page, copy the Discovery URL from the IdP Configuration section:
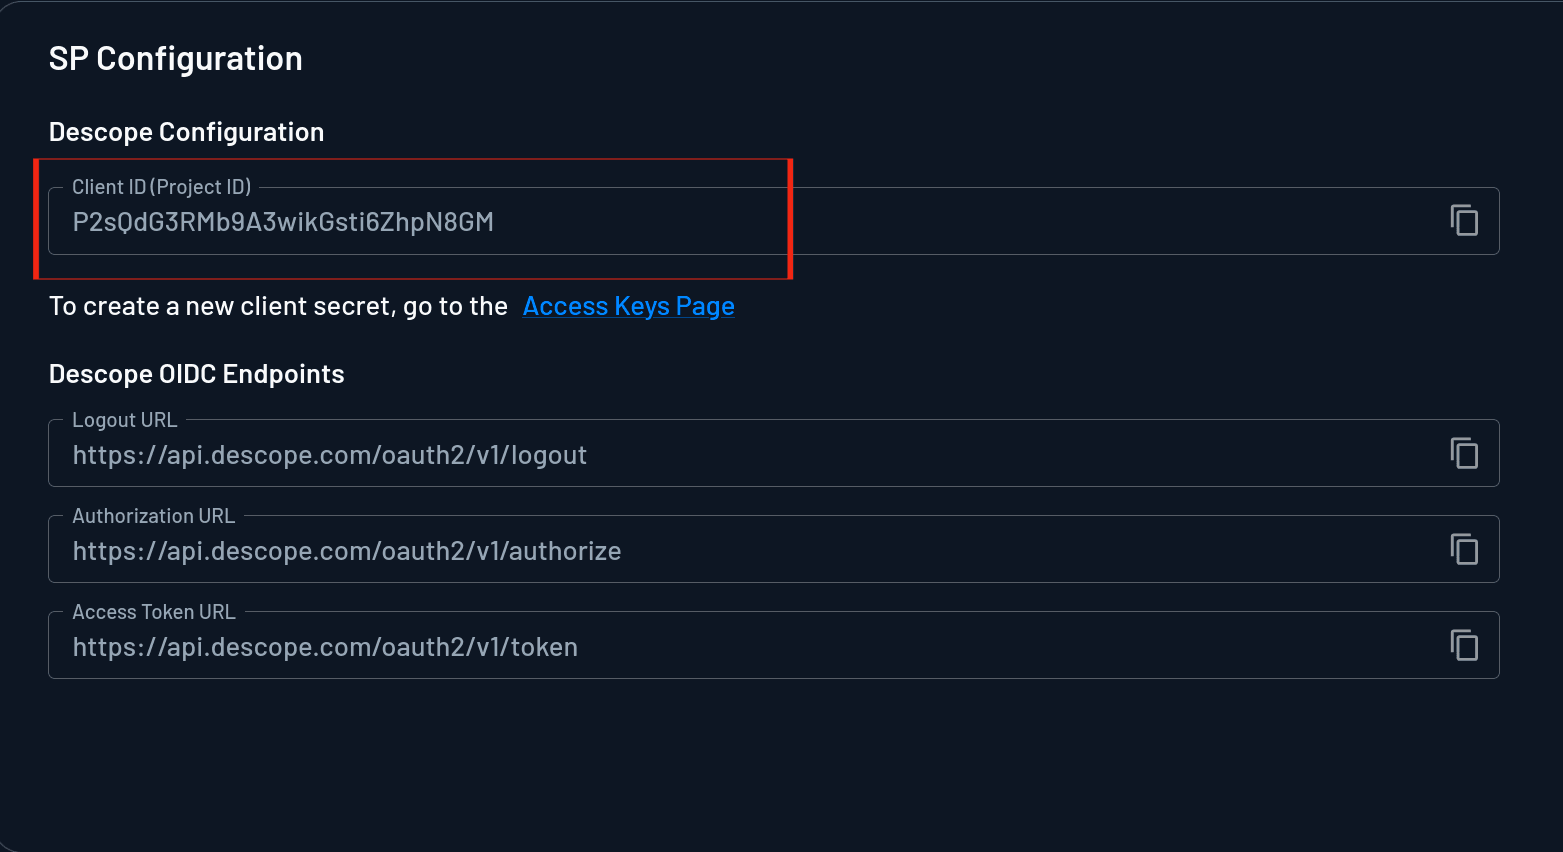
Scroll down to the SP Configuration section, copy the Client ID, and paste it into the DESCOPE_CLIENT_ID environment variable in the .env file.
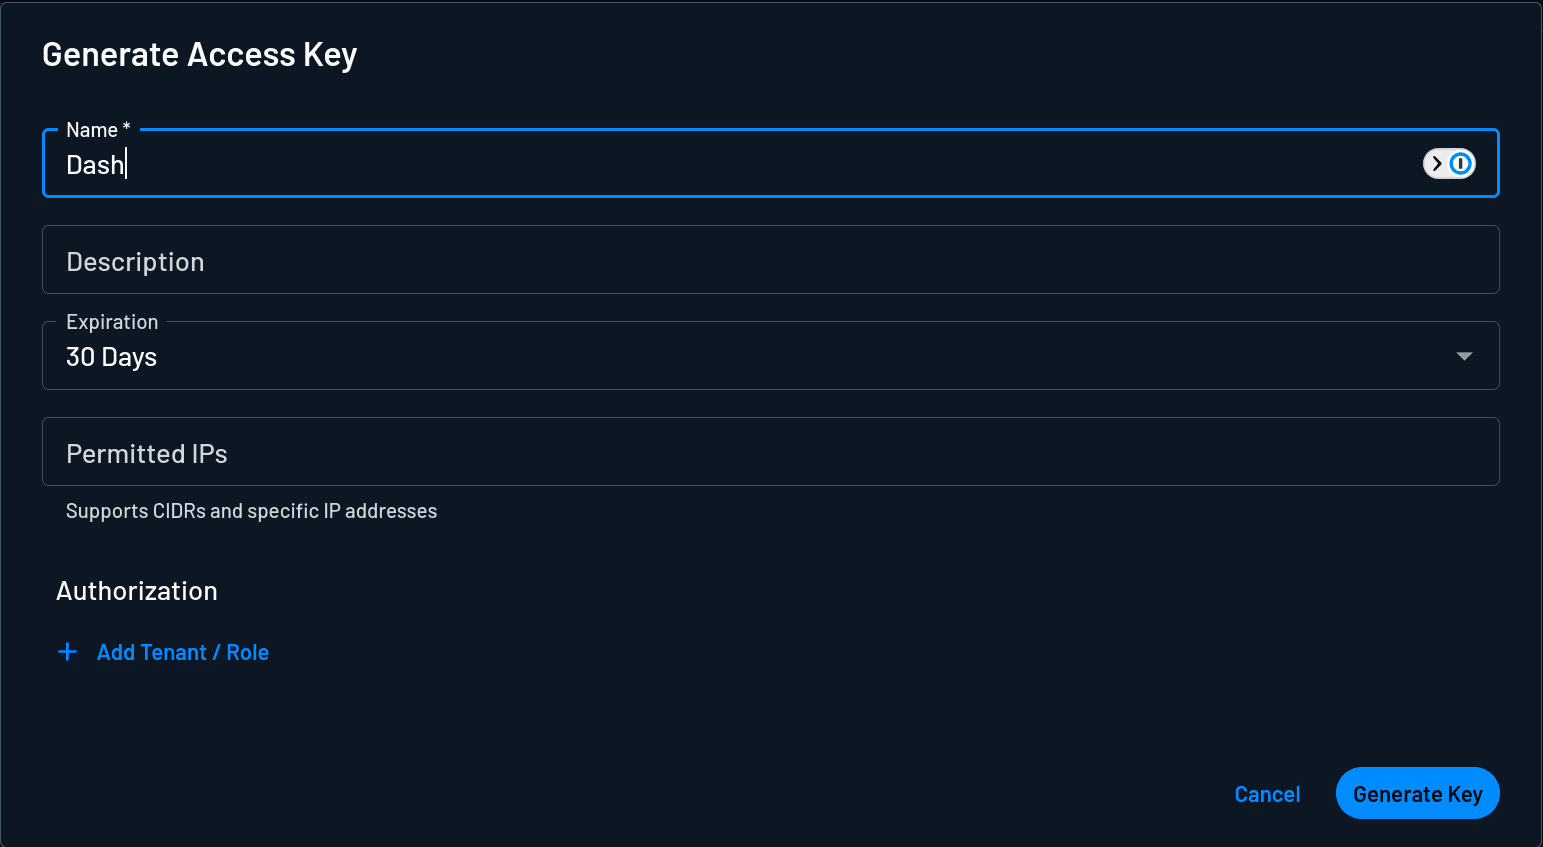
To get the client secret, navigate to M2M and click + Access Key. Provide a name for the key and click Generate Key:
Copy the key and assign it to the DESCOPE_CLIENT_SECRET environment variable.
Run the following command in the project directory to install the required libraries:
pip install dash-auth authlib requestsReplace the contents of app.py with the following:
from dash import Dash
from dash_auth import OIDCAuth
import os
from dotenv import load_dotenv


load_dotenv()


app = Dash(__name__, use_pages=True, suppress_callback_exceptions=True)


auth = OIDCAuth(app, secret_key="aStaticSecretKey!", public_routes=["/"])
auth.register_provider(
    "descope",
    token_endpoint_auth_method="client_secret_post",
    client_id=os.getenv("DESCOPE_CLIENT_ID"),
    client_secret=os.getenv("DESCOPE_CLIENT_SECRET"),
    server_metadata_url="<YOUR_DISCOVERY_URL>",
    client_kwargs={"scope": "openid email profile"}
)


if __name__ == '__main__':
    app.run(debug=True)
Make sure you replace <YOUR_DISCOVERY_URL> with the discovery URL.
This code sets up dash-auth to communicate with Descope via OIDC. The public_routes keyword tells dash-auth which routes do not require authentication. In this case, the root route will be public, but the /private route will require authentication.
Fetching user details from Descope
After authentication, dash-auth stores the user object in the Flask session. To use the user object, open pages/private.py and add the following import:
from flask import sessionDelete the layout variable and define a layout function as below:
def layout():
    user = session["user"]
    return [
        html.H1(children=f'Welcome {user["email"]}', style={'textAlign':'center'}),
        dcc.Dropdown(df.country.unique(), 'Canada', id='dropdown-selection'),
        dcc.Graph(id='graph-content')
    ]
Here, the user object is fetched from the session, and the email ID of the logged in user is shown.
Restart the app and visit http://127.0.0.1:8050/ again. This time, you’ll be required to authenticate before you can visit the private page:
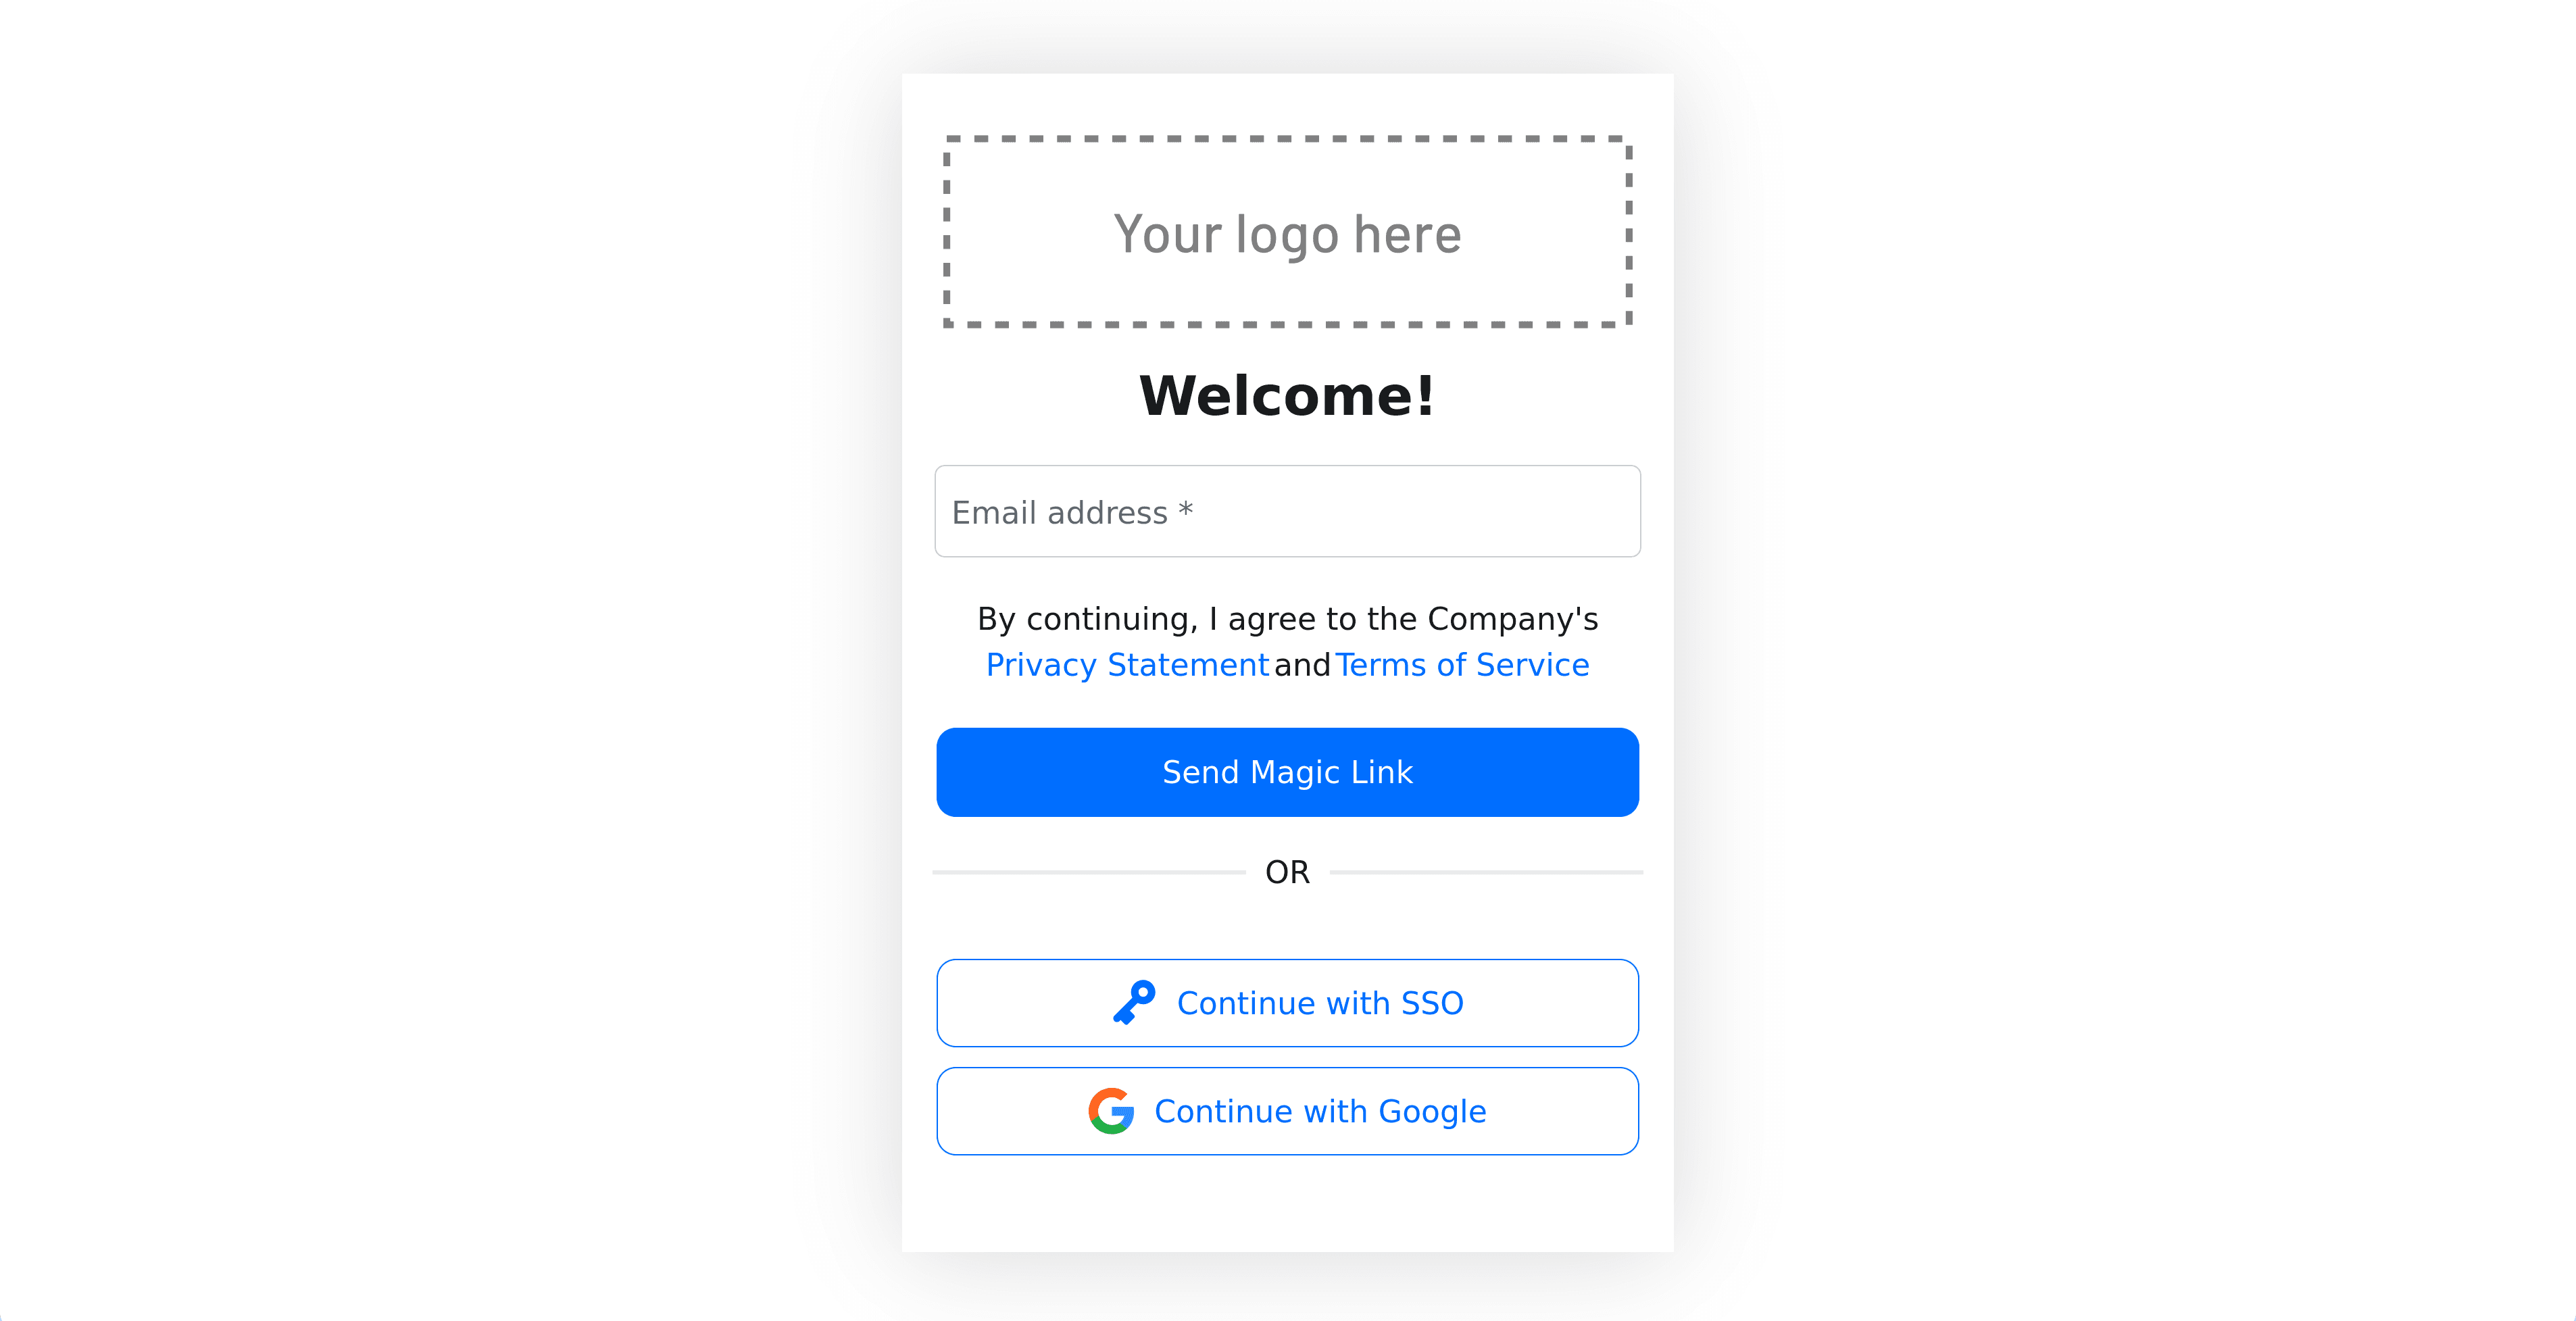
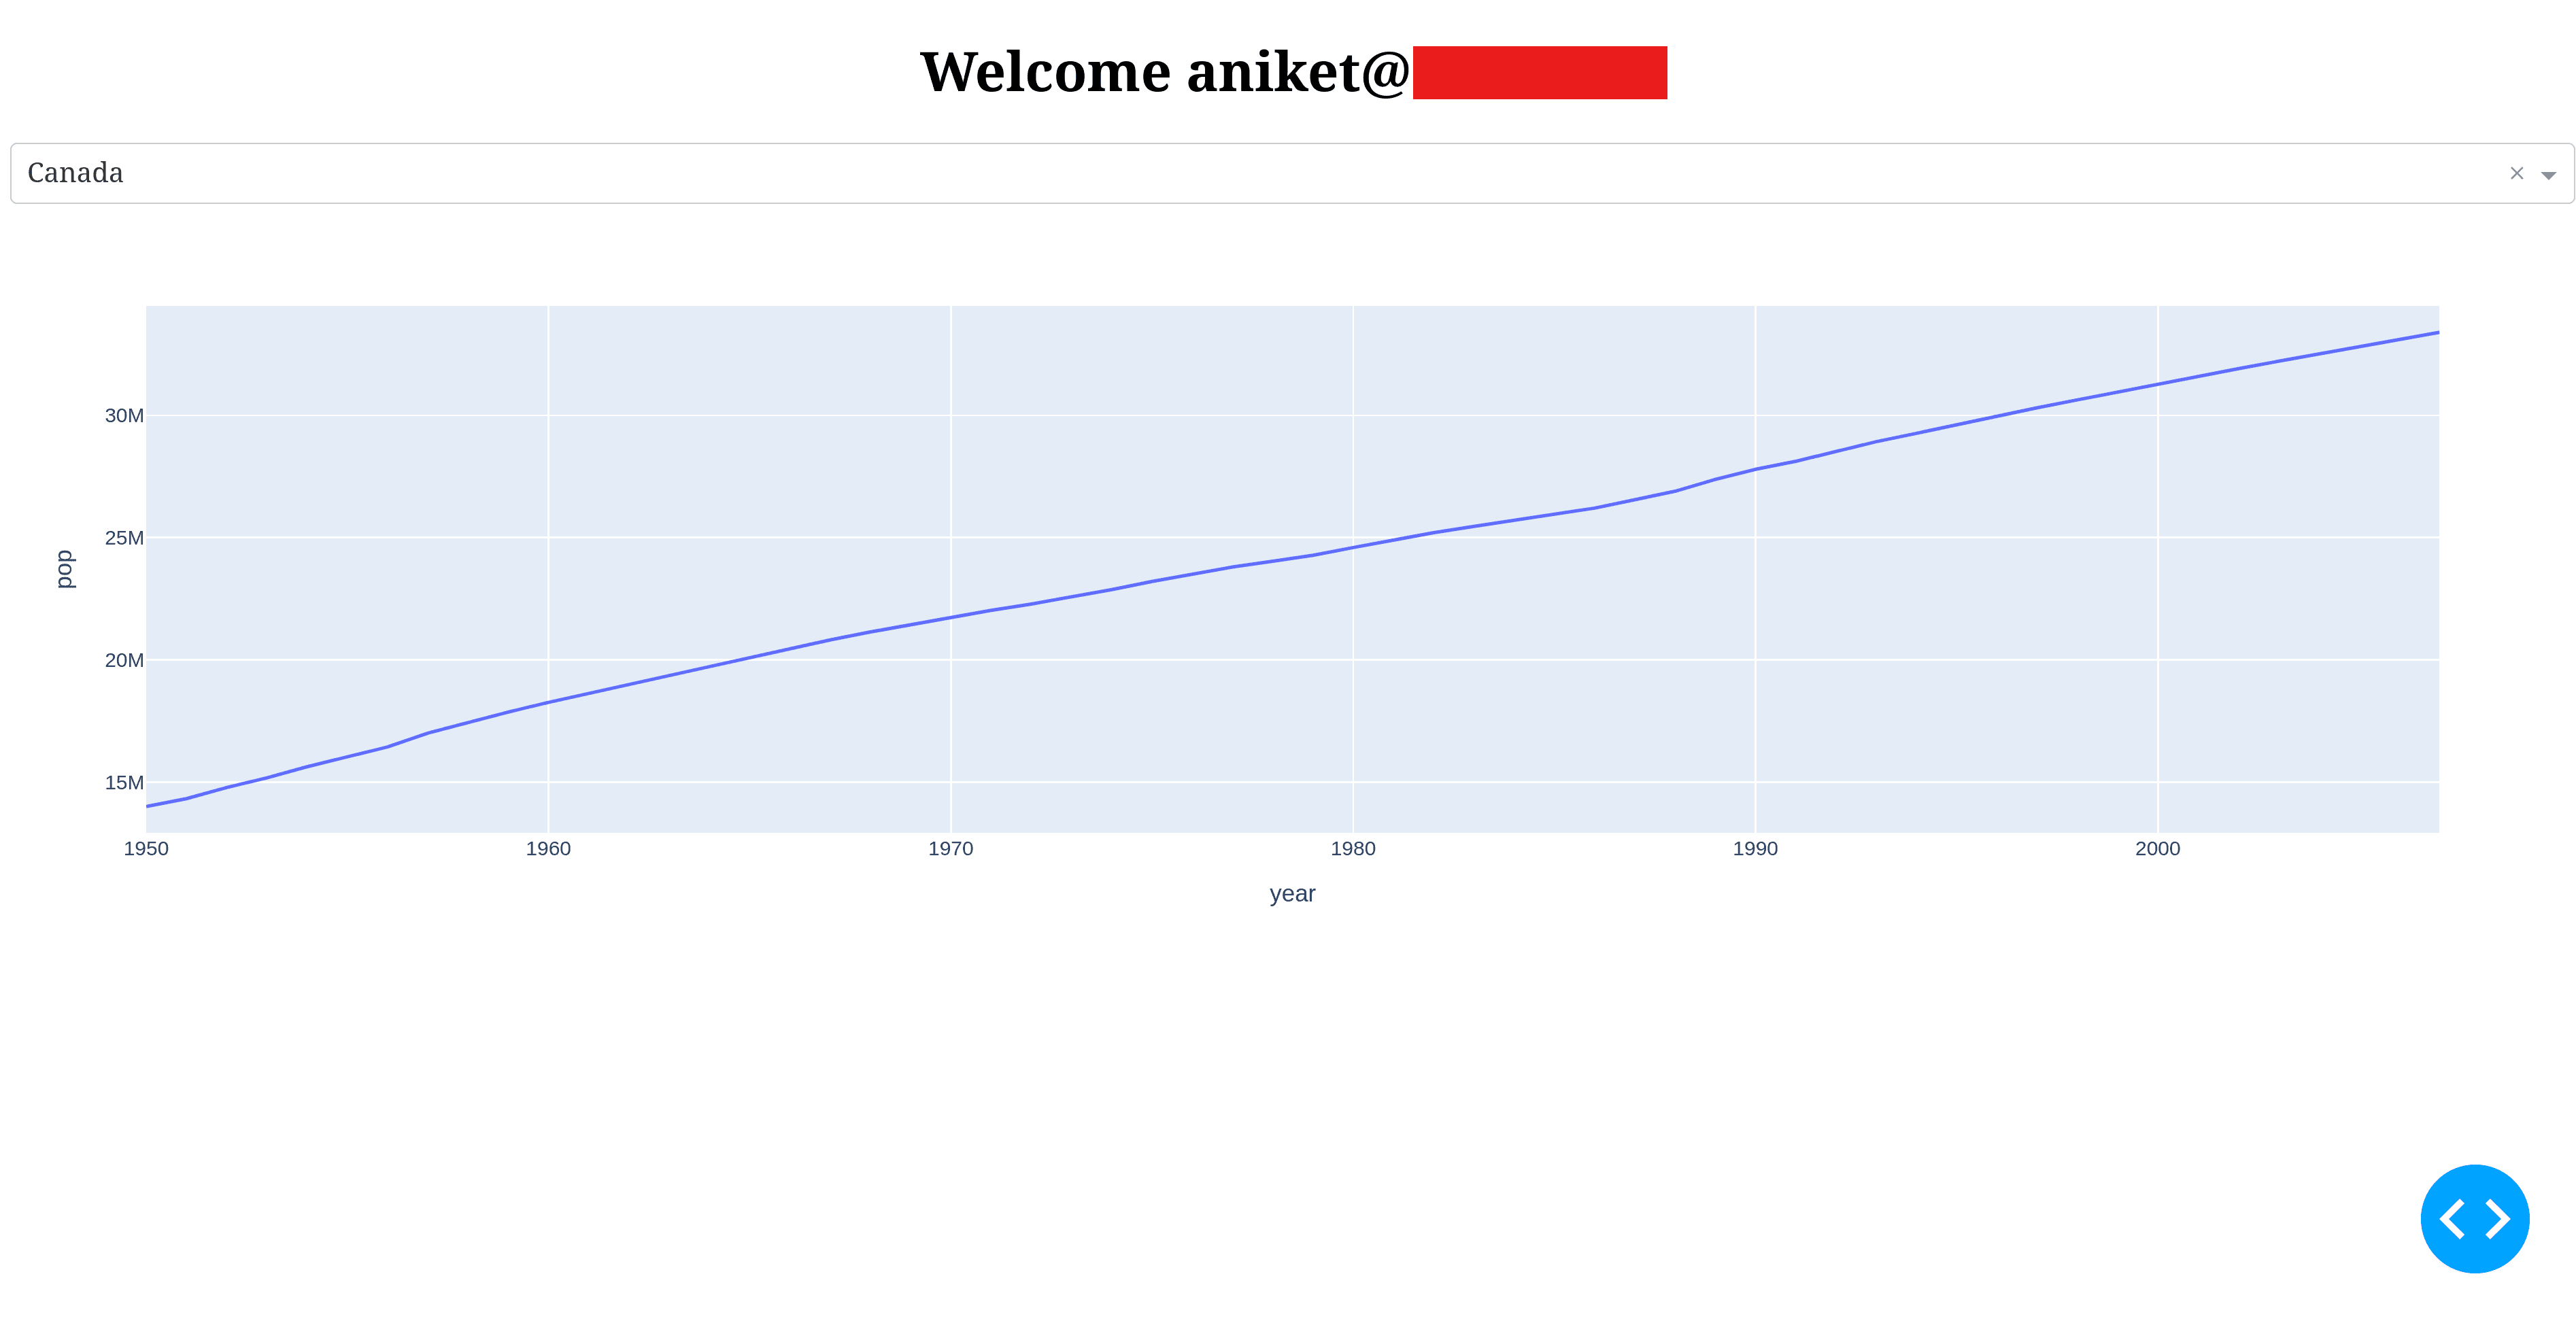
You can sign in via a magic link or Google. After logging in, you’ll be able to see your email on the private page:
Adding SSO to your app
In this section, you’ll configure Okta as the IdP to integrate SSO into your Dash application.
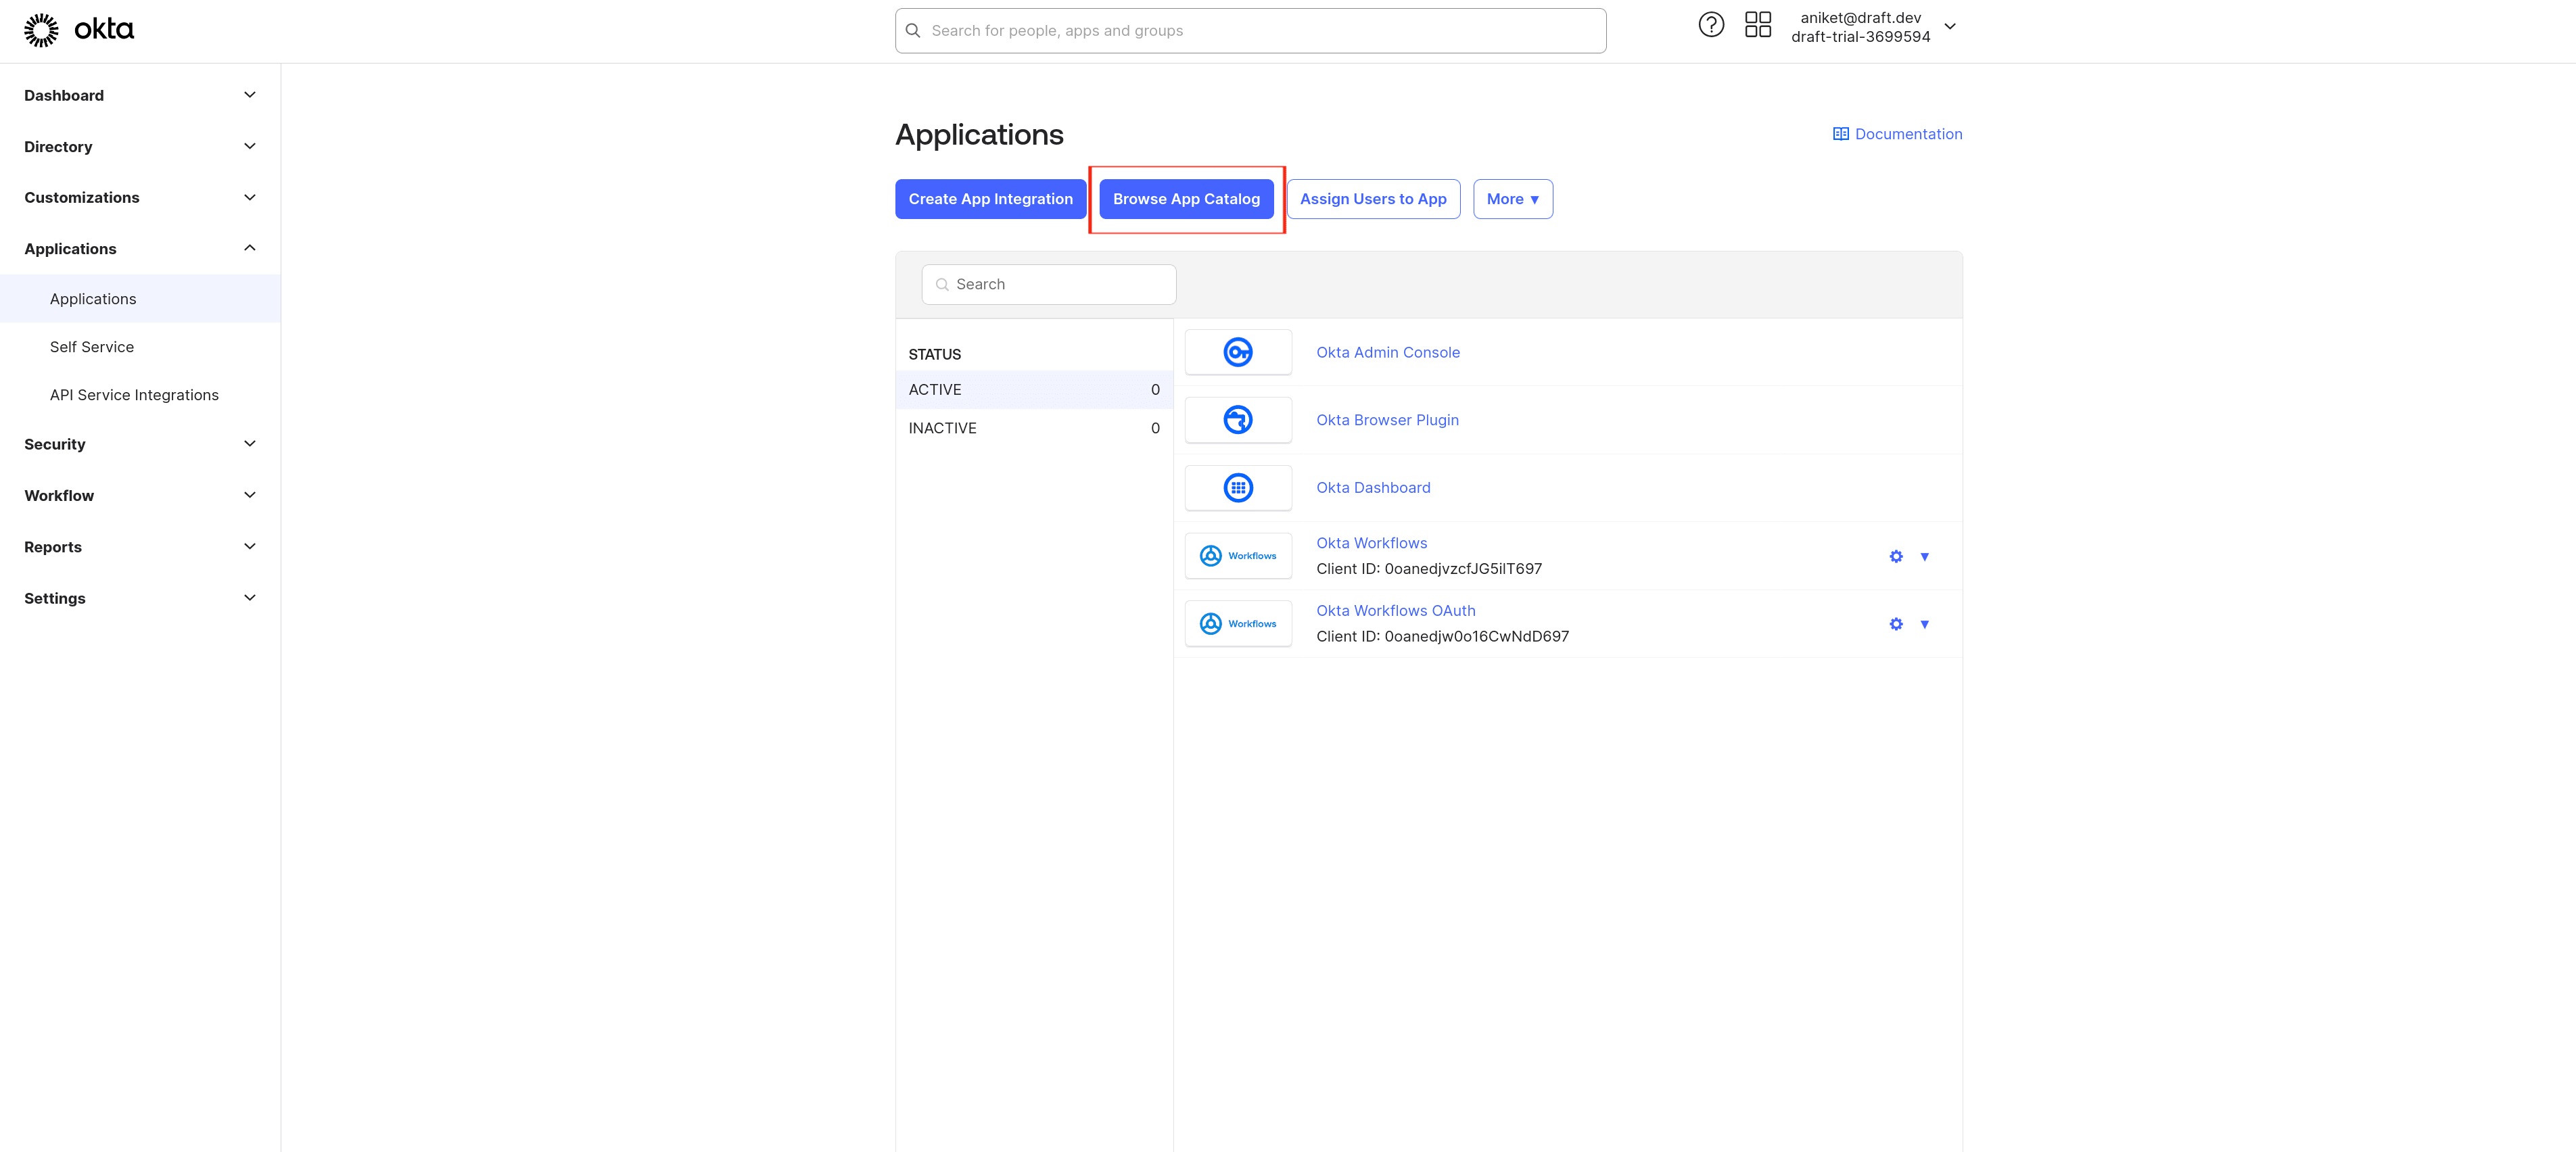
Log in to your Okta admin dashboard, navigate to Applications > Applications, and click on Browse App Catalog:
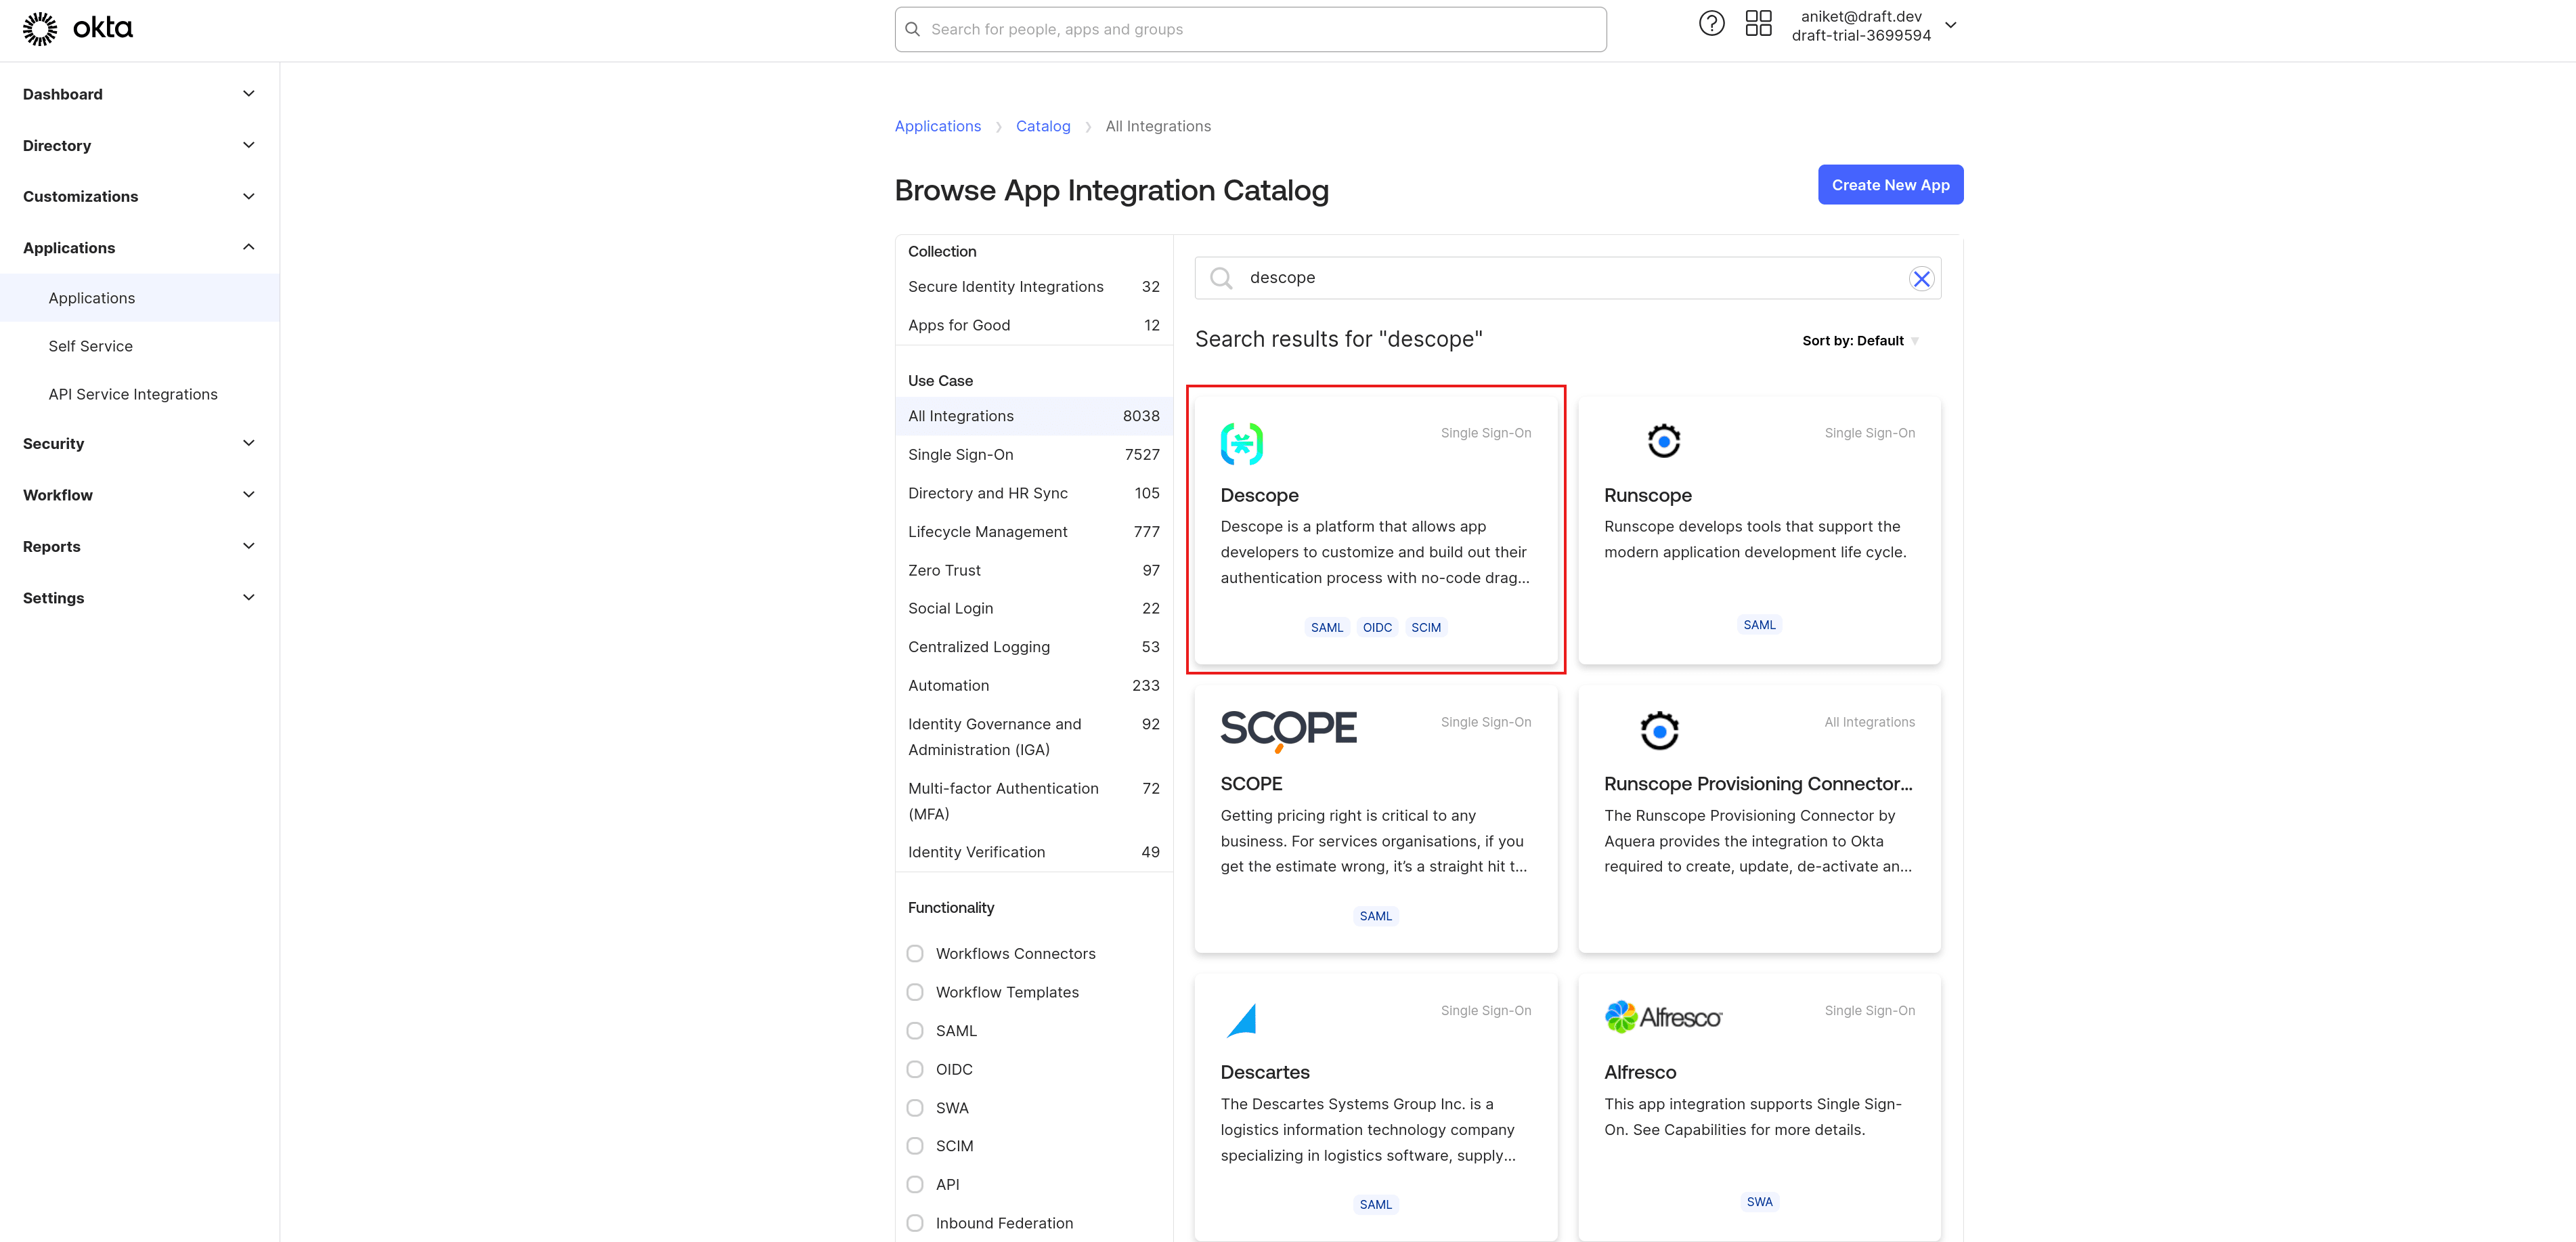
Search for “Descope” and select the Descope application:
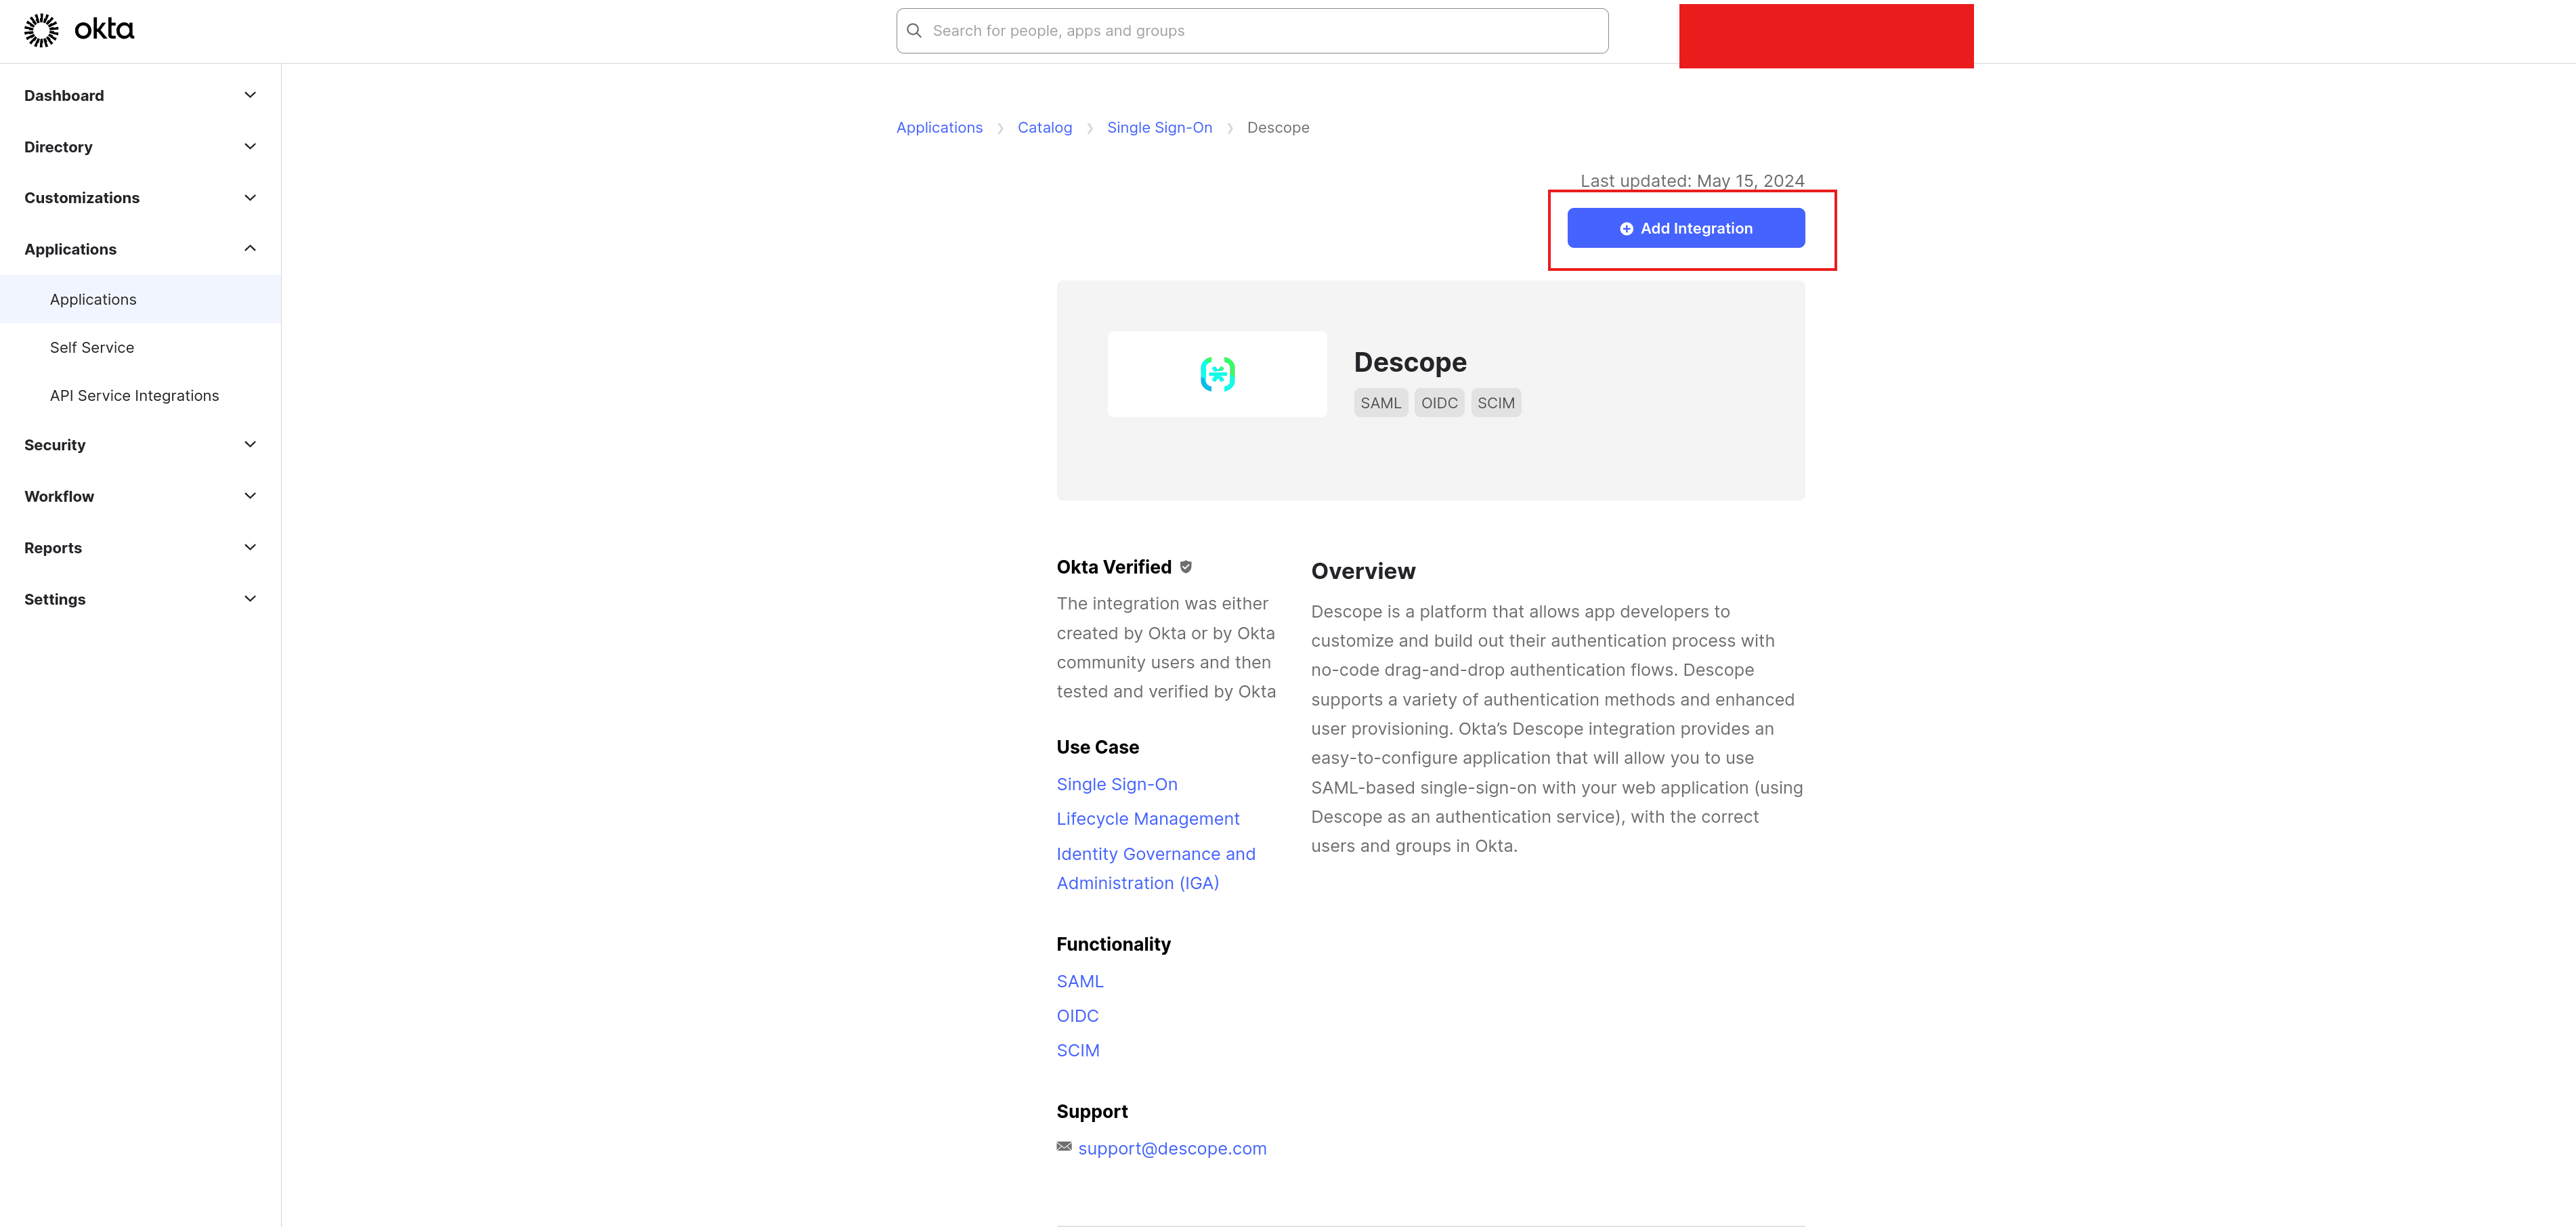
Select + Add Integration:
Provide a name for the integration, such as Descope, and click Next. On the Sign-On Options page, select OpenID Connect as the sign-on method, and paste https://api.descope.com/v1/oauth/callback in the Callback URL field:
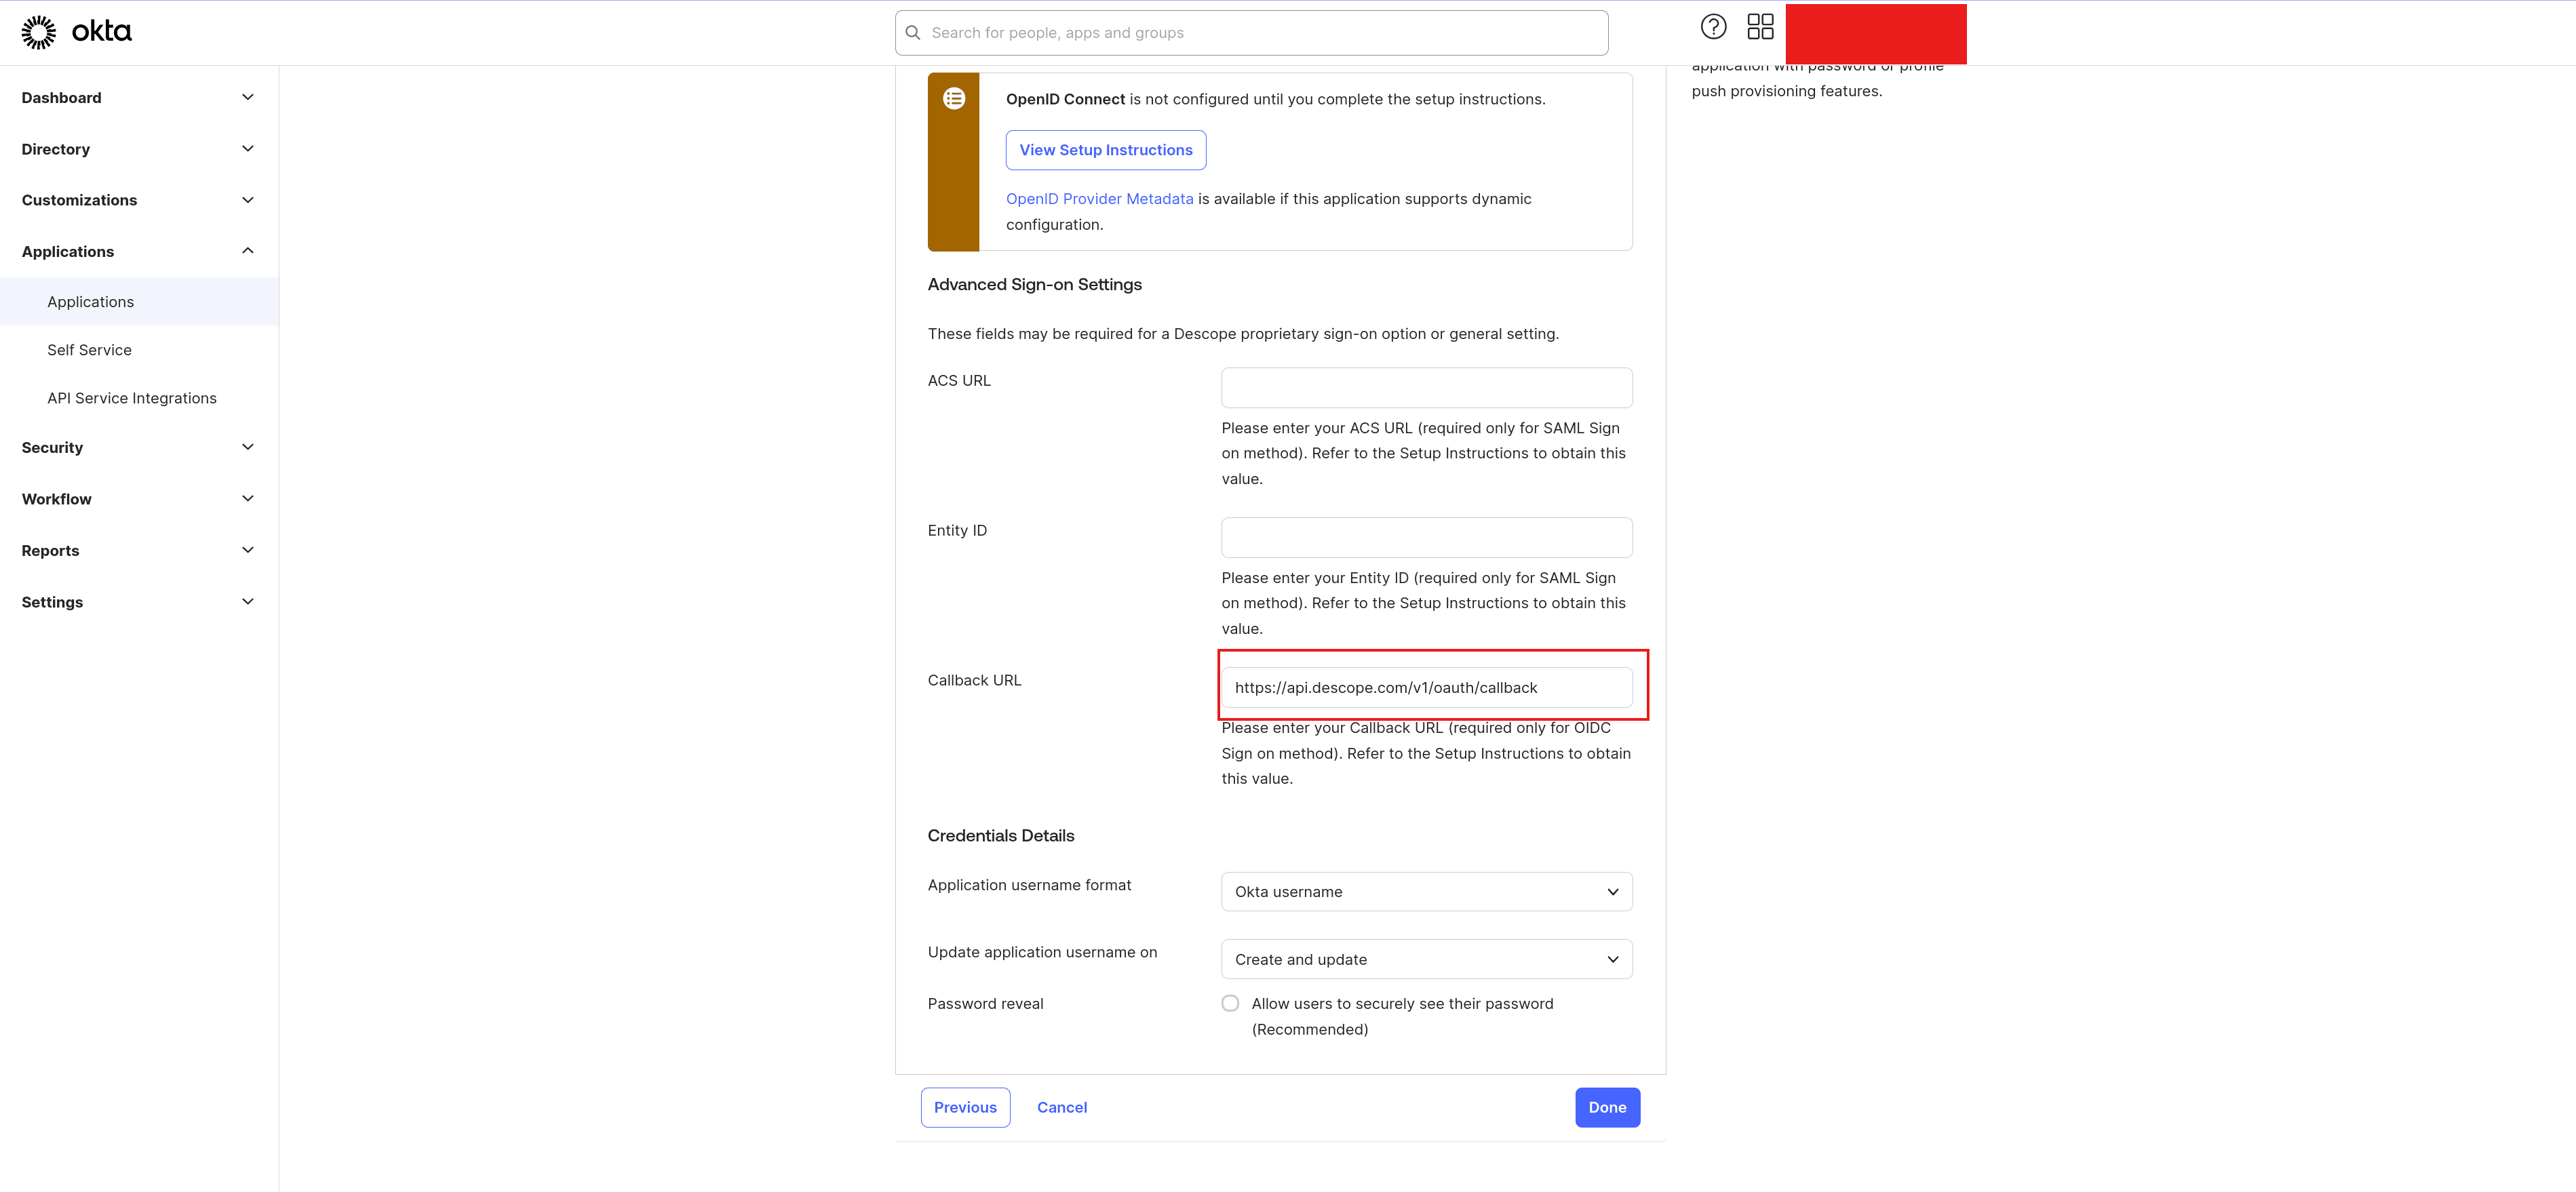
Click Done to save the changes.
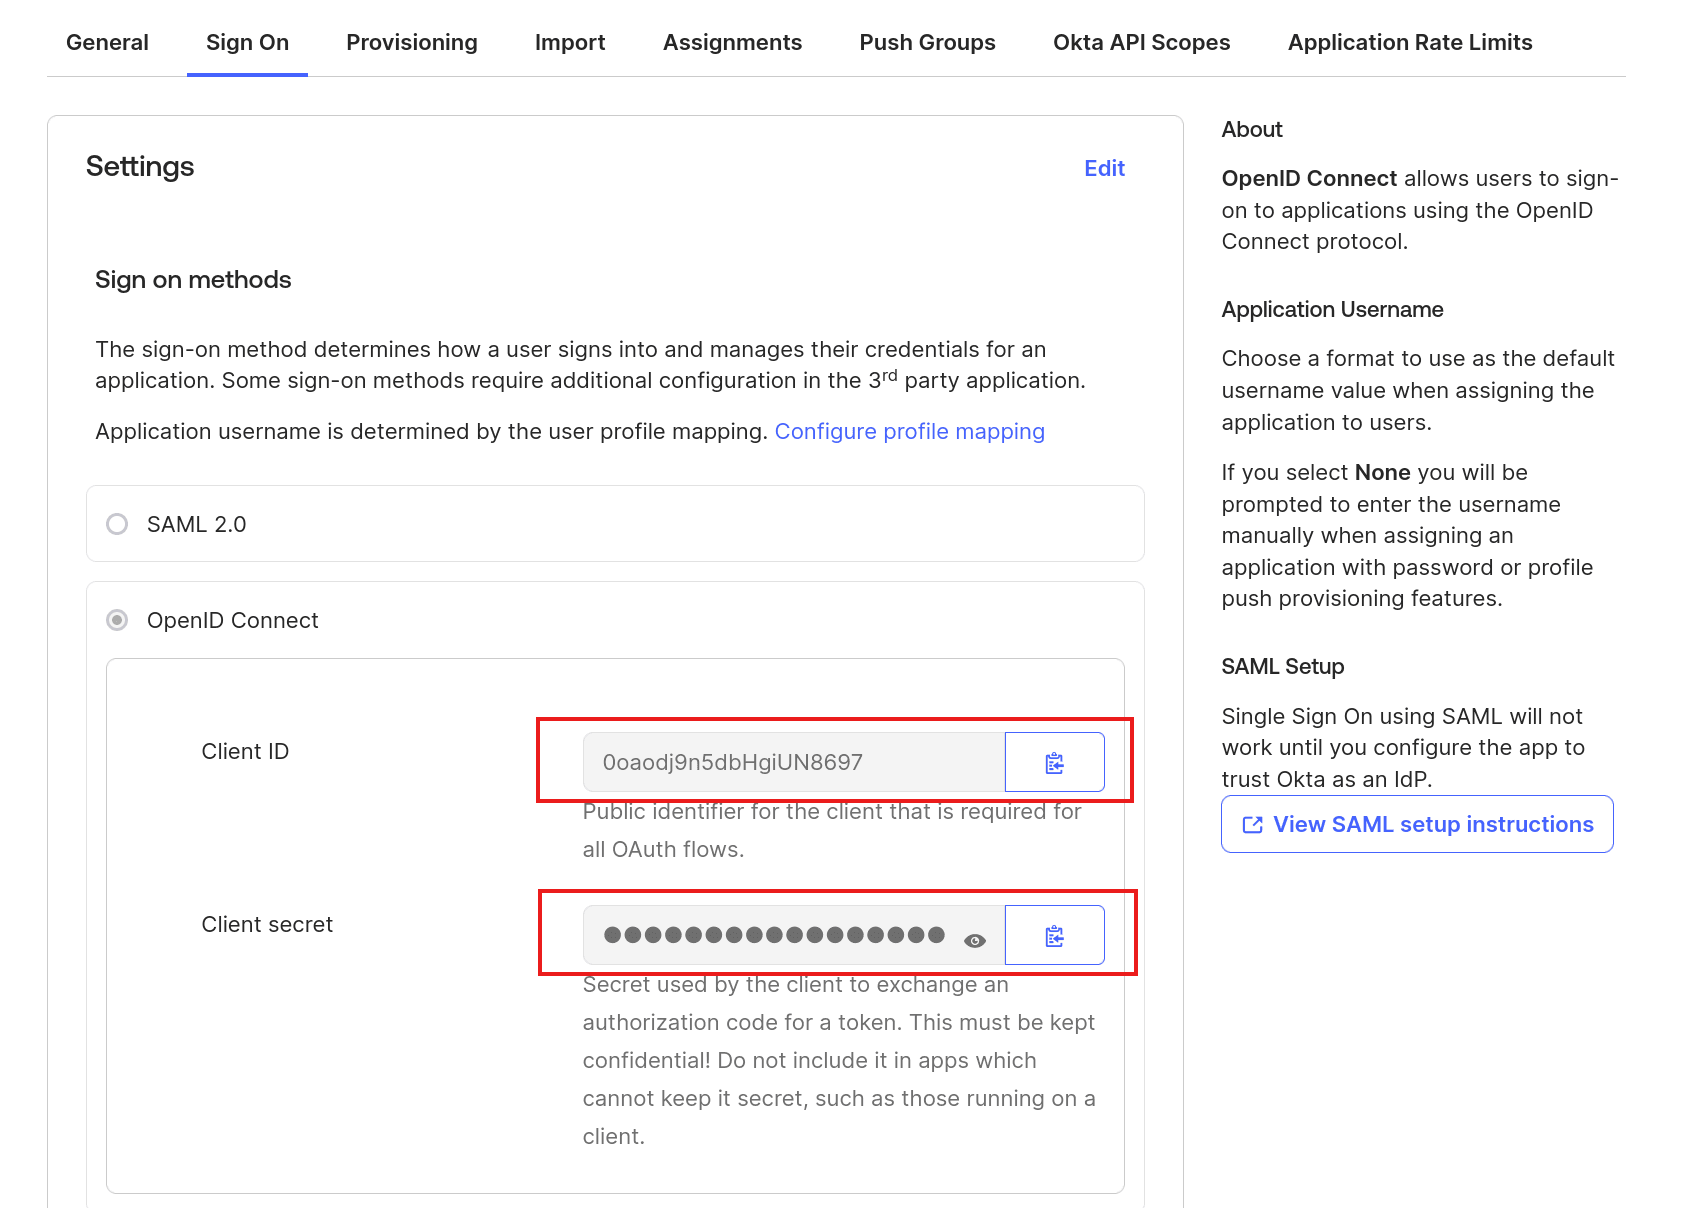
On the app details page, go to the Sign On tab and copy your client ID and client secret:
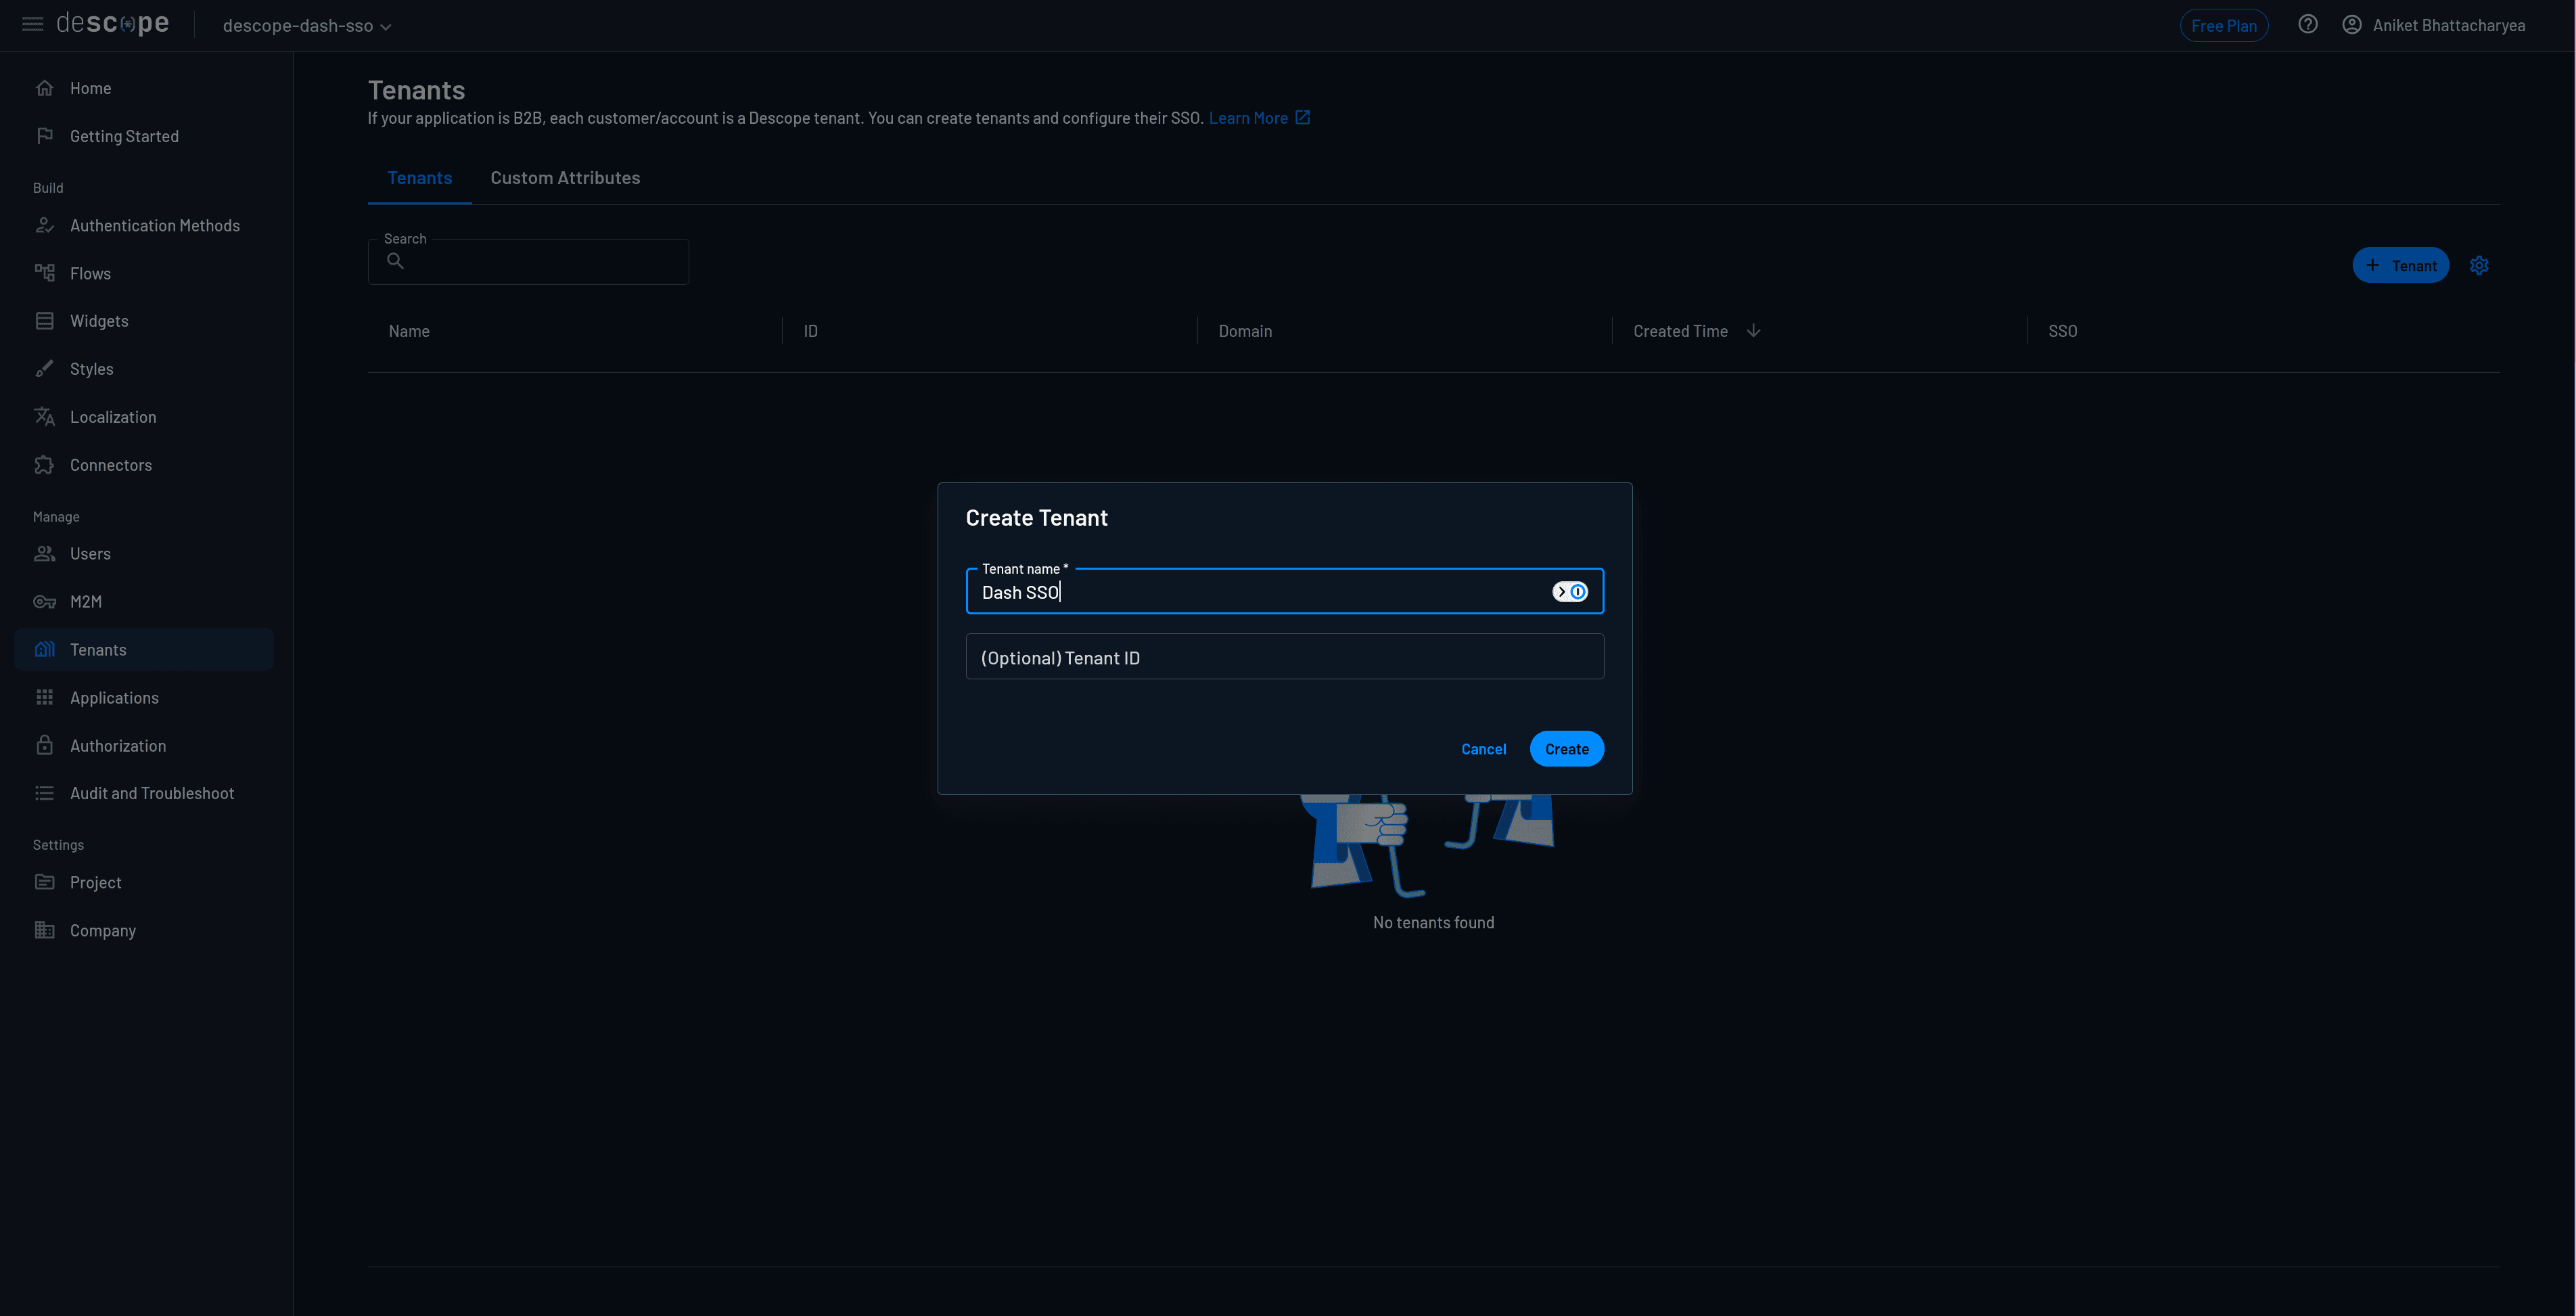
In the Descope console, navigate to the Tenants page and click + Tenant to create a new tenant. Give the tenant a name and click Create:
Select the tenant to open the tenant details page, add your email domain to the list of allowed domains, and save the changes. Navigate to Authentication Methods > SSO and select OIDC as the authentication method. Under Tenant Details, add your email domain.
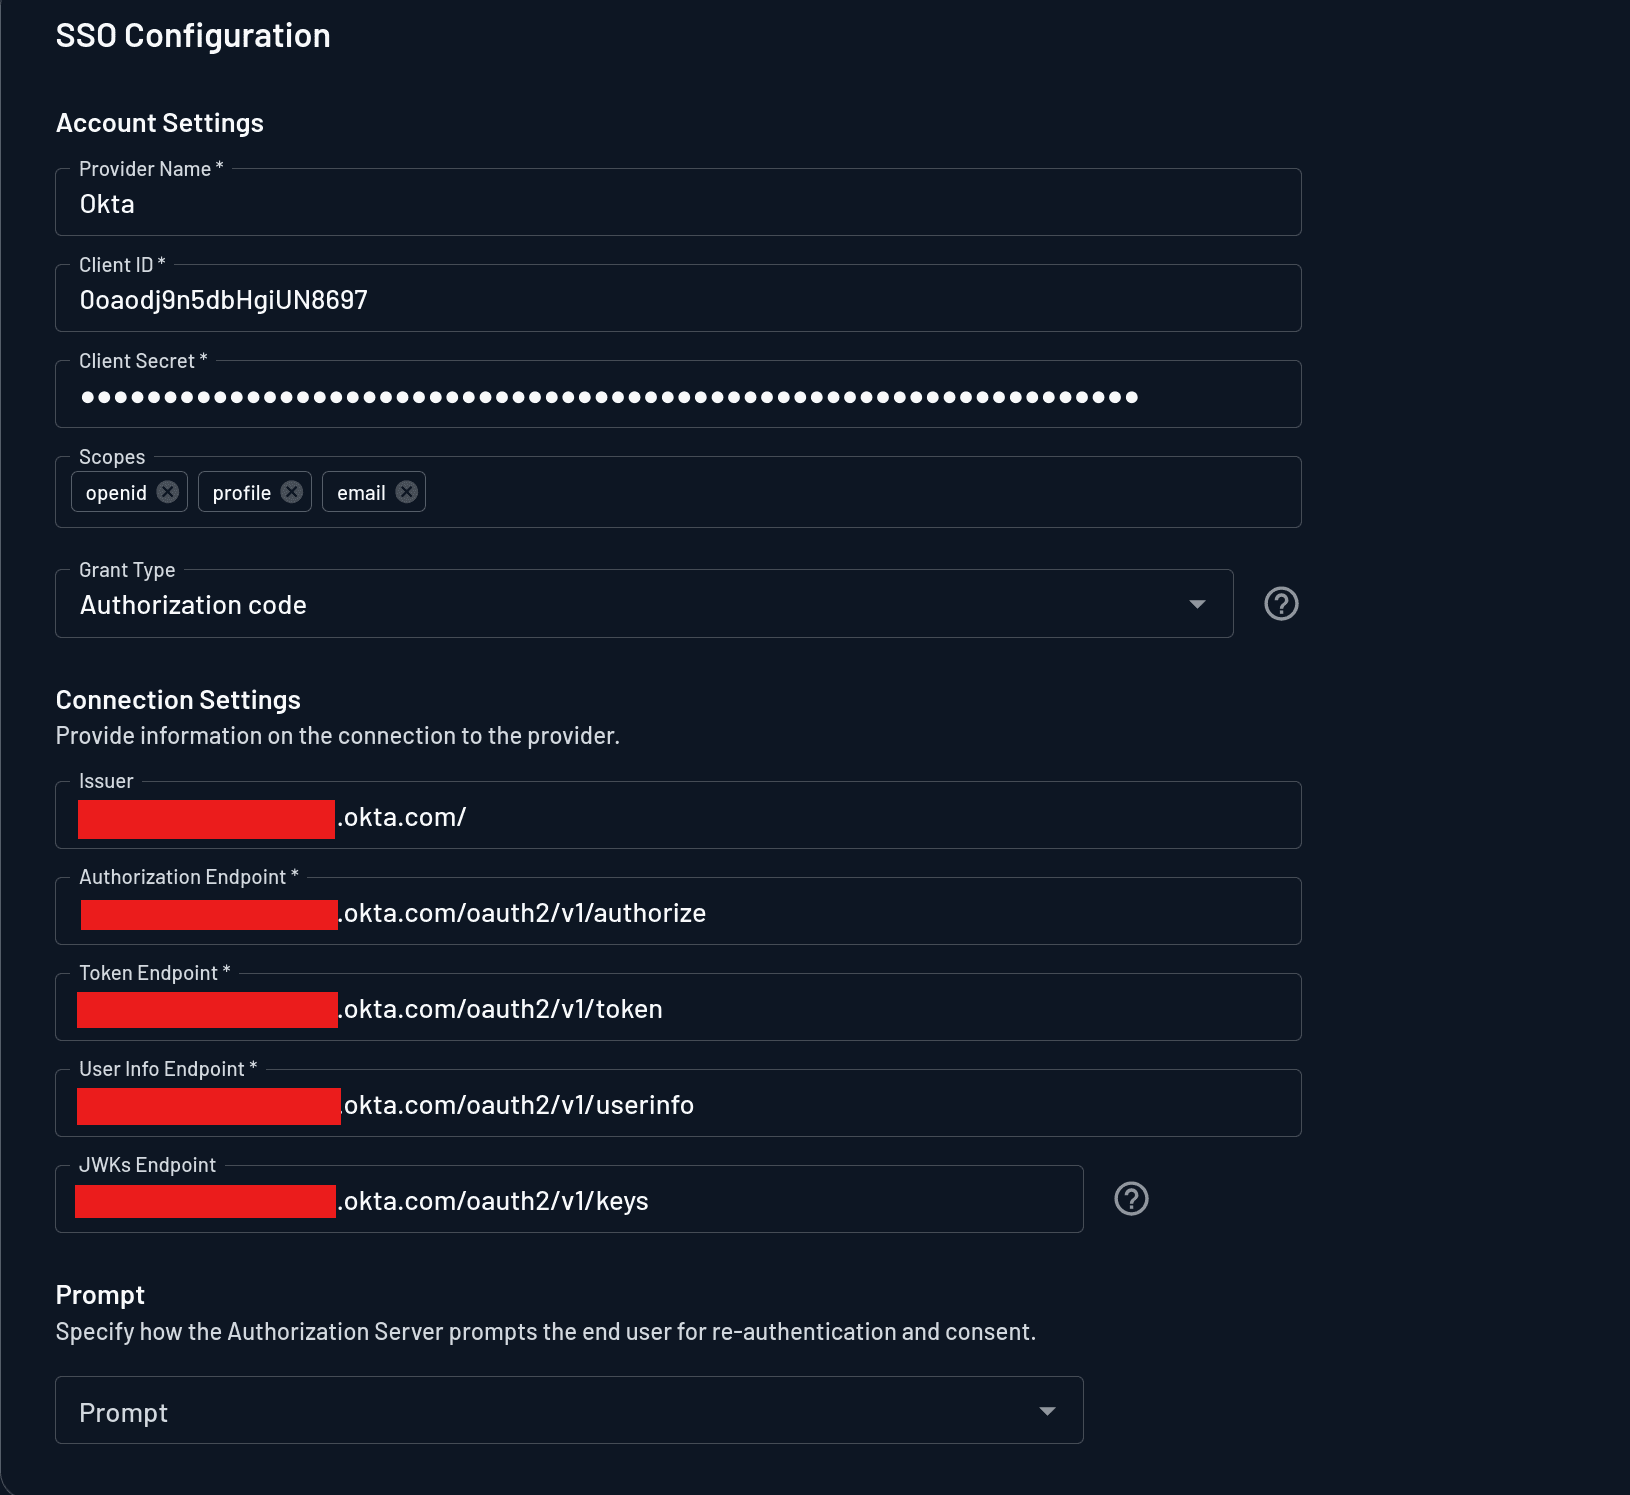
Scroll down to the SSO configuration > Account Settings section and provide the values as follows:
Provider Name:
OktaClient ID: The client ID you obtained from the Okta dashboard
Client Secret: The client secret you obtained from the Okta dashboard
Scope:
openid profile emailGrant Type:
Authorization code
To find out the values for the Connection Settings section, come back to the Okta application setup and you’ll find the following notice that provides a link to the metadata values for your Okta instance:

Click the OpenID Provider Metadata link to open the OpenID configuration page. You’ll need the issuer, authorization_endpoint, token_endpoint, userinfo_endpoint, and jwks_uri values.

In the Descope console, input these values in their respective endpoints and save the changes.
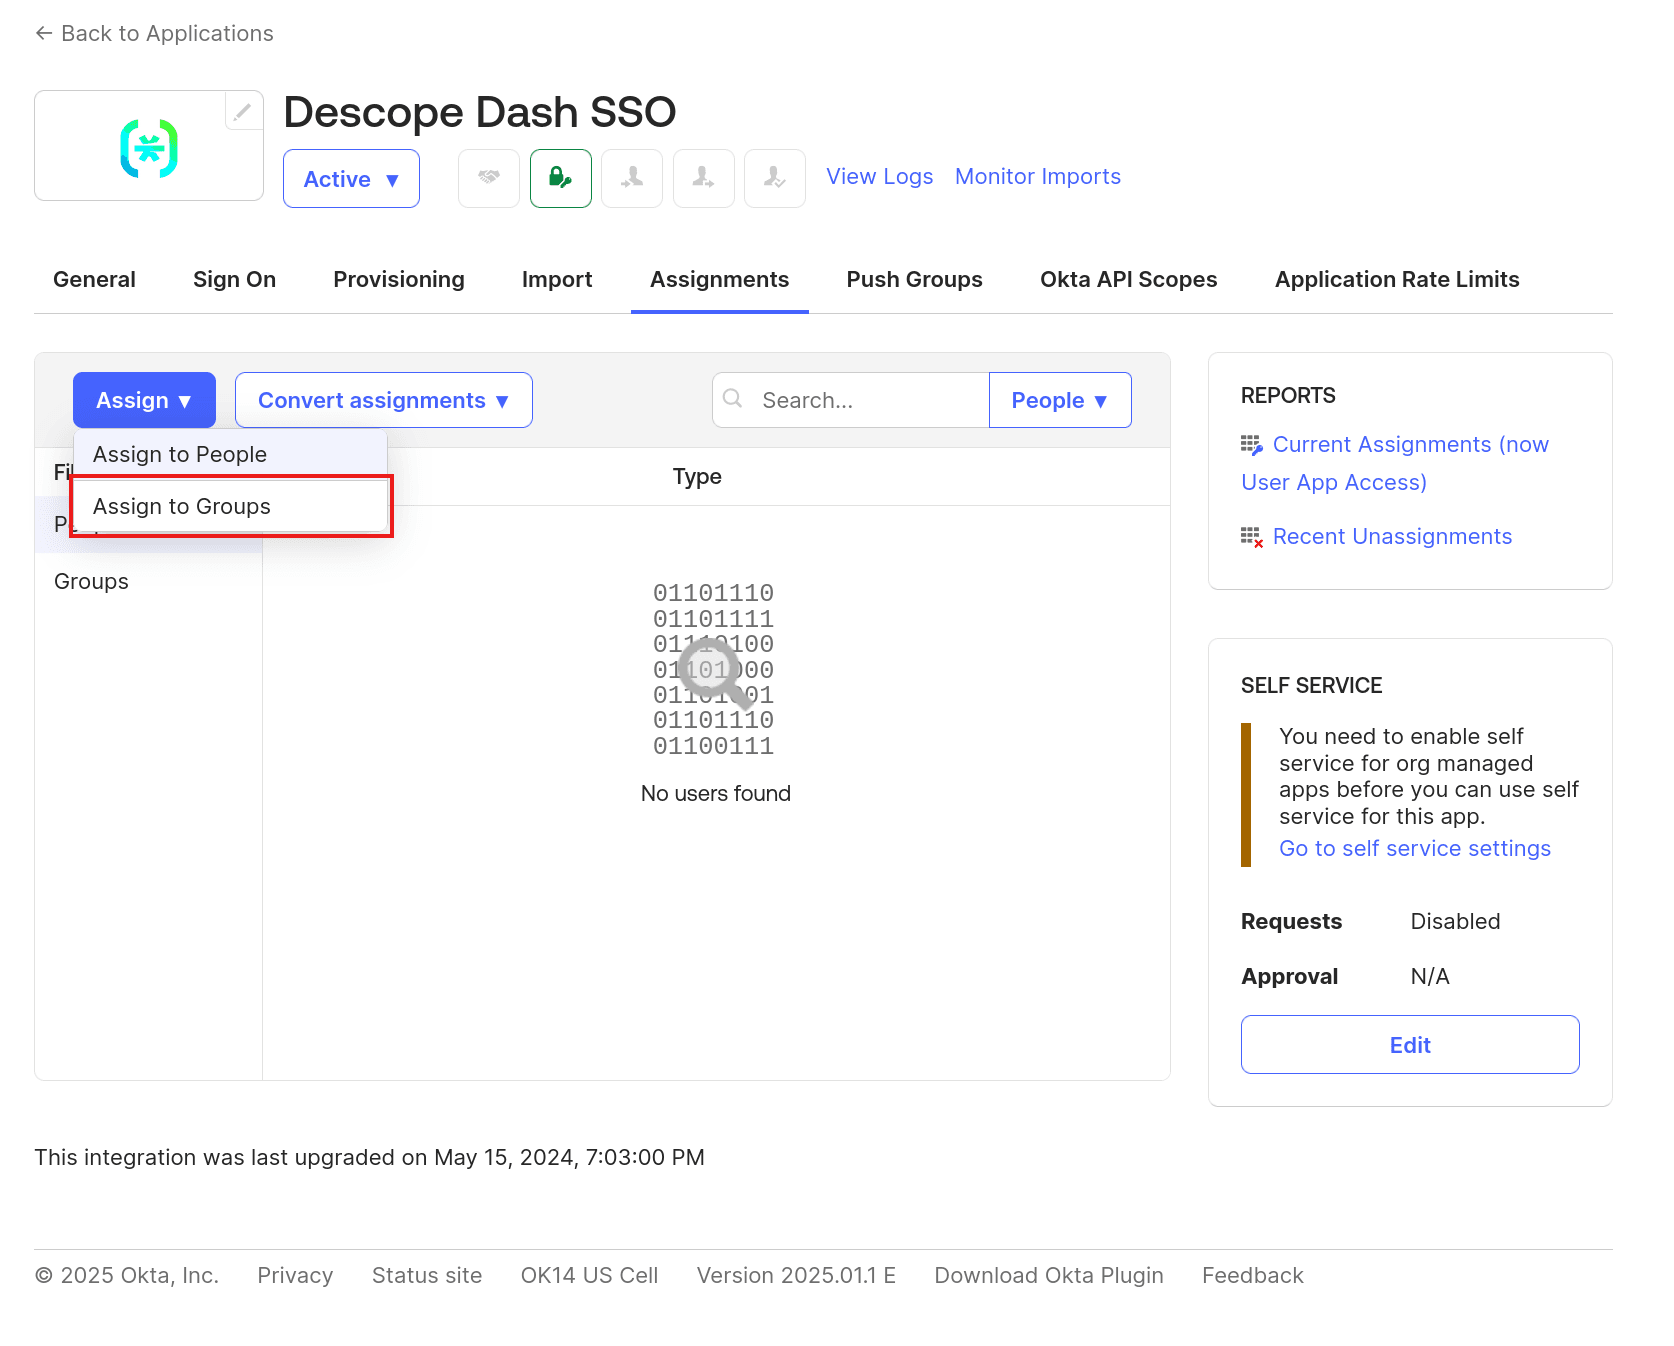
To grant users access to the Okta app, you need to assign users to the Descope app. To do this, open the app details page in Okta and select Assignments > Assign > Assign to Groups:
Click on the Assign button next to the Everyone group to allow all users to log in via SSO, and click Done to save the changes.
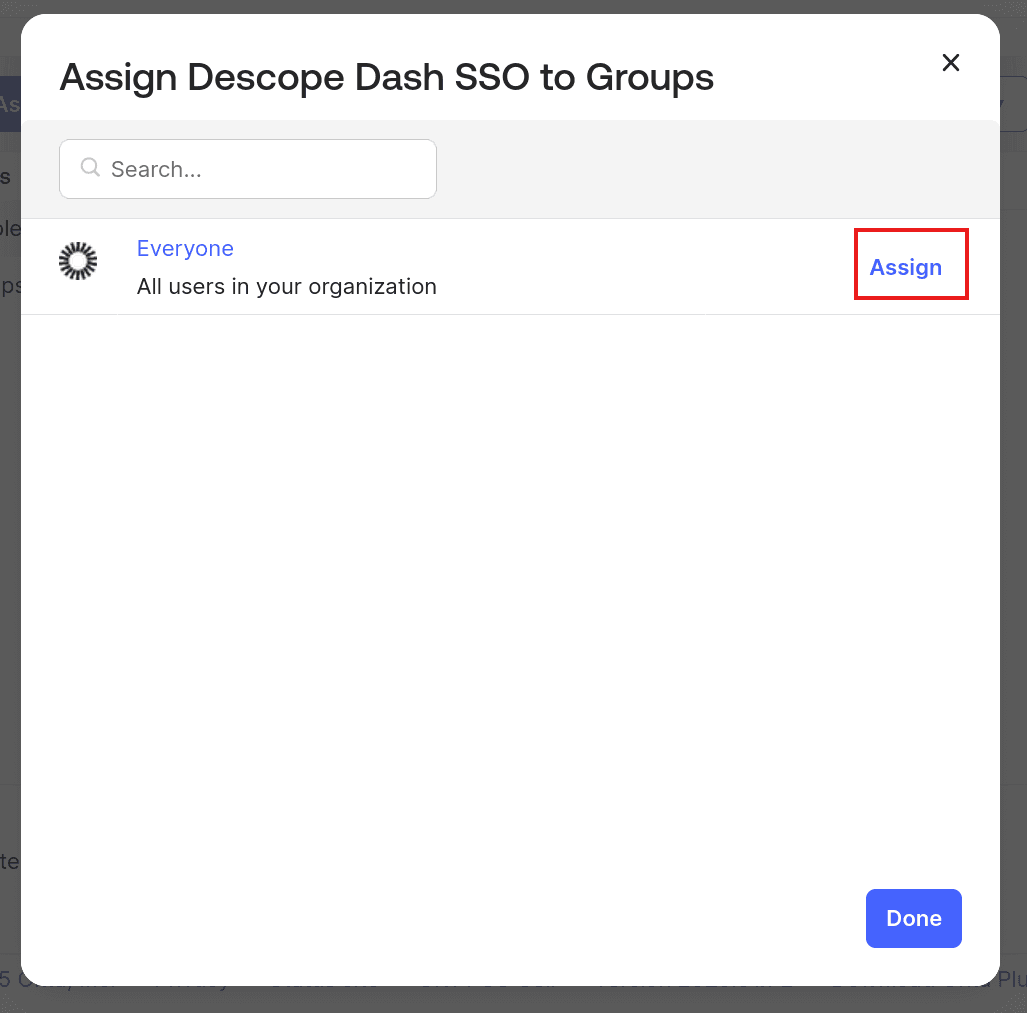
Note that in a real-world application, you should not use the Everyone group. Instead, you should create a group with only those members who need to access the app and assign the app to this group.
Adding a logout button
Before you can test the SSO, you need to have a way to log the existing user out if you have already signed in using the magic link or social login. You can visit /oidc/logout to log in, but to make it more convenient, let’s add a logout button.
In pages/private.py, add the following entry at the end of the array that is returned from the layout function:
dcc.Link("Log out", href="/oidc/logout", refresh=True)This adds a logout link at the end of the private page.
Testing the app
Restart the server and open the app again. If you’re already logged in, log out by clicking on the logout link.
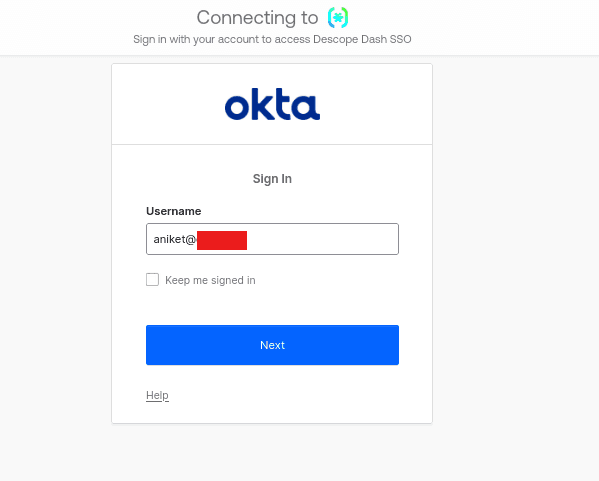
This time, you’ll be able to enter your email and click on the Continue with SSO button to start the SSO process. You’ll be taken to Okta, where you can sign in.
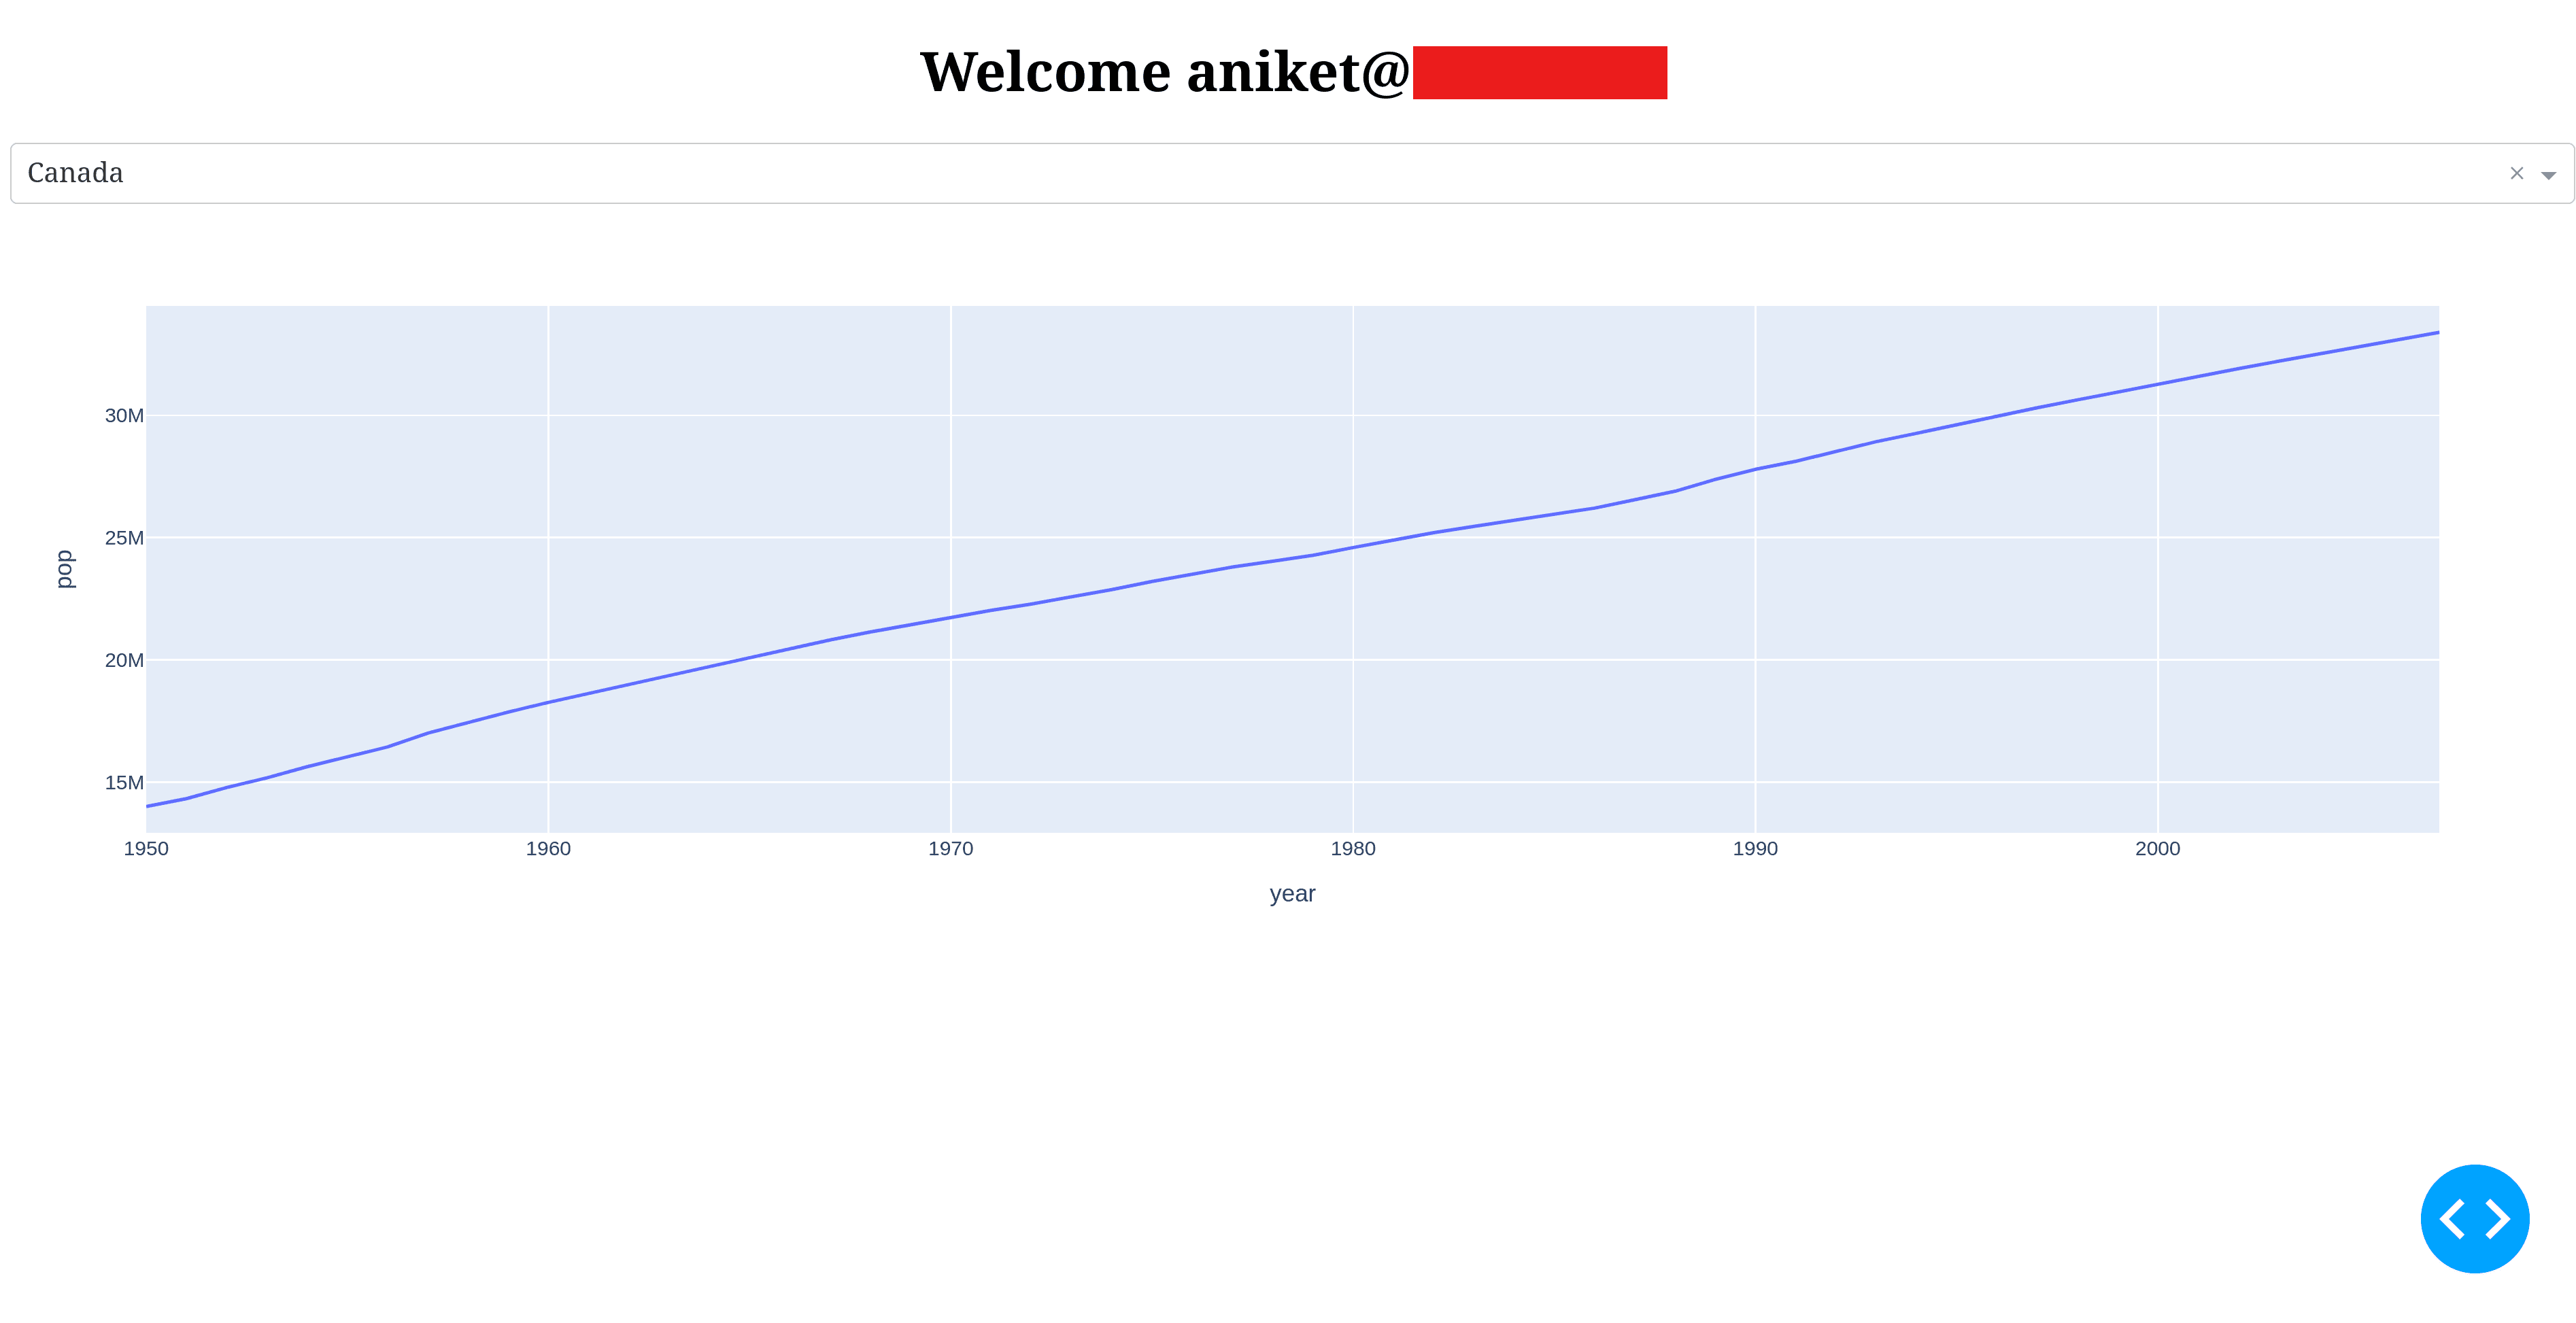
After getting redirected to the app, you’ll see the private page as usual.
The full version of this app is available on GitHub in the final branch.
Conclusion
In this guide, you learned how to secure your Dash app by adding authentication and SSO using Descope. You saw how Descope makes it easy to add magic link authentication and social login via OIDC. You then saw how to configure Okta as an IdP and add SSO.
Descope is a drag & drop CIAM platform. Our no / low-code solution helps hundreds of organizations easily create and customize their entire user journey using visual workflows—from authentication and authorization to MFA and federated SSO. Customers like GoFundMe, Navan, You.com, and Branch use Descope to reduce user friction, prevent account takeover, and get a unified view of their customer journey. To learn more, join our dev community AuthTown and check out our docs.
