
Table of Contents
This tutorial was written by Ikeh Akinyemi, a software engineer, technical writer, and open source evangelist. Connect with him on his GitHub or X to see more of his work!
Authentication and authorization are essential for controlling user access and actions within applications, ensuring the right people can do the right things. However, implementing these features can be complex and error-prone, especially in Webflow, where server-side logic isn’t easily accessible. Ineffective management of sessions and user roles can expose your application to security vulnerabilities.
Consider a typical Webflow content management system (CMS) where team members collaborate on content but their access must vary based on their roles. Writers should manage only their own articles, while editors require full control to publish, delete, or oversee other authors’ work. Role-based access control (RBAC) simplifies this by assigning roles—such as Writer or Editor—to users and granting permissions accordingly.
Traditionally, implementing authentication and RBAC required significant backend development and ongoing maintenance. With Descope, you can add these features to your Webflow app without writing complex backend code. Descope provides a visual workflow editor, Descope Flows, for authentication and integrated RBAC functionality, enabling you to add these features to your Webflow app without backend complexity. This tutorial will guide you through securing your Webflow CMS with Descope social login, email verification, and role-based permissions.
Setting up your Descope project and configuring an authentication flow
Before implementing authentication and RBAC in your application, let’s set up the development environment and configure Descope to meet your needs.
Head over to the Descope website and create your free account. Once you’ve successfully created an account, you’ll be guided through creating an authentication flow that matches your application’s needs:
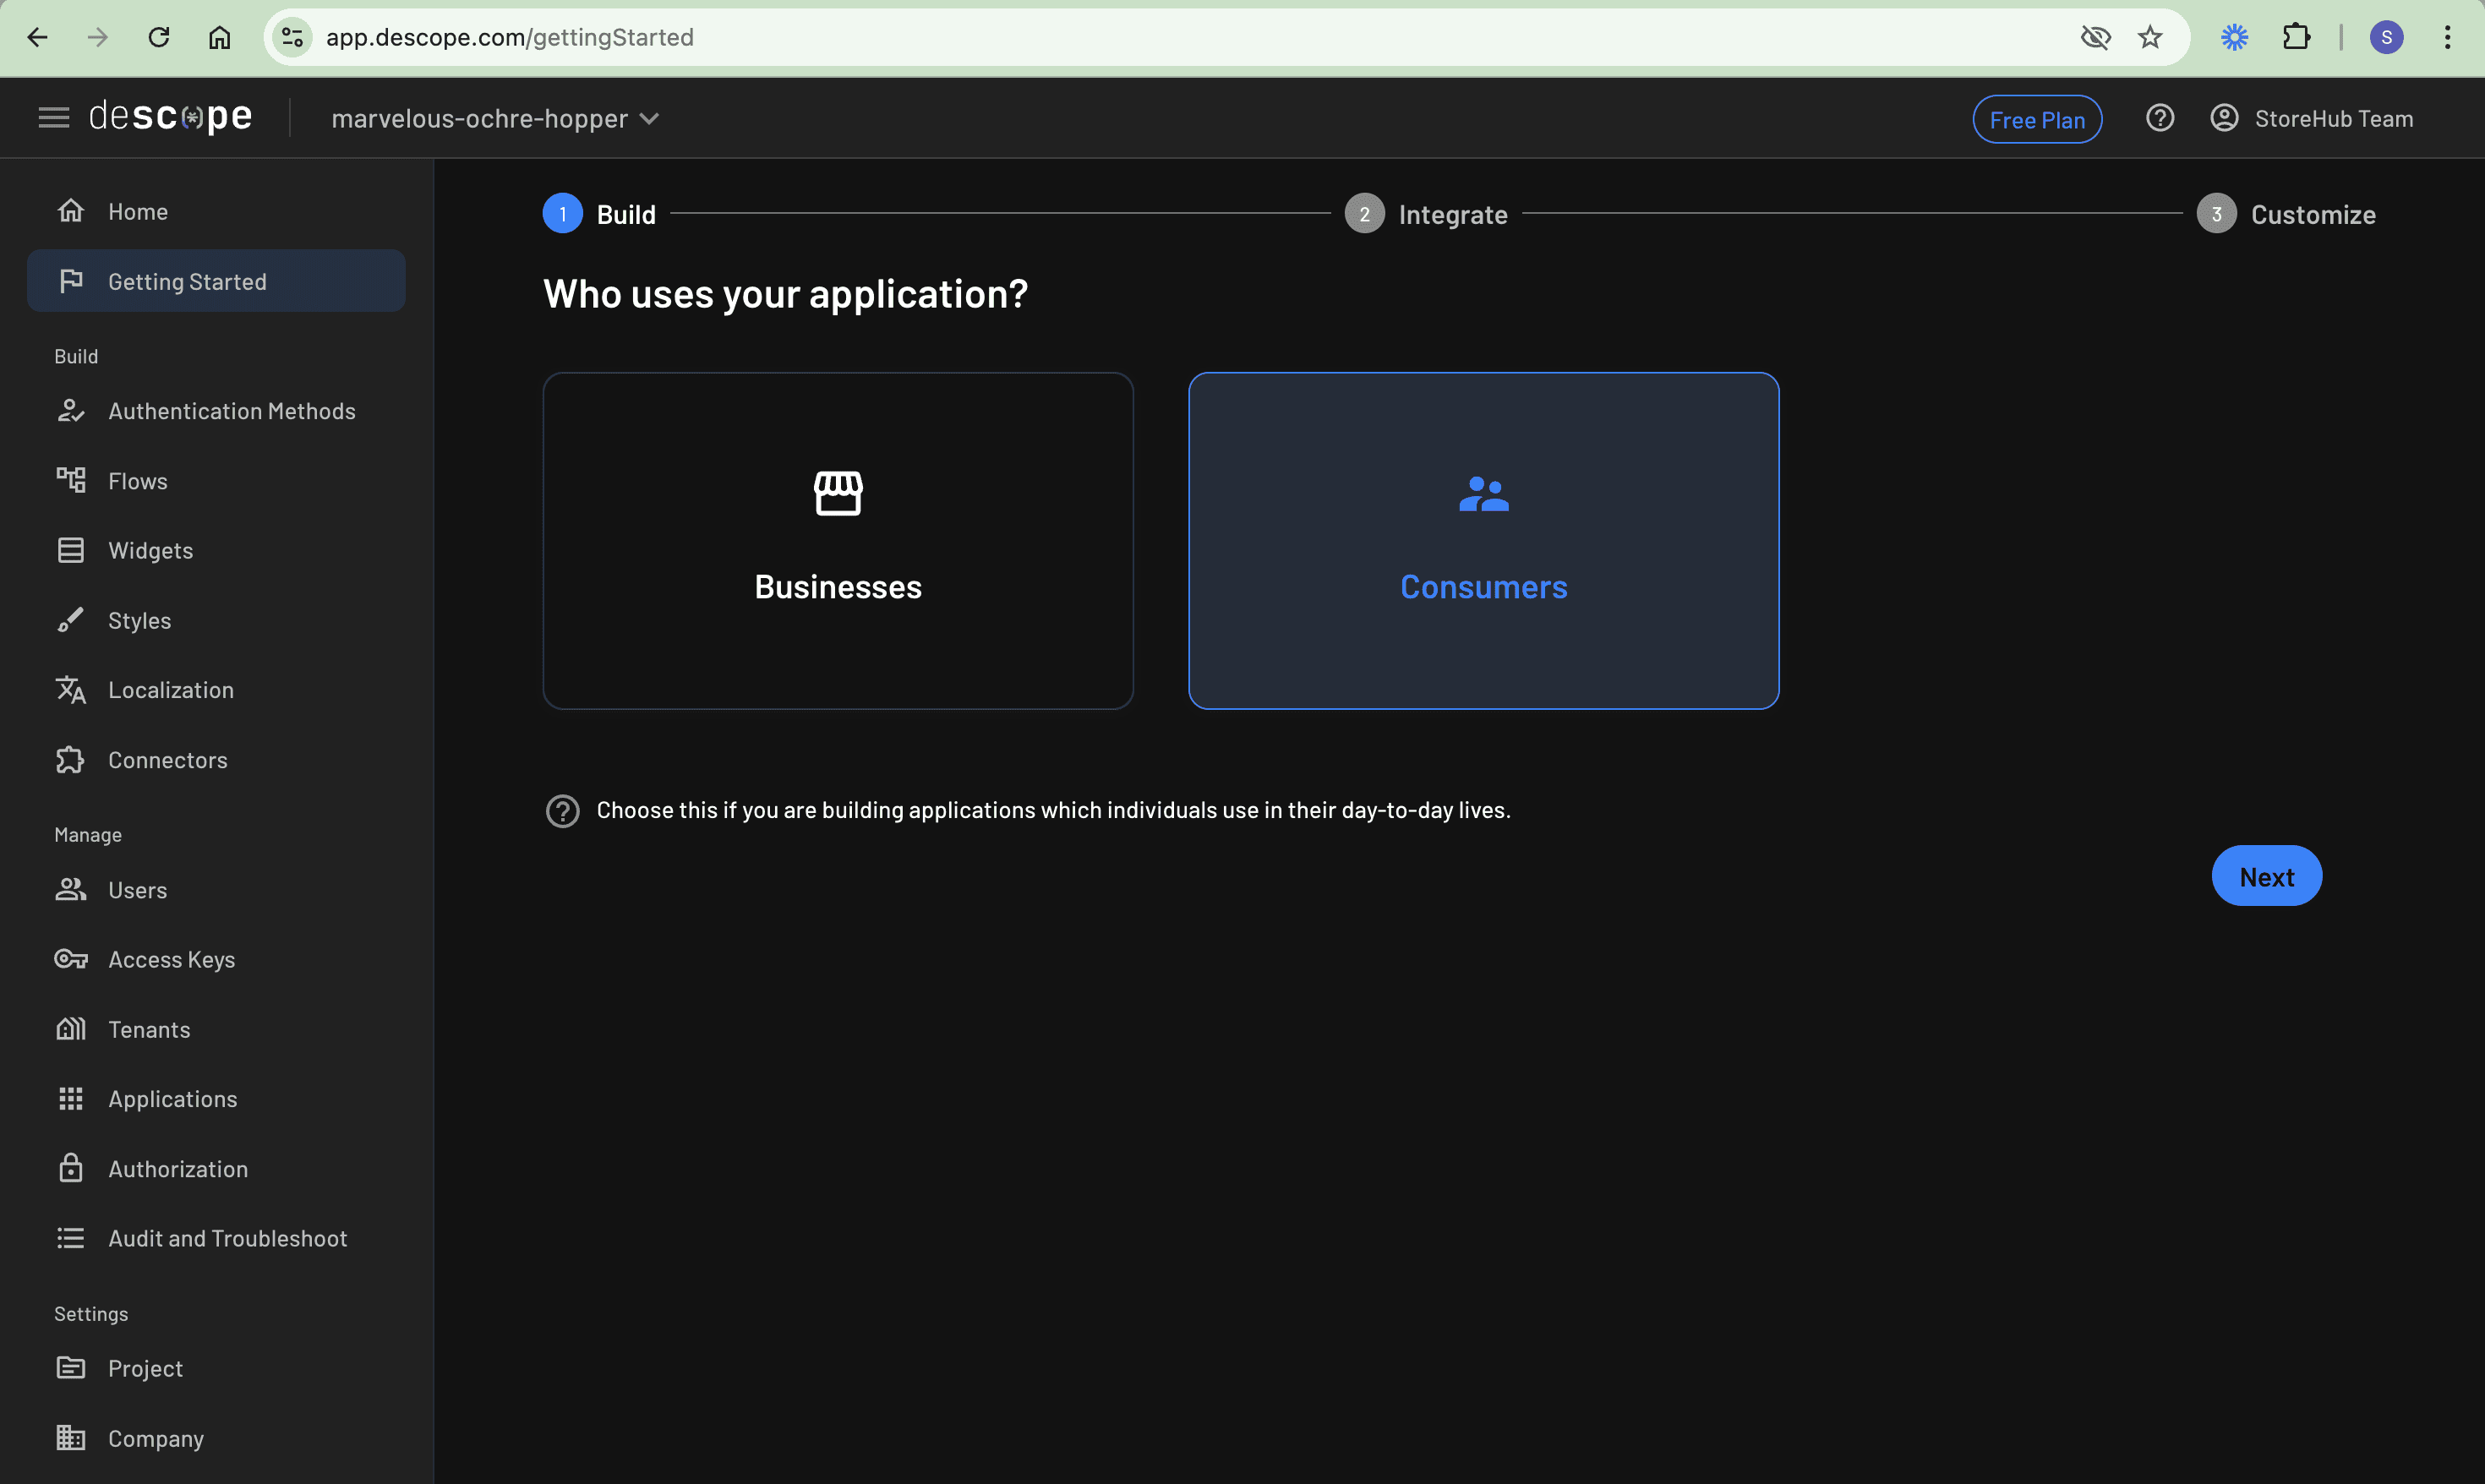
For a CMS application, you want to offer both email-based and social authentication to give users some flexibility in their preferred sign-in method.
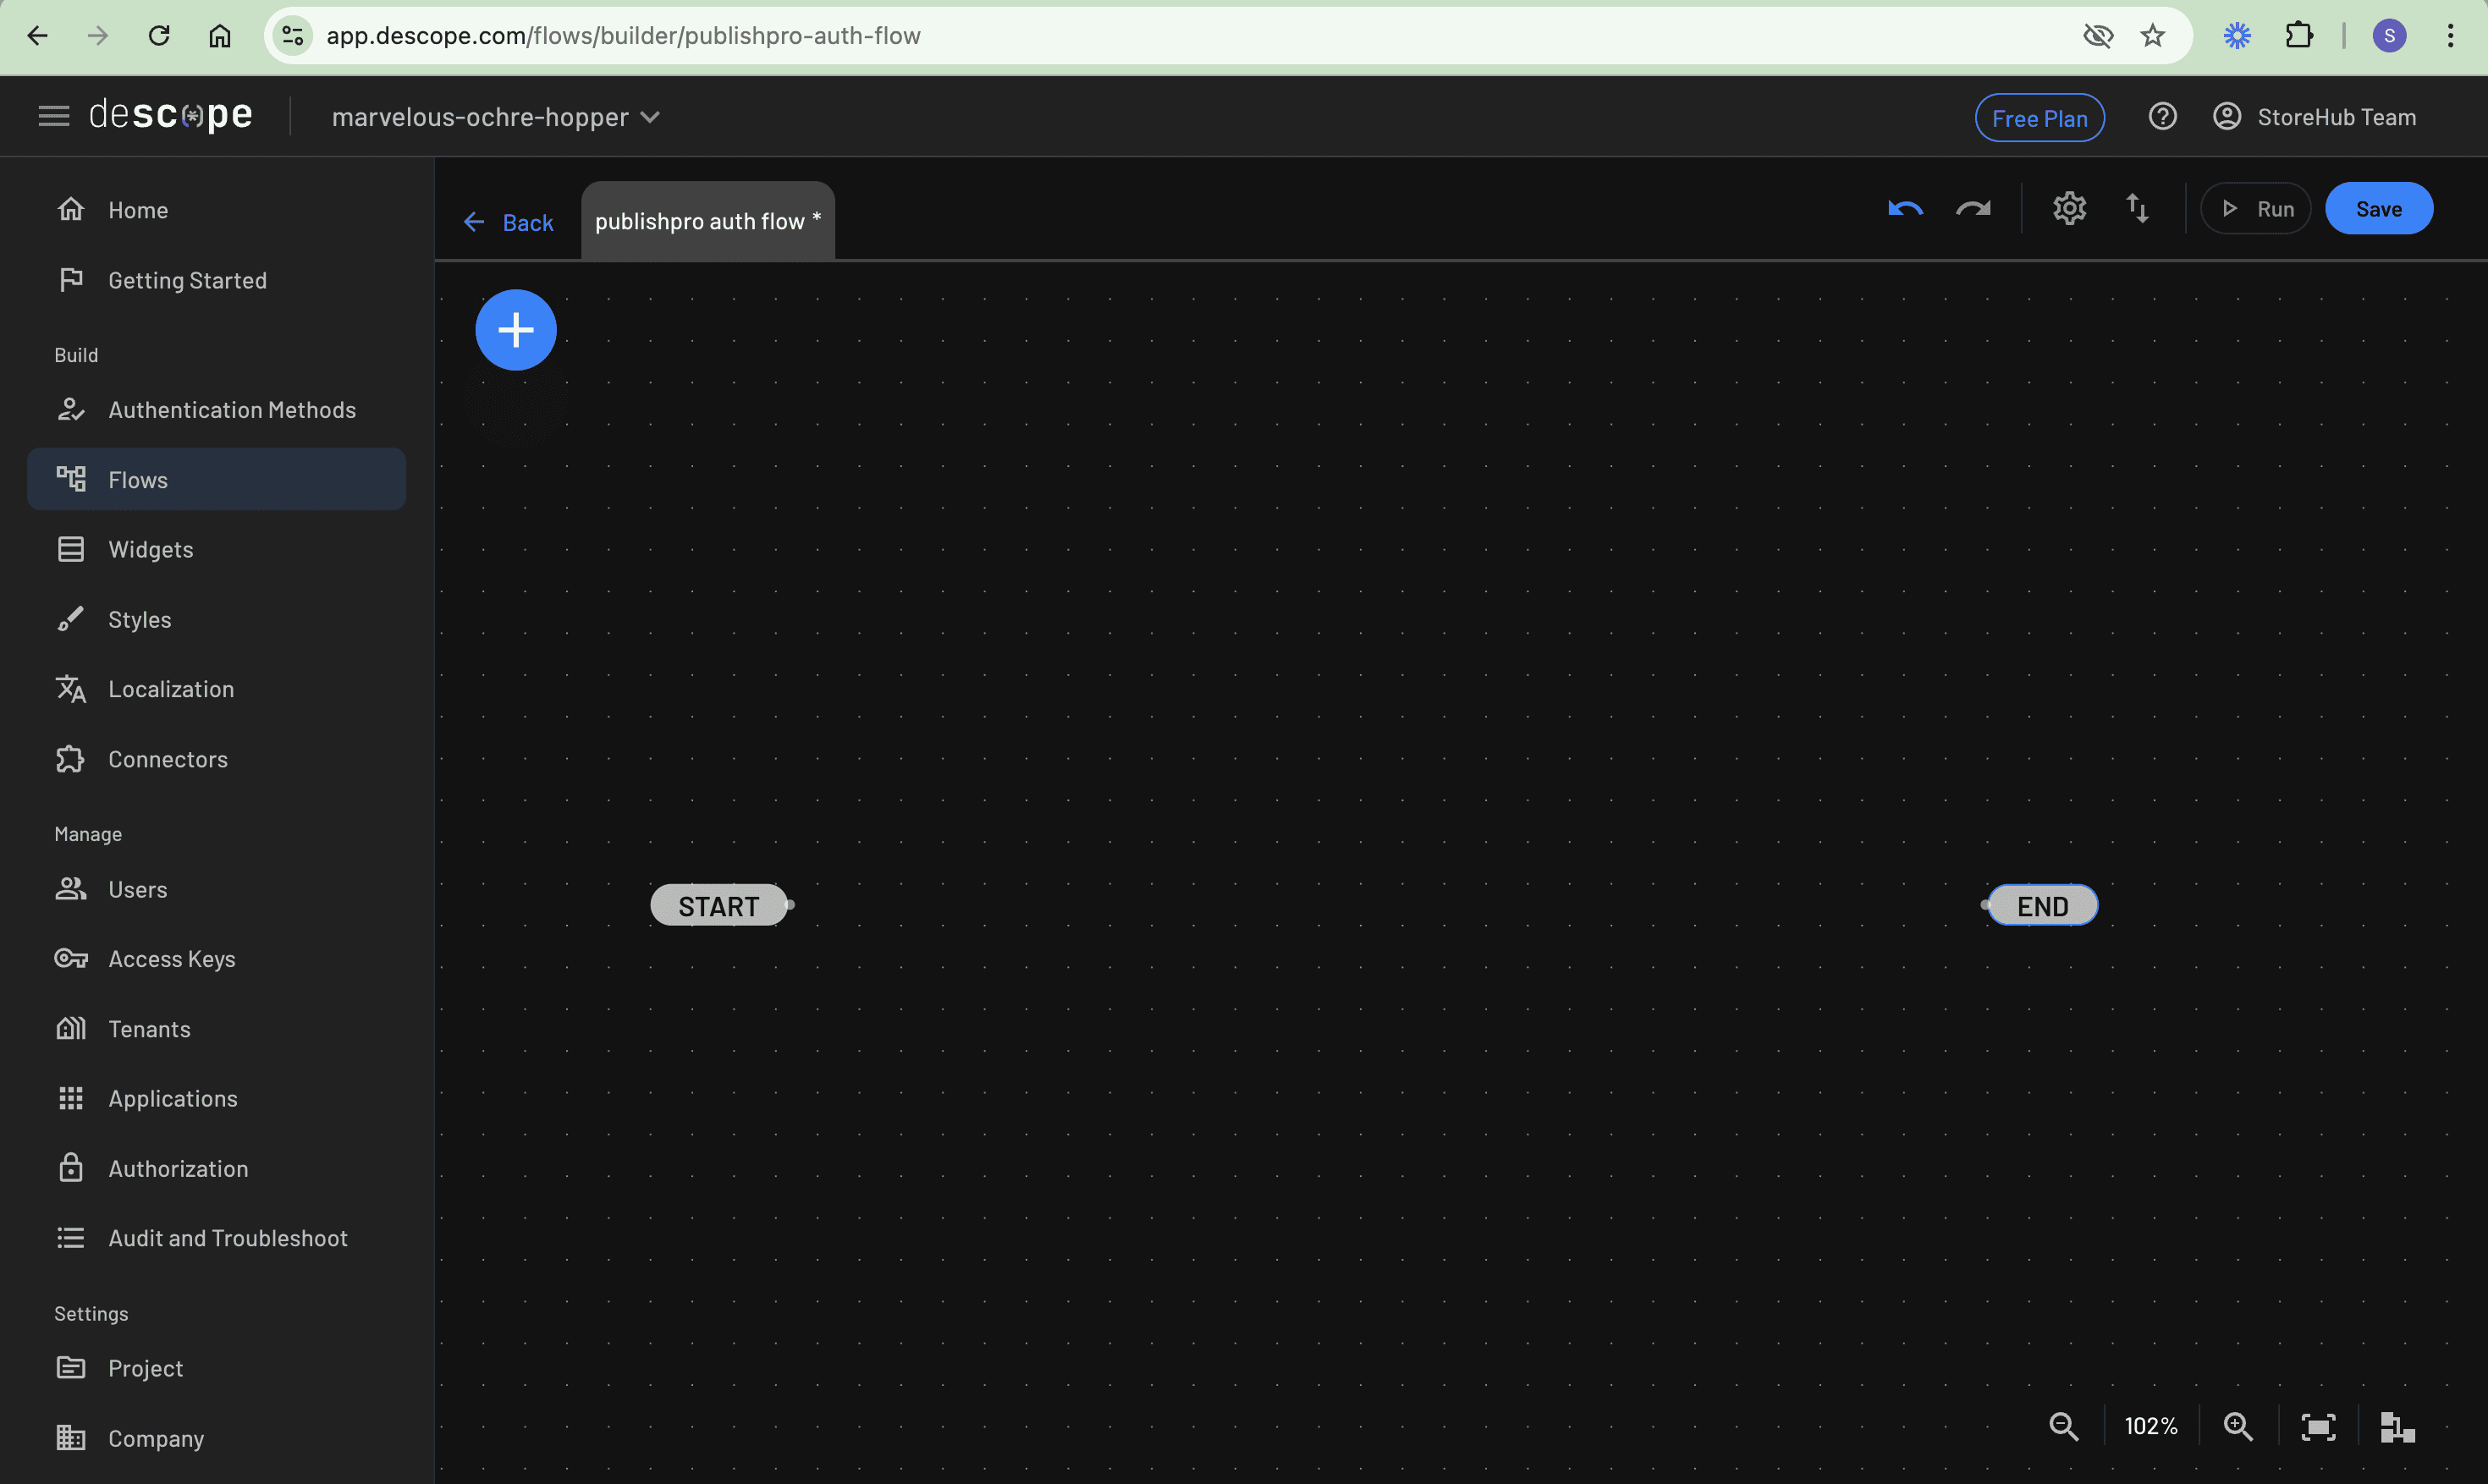
Navigate to the Flows section in the Descope Console and click Start from scratch:
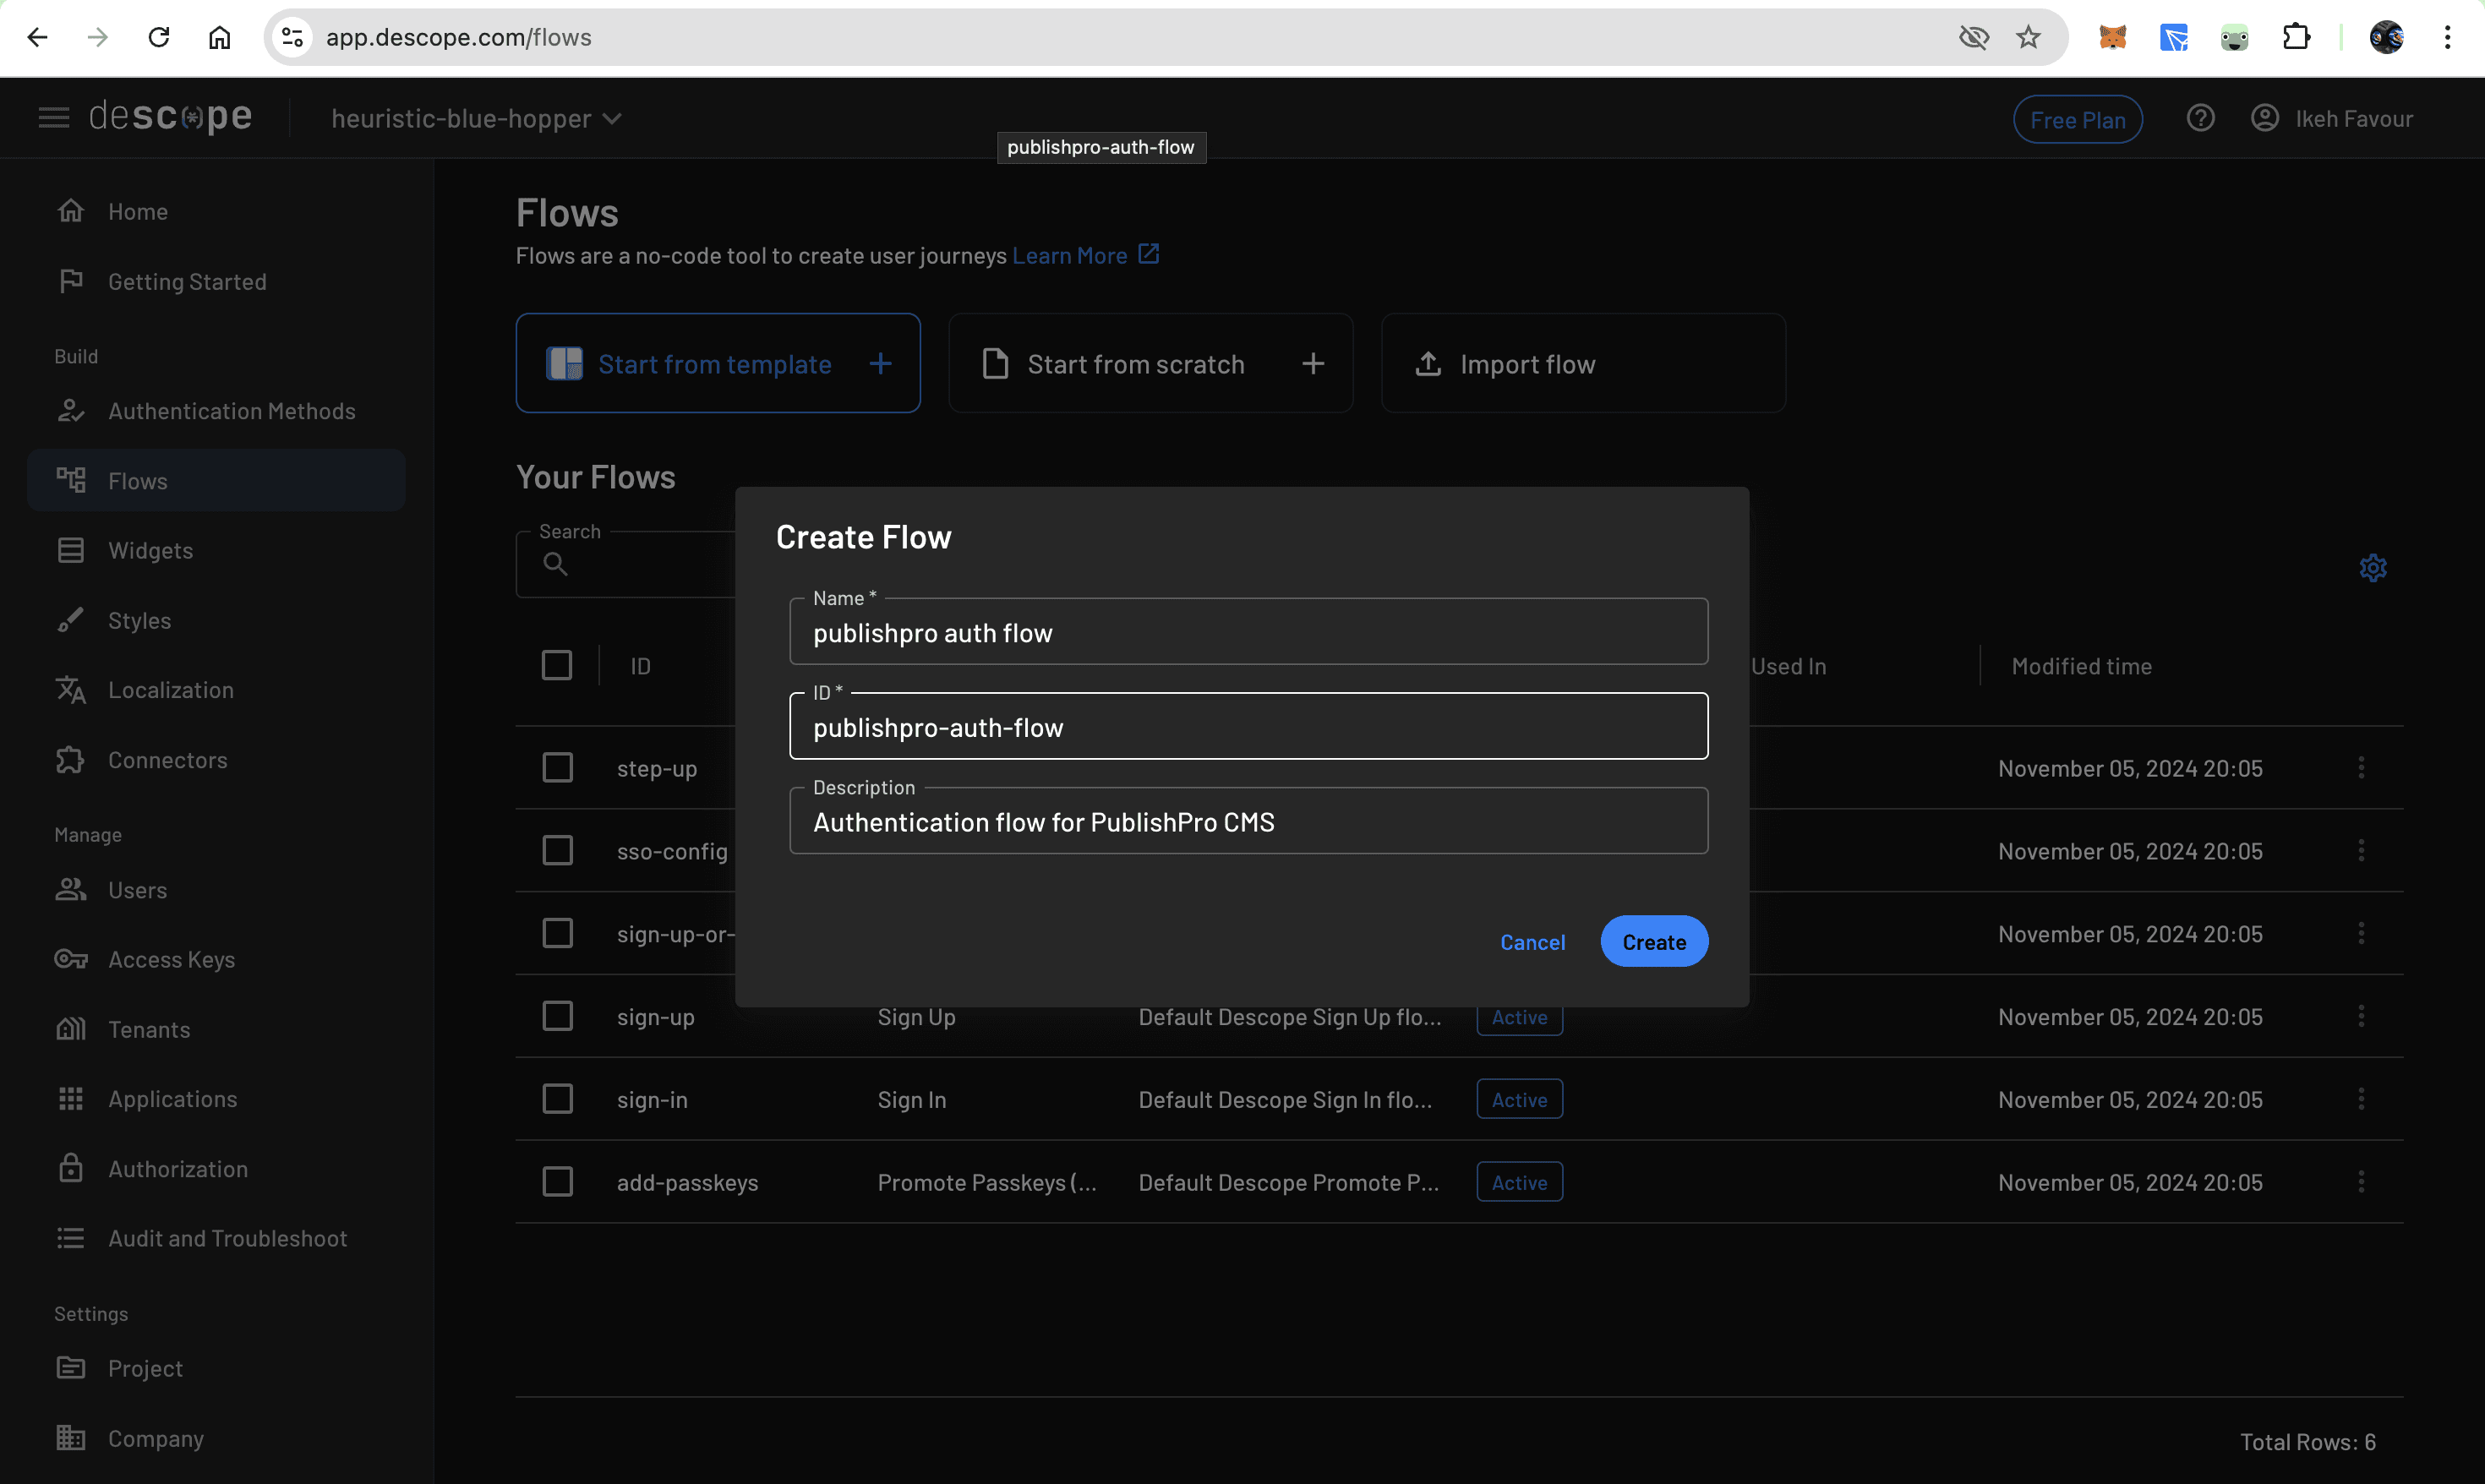
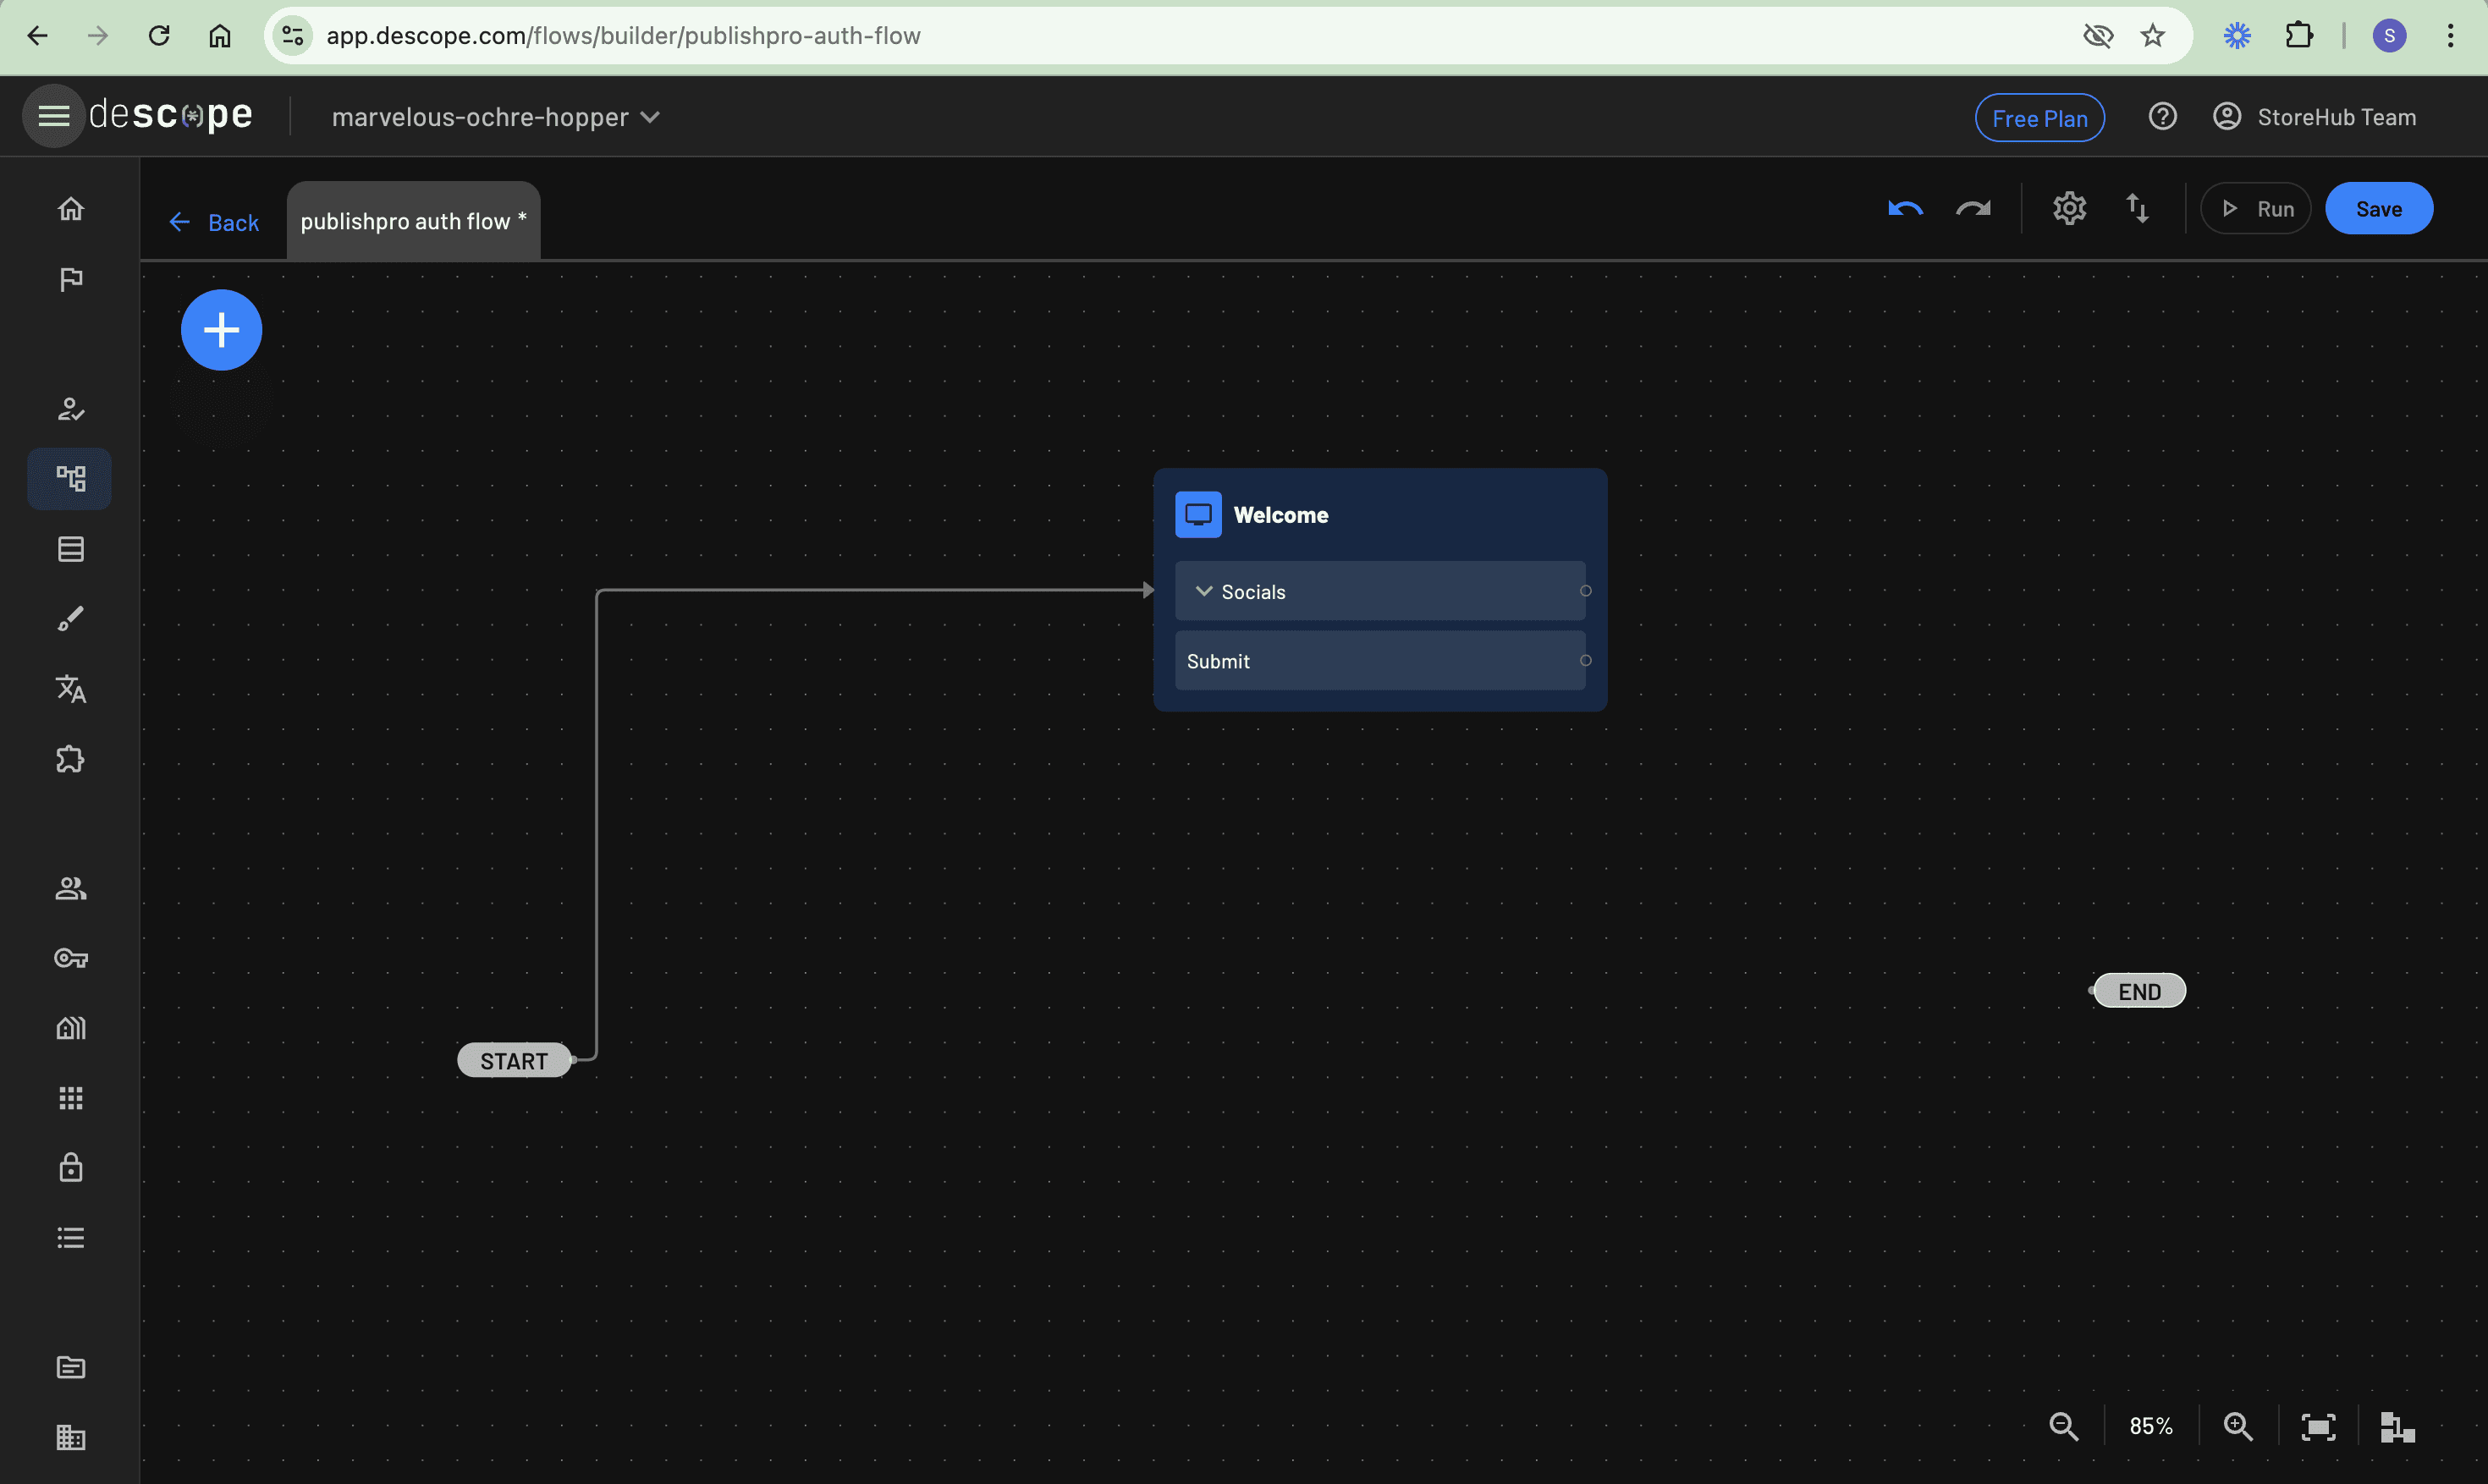
Since this flow handles both new user registration and existing user authentication for the CMS, you can name it “publishpro auth flow”. The flow editor presents a visual canvas where you design the authentication experience:
Creating and adding elements to the authentication interface
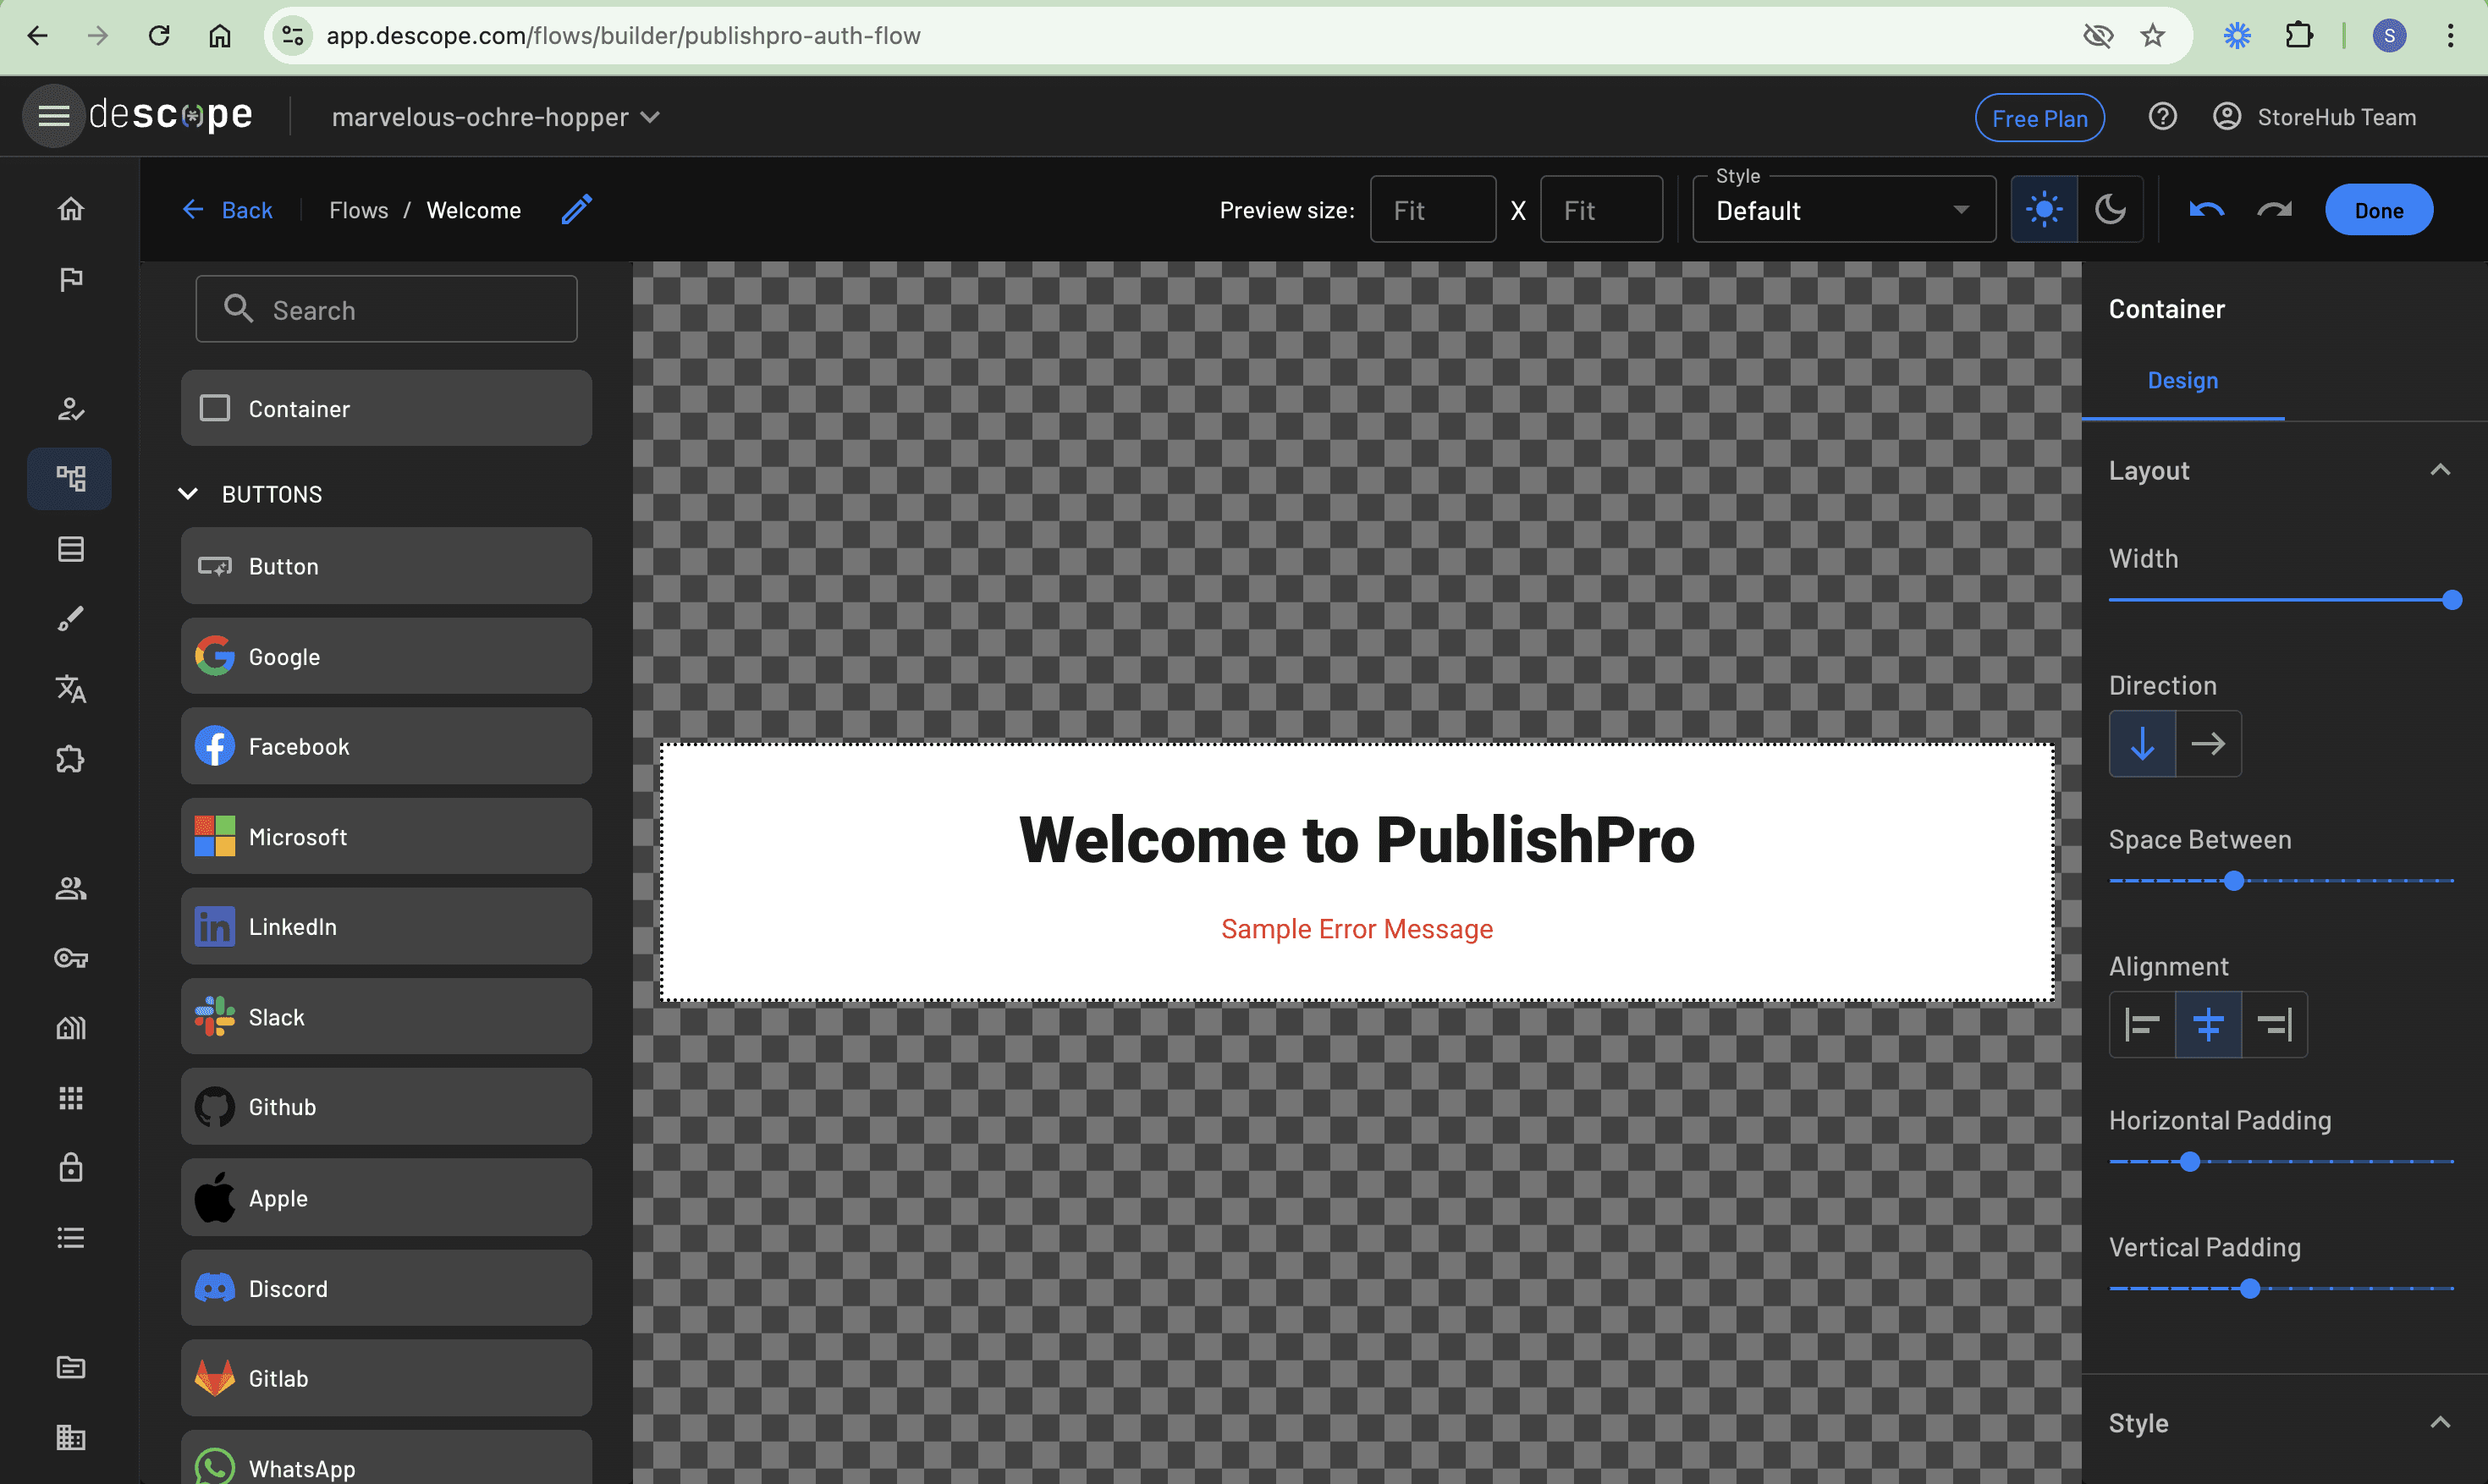
You can now build the authentication interface by creating a Sign Up or Sign In screen. Click the + button to drag and drop a new screen. Inside the screen, click the screen body text element. On the right panel of the editor, go to the Content section and update the text to “Welcome to PublishPro”. Then, scroll down to the Style section and set the style to the H2 element, as shown here:
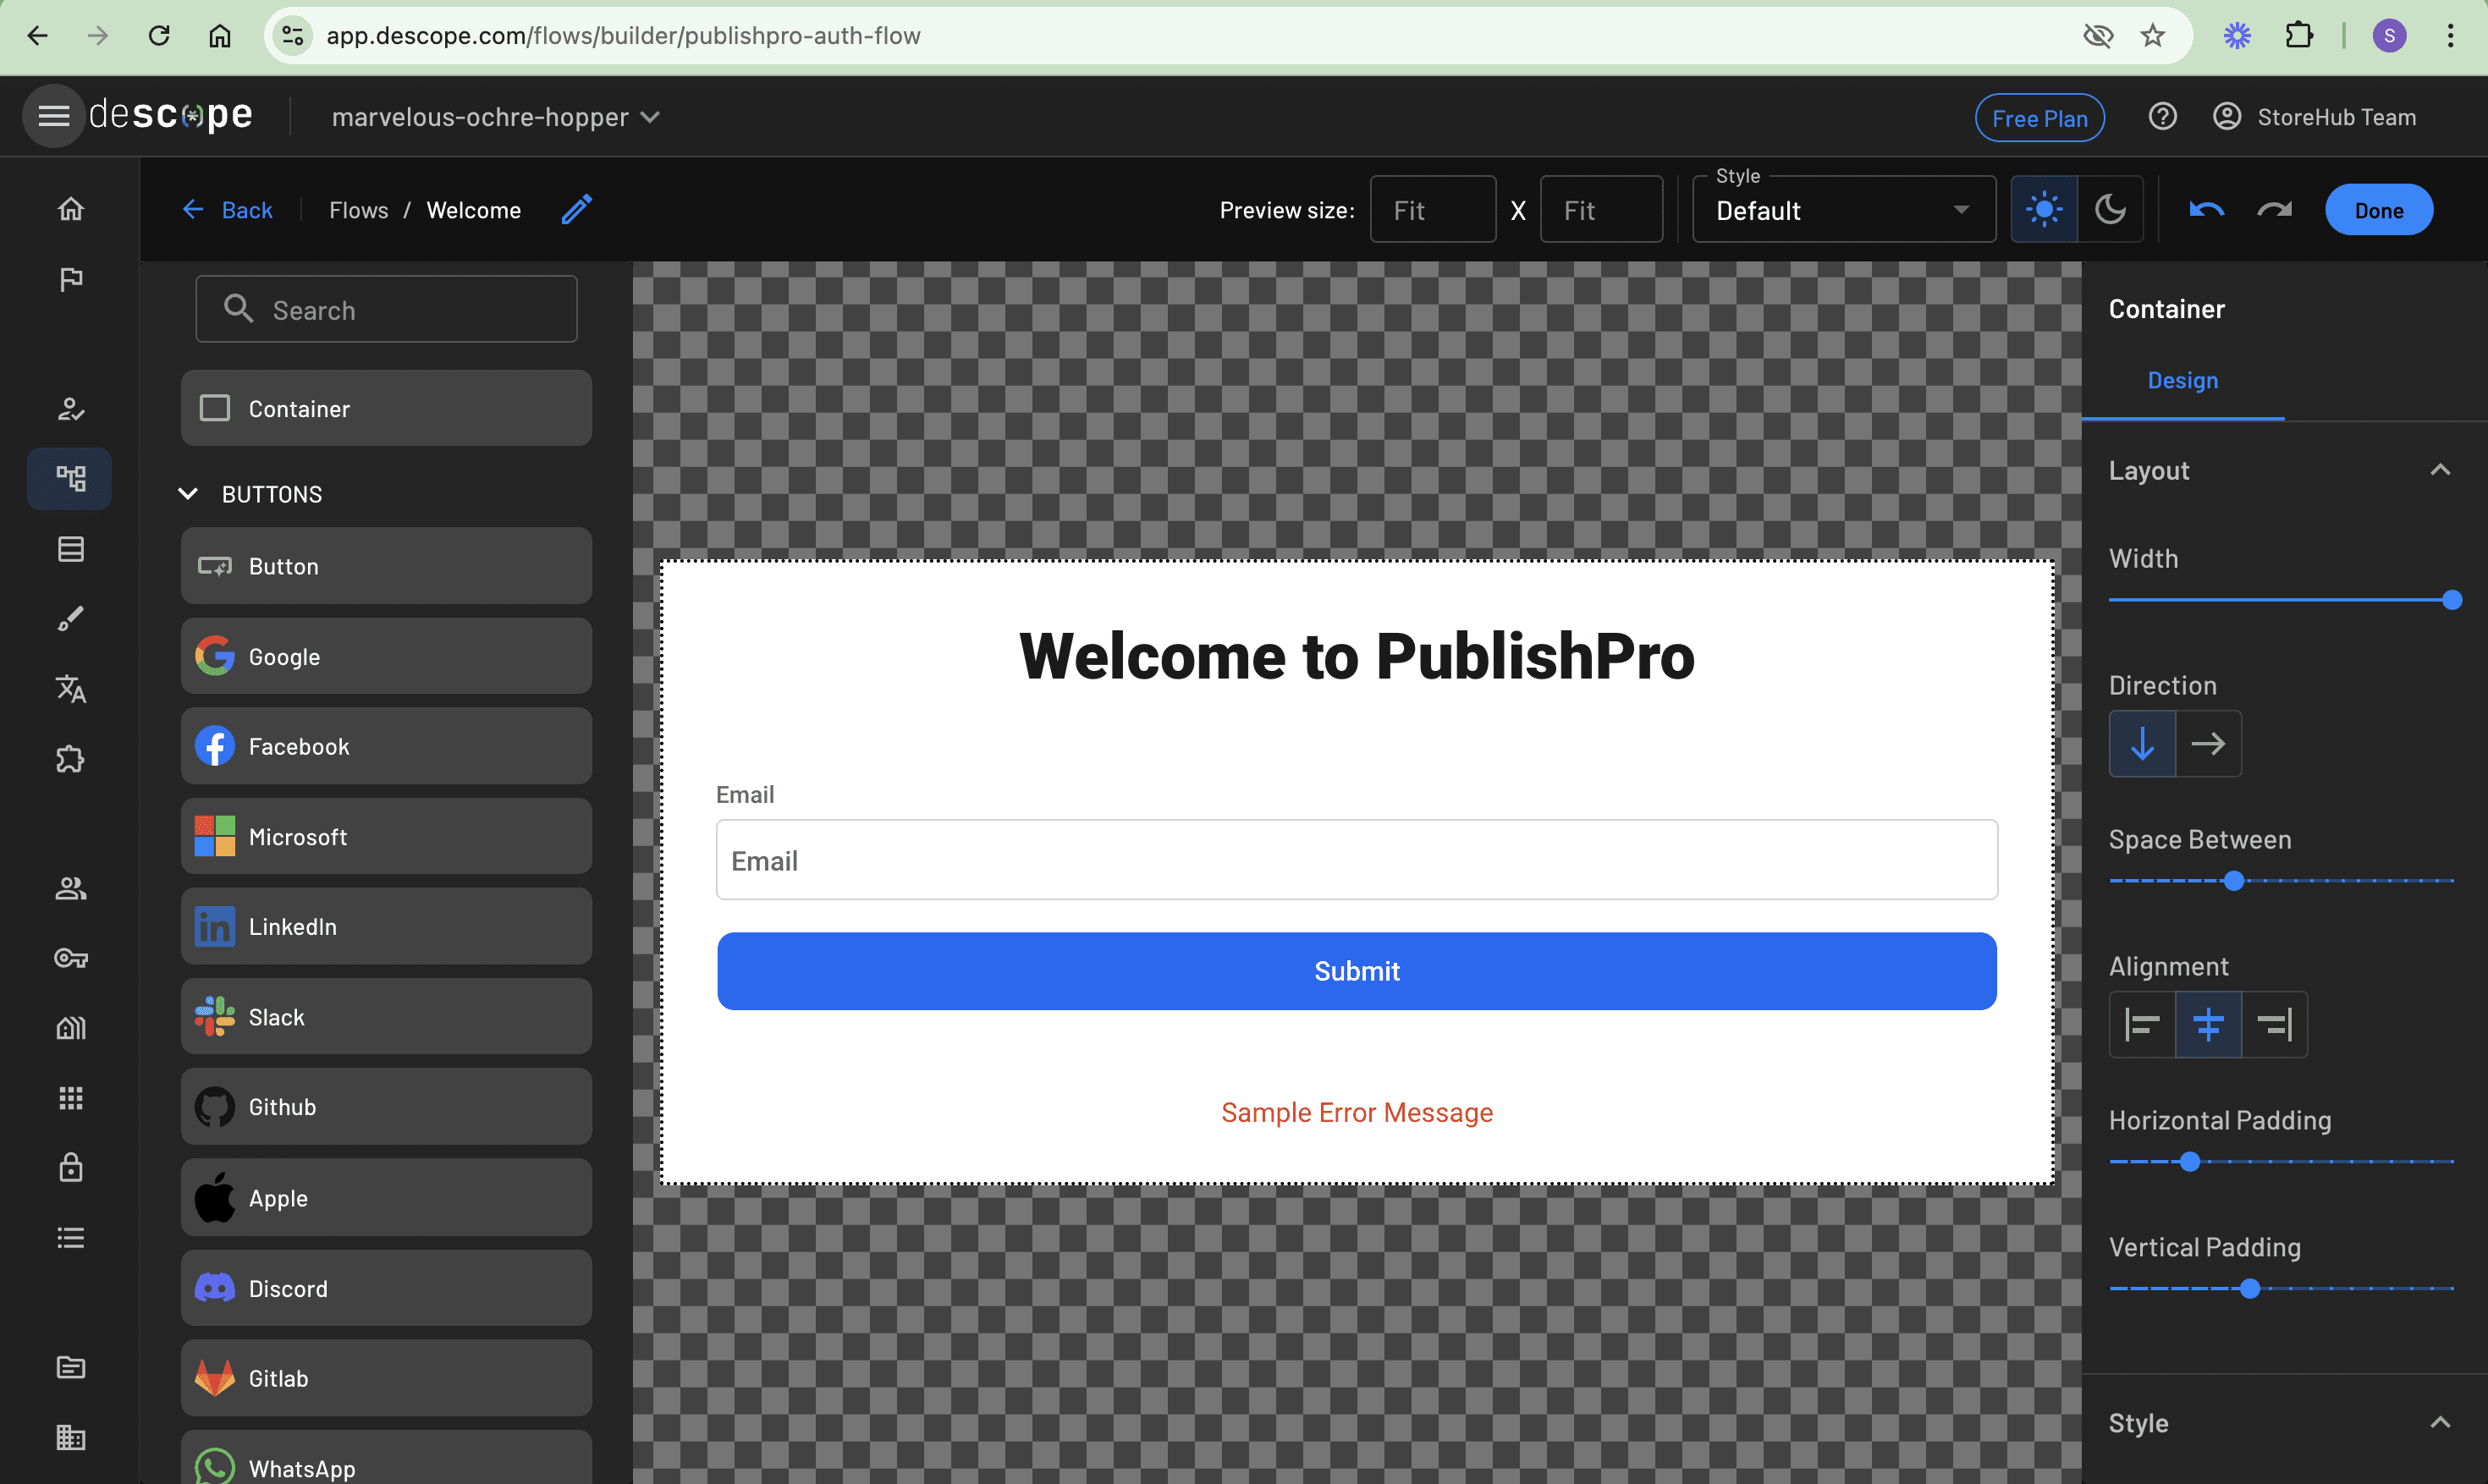
Drag and drop a Container element from the list of elements in the left panel of the screen. Then drag and drop an Email input element and a Button element inside this container. Select the Button and rename its Text value to “Submit” on the right panel. Then adjust its width to fit that of the container by toggling the Fill container button. Here’s what it should look like:
Adding social login
This setup handles email OTP authentication, providing a passwordless option for users. Next, you’ll add social login as an alternative authentication method.
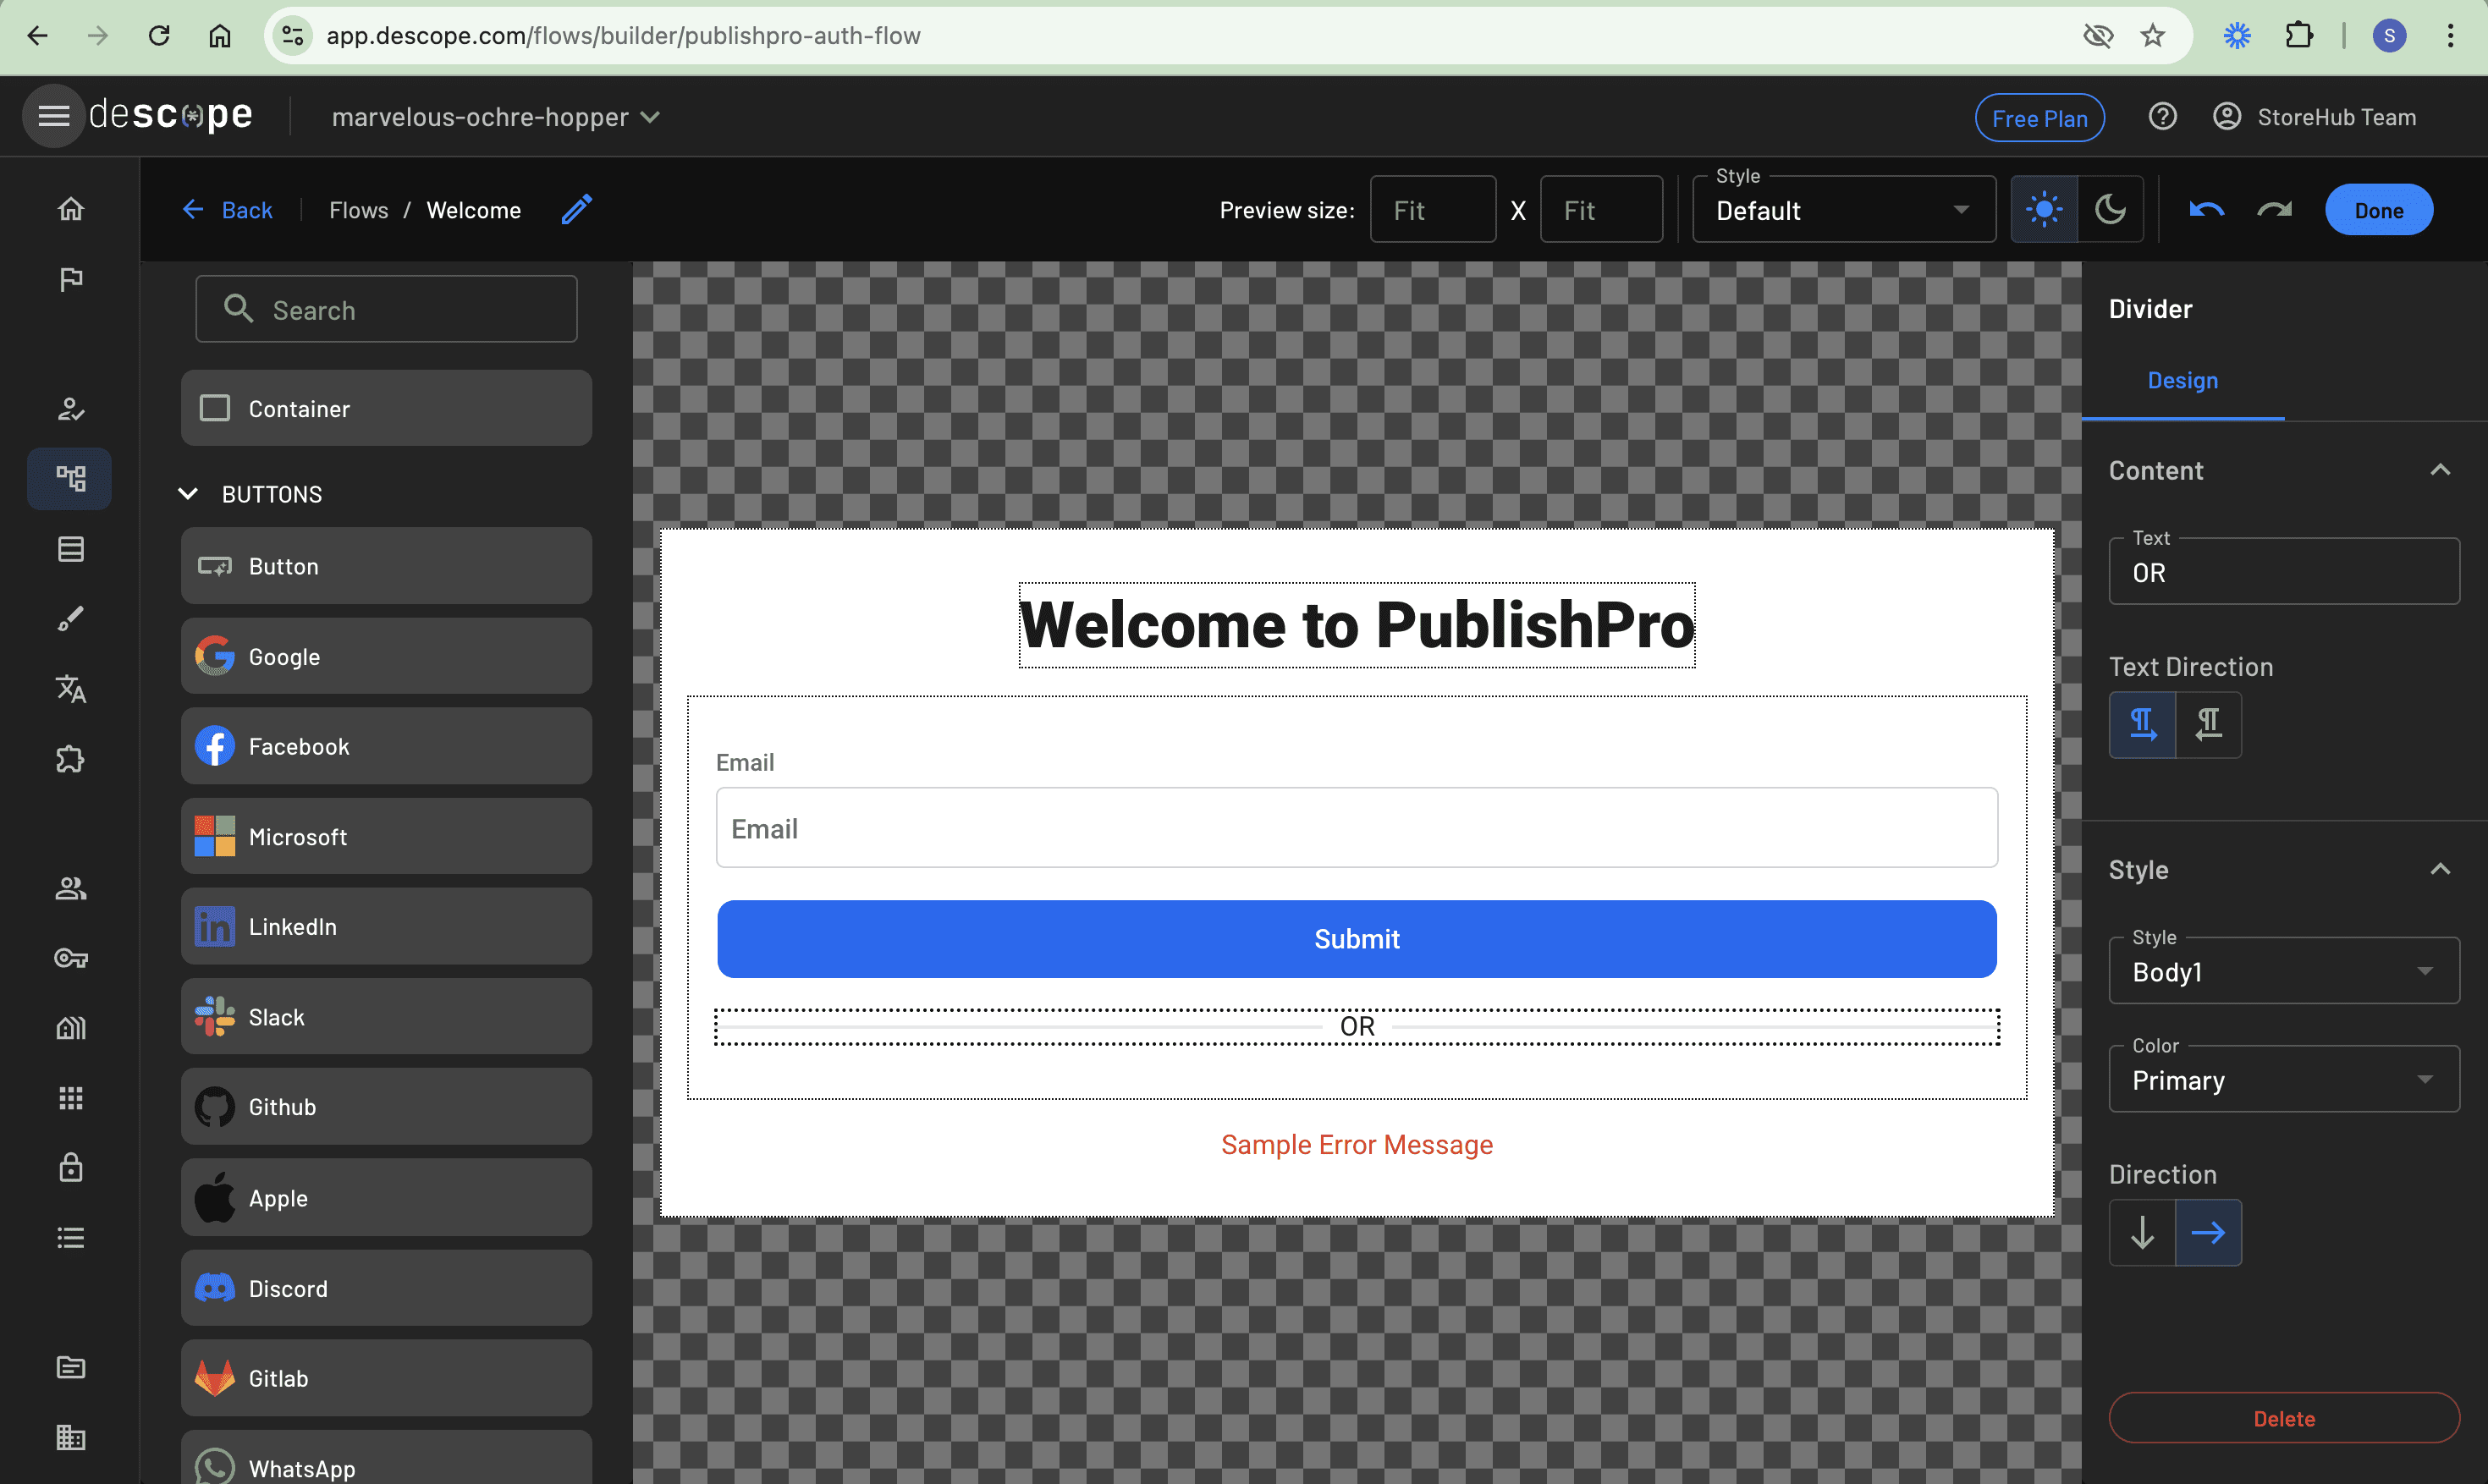
To clearly distinguish between the two authentication methods, add a divider element between the methods. On the left panel, scroll down to the TEXT section and drag and drop a Divider element below the Button element:
While still on the left panel, scroll to the BUTTONS section and add a Google button from the list of OAuth providers right under the divider. You can choose other OAuth providers from the existing list, but this example uses only Google:
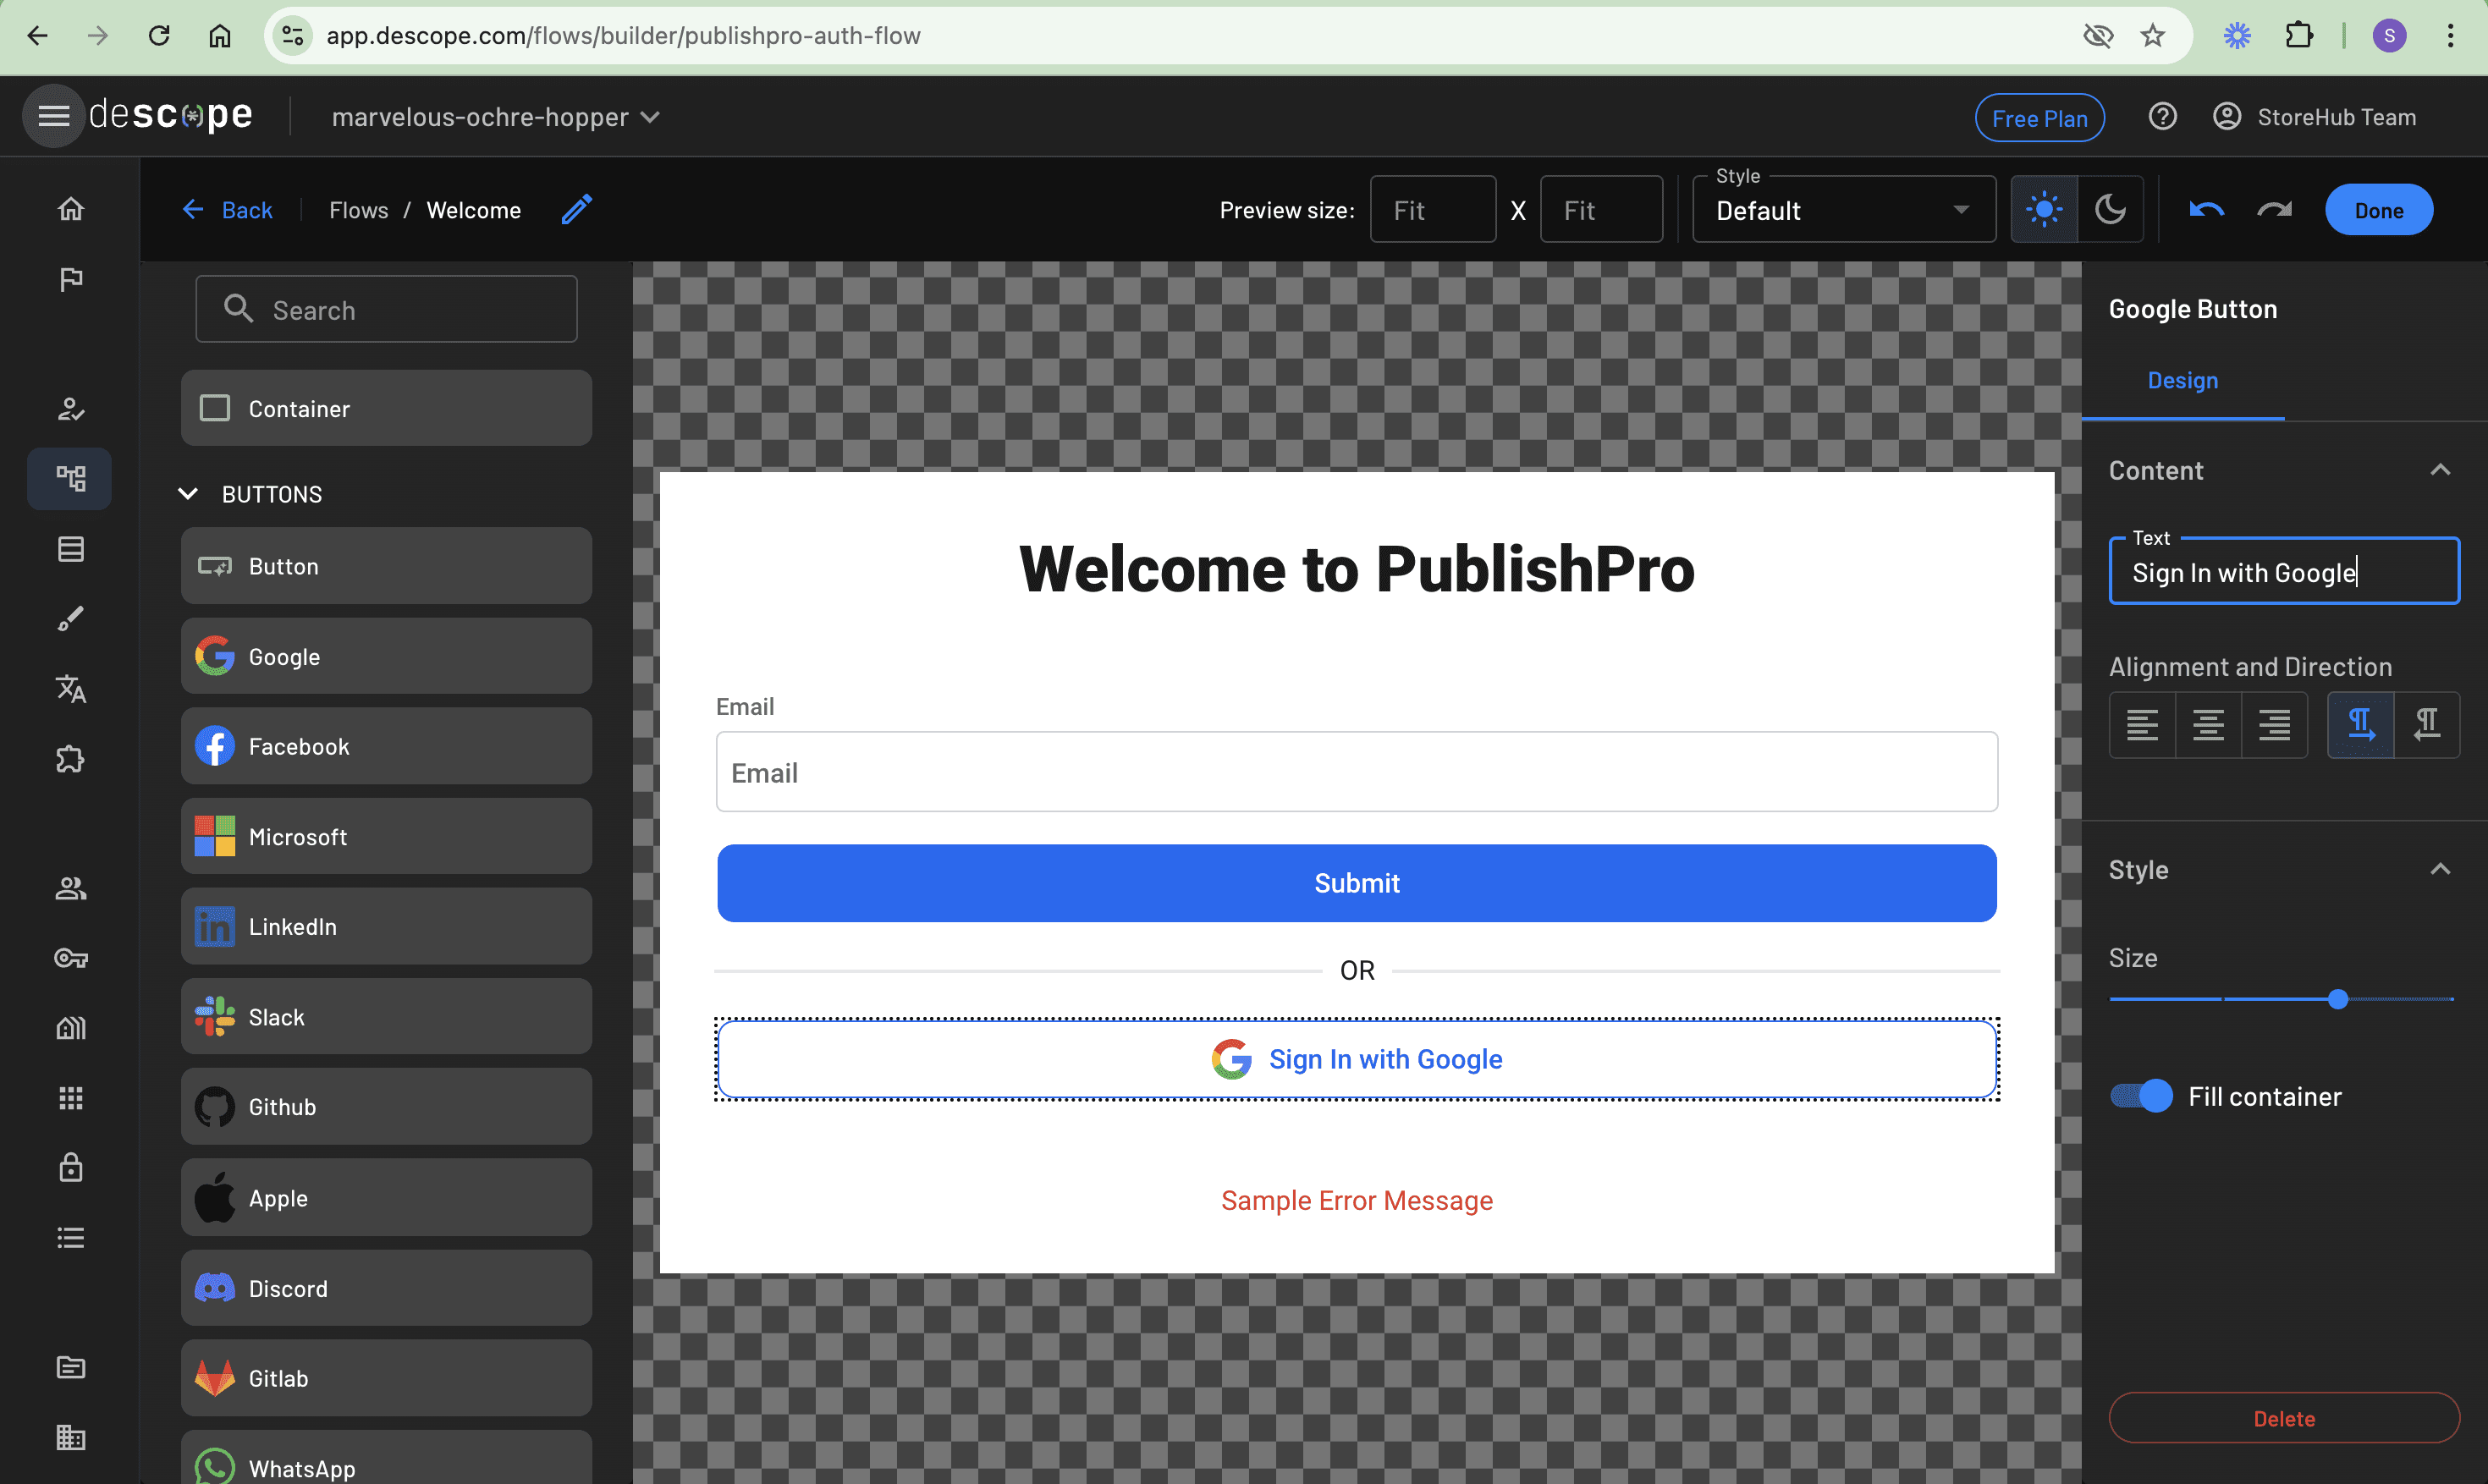
With that in place, you can click the Done button to return to the canvas. Here, you see the newly created screen, so connect it to the START of the flow, as follows:
Linking the submit and socials buttons
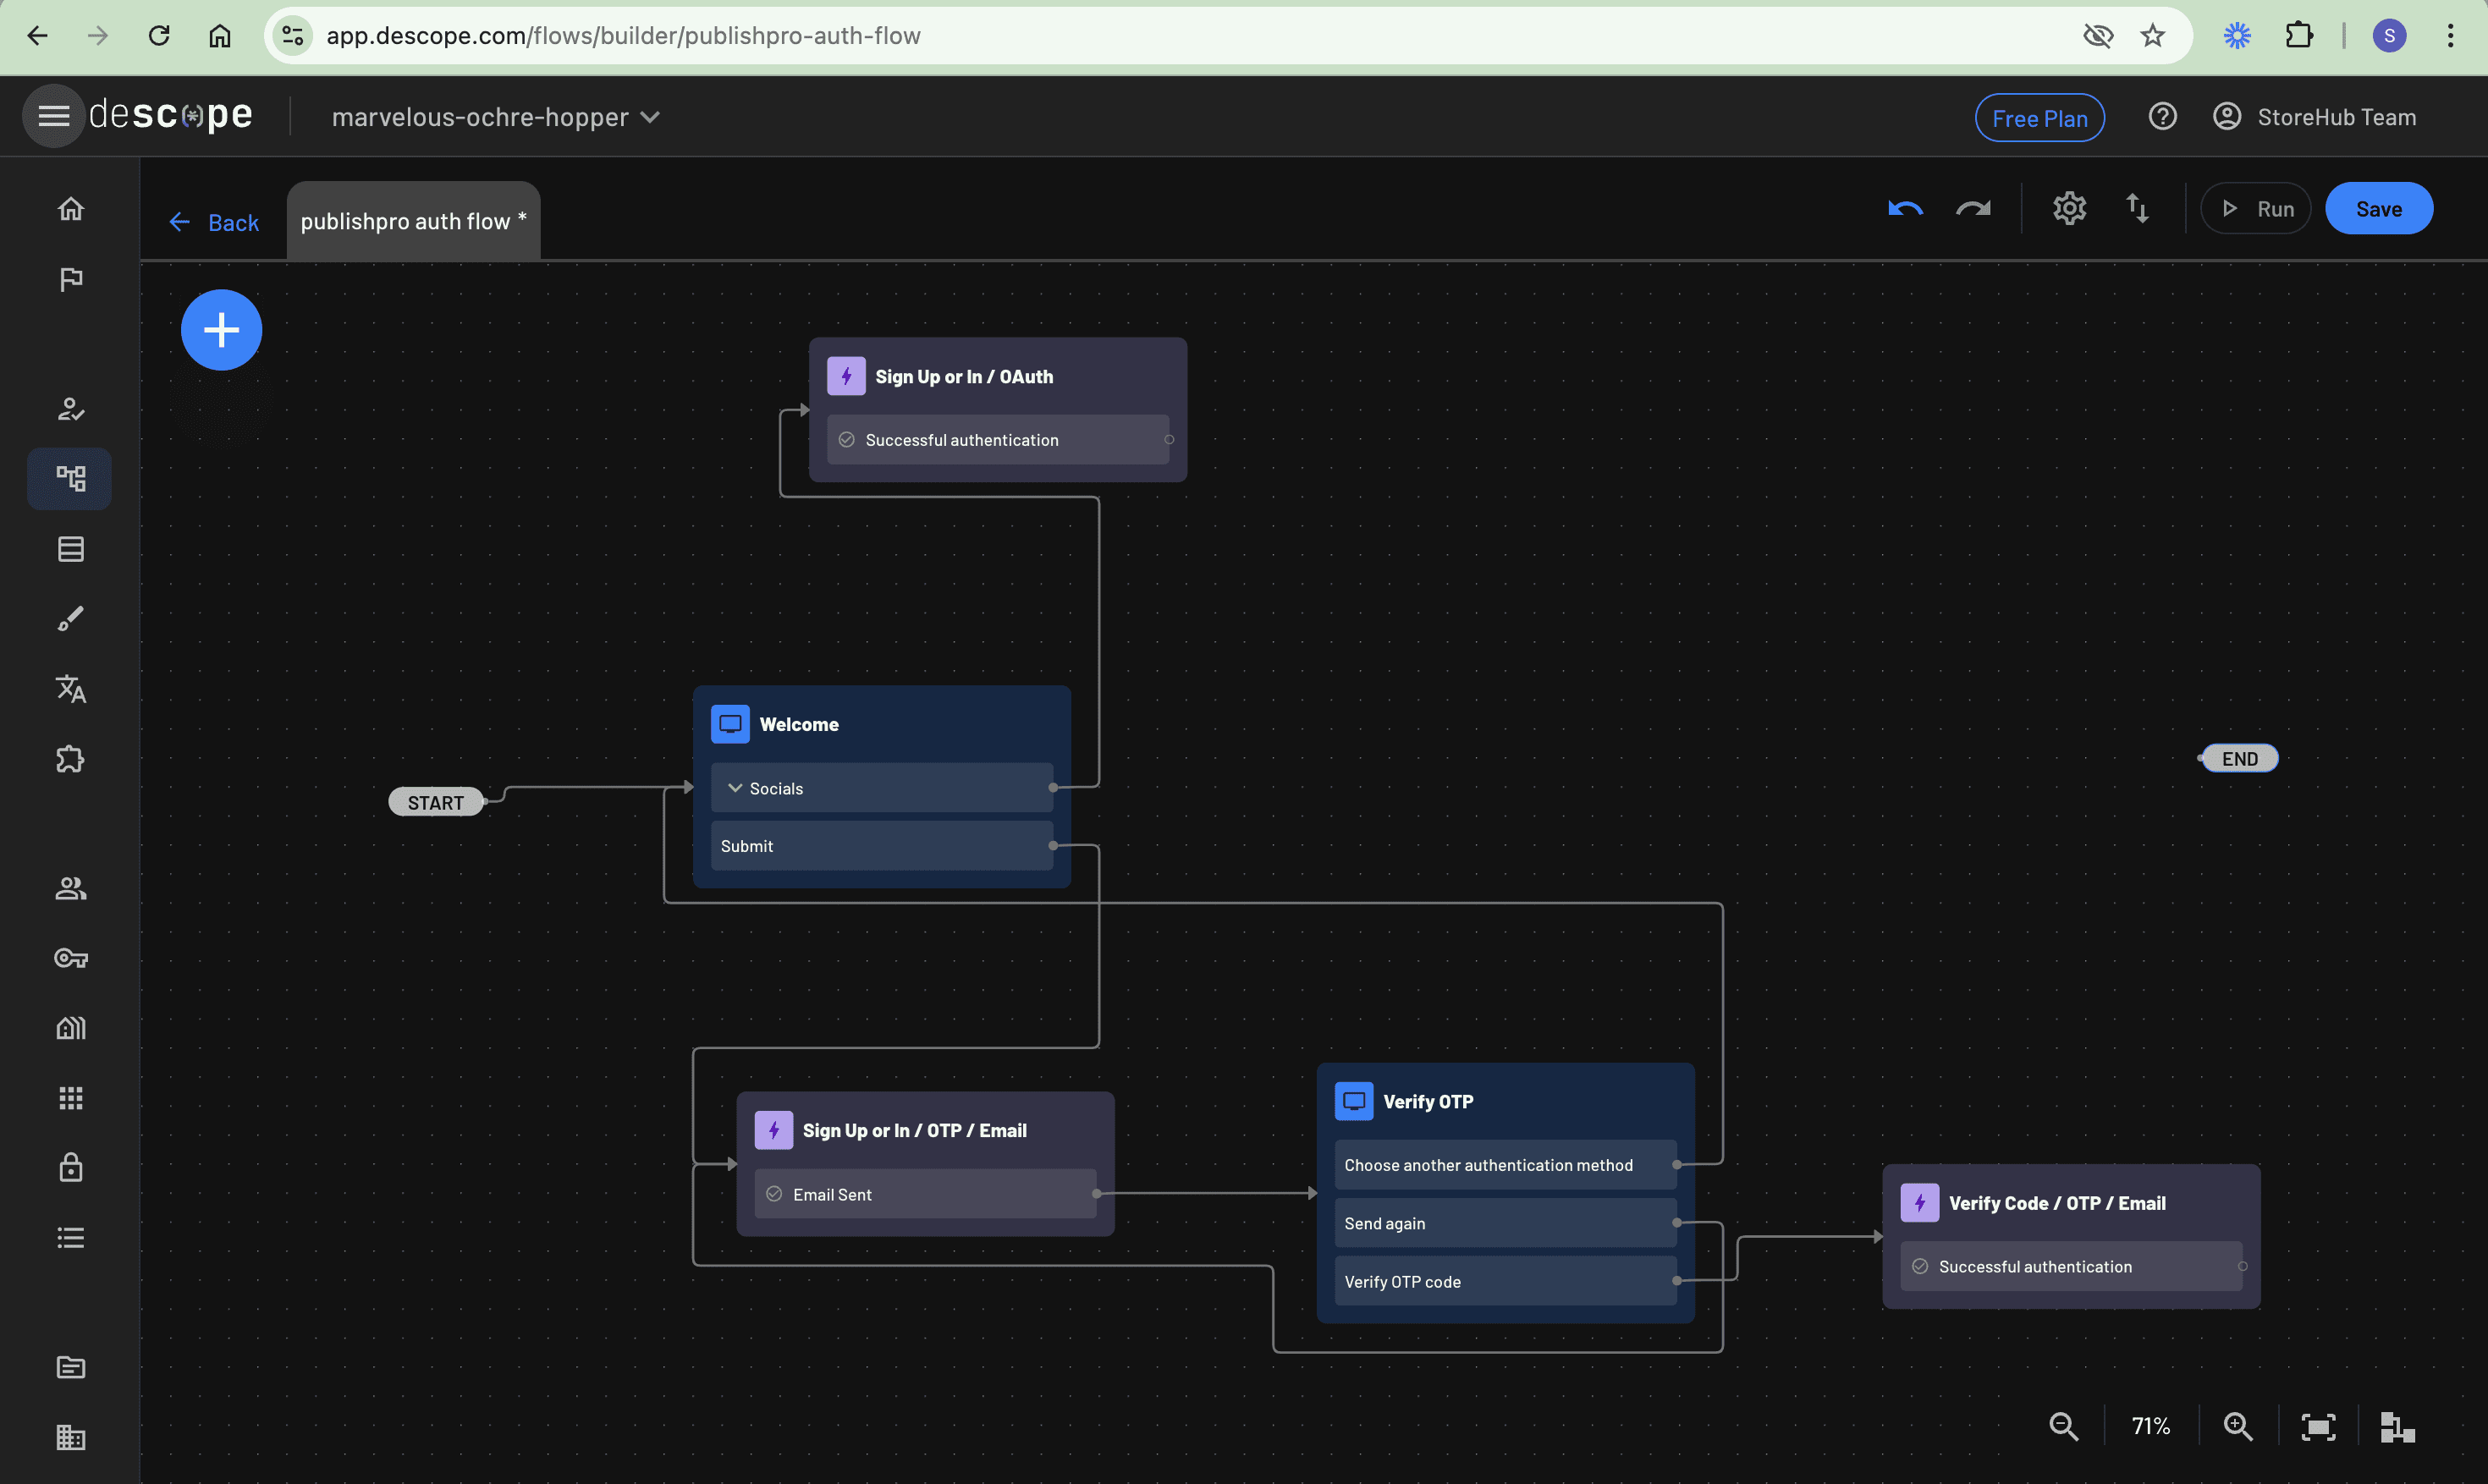
The next step is to link the Submit and Socials buttons on the newly created Sign Up or Sign In screen to their respective actions, ensuring they trigger the intended functionality when clicked. Click the + button and select Action. Then, search for and add both Sign Up or In / OTP / Email and Sign Up or In / OAuth actions to the canvas. Connect the Submit button to the Sign Up or In / OTP / Email action to handle email authentication and connect the Socials button to the Sign Up or In / OAuth action to handle social login:
These custom actions contain both actions and screens that handle the common flows inherent in OTP and OAuth authentication methods.
Handling new and existing users
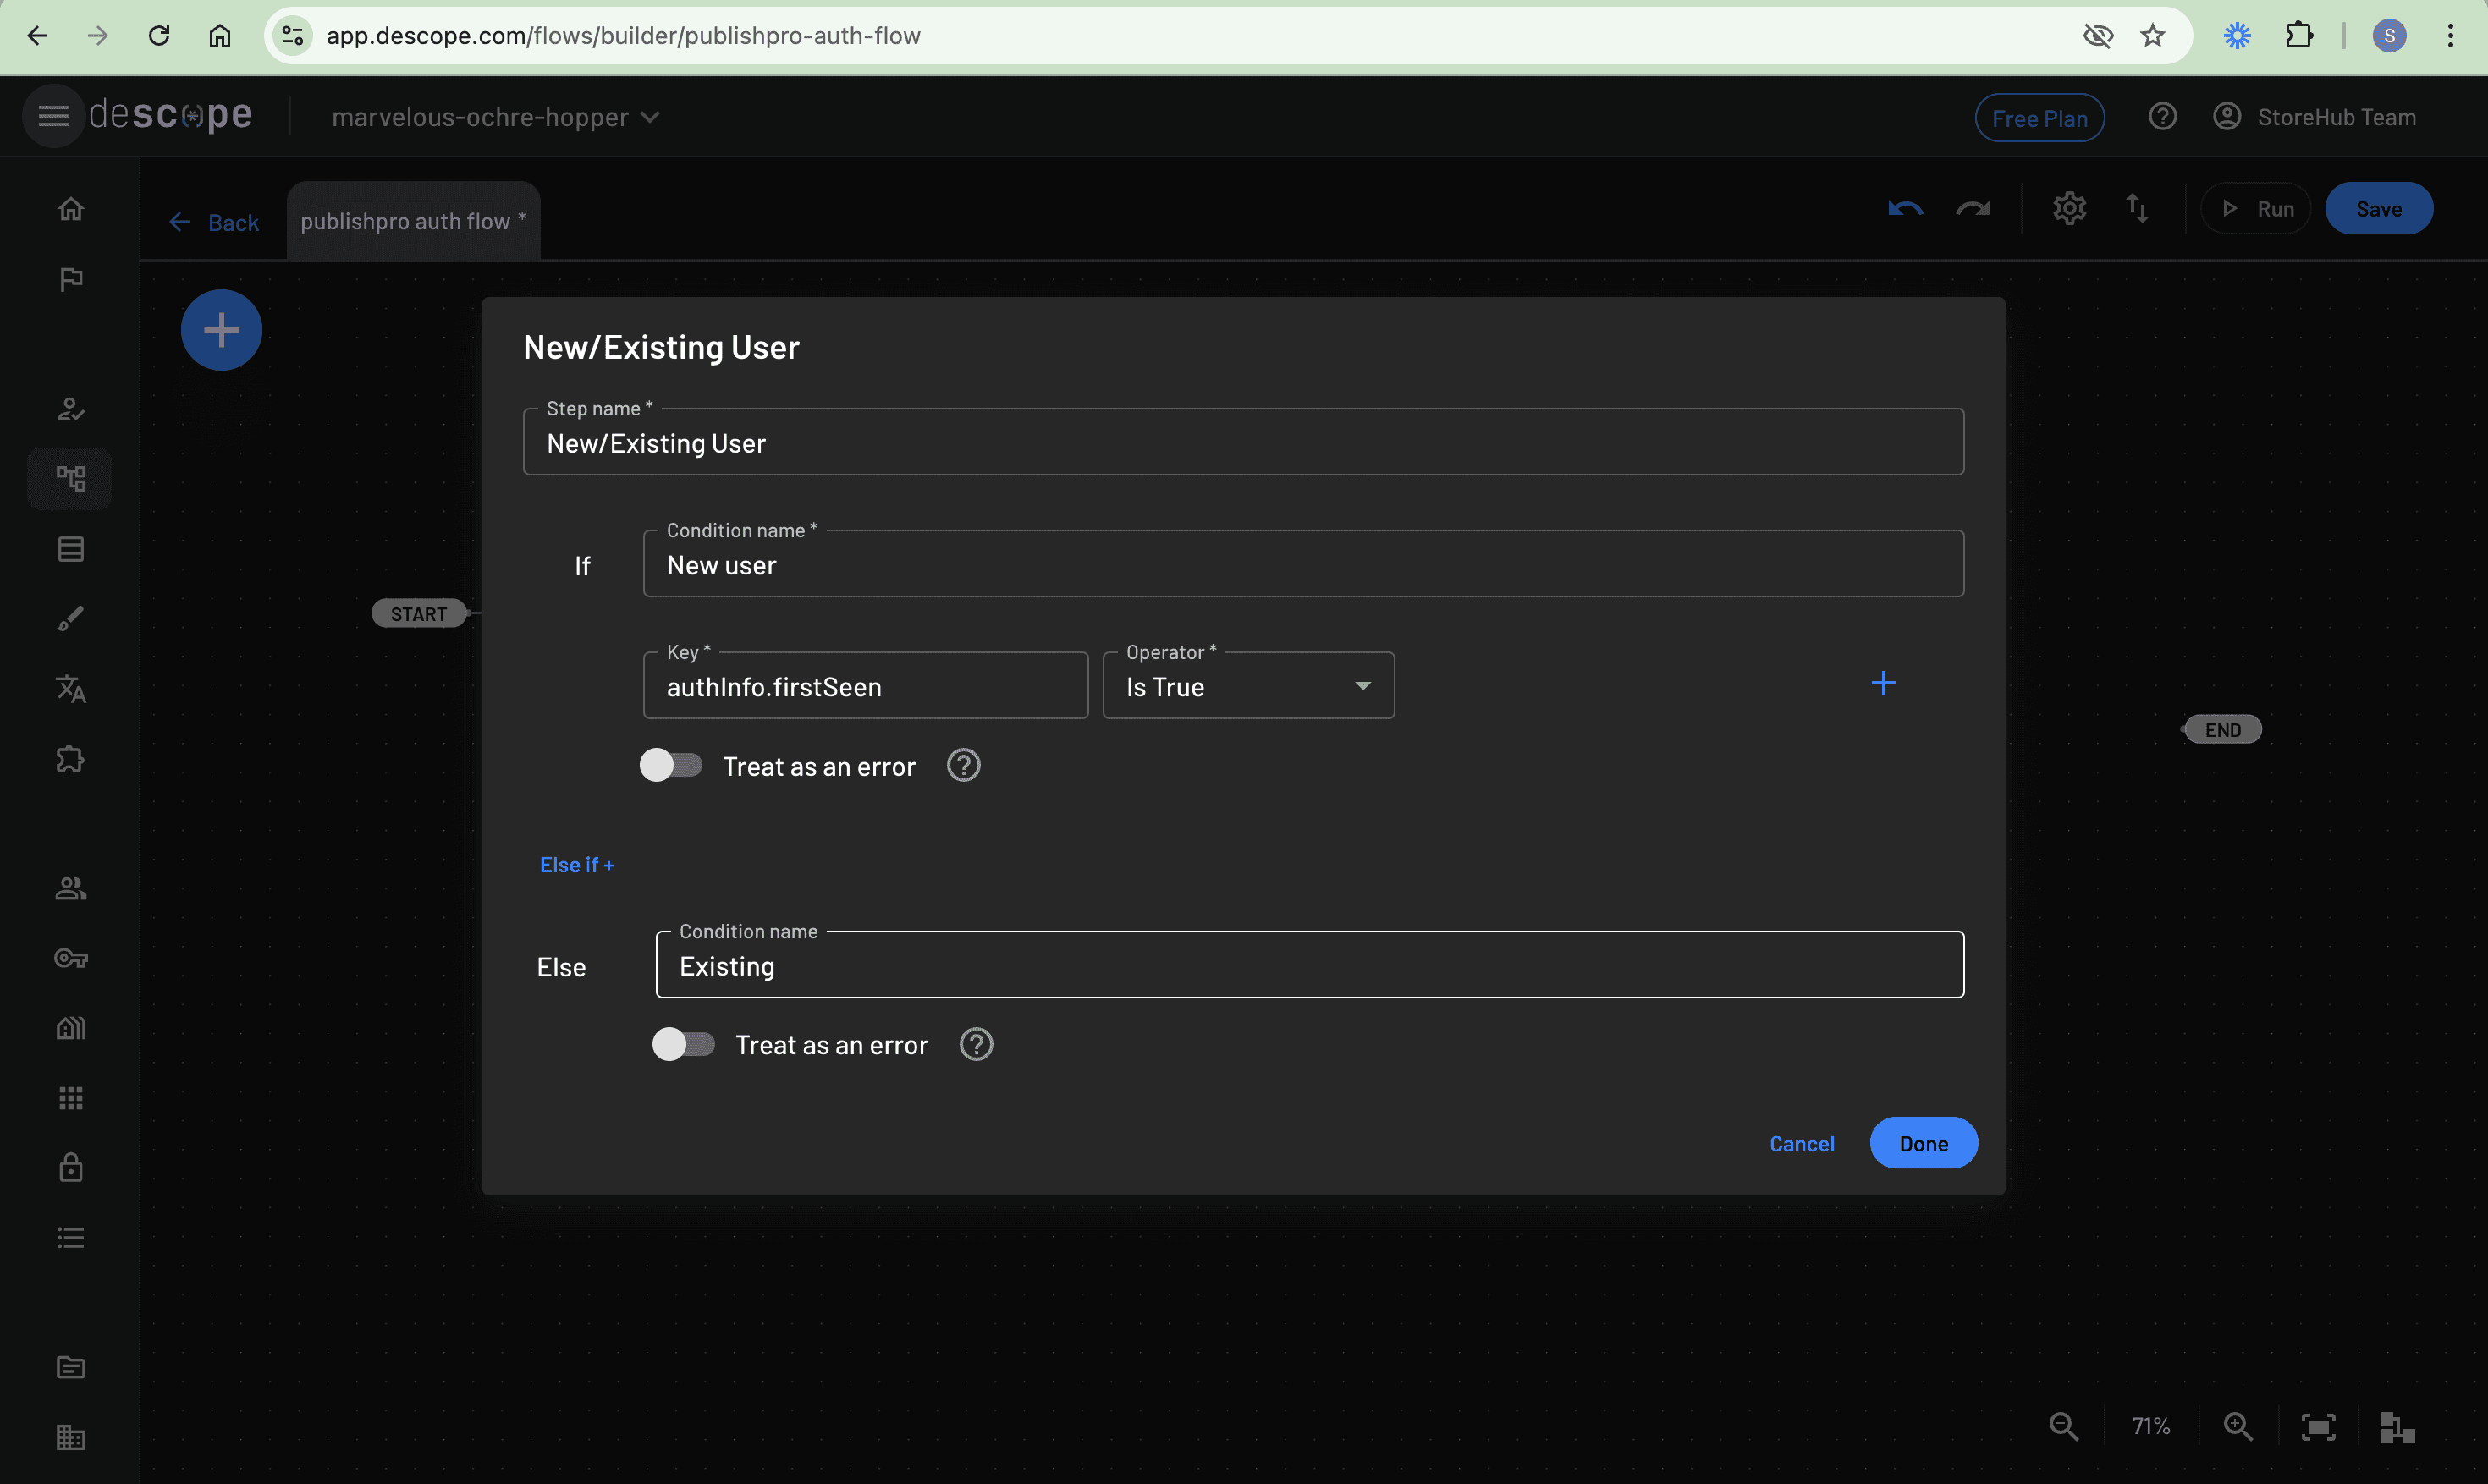
You also need to differentiate between new and existing users to customize their authentication experience. This can be done using the Condition option. Click the + button and select Condition to open a dialog for configuring an If-Else check. Set the step name to New/Existing User. In the If block, name it “New user” and use the authInfo.firstSeen key with the Is True operator to identify first-time logins. For the Else block, simply name it “Existing” since it automatically handles returning users. Save the condition to complete the setup:
Connect both Verify Code / OTP / Email and Sign Up or In / OAuth actions to the newly created condition so it performs the check every time a user logs in:
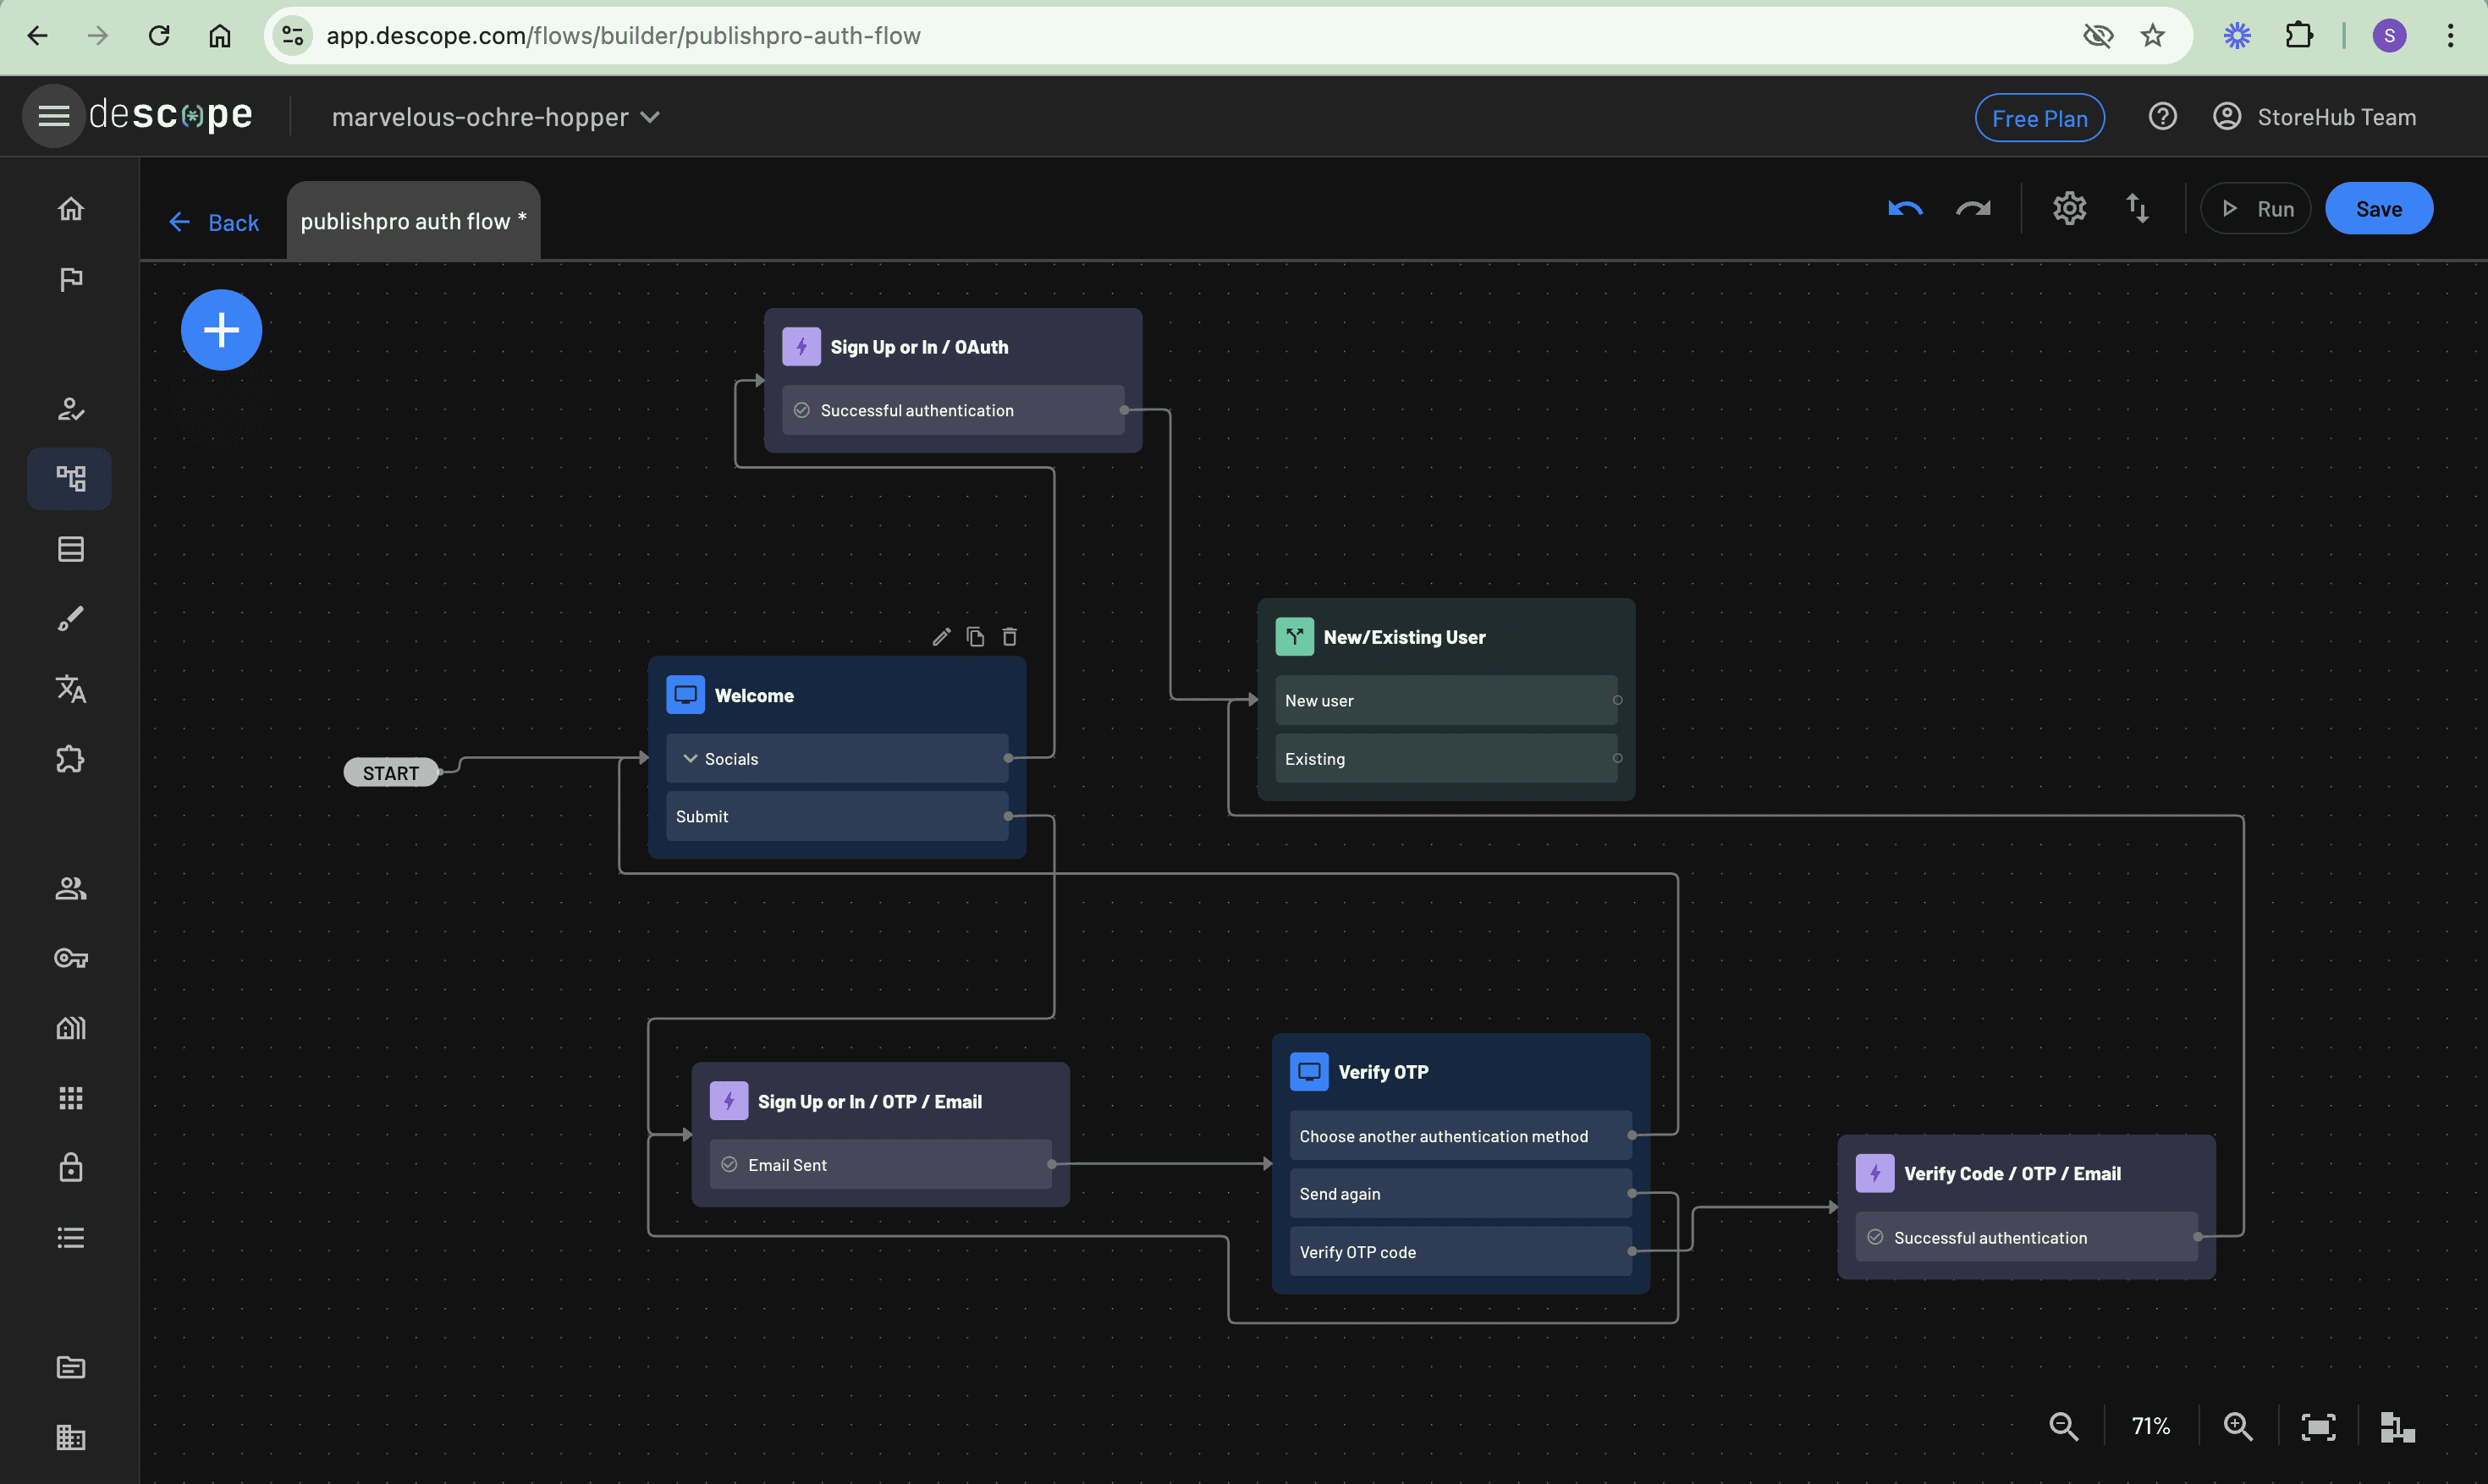
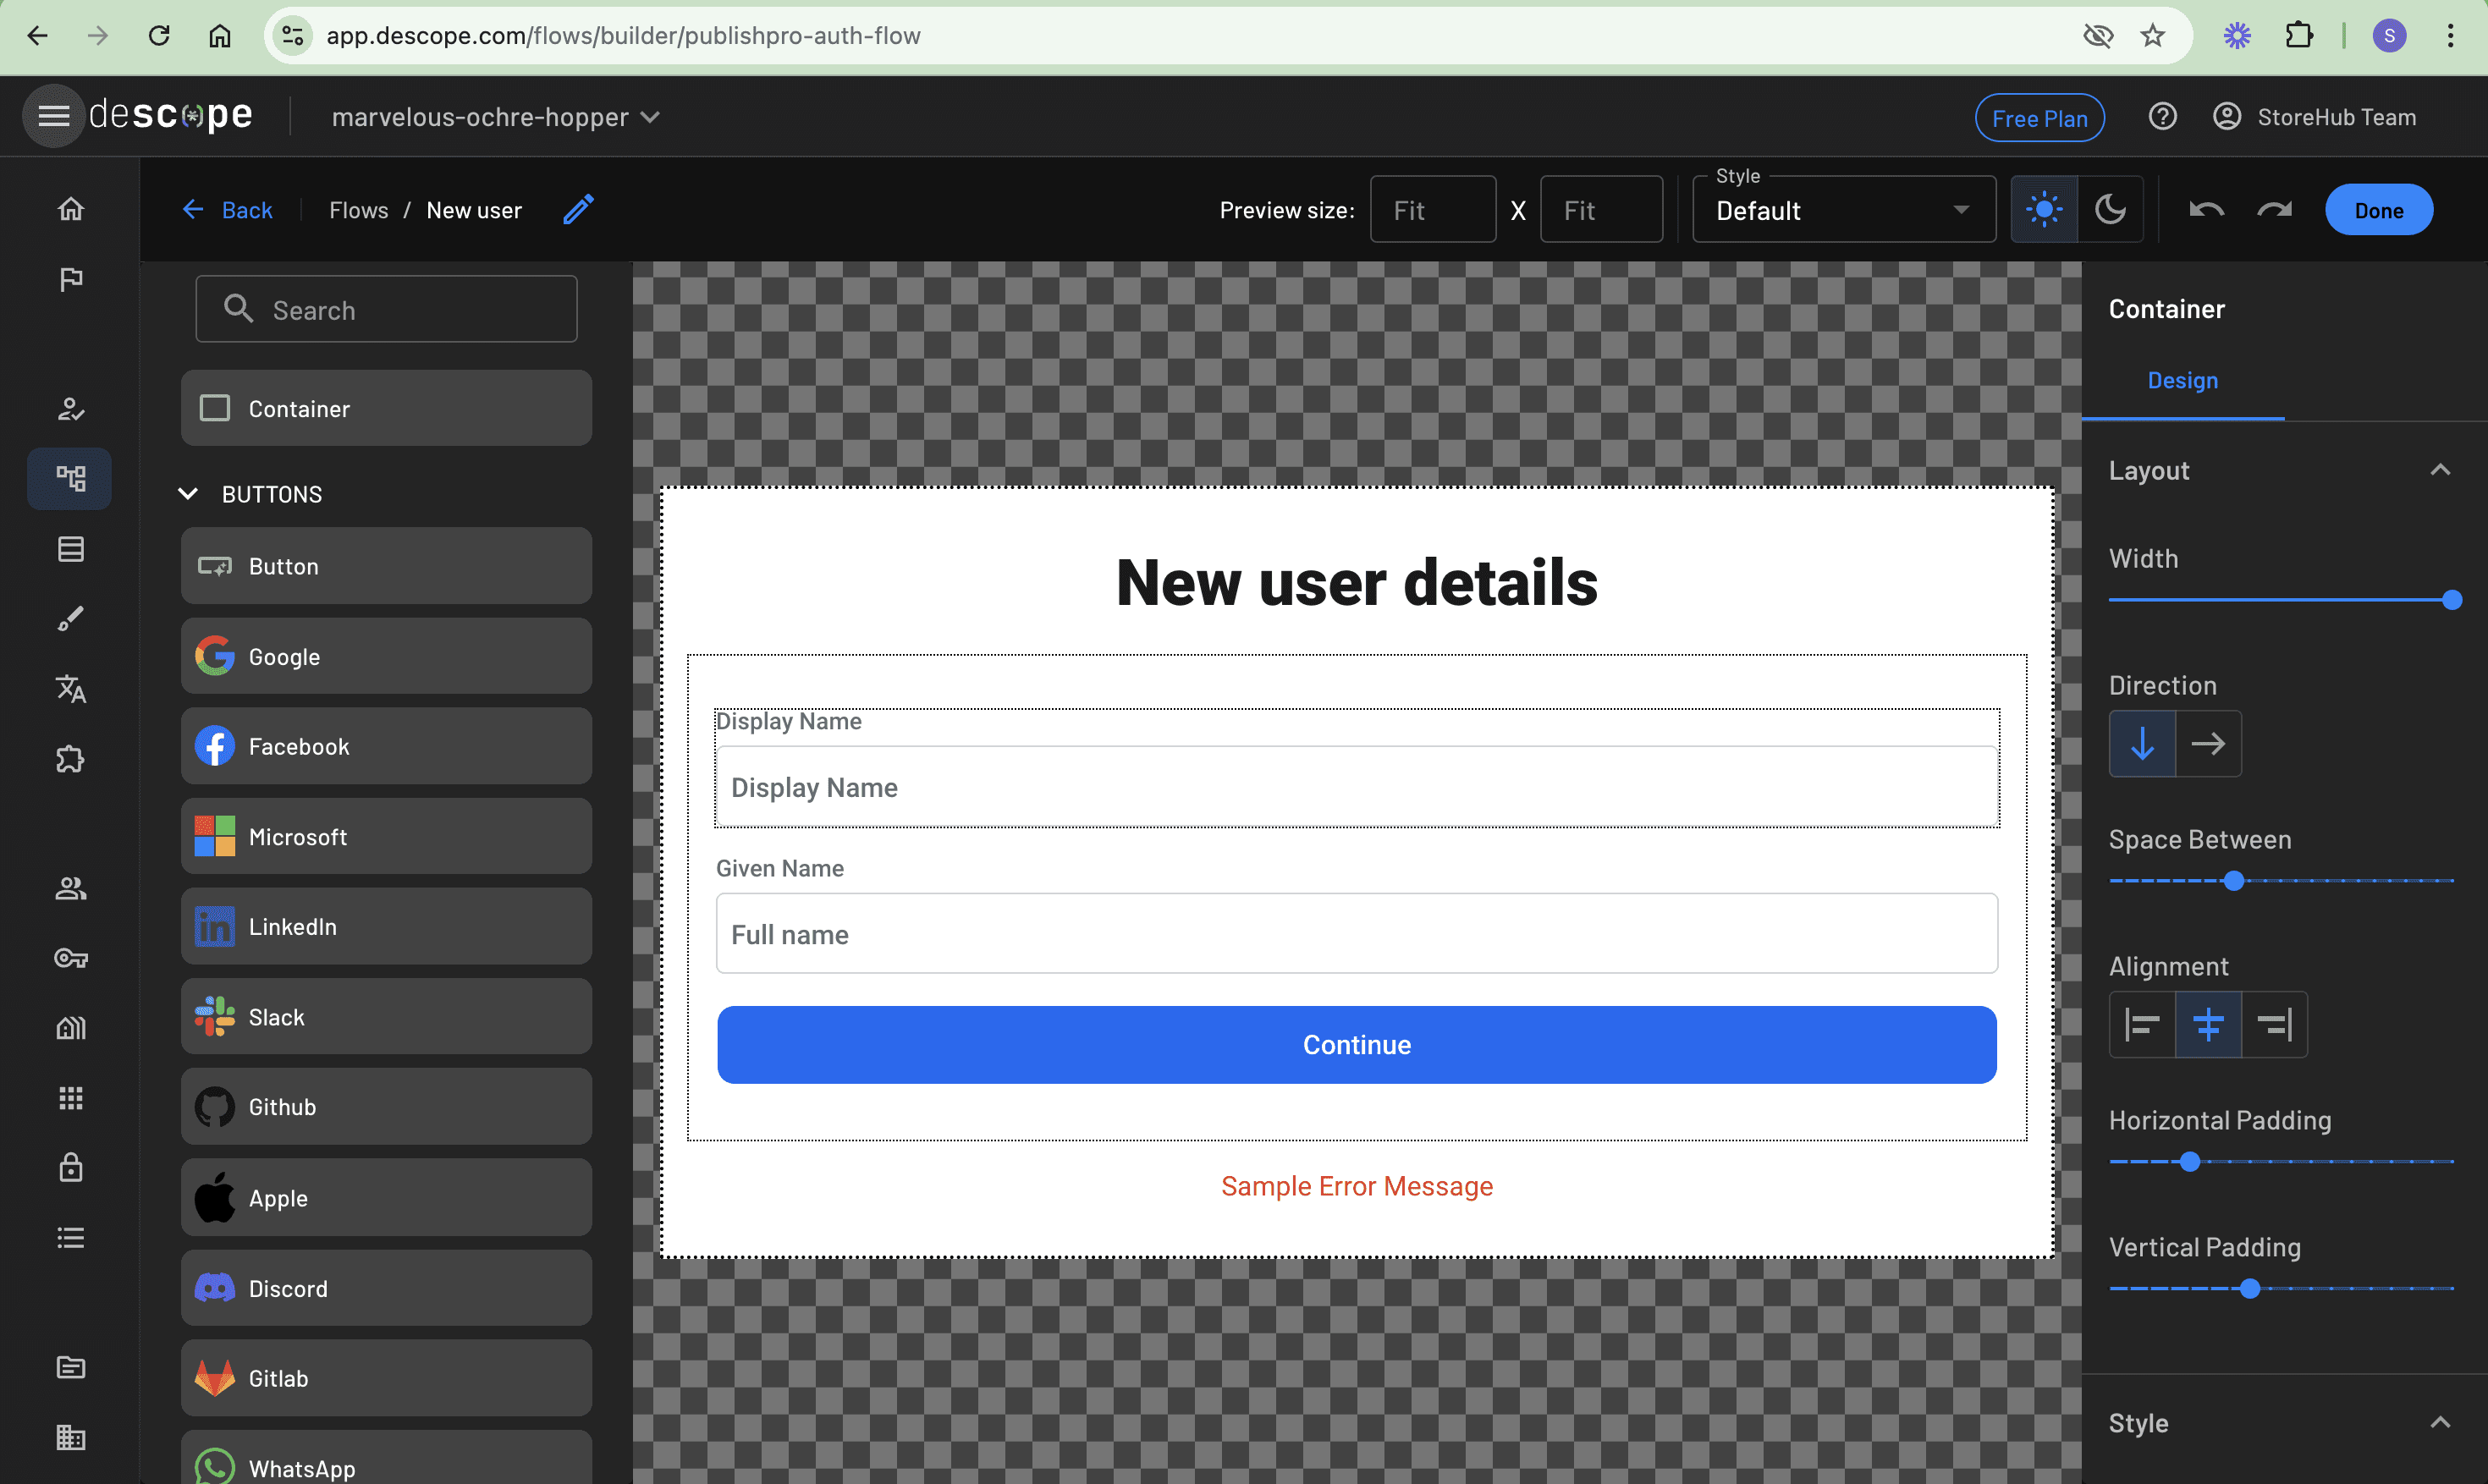
Next, a new screen, New user, needs to be added so that new users can provide their username and full name. To do this, create a new screen and add a Container element to the screen. Then inside the container, drag and drop the Display Name and Given Name inputs from the INPUTS section on the left panel. Also, add a button and change its text value to Continue. Remember to remove the screen body text element and save the new screen:
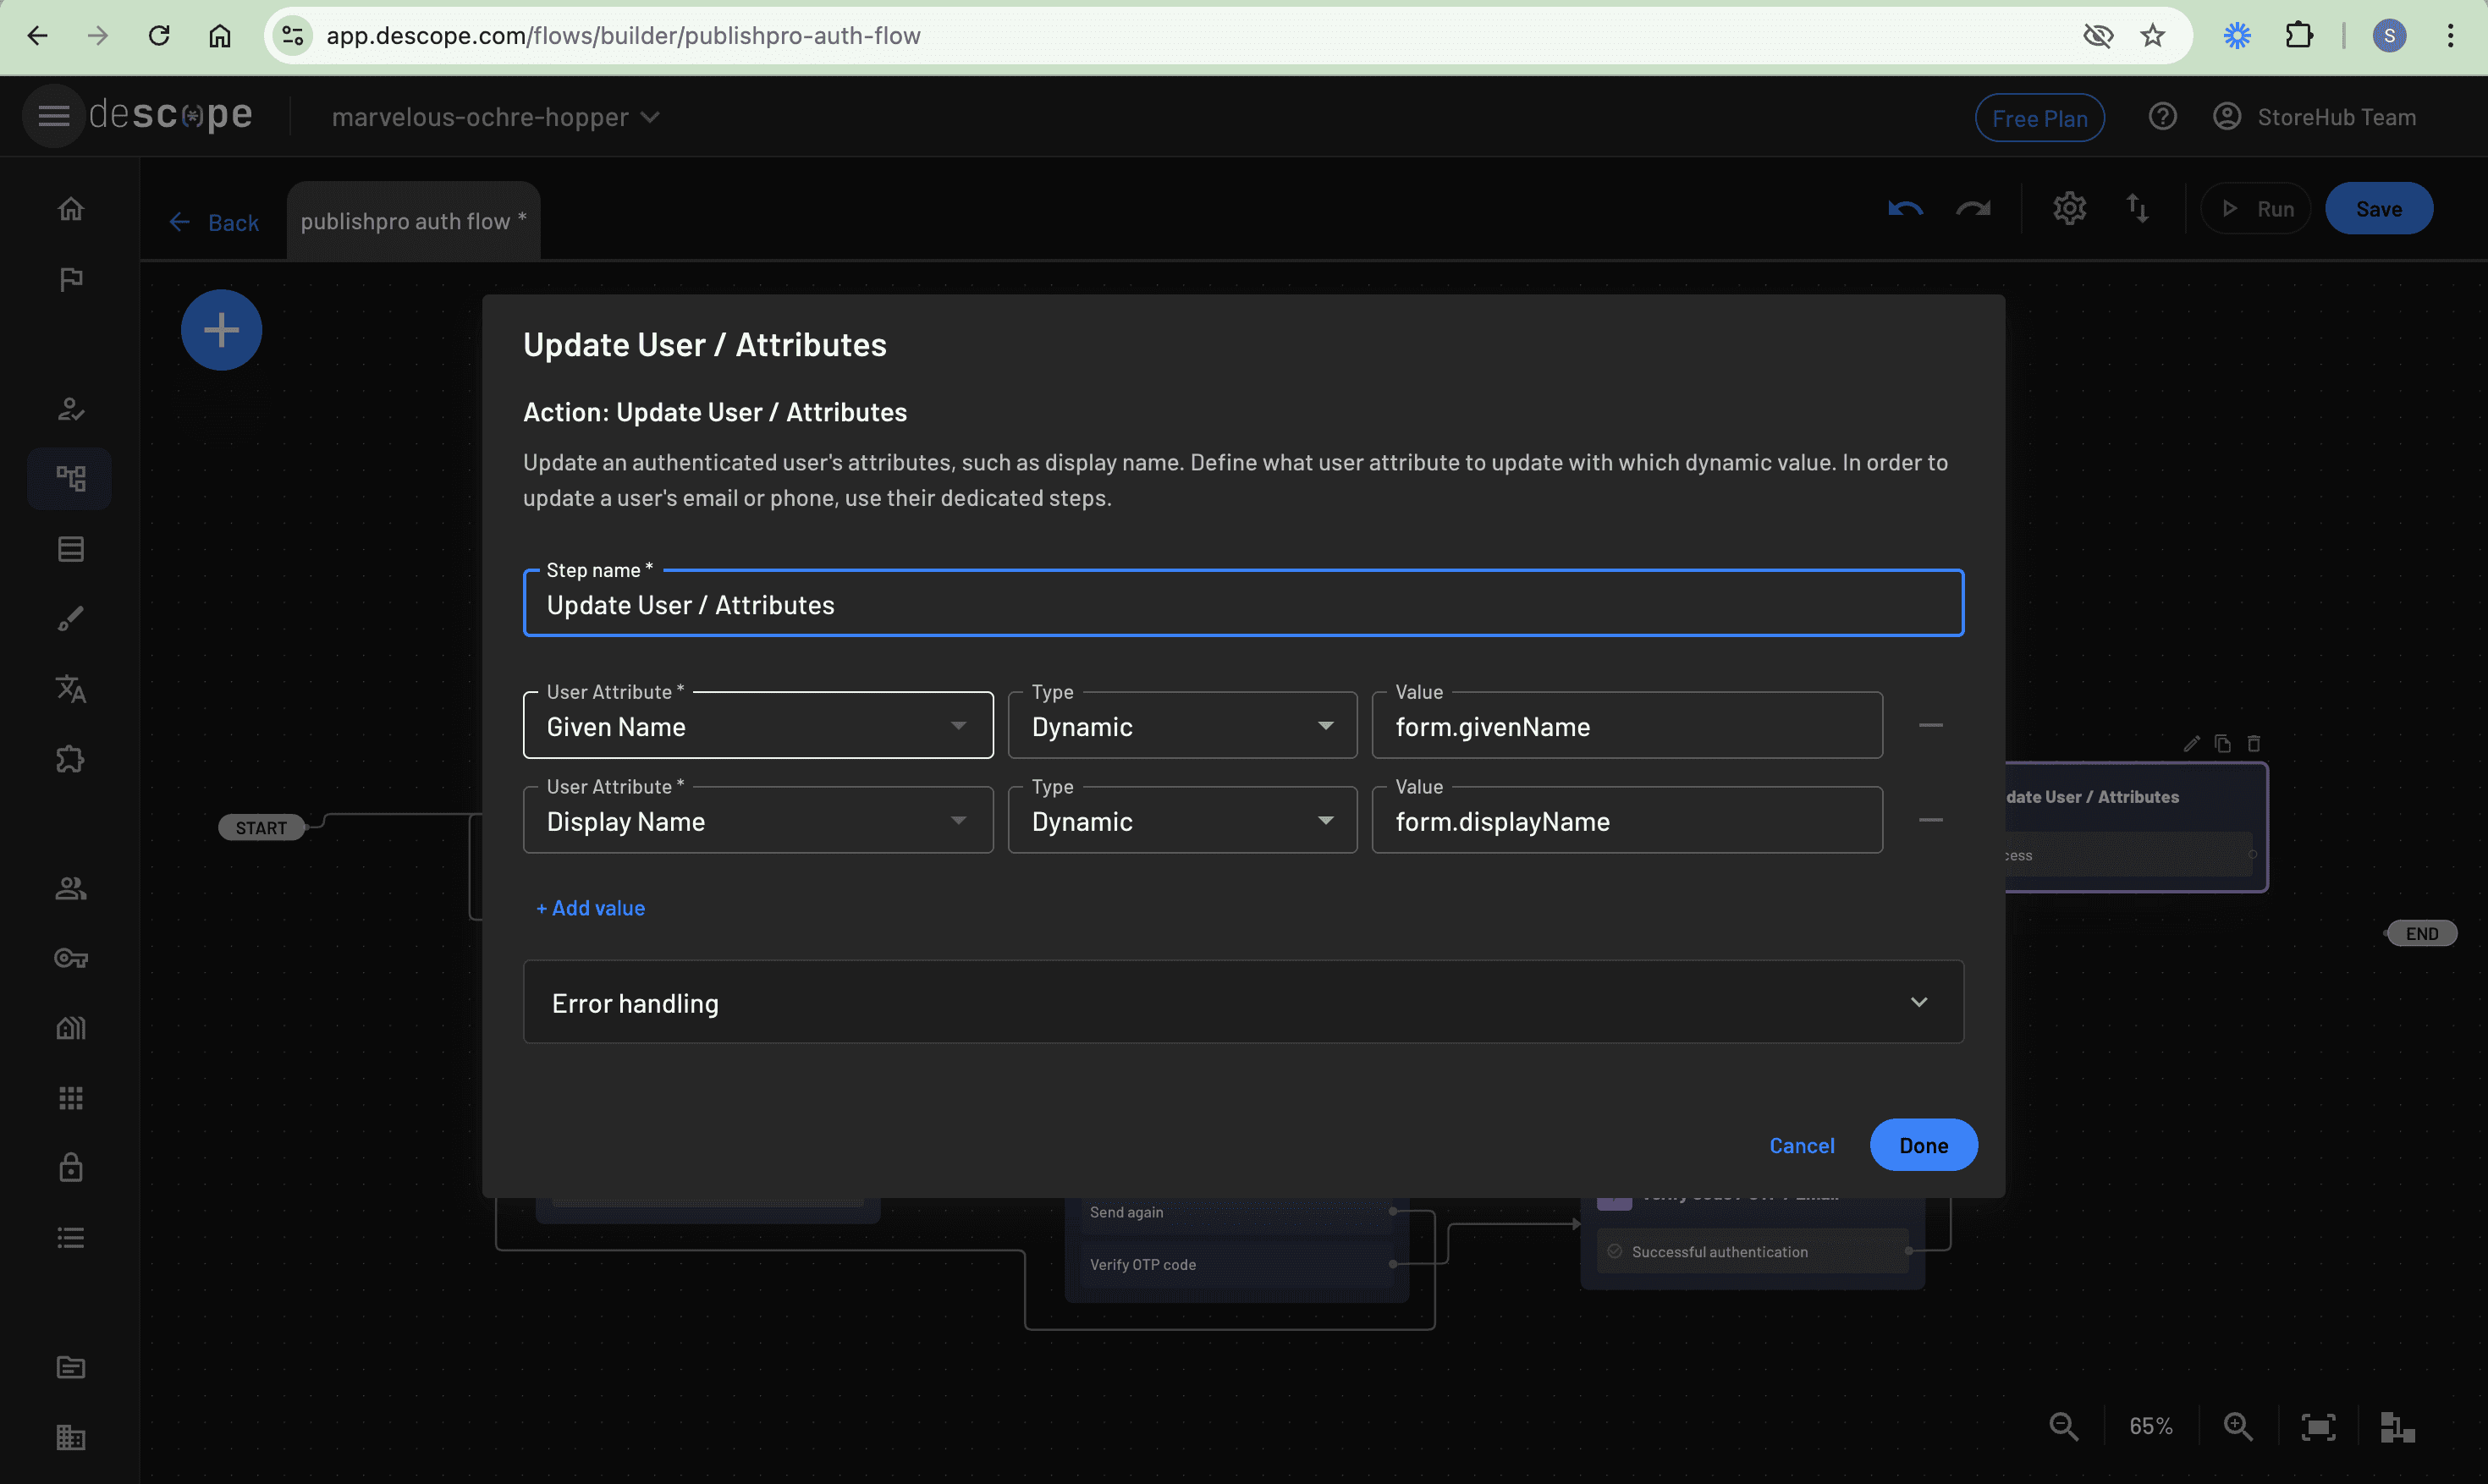
After creating the screen, you need to add an action to update the user’s profile. Click the + button, select Action, and in the Actions dialog that appears, search for and select Update User / Attributes. Edit the action to map the input fields from the New user screen (form.displayName for Display Name and form.givenName for Given Name) to their corresponding user attributes, ensuring new users’ profile information is properly stored:
Completing the flow
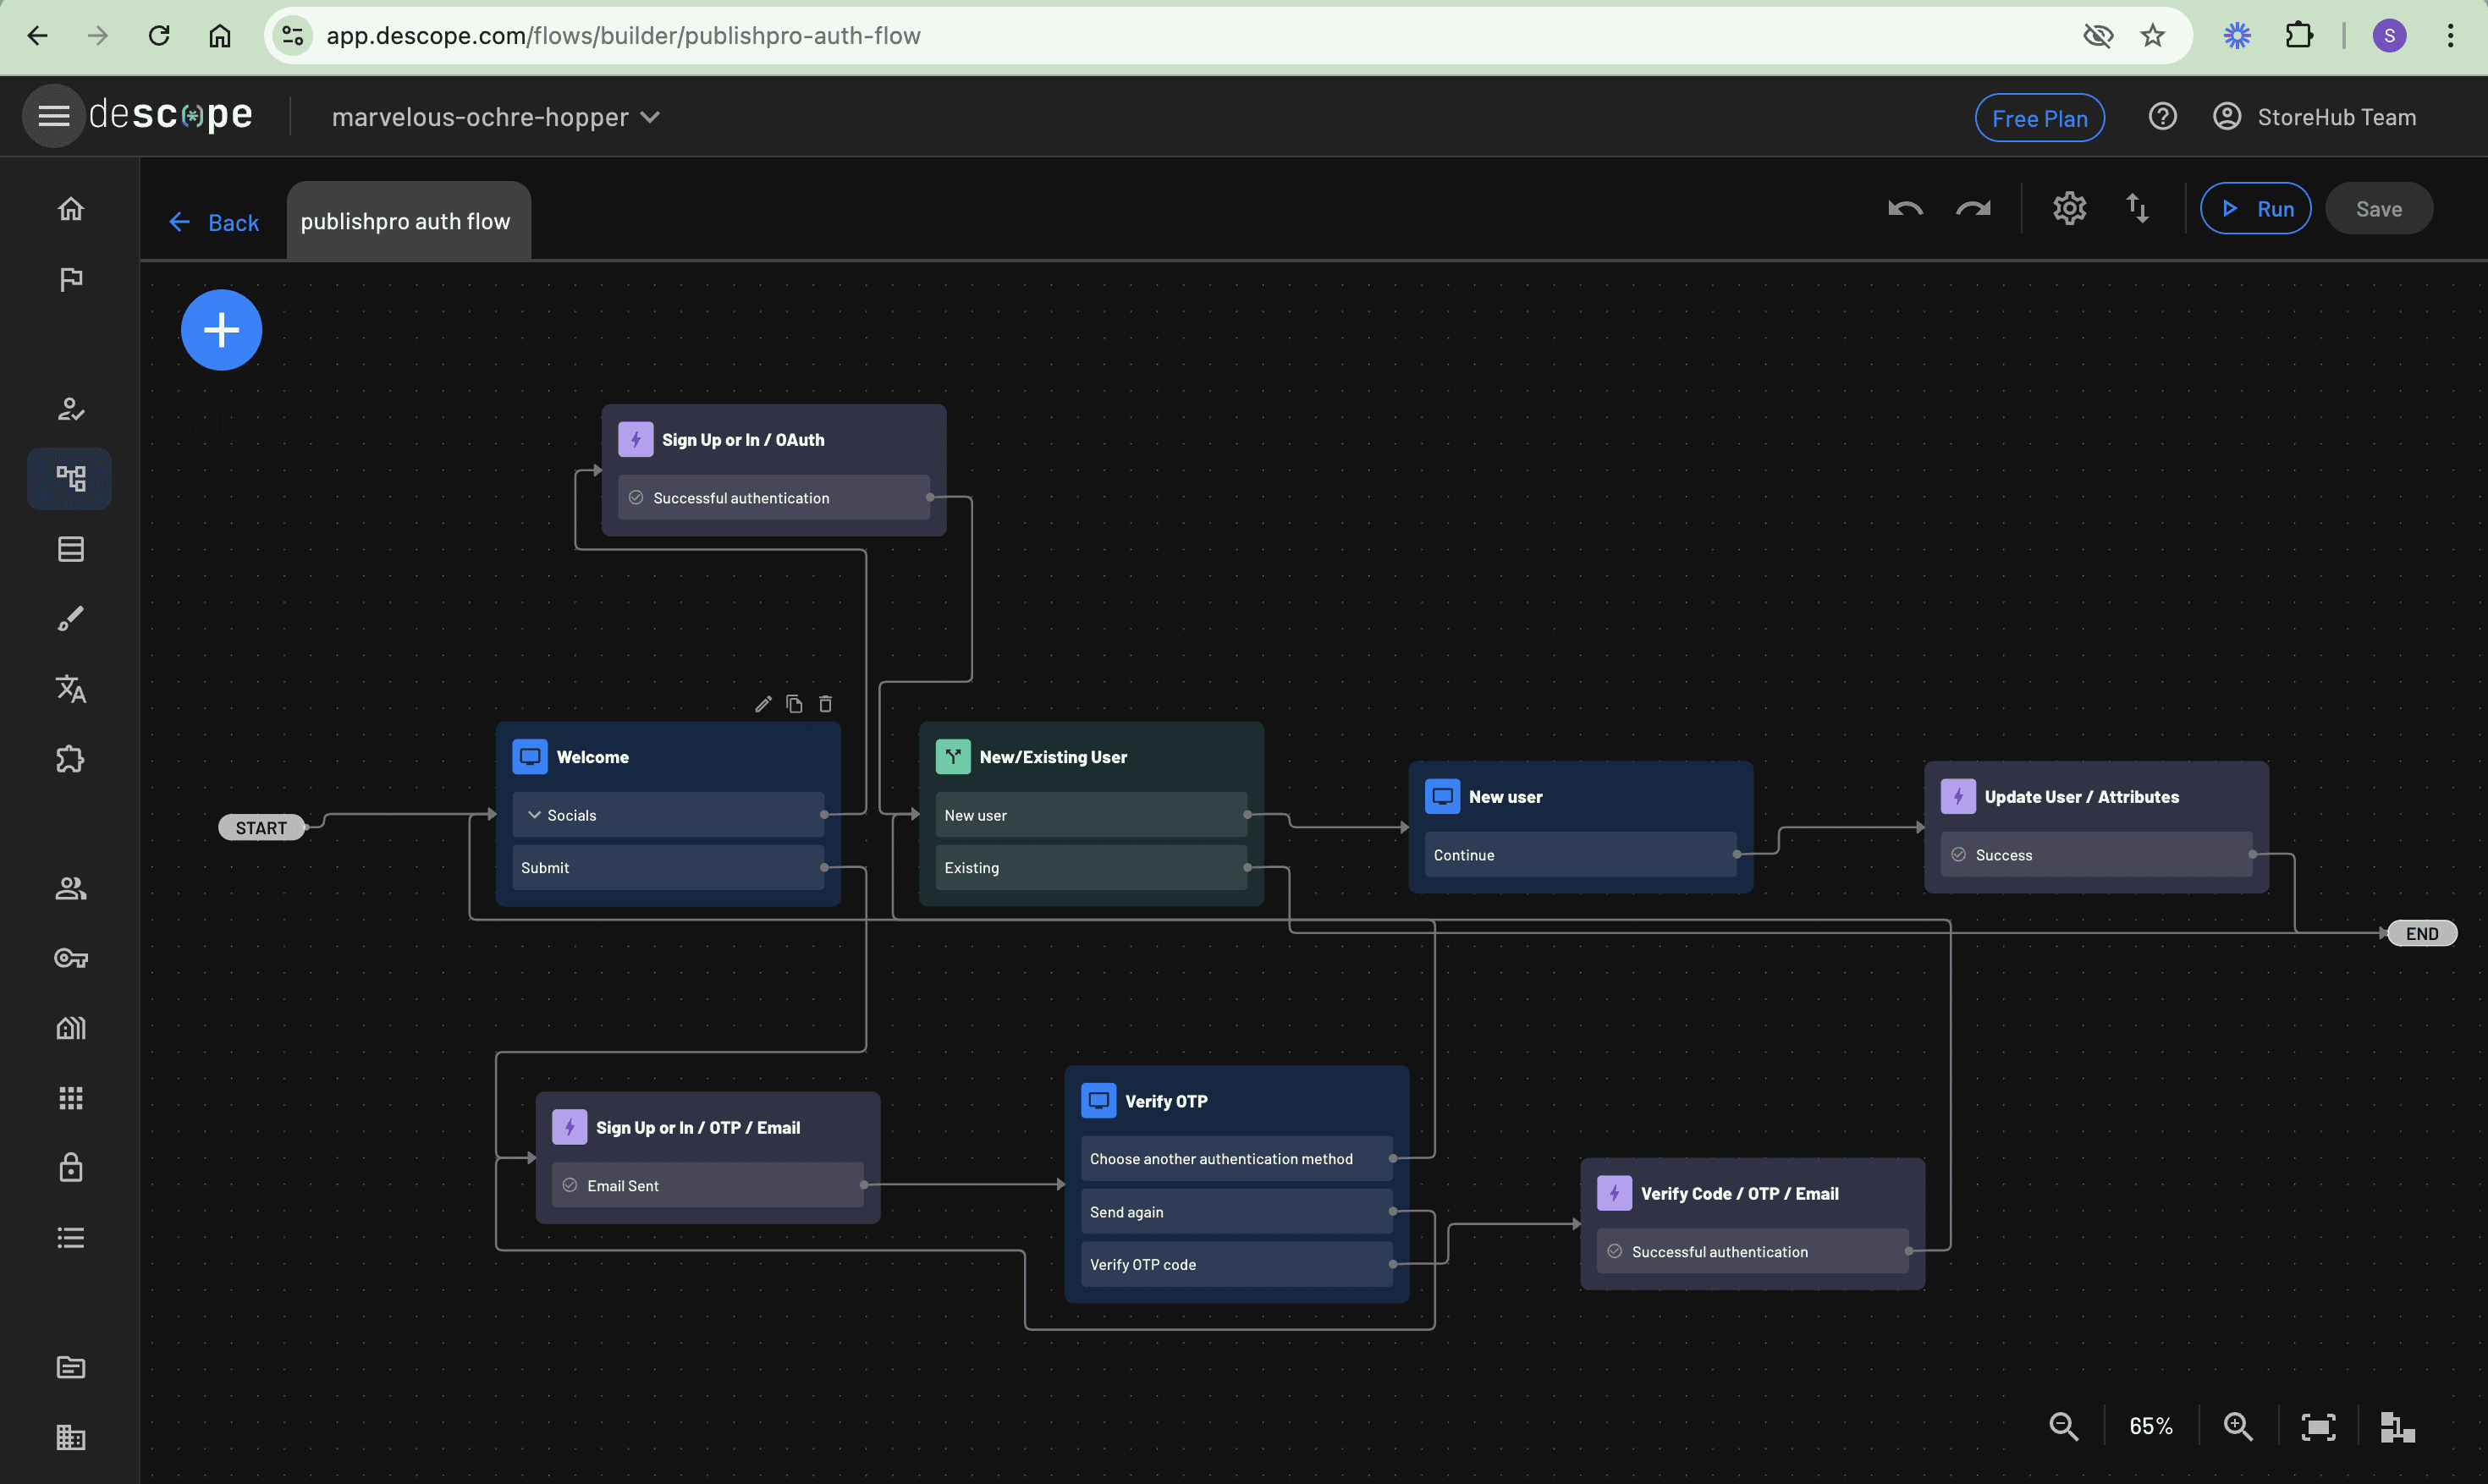
With the user detail collection screen and the update actions in place, you need to complete the flow by connecting these last two components. Start by connecting the New user screen’s Submit button to the Update User / Attributes action, which ensures that when new users submit their details, the information gets properly stored in their user profile. The flow then needs two distinct paths to completion. The first path connects the Update User / Attributes action to the END node, handling new users who have just provided their additional information. The second path connects the Existing branch from the New/Existing user condition directly to the END of the flow, creating a streamlined experience for returning users who don’t need to provide additional details.
These connections work together to create two separate journeys through the authentication flow—one that collects necessary information from first-time users and another that provides a faster route for those returning to your application.
Here is the final version of the flow you just created:
Save the flow and click the Run button to test run the flow directly on the Descope Console:

Understanding the PublishPro application
The starter application is a CMS that currently lacks any authentication or access control.
Here is the Webflow app. Currently, anyone, without signing in, can access the dashboard, see all articles in the system, and access creation, editing, deletion, and publishing features:
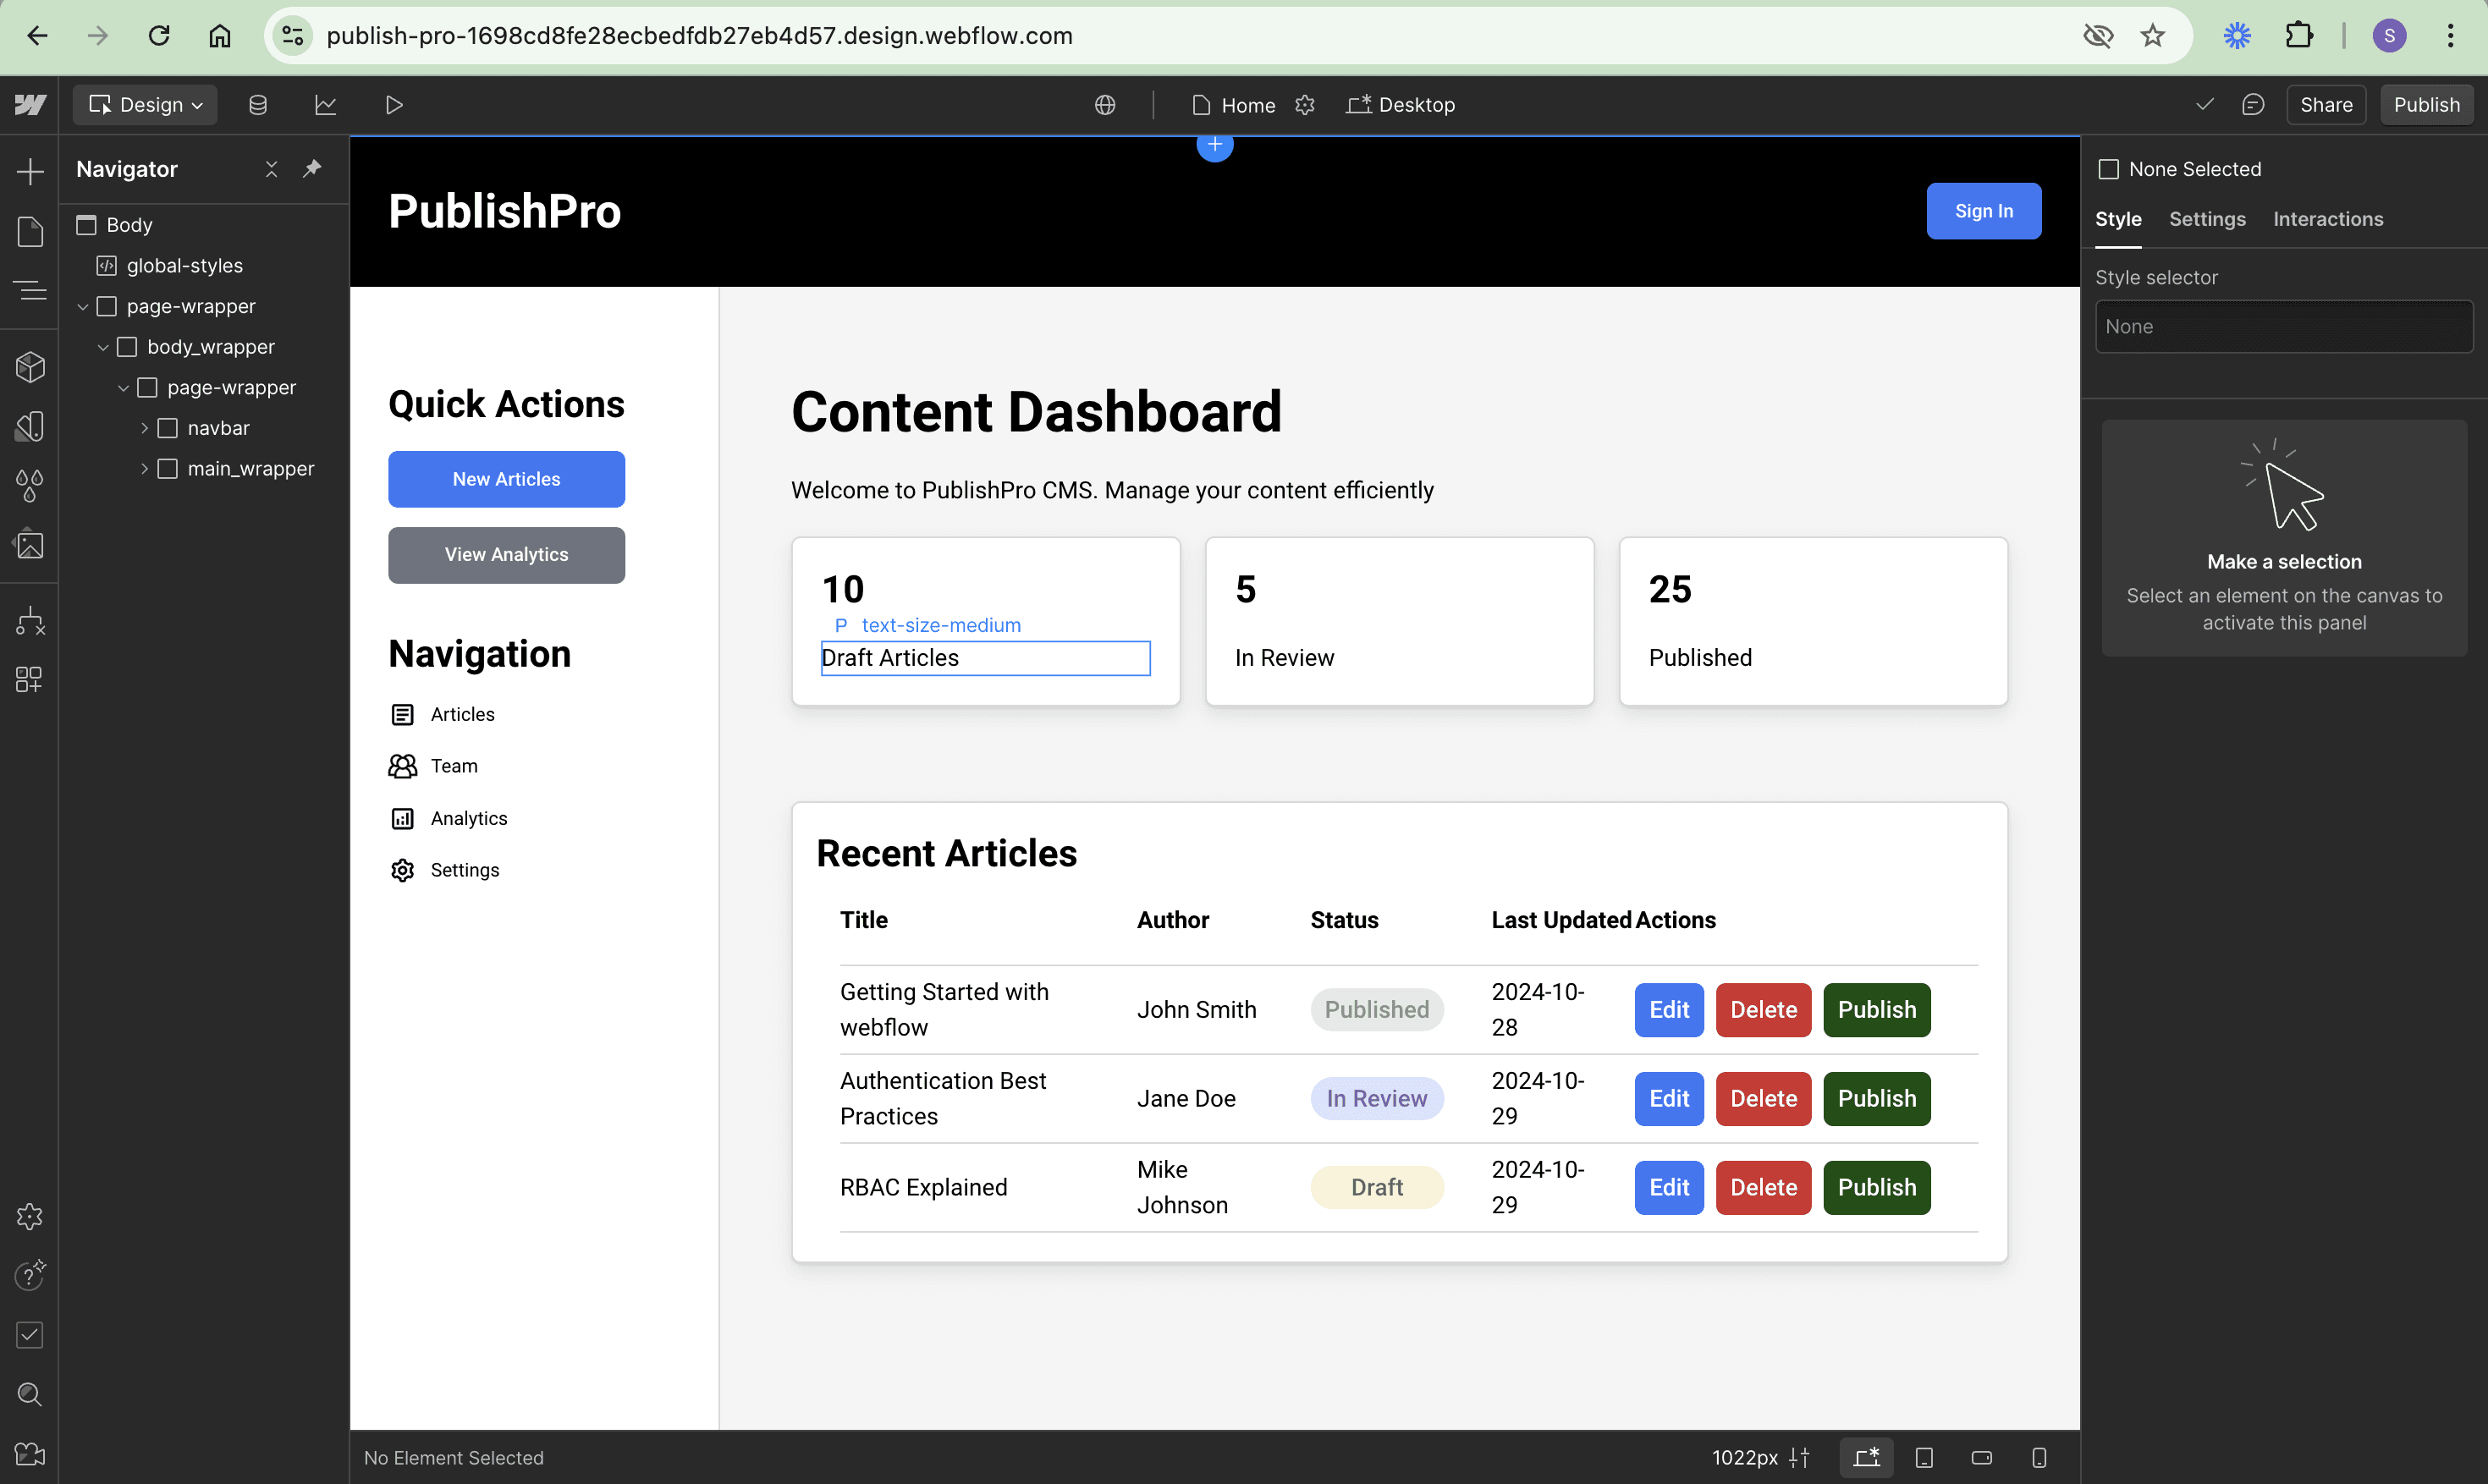
While the application includes a navigation bar with a Sign In button, it lacks any functionality since authentication isn’t implemented. This unrestricted access highlights two key security needs: protecting the dashboard behind authentication and implementing different access levels for various user roles.
Implementing authentication
Now that the authentication flow is set up in Descope, let’s integrate it into the CMS application. You need to add the Descope web component and implement the authentication logic.
Adding the required scripts
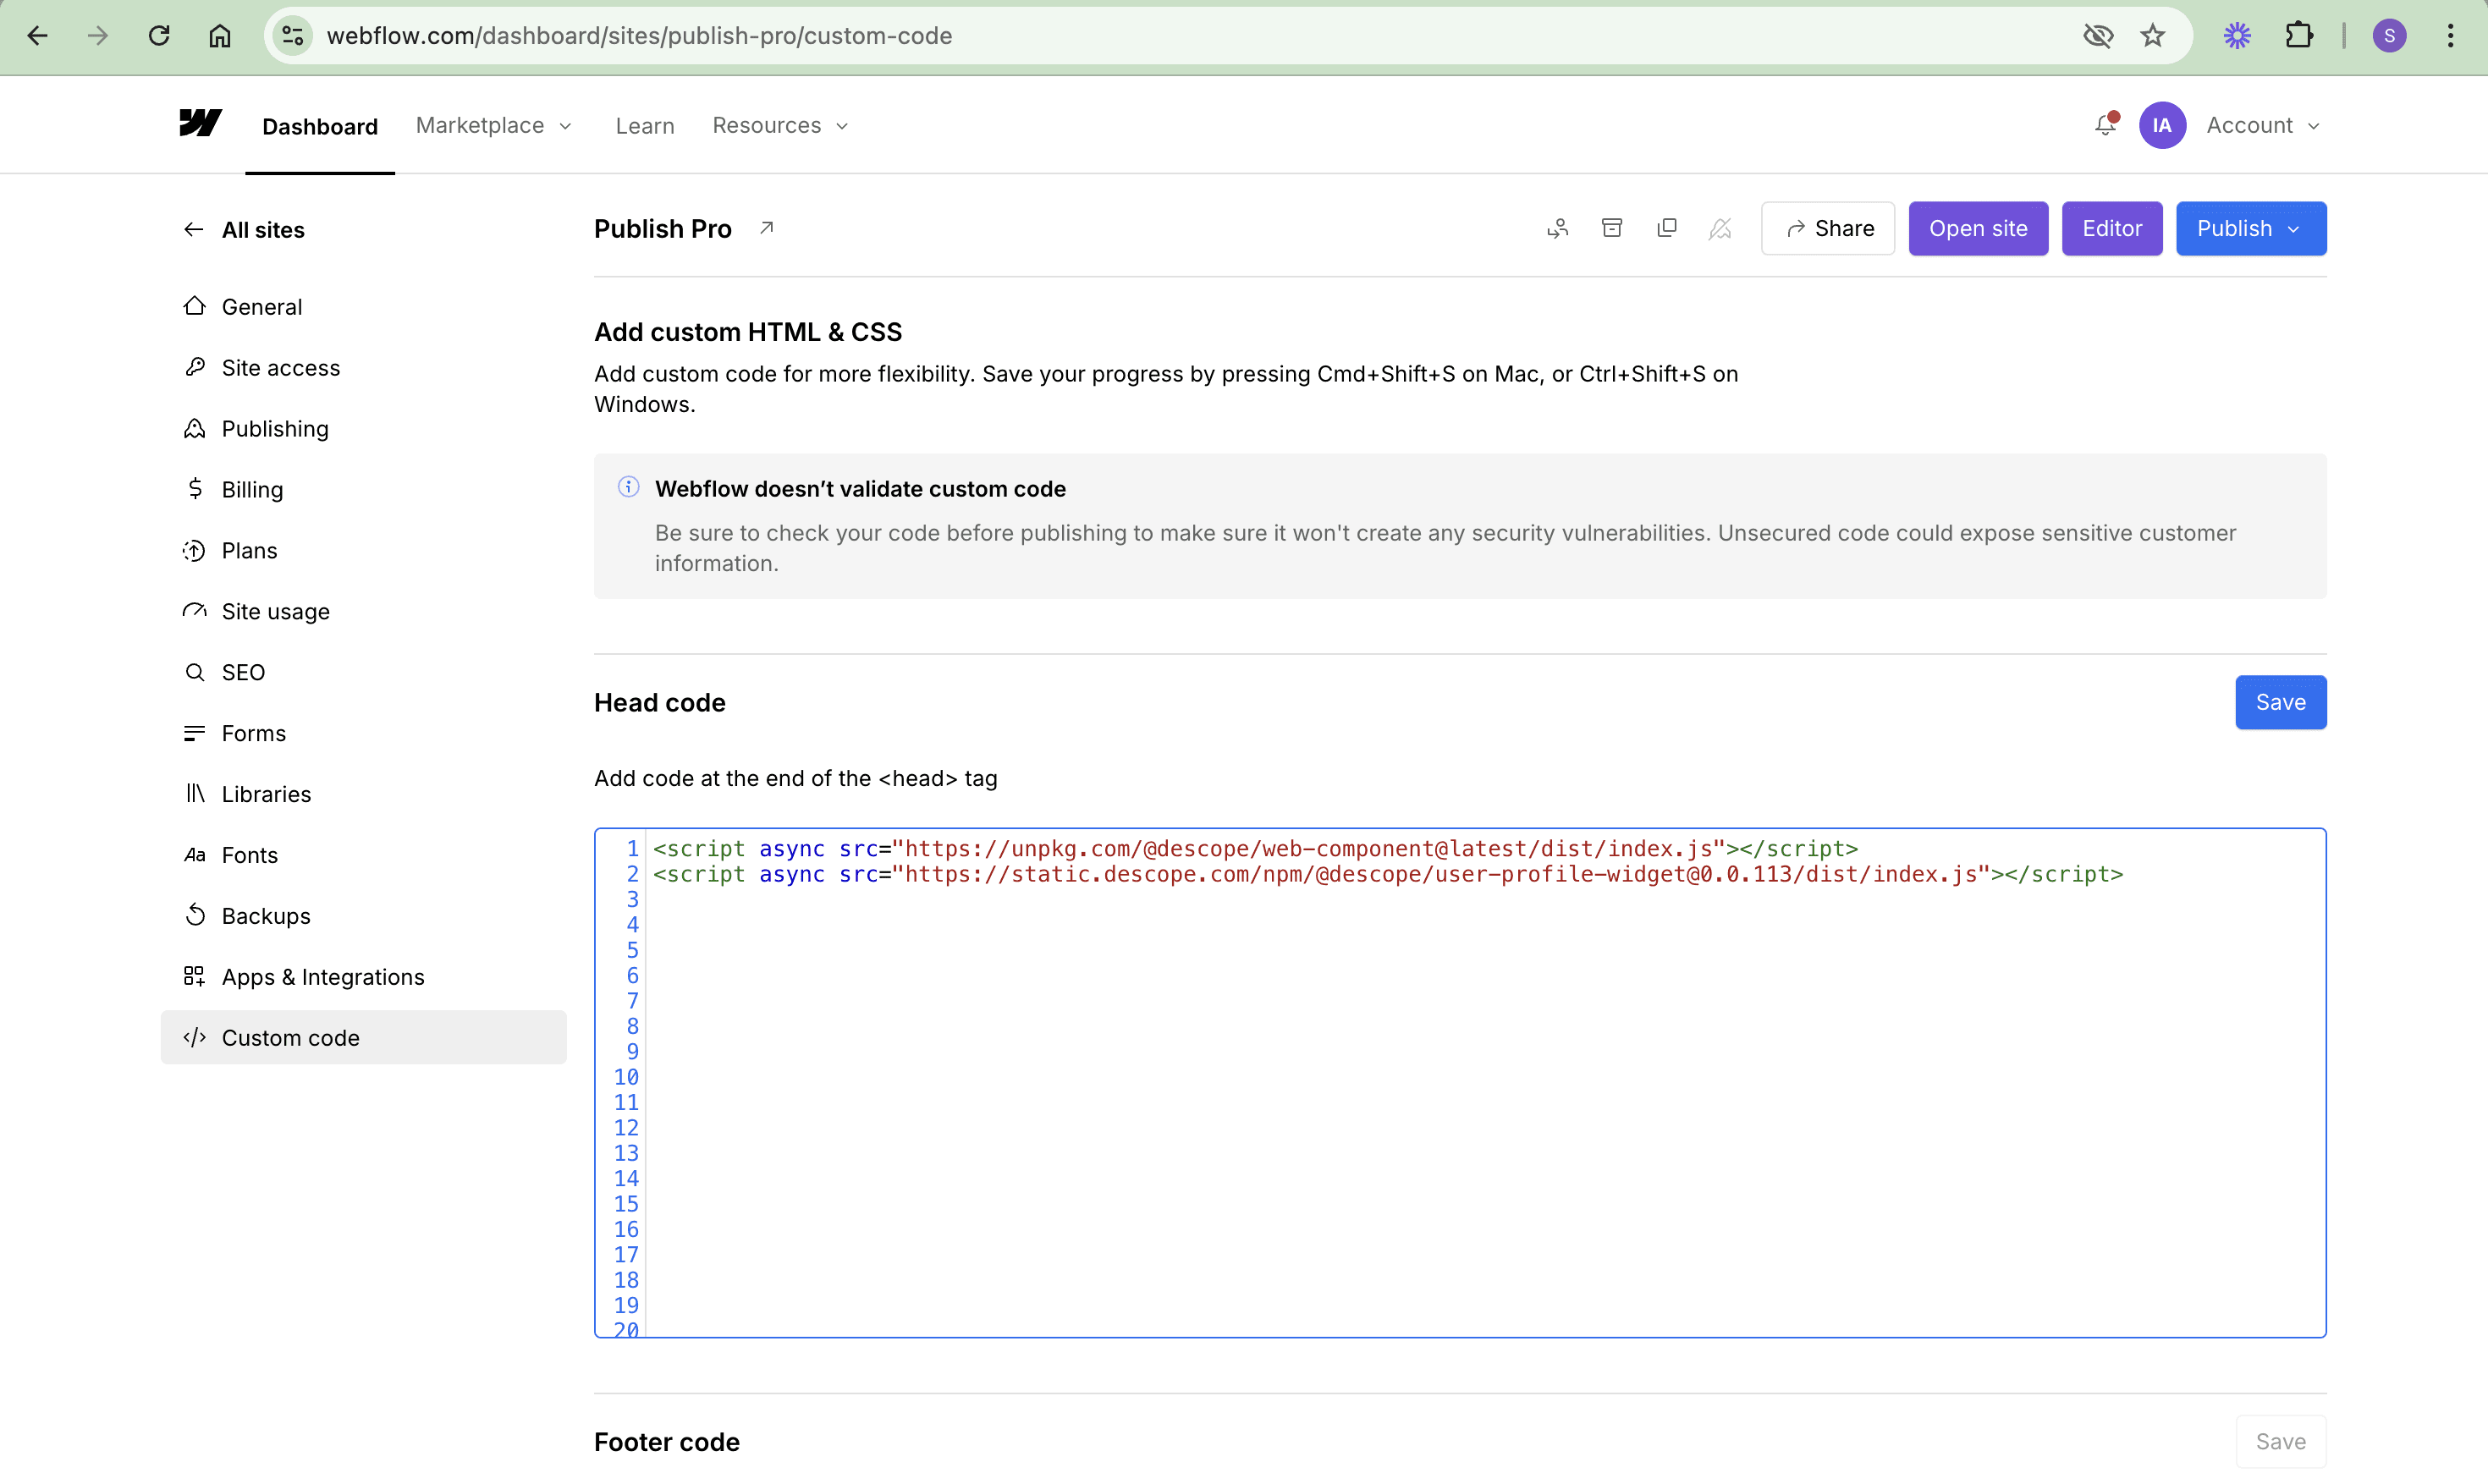
To start, let’s add the required Descope scripts, Descope web component, and user profile widget scripts to the Head code section of the Webflow app. These scripts provide the core functionality for the authentication system and user profile management. On the Webflow dashboard, under the Custom code tab of the site’s settings, add the following scripts:
<script async src="https://unpkg.com/@descope/web-component@latest/dist/index.js"></script>
<script async src="https://static.descope.com/npm/@descope/user-profile-widget@0.0.113/dist/index.js"></script>
Remember to save the changes by clicking the Save button to successfully add the scripts to the Webflow app:
Descope provides a list of widgets that you can easily integrate alongside your authentication code to manage users’ sessions:
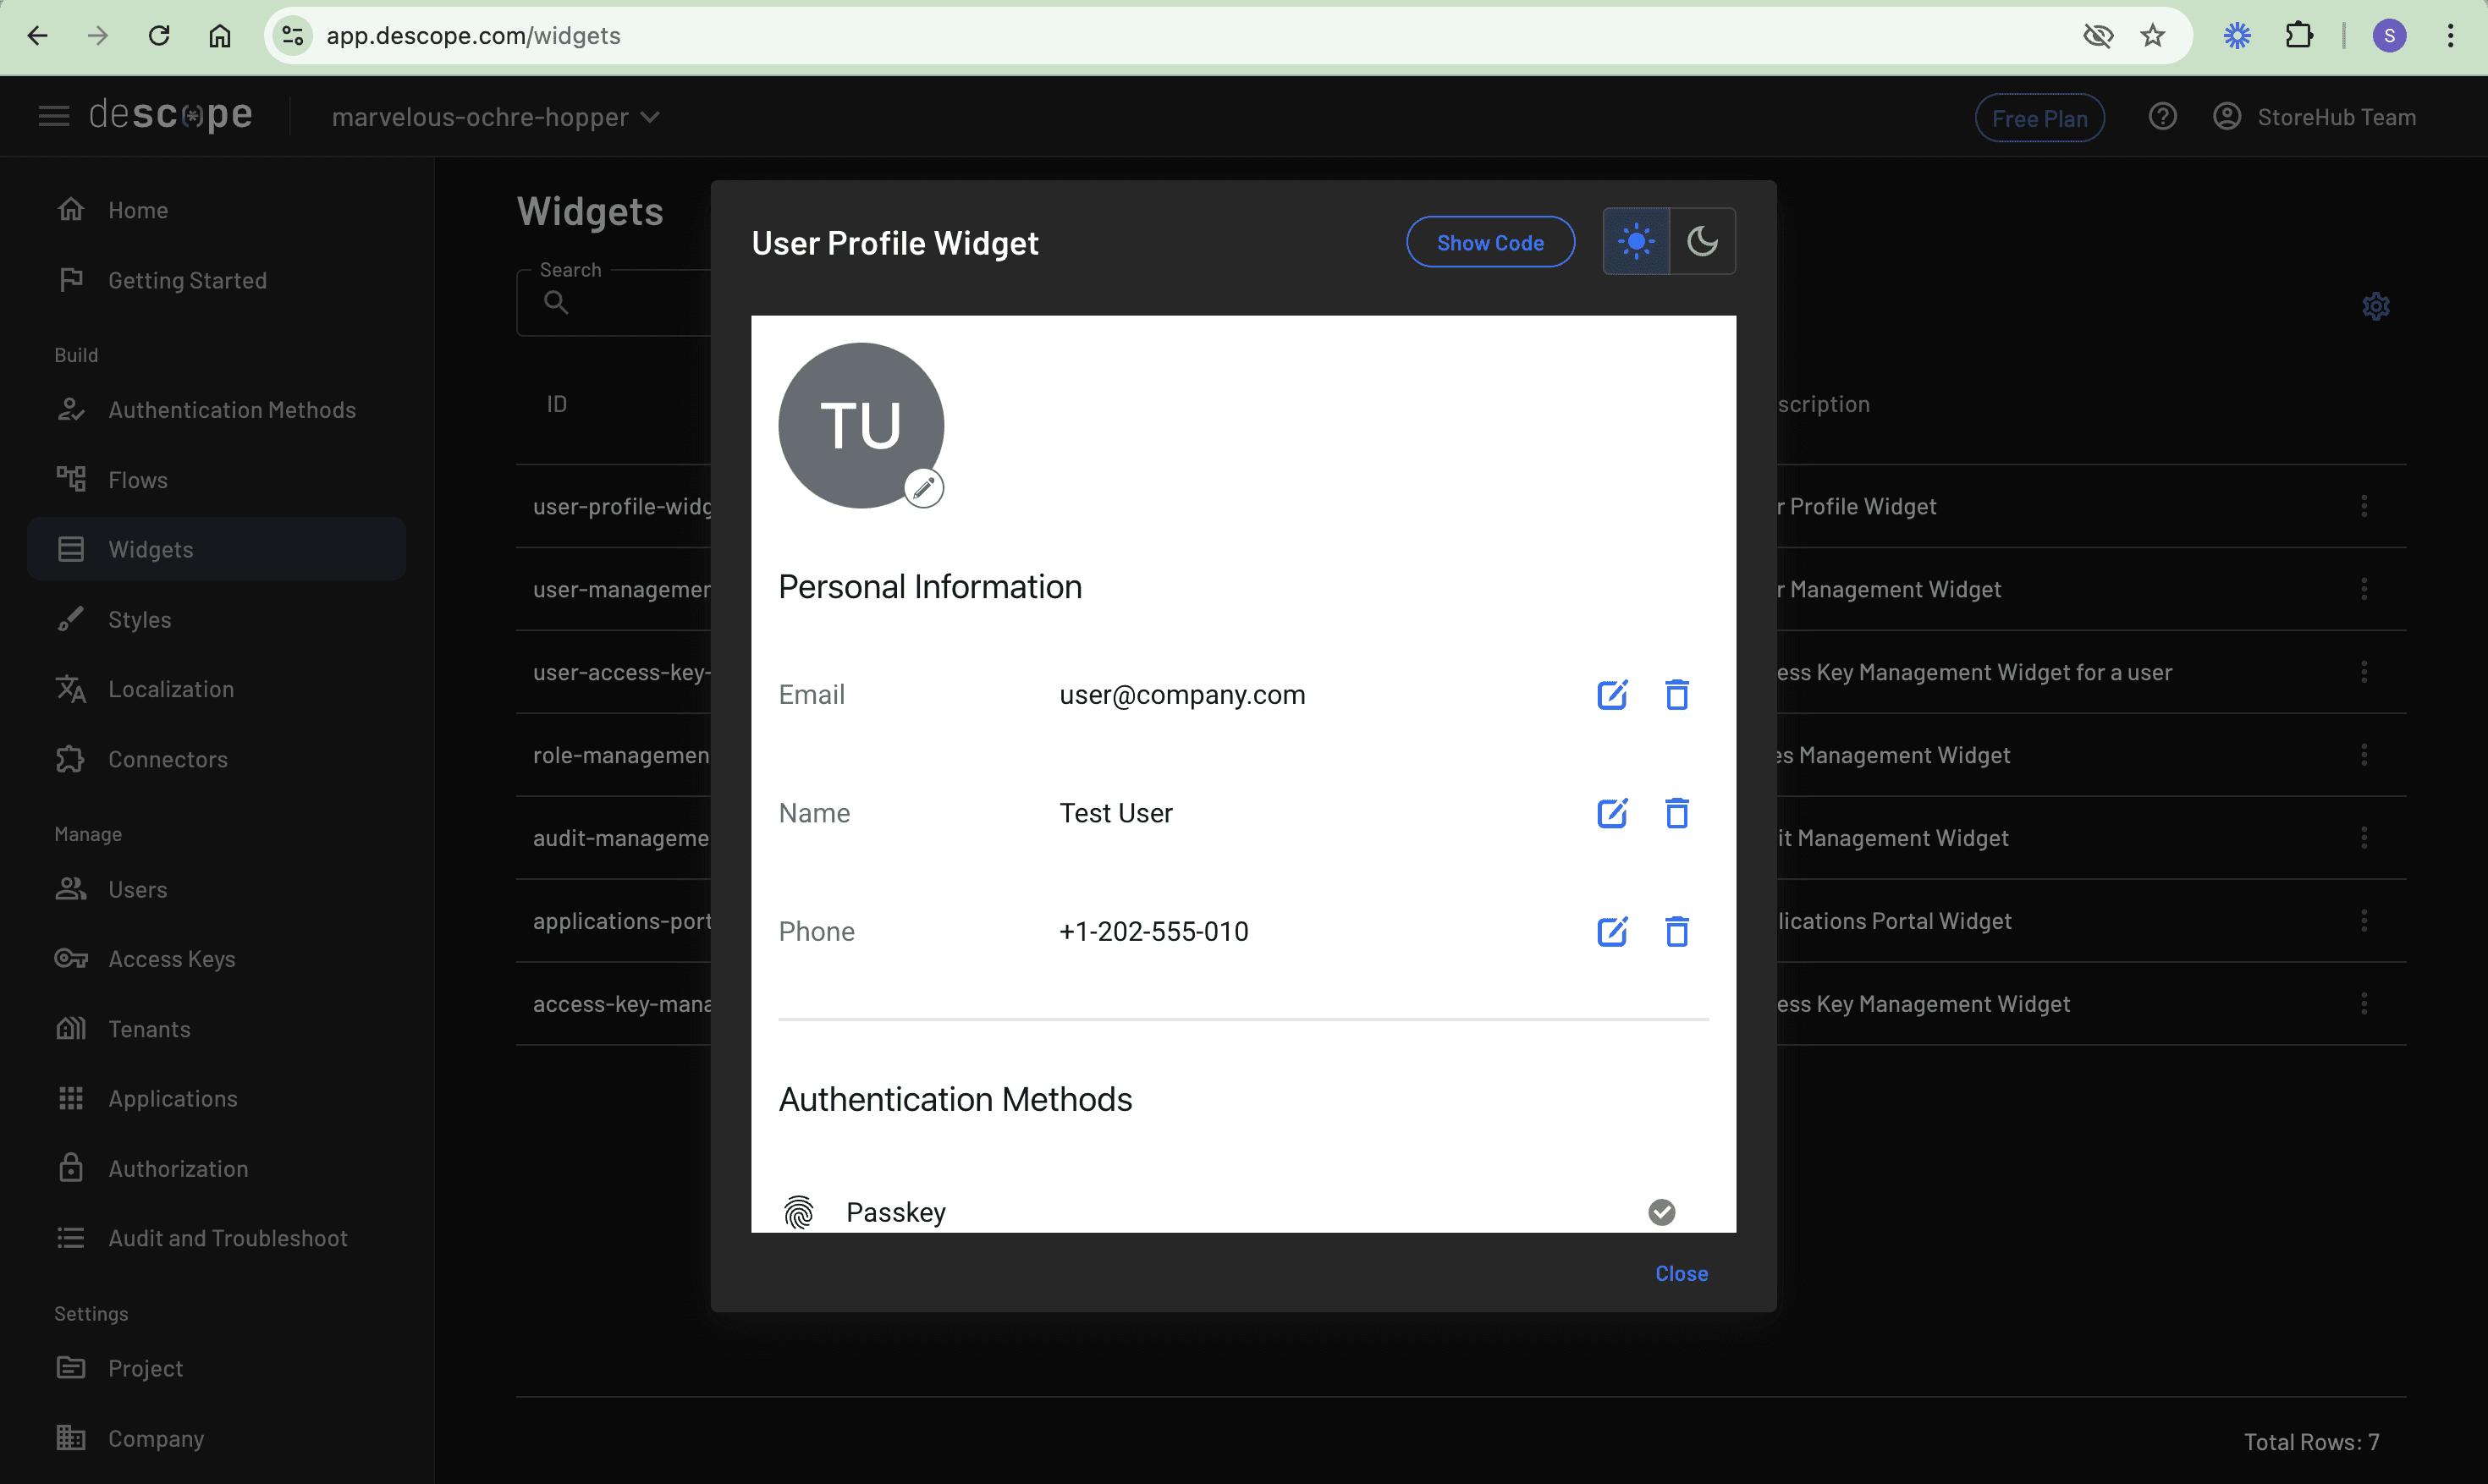
Click the Show Code button and select the Web Component option to see the sample code included in the preceding code snippet.
Adding authentication and user profile modals
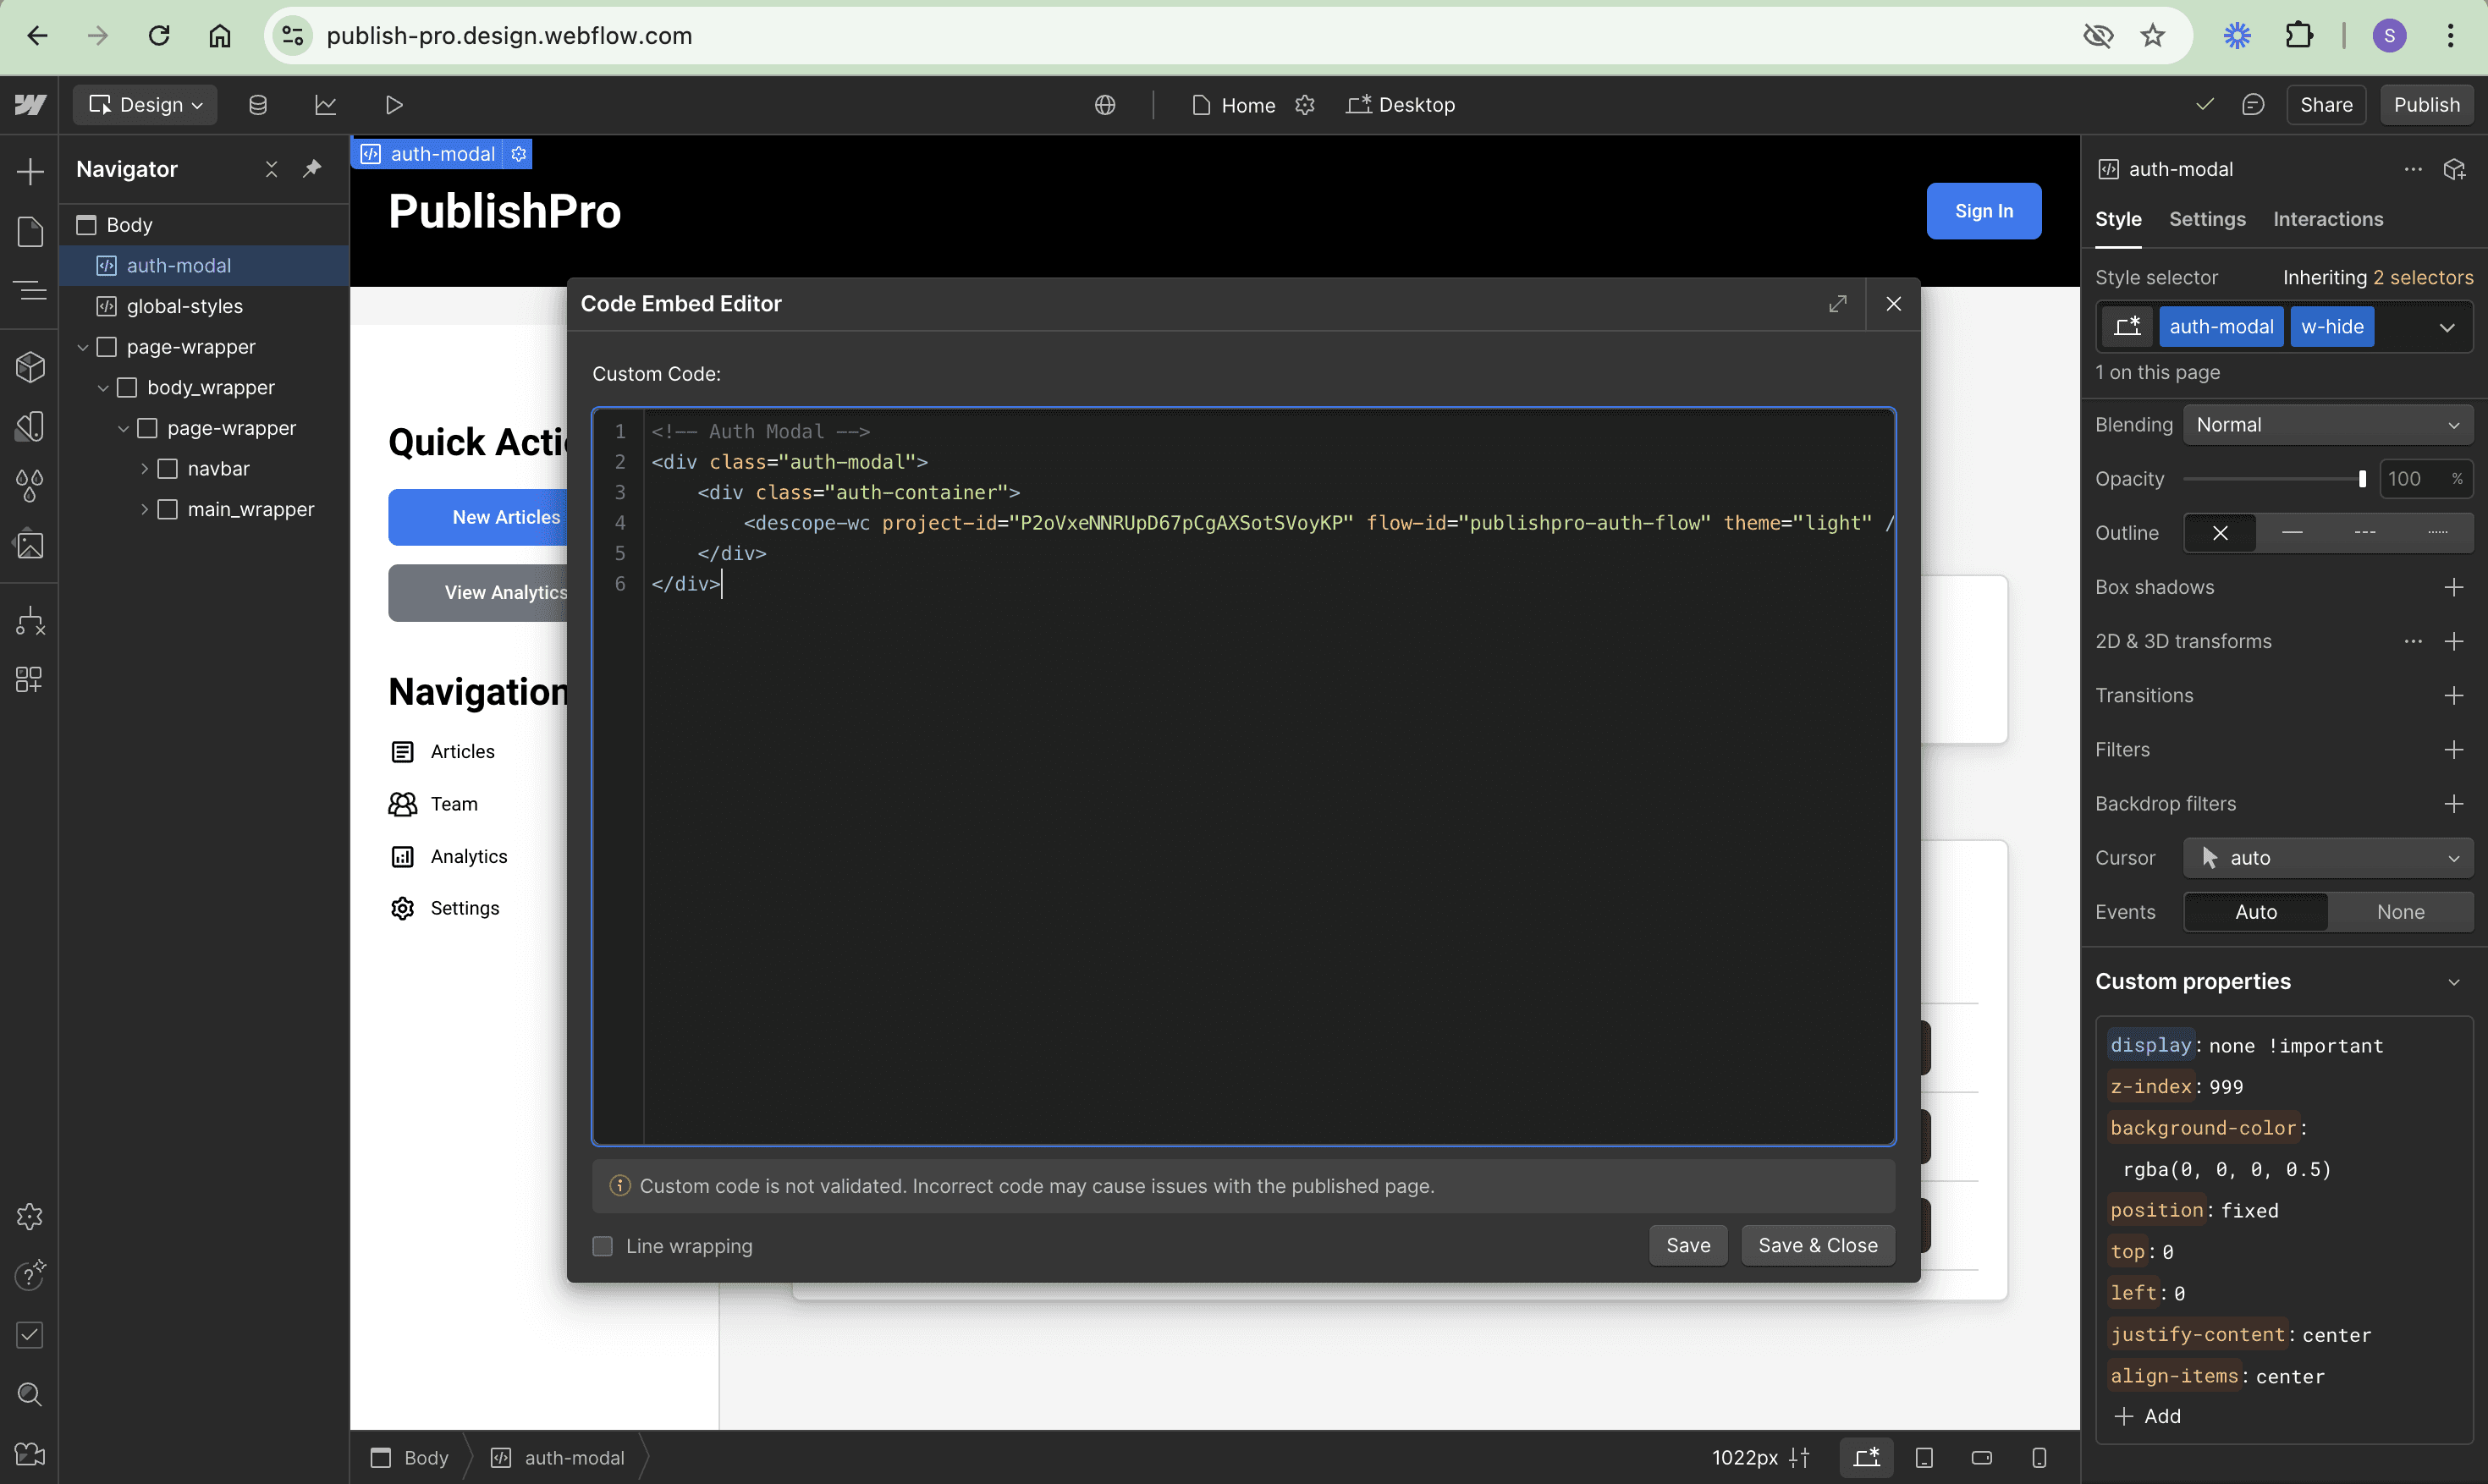
Next, create a Code embed element for the authentication. You need two key components: an authentication modal and a user profile modal. These components handle user sign-in and profile management, respectively.
For the authentication modal, create it under the Body element and name it auth-modal:
<!-- Auth Modal -->
<div class="auth-modal">
    <div class="auth-container">
        <descope-wc project-id="YOUR_PROJECT_ID" flow-id="publishpro-auth-flow" theme="light" />
    </div>
</div>
Make sure to replace YOUR_PROJECT_ID with the project ID from your Descope Console:
Next, let’s also create the user profile modal next to the Sign In button and name it user-profile:
<!-- Authenticated State -->
<div id="user-profile" class="user-profile">
   <span id="user-name" class="user-name"></span>
   <div
      id="profile-widget-container"
      class="profile-widget-container"
      >
      <descope-user-profile-widget
         project-id="YOUR_PROJECT_ID"
         widget-id="user-profile-widget"
         theme="light"
         />
   </div>
</div>
Remember to replace the YOUR_PROJECT_ID with your project ID as well here:

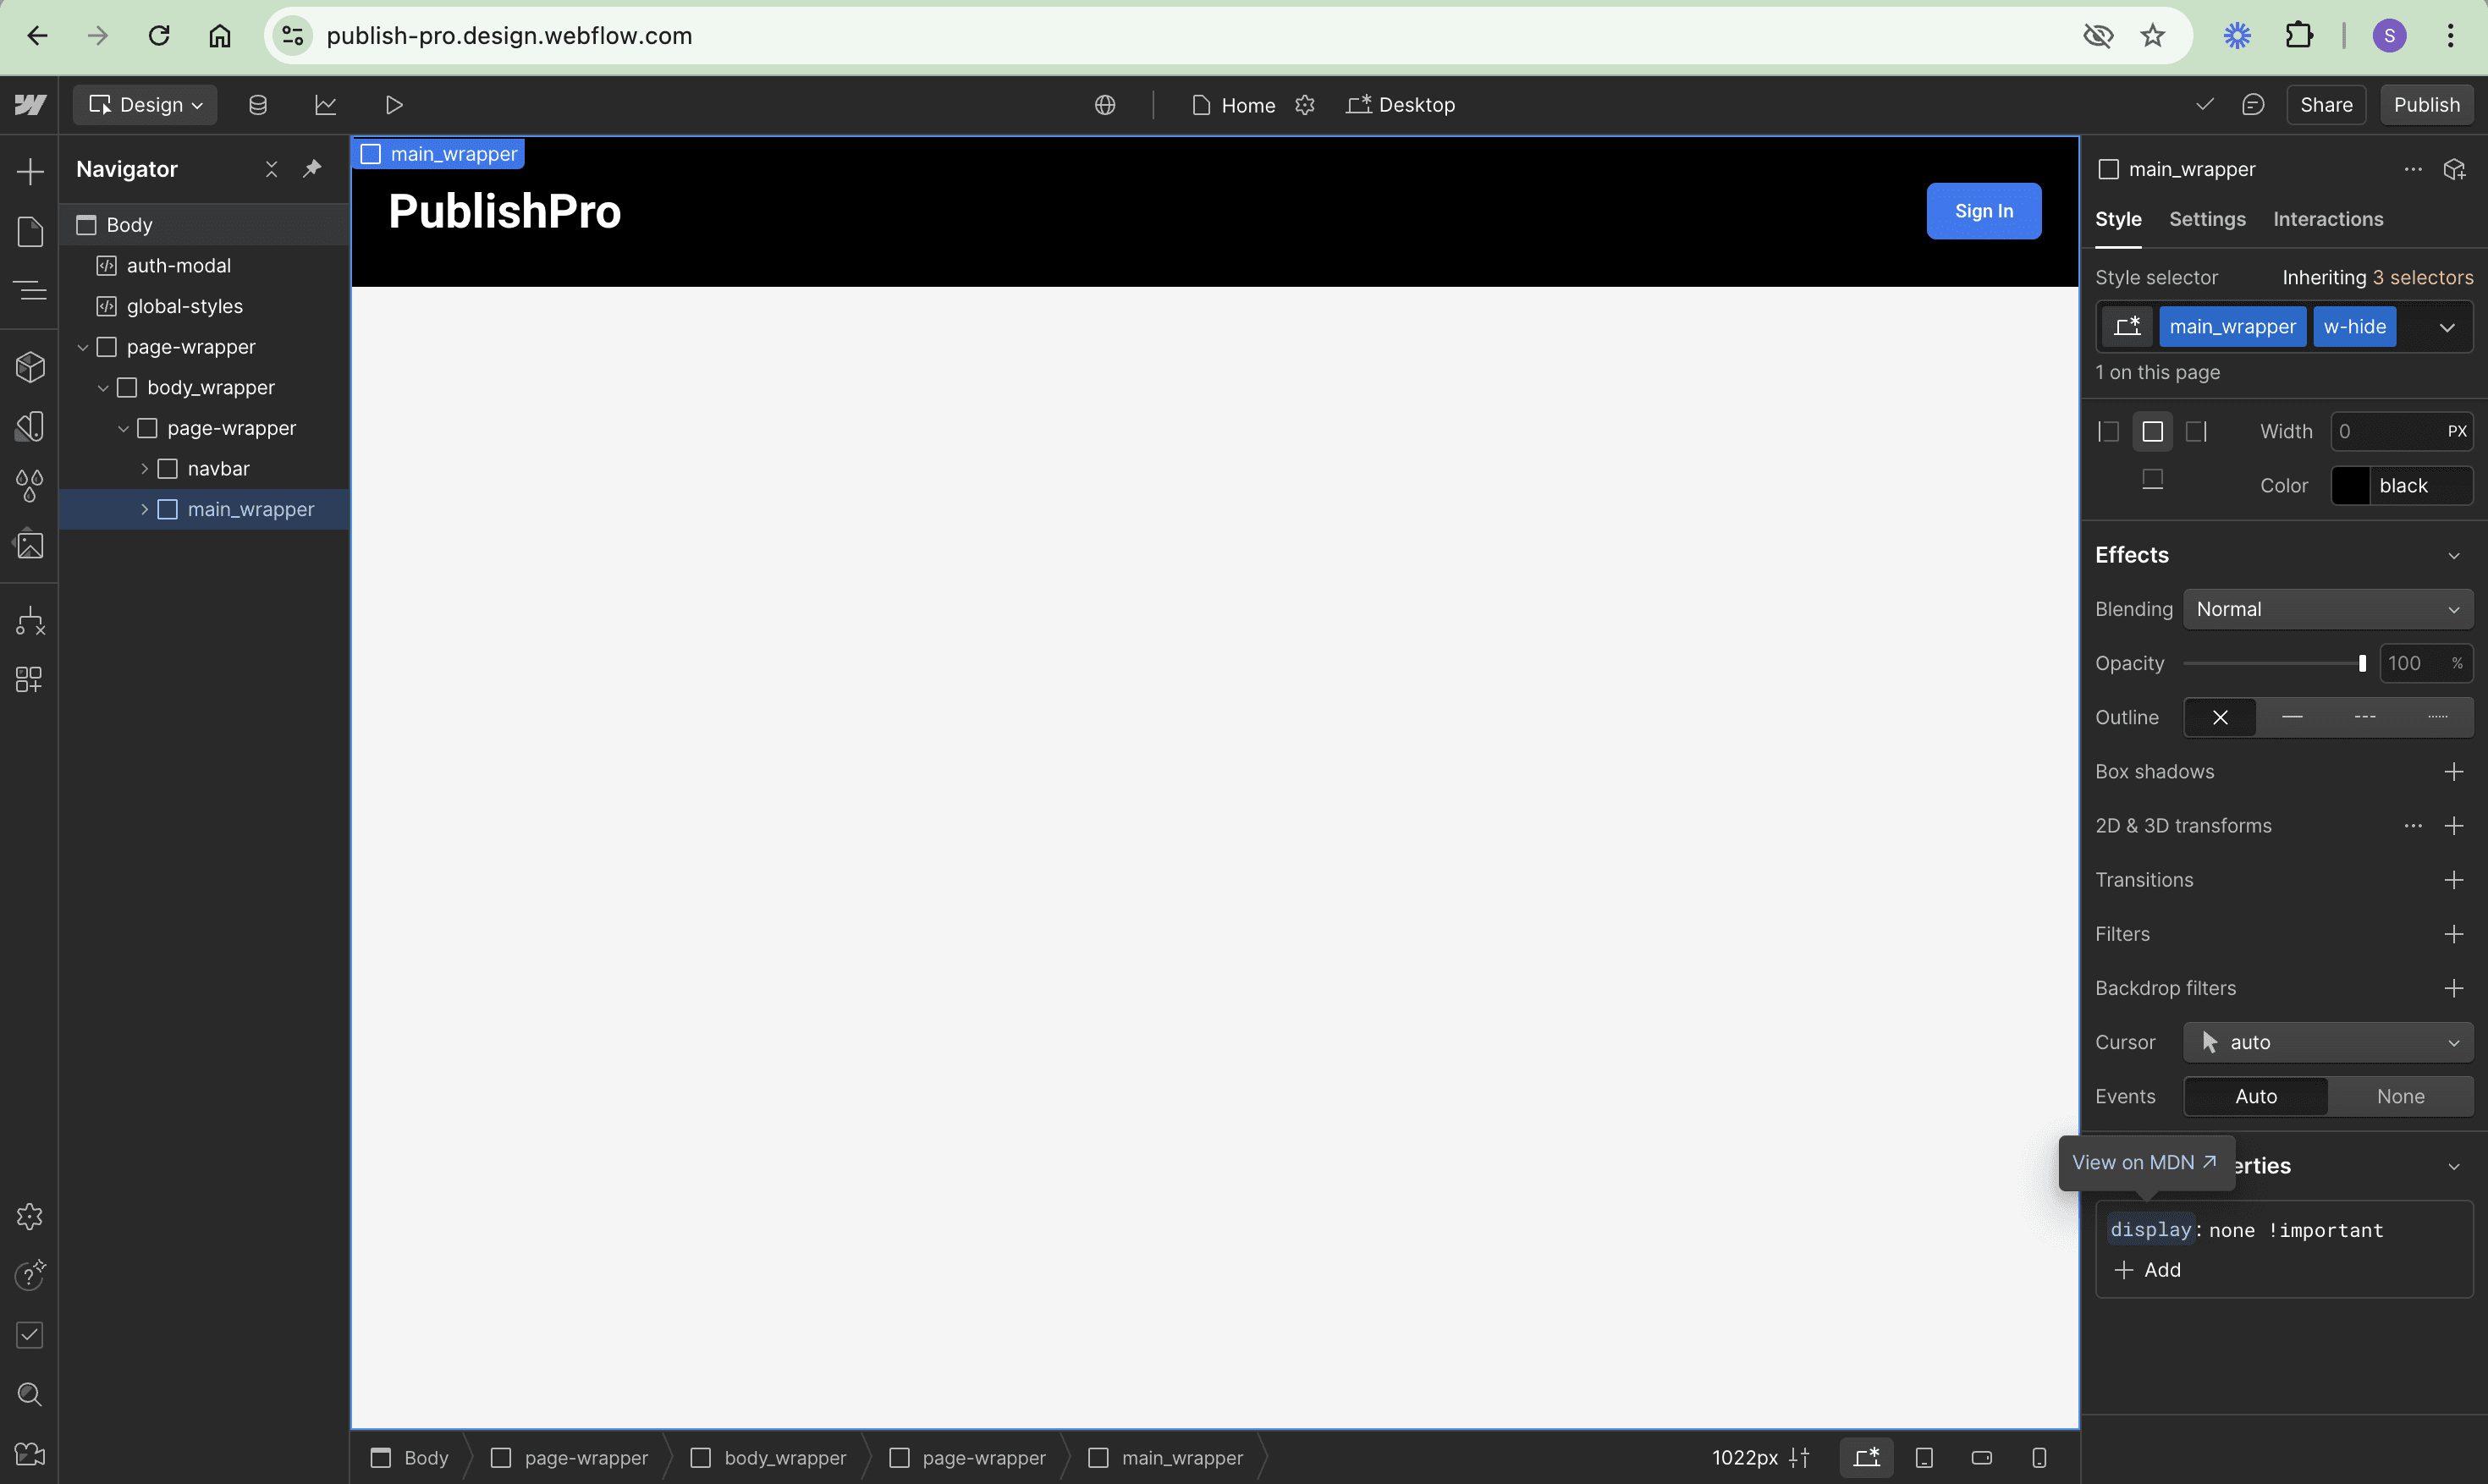
Since authentication is being implemented, the dashboard of the app should be visible only to authenticated users. Let’s create a new Combo class named w-hide with style display: none !important to hide the dashboard from unauthorized users. Add this new class to the existing main_wrapper class as well as to the auth-modal and the user-profile modal:
Enhancing with custom styles
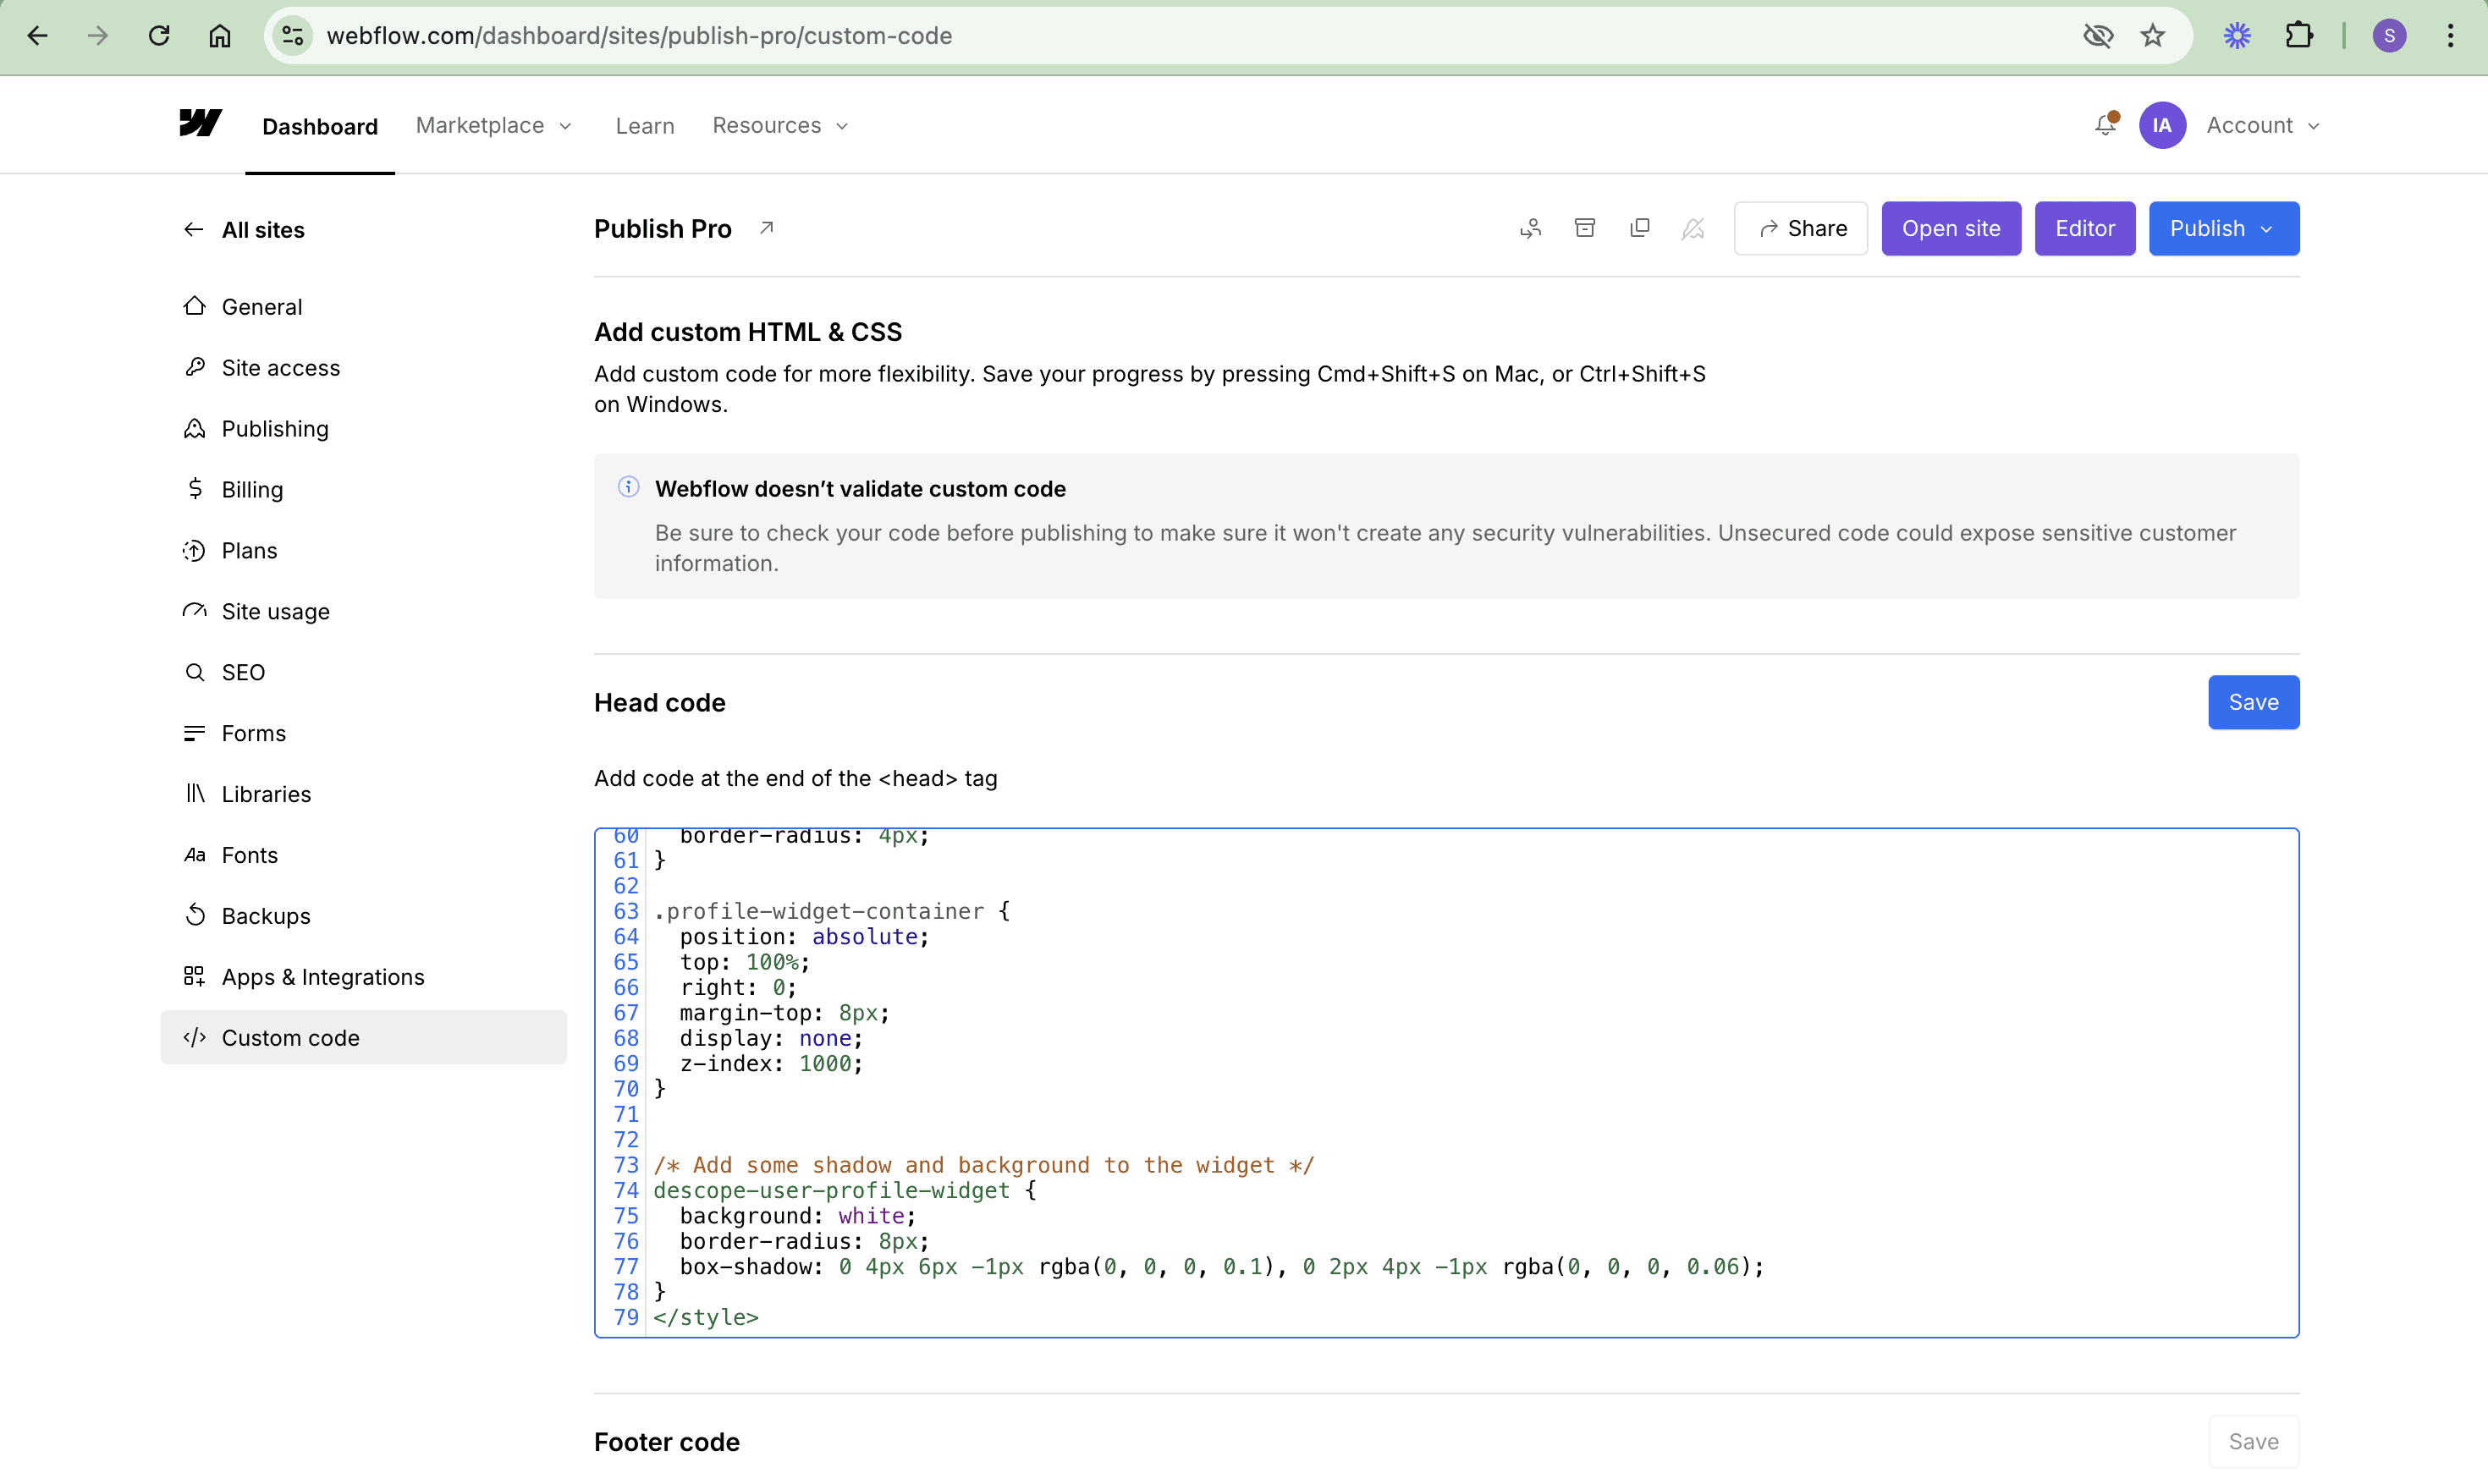
You can use the <style> tag to add custom styles for the modals and other utility classes created in the remaining part of the project. This includes styles for the auth-modal, user-profile, and widget-containers. Navigate back to the dashboard, check under the Custom code tab, and add the following CSS below the two <script> tags in the Head code section:
<style>
  .auth-modal {
  position: fixed;
  top: 0;
  left: 0;
  width: 100%;
  height: 100%;
  background-color: rgba(0, 0, 0, 0.5);
  display: flex;
  justify-content: center;
  align-items: center;
  z-index: 999;
}

.auth-container {
  background-color: #ffffff;
  padding: 20px;
  border-radius: 8px;
  box-shadow: 0 2px 10px rgba(0, 0, 0, 0.1);
}

.user-profile {
  display: flex;
  align-items: center;
  gap: 1rem;
}

.user-name {
  color: #ffffff;
  font-weight: 500;
}

/* Utility Classes */
._w-hide {
  display: none !important;
}

.user-profile {
  position: relative;
  display: flex;
  align-items: center;
  gap: 1rem;
}

.user-name {
  color: #ffffff;
  font-weight: 500;
  cursor: pointer;
  padding: 8px;
}

.user-name:hover {
  background-color: rgba(255, 255, 255, 0.1);
  border-radius: 4px;
}

.profile-widget-container {
  position: absolute;
  top: 100%;
  right: 0;
  margin-top: 8px;
  display: none;
  z-index: 1000;
}

/* Add some shadow and background to the widget */
descope-user-profile-widget {
  background: white;
  border-radius: 8px;
  box-shadow: 0 4px 6px -1px rgba(0, 0, 0, 0.1), 0 2px 4px -1px rgba(0, 0, 0, 0.06);
}
</style>
Remember to click the Save button for the styles to take effect on the project:
Implementing custom authentication
Next, let’s add custom authentication to your Webflow app. To do this, go to the Custom code tab, scroll down to the Footer code section, and paste the code before the closing </body> tag. Let’s break this down into easy steps.
To begin, you need to wait for the DOM to be fully loaded. Then set up the necessary DOM elements and initialize event listeners:
<script async>
    document.addEventListener('DOMContentLoaded', function () {
         // Get references to all the UI elements needed to be manipulated
        const authModal = document.querySelector('.auth-modal');
        const mainWrapper = document.querySelector('.main_wrapper');
        const signInButton = document.querySelector('.sign-in-btn');
        const userProfile = document.querySelector('.user-profile_container');
        const userName = document.getElementById('user-name');
        const profileWidgetContainer = document.getElementById('profile-widget-container');
        const sidebar = document.querySelector('.sidebar_wrapper');
        const dashboard = document.querySelector('.dashboard_wrapper');
         // Initialize Descope authentication components
        const authComponent = document.querySelector('descope-wc');
        authComponent.addEventListener('success', handleAuthSuccess);
        authComponent.addEventListener('error', handleAuthError);

         // Set up the profile widget with logout handling
        const profileWidget = document.querySelector('descope-user-profile-widget');
        profileWidget.logout = handleLogout;
This preceding initialization code ensures the app has access to all the necessary elements and sets up the Descope authentication component with its event listeners. Think of it as gathering all the tools before starting work.
Making the authentication interface interactive
Next, you need to handle user interactions with the authentication interface. This includes showing the login modal and managing the profile widget:
// Show the auth modal when users click sign in
    signInButton.addEventListener('click', function () {
        authModal.classList.remove('_w-hide');
    });

    // Toggle the profile drop-down when users click their name
    userProfile.addEventListener('click', function() {
        if (profileWidgetContainer.style.display !== "block")
            profileWidgetContainer.style.display = "block";
        else
            profileWidgetContainer.style.display = "none";
    });

    // Handle returning from social login
    const urlParams = new URLSearchParams(window.location.search);
    const isDescopeOAuthReturn = urlParams.has("descope-login-flow");

    if (isDescopeOAuthReturn) {
        authModal.classList.remove("_w-hide");
    }
These event listeners create the interactive elements of the authentication system. The code responds to user actions like clicking the sign-in button or toggling their profile menu. You also handle the special case of users returning from the social login.
Managing user sessions
The heart of the authentication system lies in how successful logins, errors, and logouts are handled. The following functions manage the user’s session and update the interface accordingly:
function handleAuthSuccess(e) {
        const { refreshJwt, user } = e.detail;

        // Store the user's session data securely
        localStorage.setItem('DSR', refreshJwt);
        localStorage.setItem('user_data', JSON.stringify(user));
        const userDataString = localStorage.getItem('user_data');
        const userData = JSON.parse(userDataString);
        // Show authenticated UI
        authModal.classList.add('_w-hide');
        signInButton.classList.add('_w-hide');
        userProfile.classList.remove('_w-hide');
        sidebar.classList.remove('_w-hide');
        dashboard.classList.remove('_w-hide');
        mainWrapper.classList.remove('_w-hide');

        if (user.name) {
          userName.textContent = user.name;
          userName.title = "Click to manage profile";
        }
        window.location.reload();
      }

    function handleAuthError(err) {
        console.error('Auth Error:', err);
    }

    function handleLogout(error) {
        if (error) {
            console.error('Logout Error:', error);
            return;
        }
        // Clean up session data and refresh
        localStorage.removeItem('DSR');
        localStorage.removeItem('user_data');
        window.location.reload();
    }
When authentication succeeds, the app securely stores the user’s session data and updates the UI to show they’re logged in. If something goes wrong, it logs the error. The logout function cleans up by removing stored data and refreshing the page.
Finally, handle session persistence so users don’t need to log in every time they visit:
  // Check if user already has a valid session
    const token = localStorage.getItem('DSR');
    const userDataString = localStorage.getItem('user_data');

    const payload = JSON.parse(atob(token.split('.')[1]));
    const expiration = payload.exp * 1000;

    if ((Date.now() < expiration) && userDataString) {
        const userData = JSON.parse(userDataString);
        authModal.classList.remove('_w-hide');
        signInButton.classList.add('_w-hide');
        signInButton.classList.add('_w-hide');
        userProfile.classList.remove('_w-hide');
        mainWrapper.classList.remove('_w-hide');
        if (userData.name) {
            userName.textContent = userData.name;
        }
    } else {
        localStorage.removeItem('DSR');
        localStorage.removeItem('user_data');
    }
});
</script>
This code checks for an existing session when the page loads. If found, it automatically restores the user’s authenticated state without requiring them to log in again.
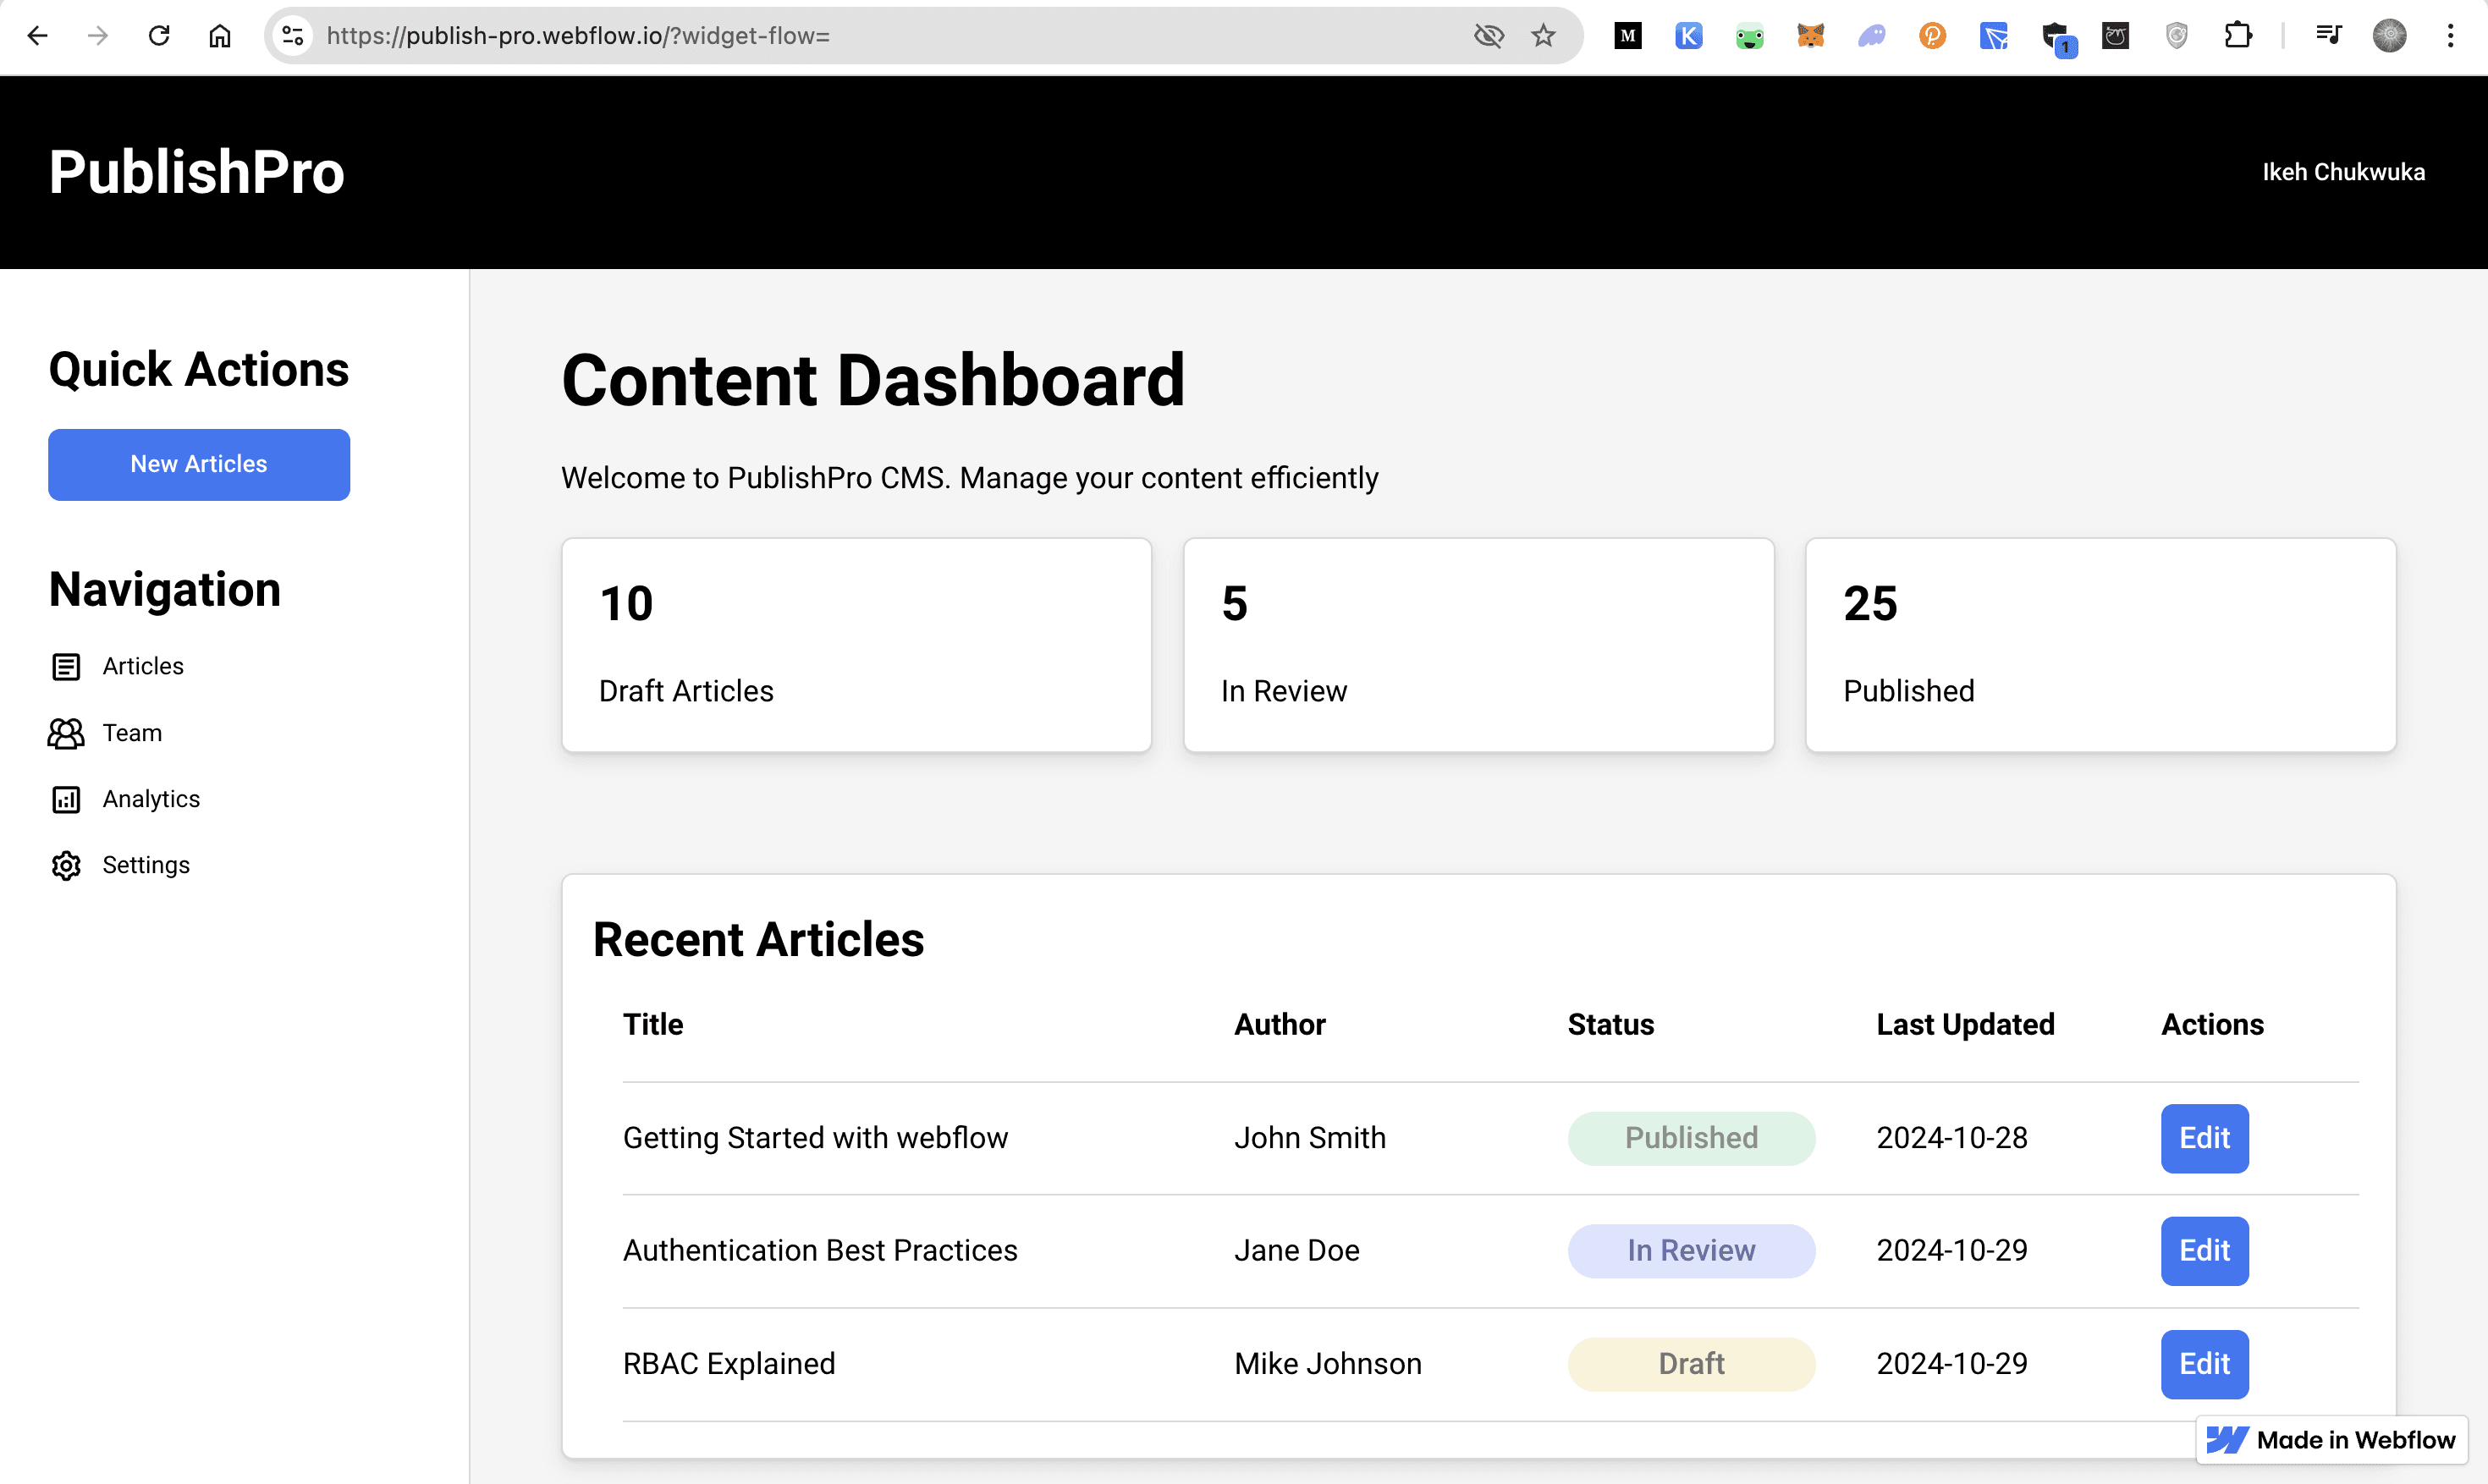
Testing the authentication
To test this implementation, you can either publish your app or use the Webflow preview feature. The code creates a seamless authentication experience where users can sign in, maintain their session across page loads, and safely sign out when needed:

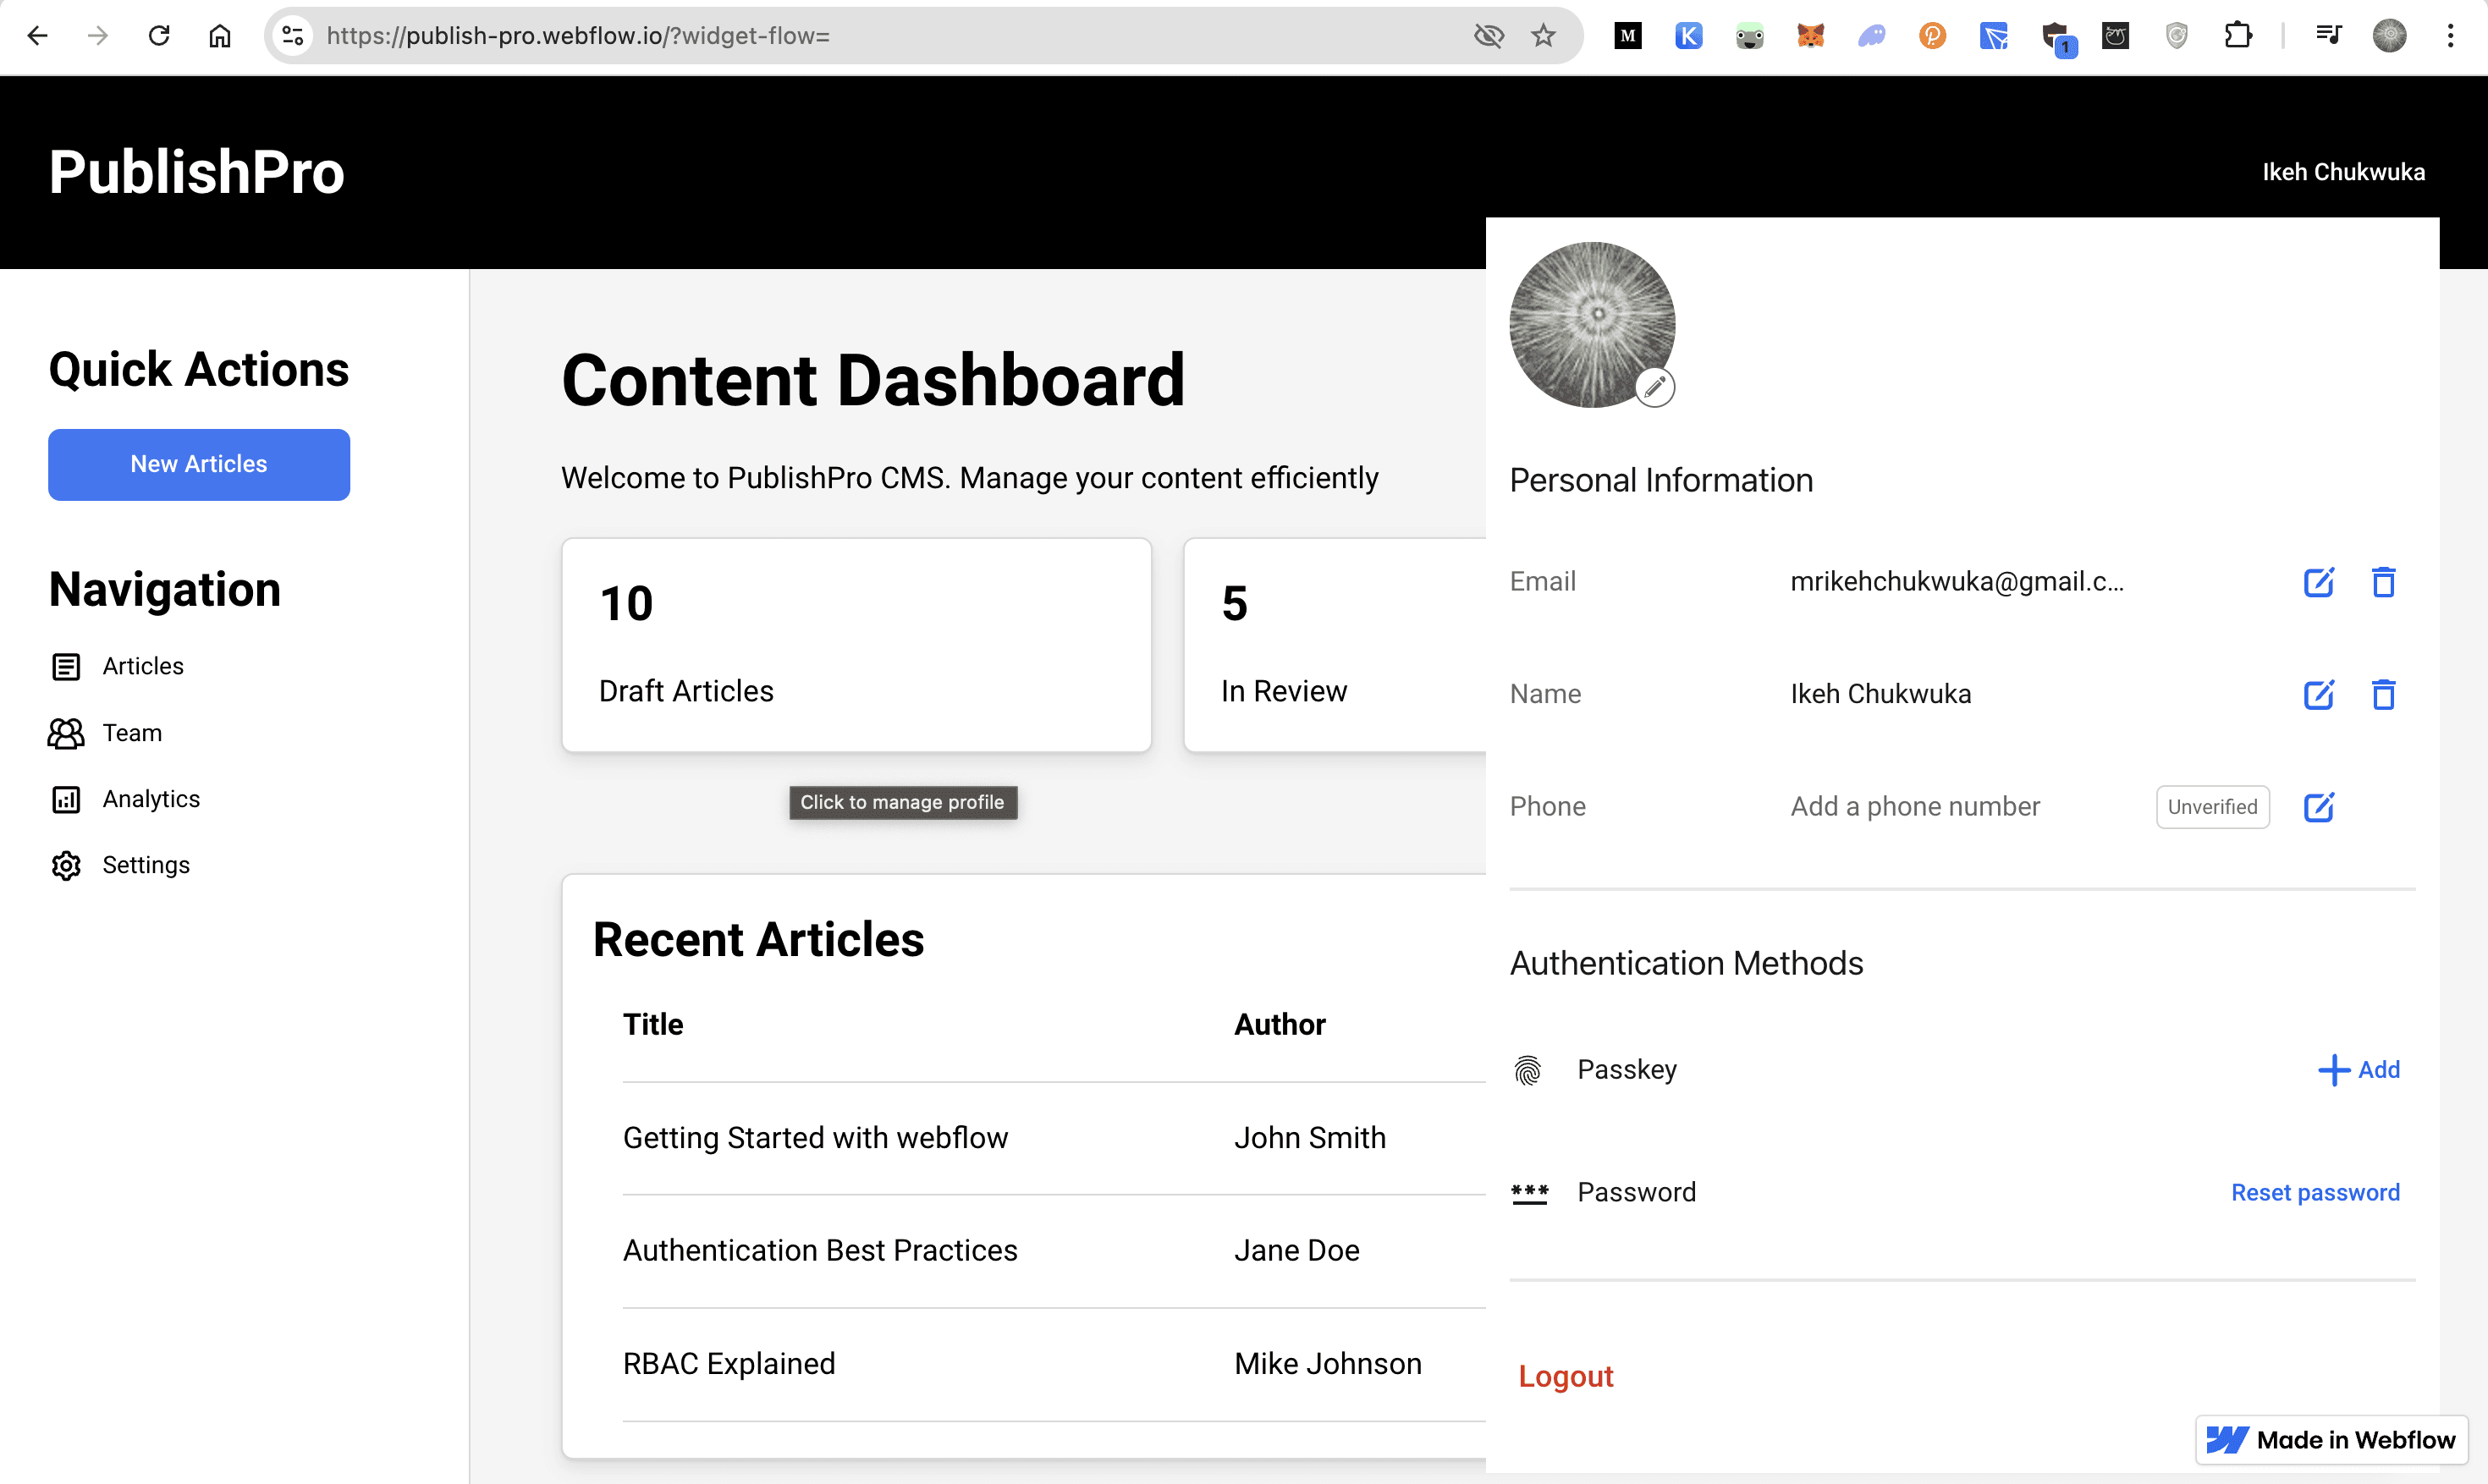
Users can manage their profile through the profile widget that appears when clicking their name:
Implementing RBAC
With authentication in place, you can now implement RBAC to manage different user permissions within the CMS. The application defines two roles with distinct permissions: Writers can create and edit their own articles, and Editors have full access, including publishing and deleting articles.
Creating roles and permissions
To create the roles and permissions in the Descope Console, navigate initially to the Authorization section. Under the RBAC tab, locate the Permissions section in the right panel. You’re creating four distinct permissions that represent the core actions in the CMS. Start by clicking + Permission to create CreateArticleDrafts—this fundamental permission enables users to create new article drafts in the system. When setting up this permission, include a clear description explaining its purpose, such as “Allows creation of new article drafts in the CMS.”
Continue adding permissions by creating UpdateArticleDrafts, which controls the ability to edit existing drafts. Follow this with the DeleteArticleDrafts to manage article removal privileges and, finally, PublishArticleDrafts to control who can publish articles publicly. For each permission, take time to write a descriptive explanation that will help you and future administrators understand its intended use.
Once your permissions are in place, move to the Roles panel to establish the two key roles needed for the CMS. Begin with the Writer role by clicking + Role. Writers need the ability to create and modify content, so assign them the CreateArticleDrafts and UpdateArticleDrafts permissions. Include a description, like “Content creators who can write and edit drafts,” to clearly define their responsibilities.
Next, create the Editor role, which requires more comprehensive access. Editors need oversight of the entire content lifecycle, so assign them all four permissions: CreateArticleDrafts, UpdateArticleDrafts, DeleteArticleDrafts, and PublishArticleDrafts. Add a description, such as “Content managers with full article control,” to document their broader responsibilities.
Here’s the Authorization page with RBAC set up:
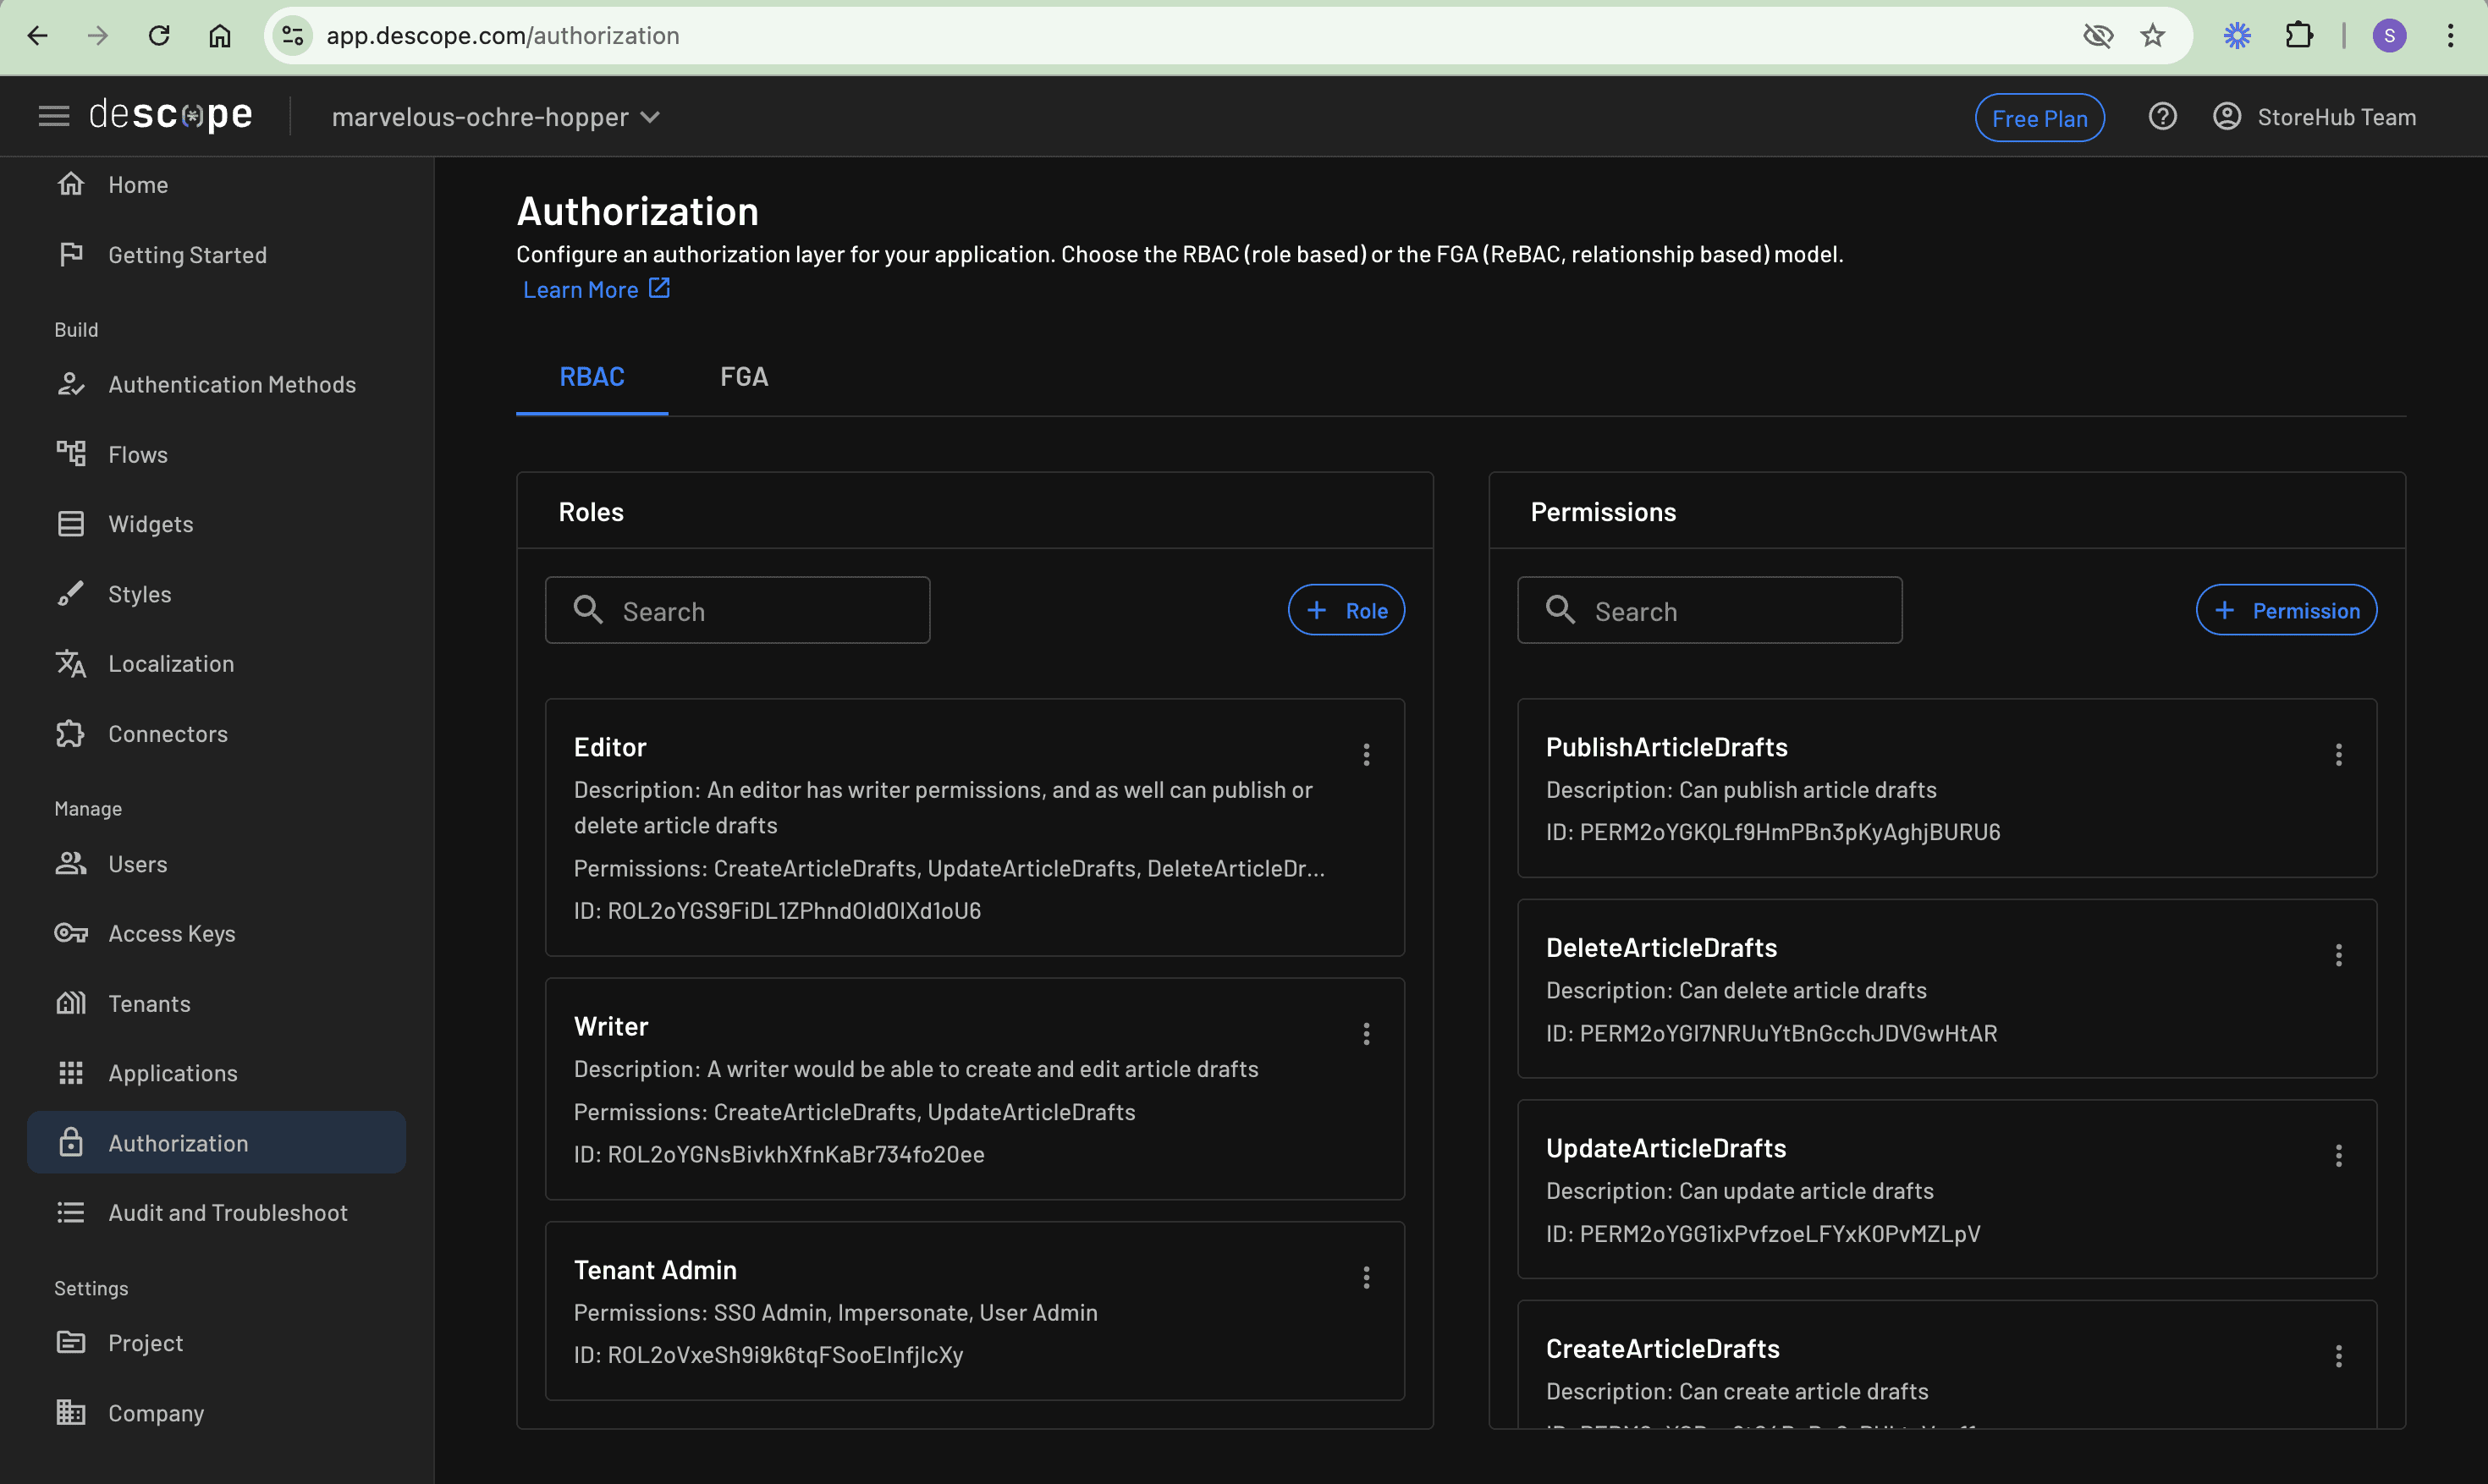
This permission structure mirrors common editorial workflows where writers focus on content creation and editors manage the overall publication process. Writers can develop and refine content, while editors maintain quality control through their additional abilities to remove content and determine what gets published.
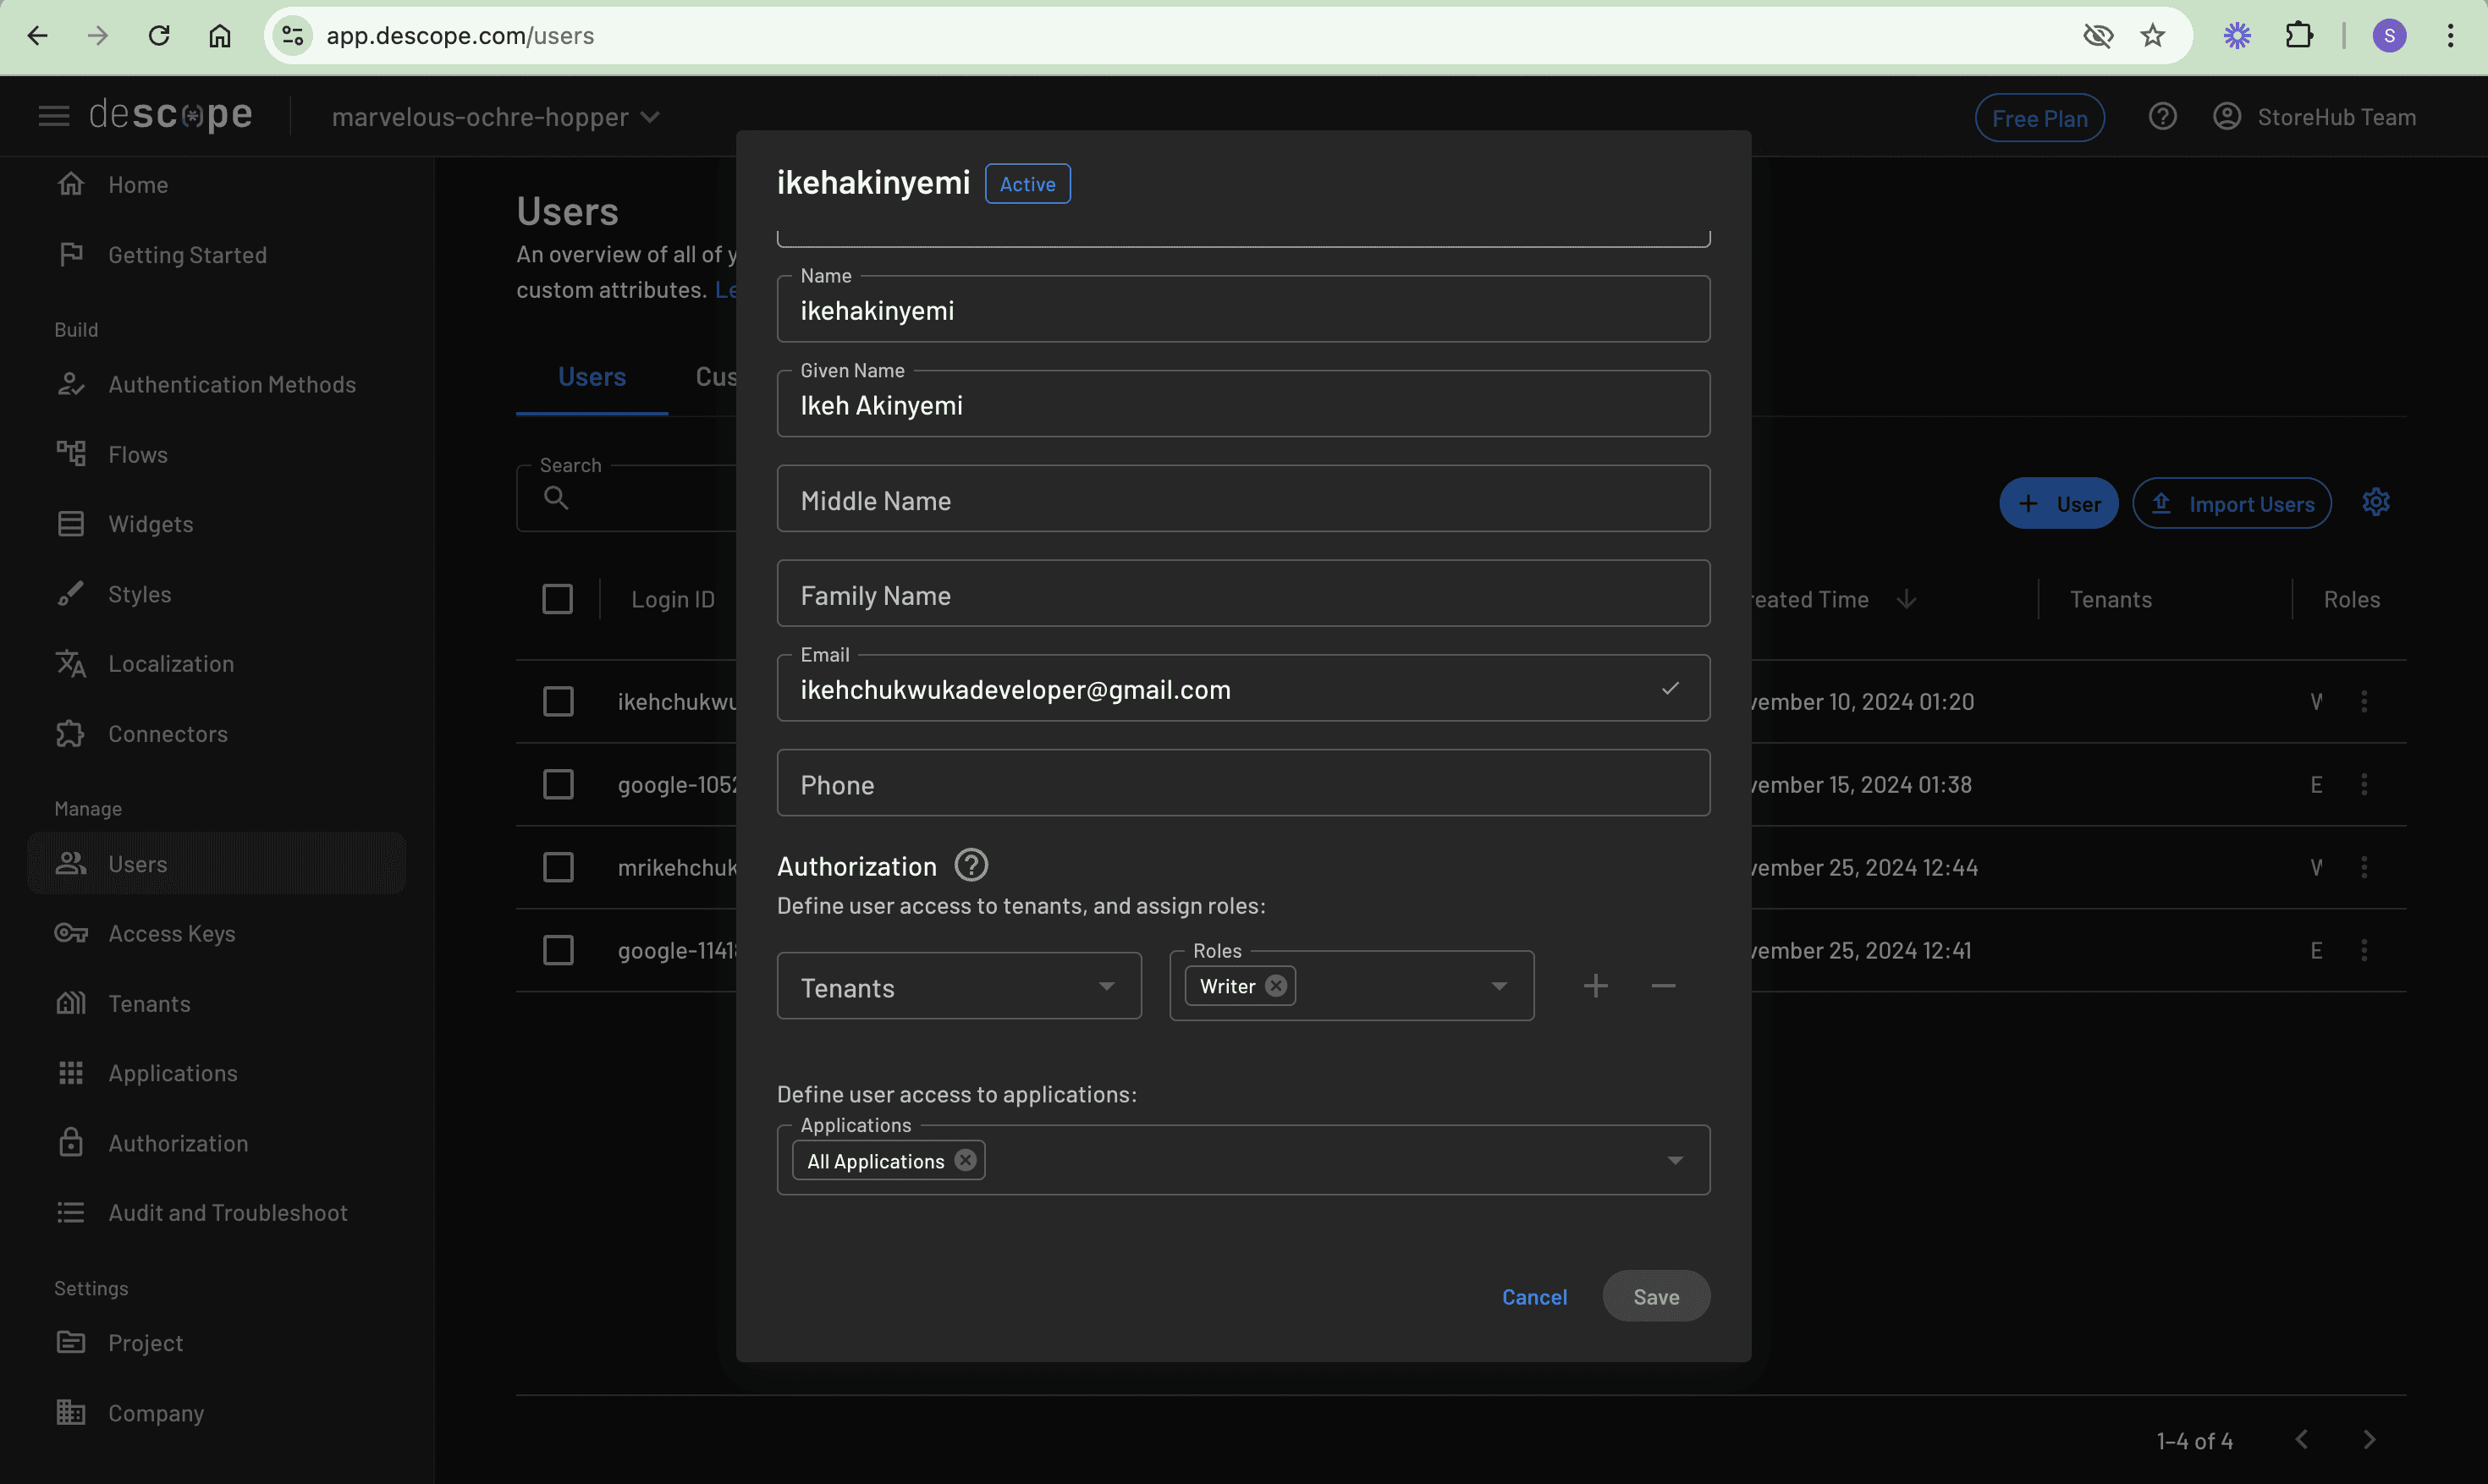
Assigning roles
Once you have created the roles, head over to the Users section and update the existing users by assigning them roles as you chose:
Let’s modify the application to show or hide features based on user roles. Update the Footer code script to include the following permission-checking functionality:
function checkPermission(user, permission) {
    const hasEditorRole = user.roleNames && user.roleNames.some(role =>
        role.toLowerCase() === 'editor'
    );


    const hasWriterRole = user.roleNames && user.roleNames.some(role =>
        role.toLowerCase() === 'writer'
    );

    // Editor has all permissions
    if (hasEditorRole) {
        return true;
    }

    // Writer has create and update permissions
    if (hasWriterRole) {
        return ['create', 'update'].includes(permission);
    }

    return false;
}
When the checkPermission function is called, it checks the user’s roles using case-insensitive comparison (toLowerCase()) and then makes permission decisions based on a simple rule: if the user is an editor, they can access everything; but if the user is a writer, they only get access to create and update actions. Any other role or permission combination results in no access being granted.
Implementing permissions
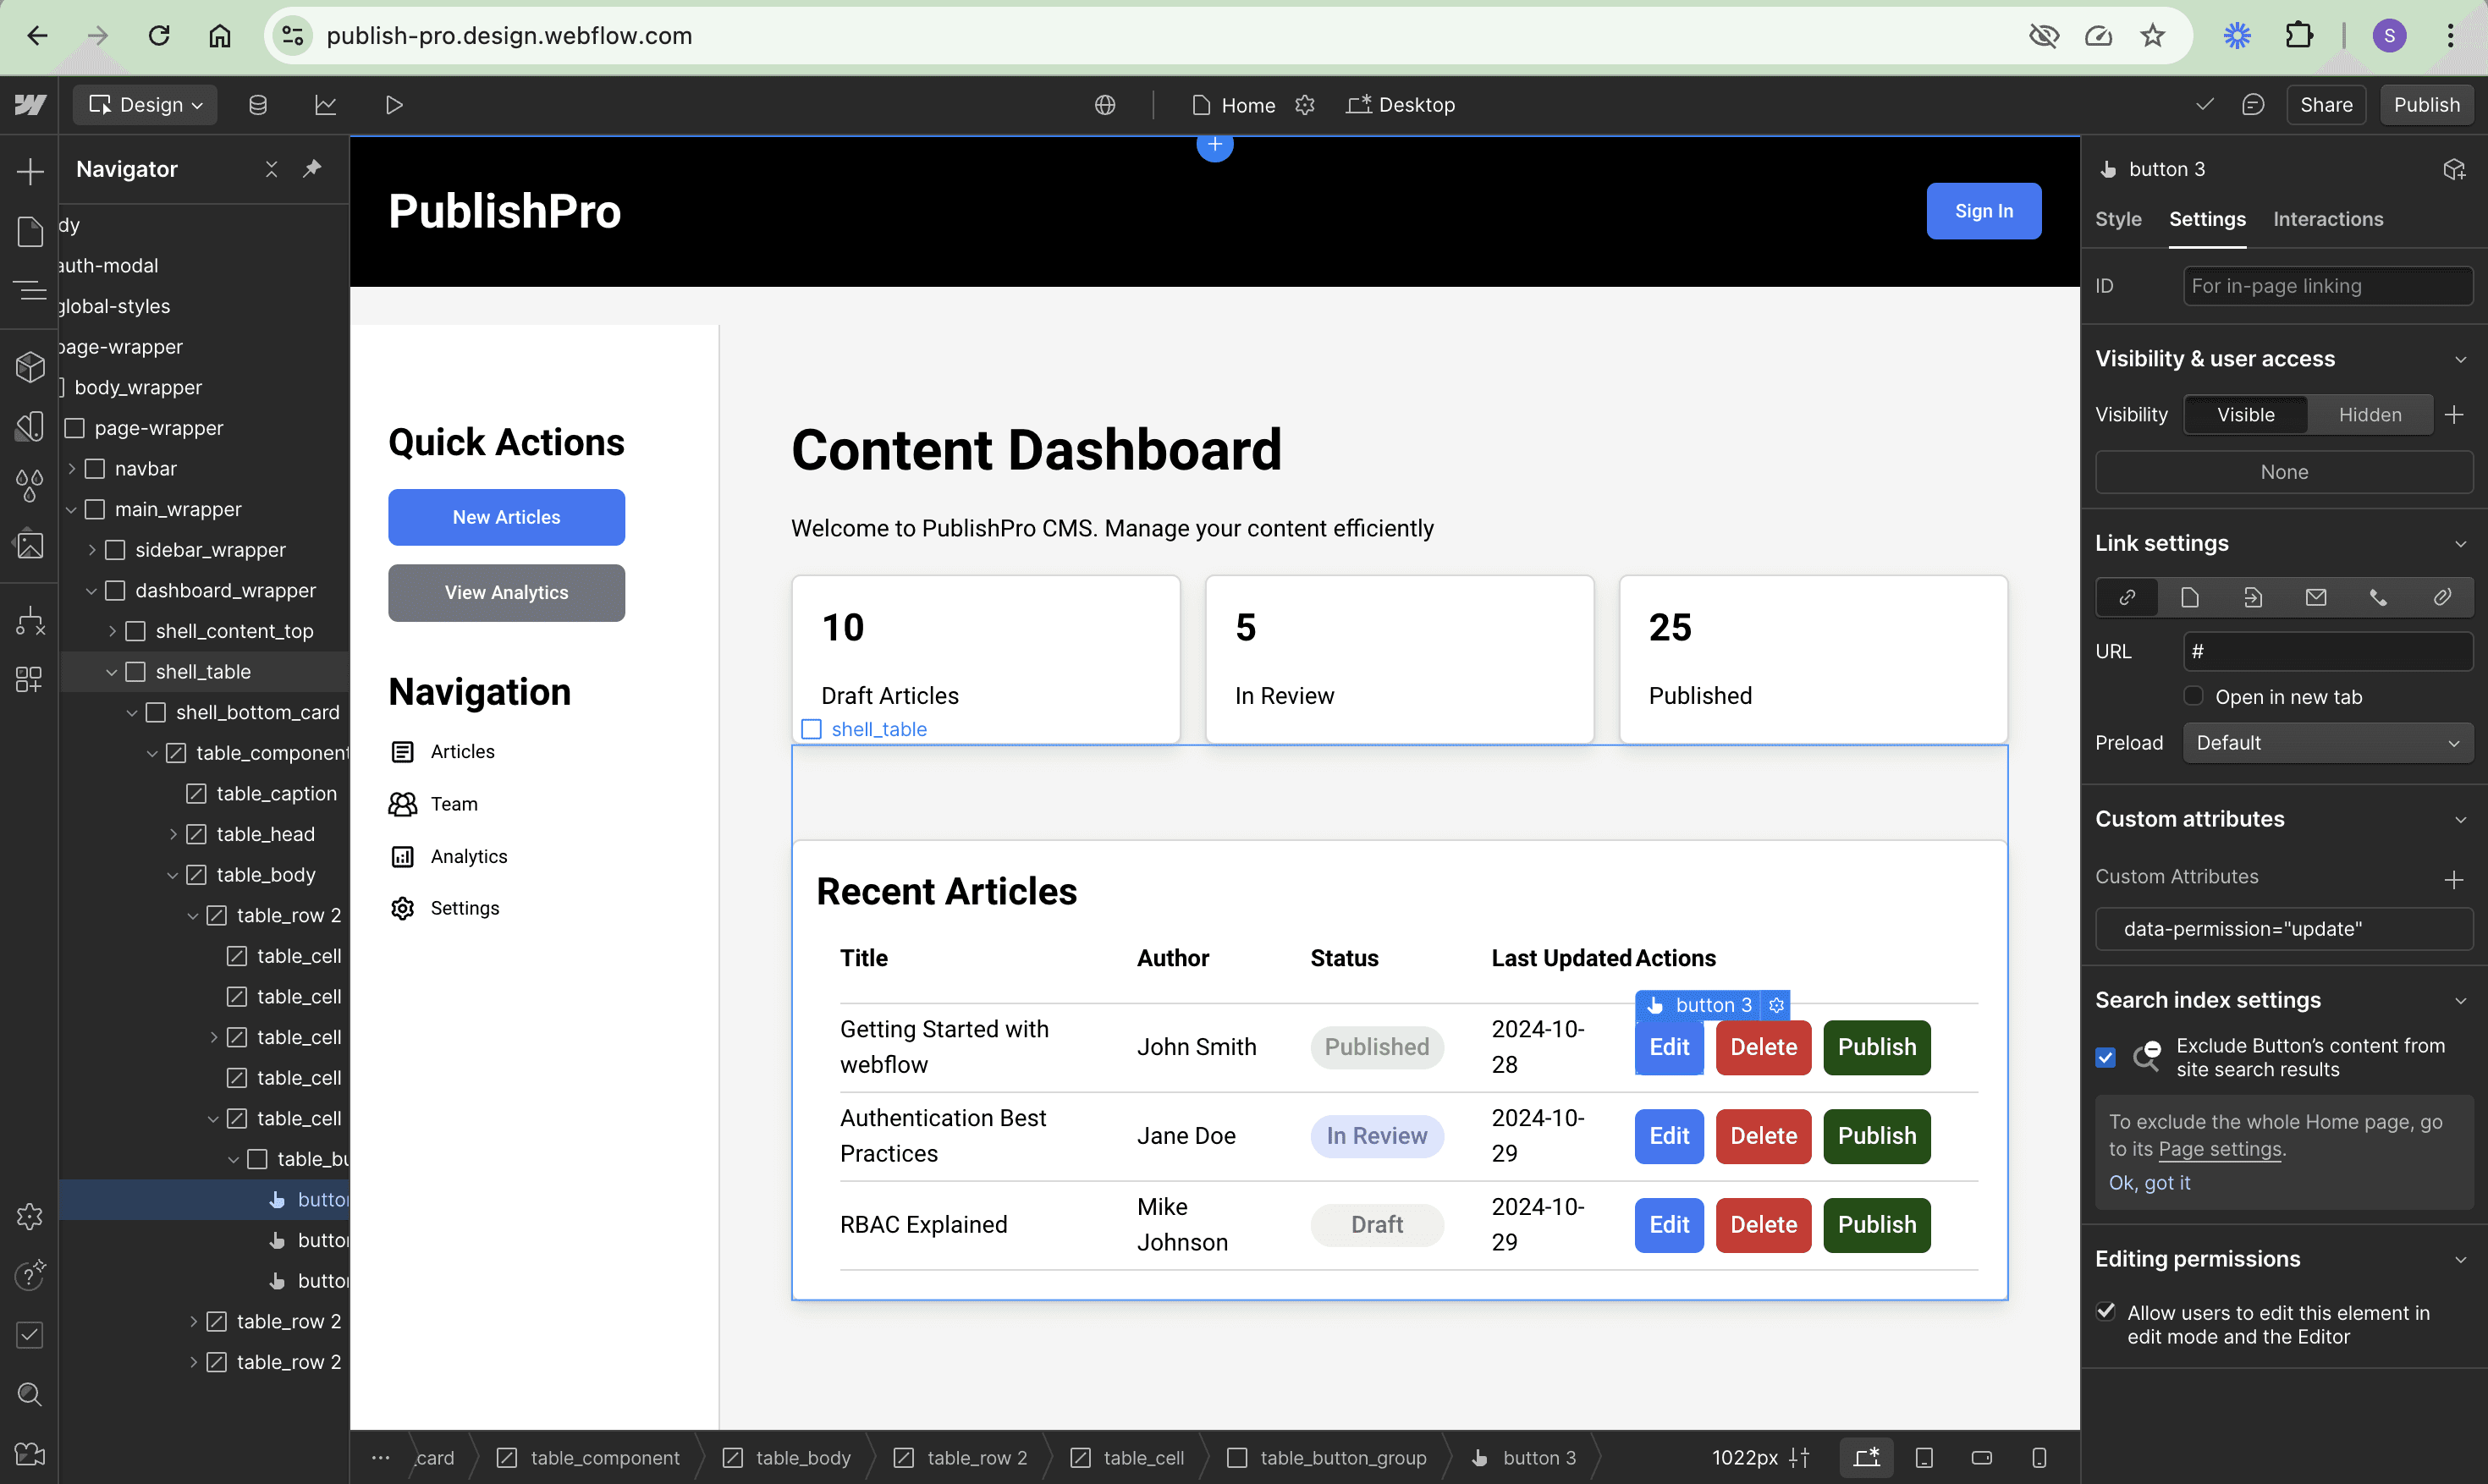
Now, you need to tell the application which UI elements should be restricted based on user roles. You do this by adding custom data attributes to the buttons. These attributes act like permission labels, telling the code which buttons should be visible to which users.
Open the Webflow Editor and navigate to the Settings tab in the right panel. For each button in the interface, you add the appropriate permission attribute based on its function. Add data-permission="update" to Edit buttons, data-permission="delete" to Delete buttons, and data-permission="publish" to Publish buttons. These attributes work with an updateUIBasedOnPermissions function to dynamically show or hide buttons based on the user’s role:
Updating the UI
With that in place, you can update the UI based on the user’s roles when they authenticate. To do so, let’s create the updateUIBasedOnPermissions function by updating the Footer code script to include the following snippet:
function updateUIBasedOnPermissions(user) {
    const permissions = ['create', 'update', 'delete', 'publish'];

    permissions.forEach(permission => {
        const elements = document.querySelectorAll(`[data-permission="${permission}"]`);
        const shouldDisplay = checkPermission(user, permission);
        elements.forEach(element => {
            element.style.display = shouldDisplay ? 'inline-block' : 'none';
        });
    });

    if (user.roleNames) {
        const isEditor = user.roleNames.some(role => role.toLowerCase() === 'editor');
        const isWriter = user.roleNames.some(role => role.toLowerCase() === 'writer');

        document.querySelectorAll('[data-role="editor"]').forEach(element => {
            element.style.display = isEditor ? 'block' : 'none';
        });

        document.querySelectorAll('[data-role="writer"]').forEach(element => {
            element.style.display = isWriter ? 'block' : 'none';
        });
    }
}
The updateUIBasedOnPermissions function manages the visibility of UI elements based on a user’s role and permissions by checking all elements with specific data attributes (data-permission and data-role) and showing or hiding them accordingly.
To ensure this function is called when a user successfully authenticates, update the handleAuthSuccess function as shown here:
function handleAuthSuccess(e) {
    const { refreshJwt, user } = e.detail;

    localStorage.setItem('DSR', refreshJwt);
    localStorage.setItem('user_data', JSON.stringify(user));
    const userDataString = localStorage.getItem('user_data');
    const userData = JSON.parse(userDataString);
    const userDataString = localStorage.getItem('user_data');
    const userData = JSON.parse(userDataString);
    // Update UI based on roles and permissions
    updateUIBasedOnPermissions(userData);

    // Show authenticated UI
    authModal.classList.add('_w-hide');
    signInButton.classList.add('_w-hide');
    userProfile.classList.remove('_w-hide');
    sidebar.classList.remove('_w-hide');
    dashboard.classList.remove('_w-hide');
    mainWrapper.classList.remove('_w-hide');

    if (user.name) {
        userName.textContent = user.name;
        userName.title = "Click to manage profile";
    }
    window.location.reload();
}
In addition, update the initial authentication check to include permission-based UI updates:
// Check auth state on load
const token = localStorage.getItem('DSR');
const userDataString = localStorage.getItem('user_data');

const payload = JSON.parse(atob(token.split('.')[1]));
const expiration = payload.exp * 1000;

if ((Date.now() < expiration) && userDataString) {
    const userData = JSON.parse(userDataString);
    // Update permissions
    updateUIBasedOnPermissions(userData);
    signInButton.classList.add('_w-hide');
    userProfile.classList.remove('_w-hide');
    sidebar.classList.remove('_w-hide');
    dashboard.classList.remove('_w-hide');
    mainWrapper.classList.remove('_w-hide');

    if (userData.name) {
        userName.textContent = userData.name;
    }
} else {
    localStorage.removeItem('DSR');
    localStorage.removeItem('user_data');
}
Updating the sidebar
Finally, you need to apply the permission system to the sidebar’s Quick Actions buttons to ensure they follow the same role-based rules as the other interface elements. In the Webflow Editor, open the Settings panel for the New Articles button in the sidebar. Just as you did with the other buttons, add the data-permission="create" attribute to ensure only users with article-creation permissions can see this button.
The Analytics button requires a different approach since it’s a feature specifically for editors. Open its Settings panel and add the data-role="editor" attribute. Using a role-based attribute here makes sense because analytics access is tied to the editor role itself rather than a specific permission.
These attribute additions connect the Quick Actions buttons to the permission-checking system built, ensuring consistent access control throughout the interface. When a user logs in, these buttons automatically show or hide based on their assigned role, just like the other UI elements:
The next step would be to implement these same permission checks on your backend API using one of the Descope SDKs, but that’s beyond the scope of this tutorial since the focus is on the frontend implementation with Webflow.
Conclusion
In this tutorial, you transformed a basic CMS into a secure, role-aware application using the Descope authentication and authorization capabilities. What makes this implementation particularly powerful is how robust security features were achieved without complex backend code, making it perfect for Webflow applications. Through the Descope visual flow editor, you created a customized authentication flow that offers both email OTP and social login options, providing users with flexible, secure authentication methods.
The integration of the Descope web component and user profile widget, combined with RBAC, demonstrates how modern authentication can be implemented in Webflow applications without sacrificing security or user experience. This tutorial transforms a vulnerable Webflow app into a more secure CMS where content creators and editors can collaborate safely within their designated roles.
To stay up to date with more developer tutorials, subscribe to the Descope blog or follow us on LinkedIn.