Table of Contents
Set up your Descope account and project
This tutorial was written by Sesethu Mhlana, a software engineer with a passion for all stages of the development cycle. Connect with him on his LinkedIn to see more of his work!
Authentication and access control provide essential security for an Angular app and maintain data integrity. Authentication verifies user identities to prevent unauthorized access, while access control manages what authenticated users can do. Role-based access control (RBAC) adds an extra layer of security by assigning specific roles to users and restricting access based on the permissions set for these roles, allowing for more granular permission control.
Descope is a customer authentication and identity management platform that allows you to easily integrate authentication and RBAC into your angular application, without extensive custom coding.
This article will walk you through the process of integrating Descope into an Angular application. You will learn how to set up passwordless logins using a magic link authentication flow and implement secure access control with minimal coding in an Angular application.
Set up your Descope account and project
To integrate Descope authentication into the Angular application, you initially have to set up a Descope account. Descope offers a Free Forever account, which enables users to develop and test their applications at no cost before deploying them to production. To set up a Free Forever account navigate to the Descope Sign up page and follow the instructions.
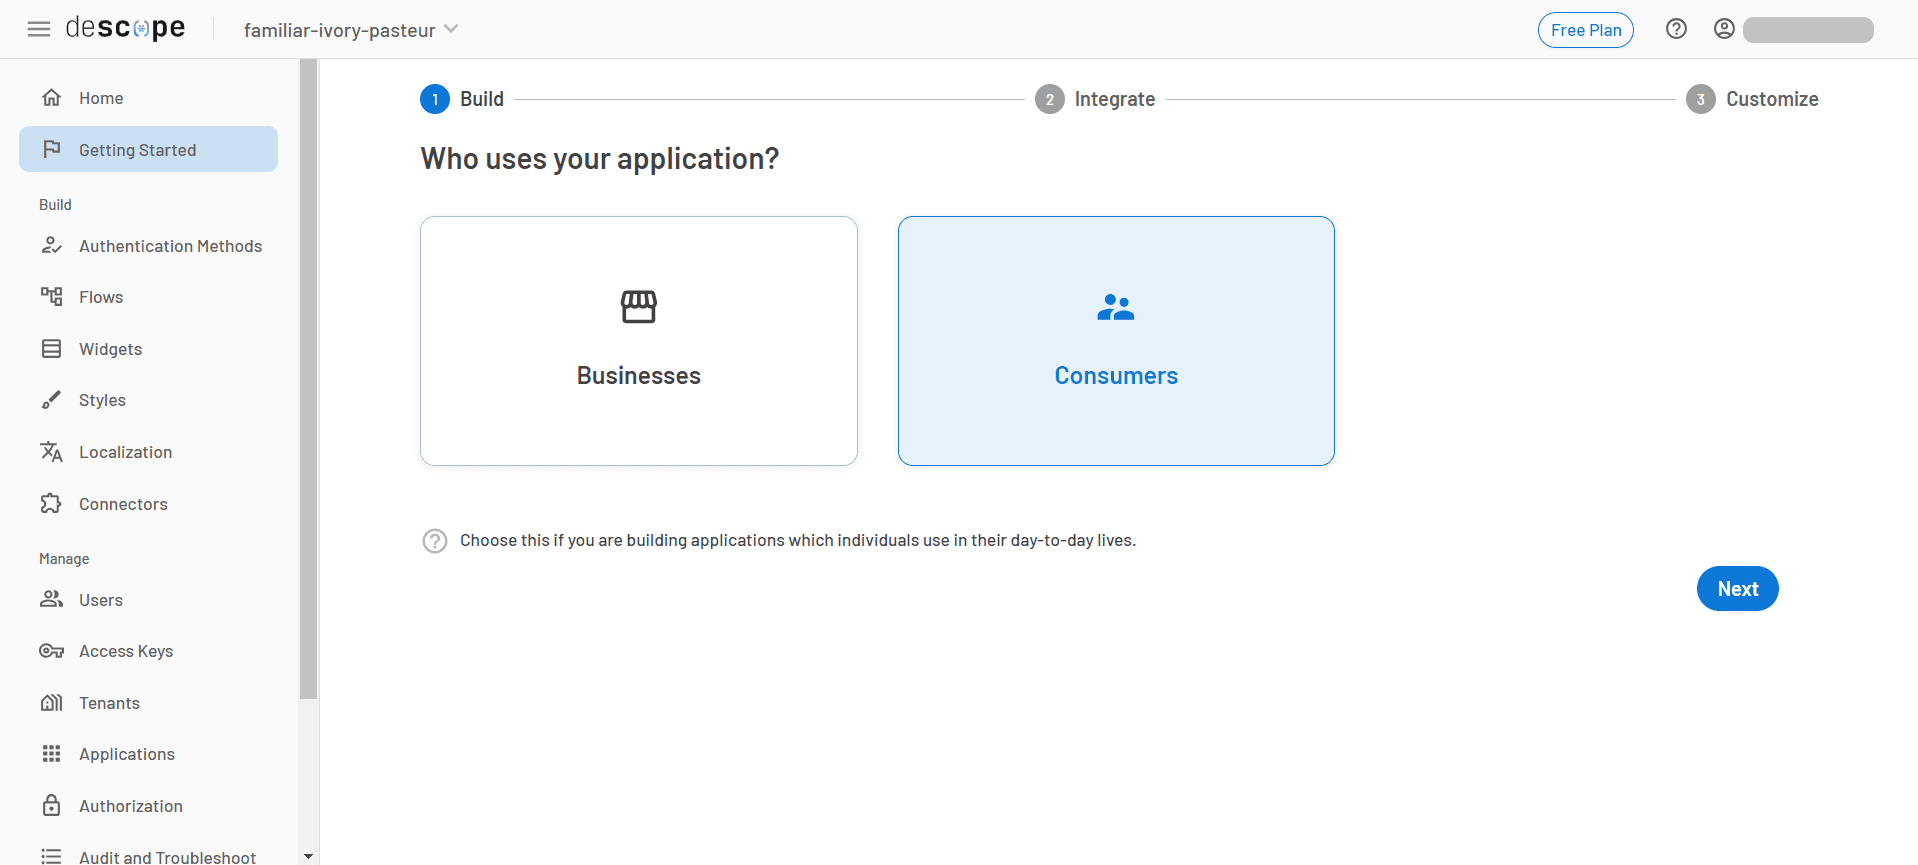
When this is complete, you can then set up a project. This project will define the authentication flow that will be integrated into the Angular app. Sign in to Descope using your new credentials. Click Getting Started, choose Consumers, and click Next:
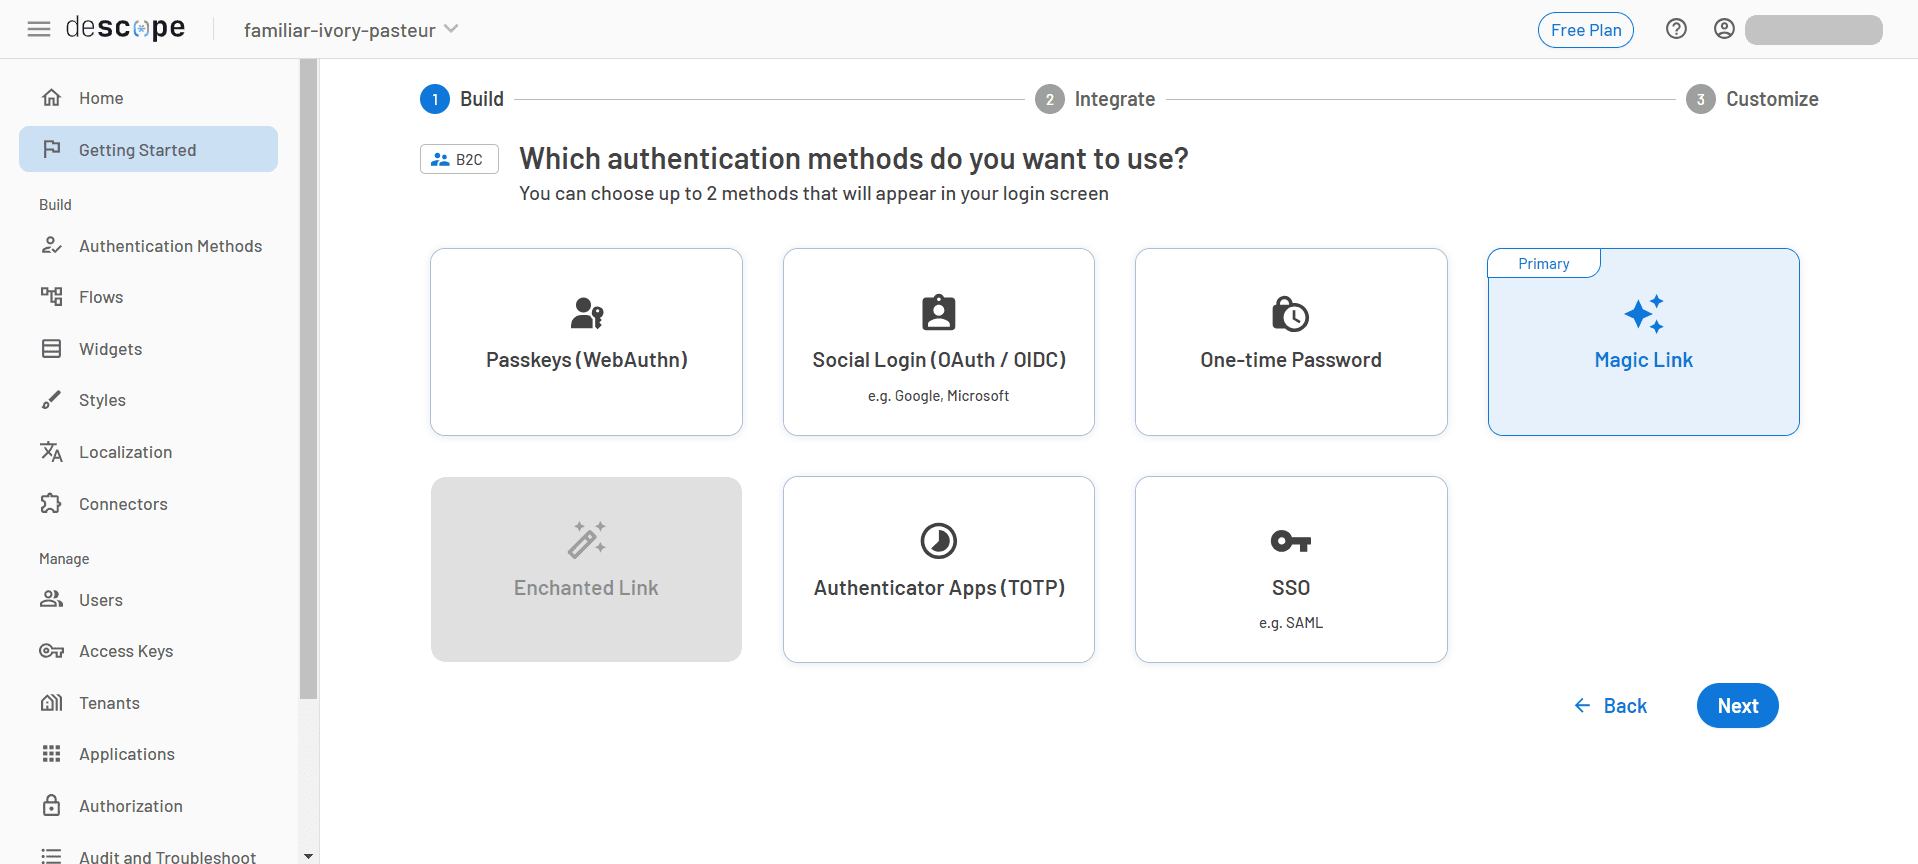
Choose Magic Link as the form of authentication and click Next:
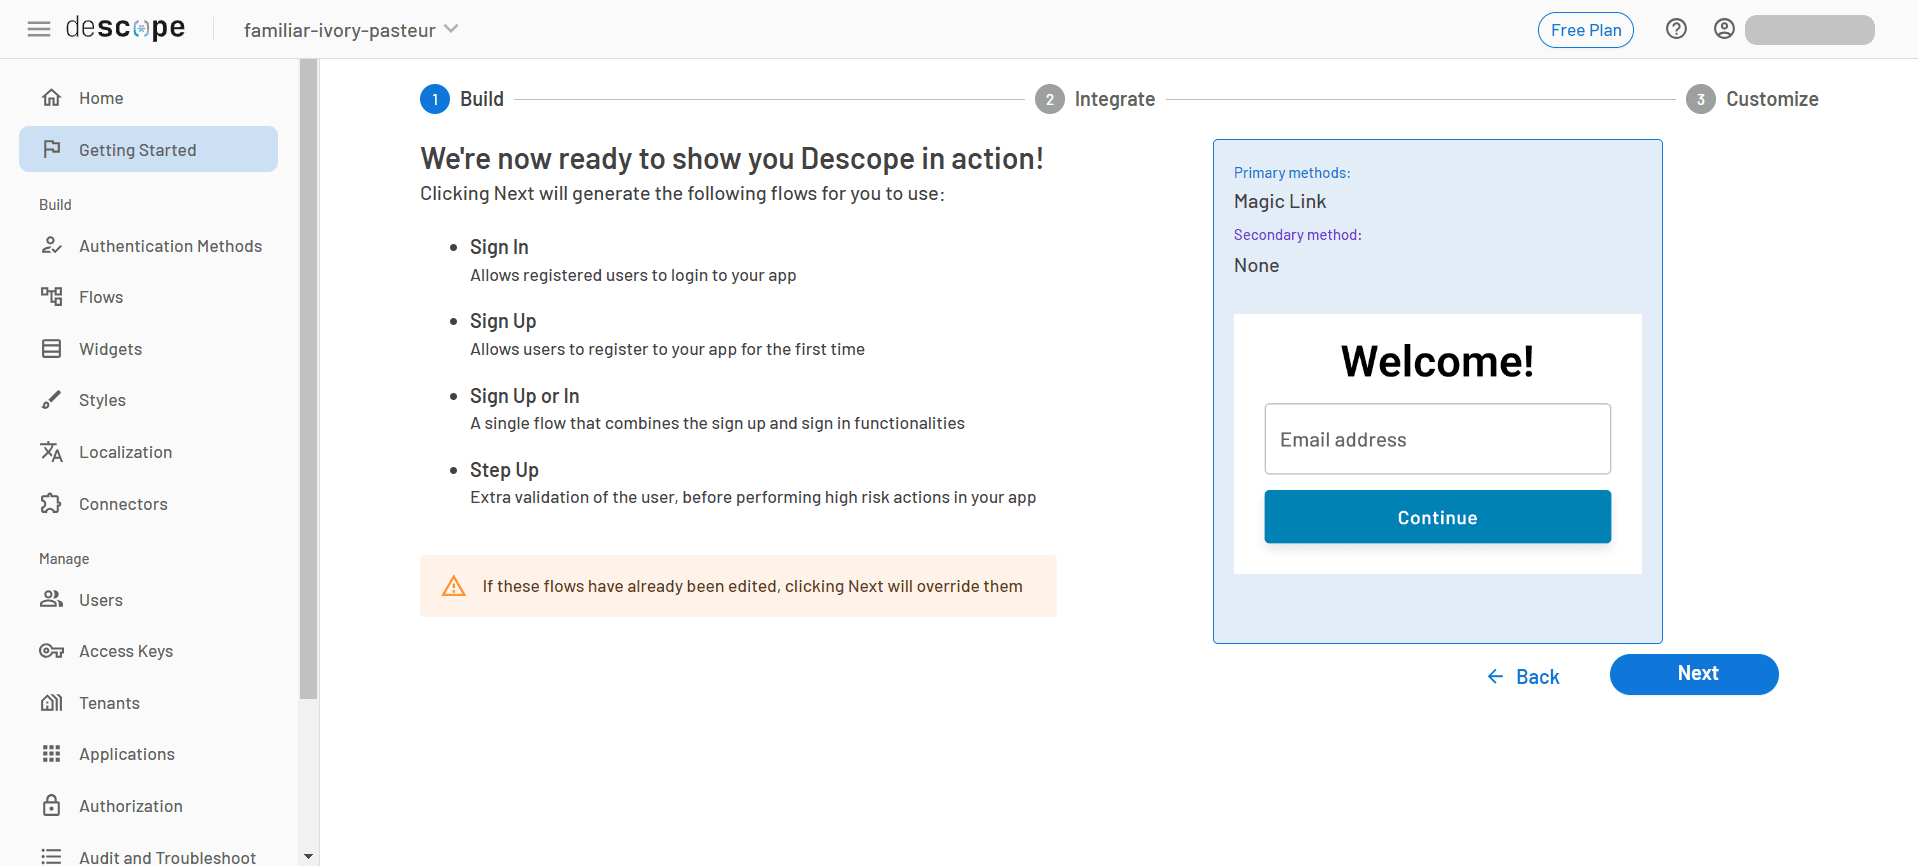
Now choose any multi-factor authentication (MFA) option of your choice or choose to go ahead without MFA. MFA is always recommended as an additional security layer. After this step, you will see a preview of the selected options, and you can click Next again:
You’re now on the Integrate stage of the Getting Started wizard. Here, you see code samples showing how to integrate with different frameworks. Locate the project ID for any of the code samples. You will need this later.
You’re now ready to integrate Descope authentication with an Angular app.
Create a starter app
You’re going to use this basic Angular application to add the authentication flow you have created.
Open a terminal to run the following commands. You can also run them in Visual Studio Code. To do this, open Visual Studio Code. On the top Menu bar, click Terminal > New Terminal.
Clone the application using the following command:
git clone https://github.com/smhlanadev/descope-angular.gitNavigate to the starter app inside the cloned folder:
cd descope-angular/starter-appInstall dependencies:
npm installRun the application:
npm startAfter successfully compiling, navigate to the URL shown in the terminal. It’s usually http://localhost:4200/. This displays the following page:
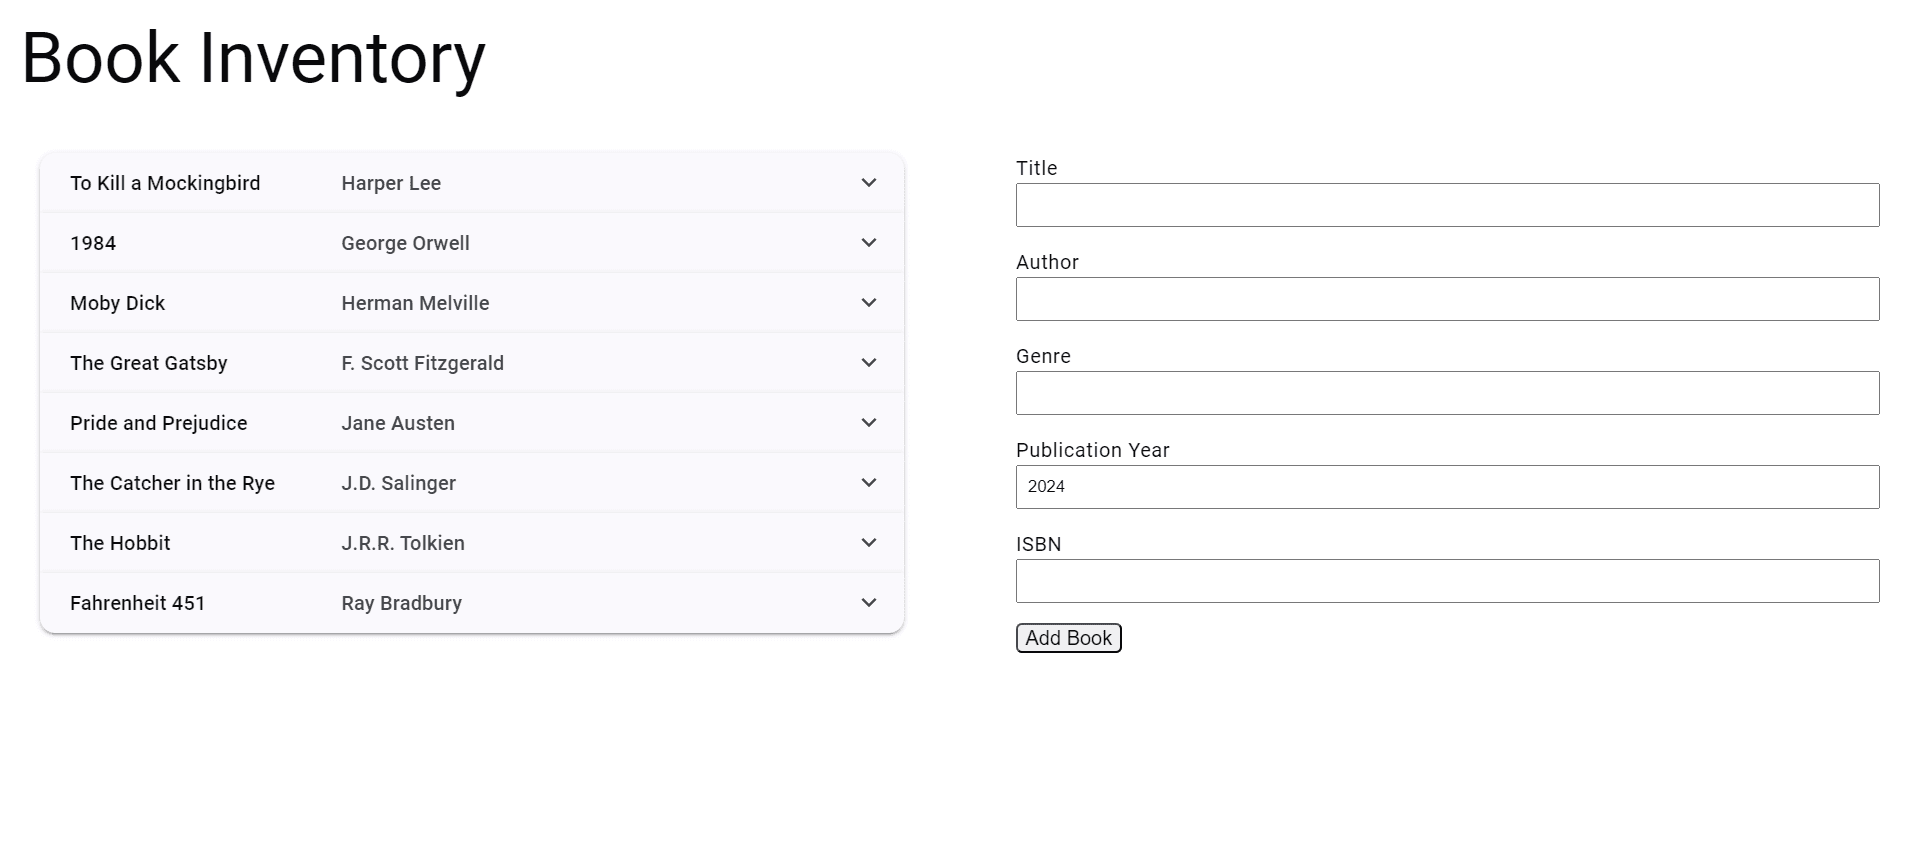
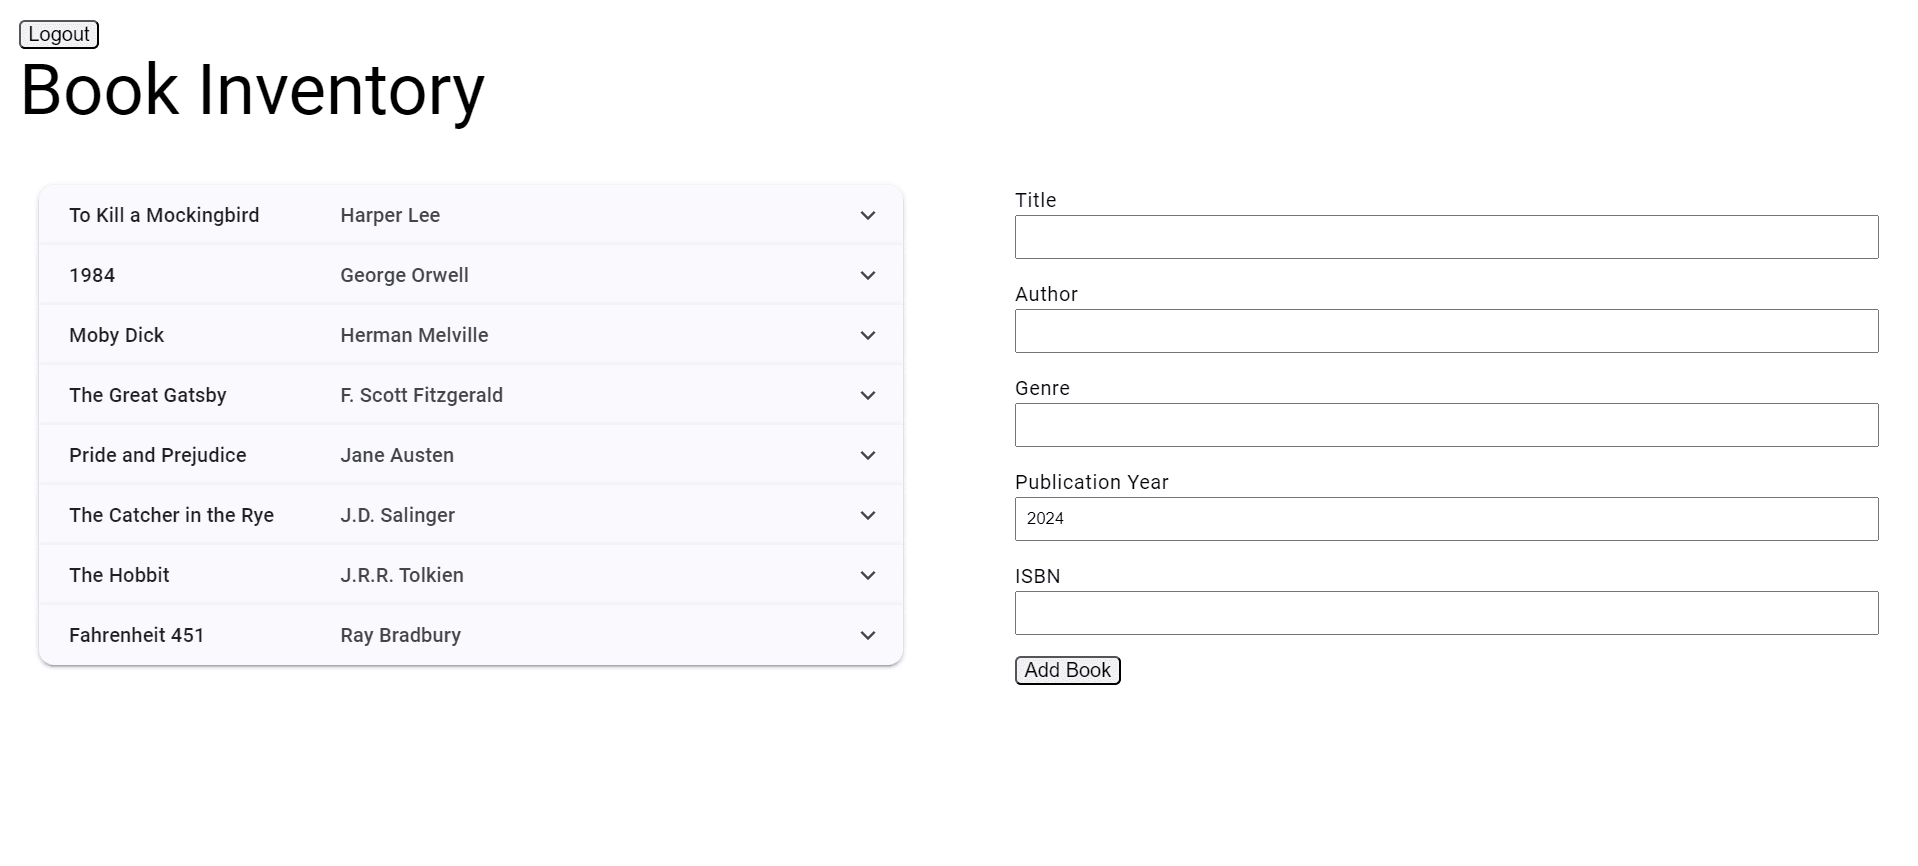
The application keeps an inventory of books and has the ability to view the books with their details and add new books using a form. Clicking each item expands it and displays more information about the book. This also provides an option to delete a book.
Lack of authentication in this application can compromise the data and allow users to perform actions they should not be allowed to, such as adding and deleting books. This can disrupt normal operations and harm the application’s integrity.
You can now terminate the running application using Ctrl + C (Windows) or Cmd + C (macOS) in the terminal.
Integrate the Descope authentication flow
You can now integrate the magic link authentication flow into the application. Run the following command to install the Descope SDK for Angular:
npm install @descope/angular-sdkOpen starter-app\src\app\app.module.ts. Add the following function below the imports:
export function initializeApp(authService: DescopeAuthService) {
    return () => zip([authService.refreshSession(), authService.refreshUser()]);
}
This initializes the DescopeAuthModule with a projectId configuration and uses the forRoot static method to enable global setup for authentication in the Angular application. Replace <project_id> application with the project ID you copied in the Getting Started wizard.
In the providers array, add the following:
{
  provide: APP_INITIALIZER,
  useFactory: initializeApp,
  deps: [DescopeAuthService],
  multi: true
},
provideHttpClient(withInterceptors([descopeInterceptor]))
This ensures that necessary initialization tasks (like refreshing authentication) are completed before the app is fully operational, and that HTTP requests are handled with the descopeInterceptor.
The starter-app\src\app\app.module.ts file should now look like this:
import { APP_INITIALIZER, NgModule } from '@angular/core';
import { BrowserModule } from '@angular/platform-browser';

import { AppRoutingModule } from './app-routing.module';
import { AppComponent } from './app.component';
import { DescopeAuthModule, DescopeAuthService, descopeInterceptor } from '@descope/angular-sdk';
import { provideAnimationsAsync } from '@angular/platform-browser/animations/async';
import { ReactiveFormsModule } from '@angular/forms';
import { MatExpansionModule } from '@angular/material/expansion';
import { zip } from 'rxjs';
import { provideHttpClient, withInterceptors } from '@angular/common/http';

export function initializeApp(authService: DescopeAuthService) {
    return () => zip([authService.refreshSession(), authService.refreshUser()]);
}

@NgModule({
  declarations: [
    AppComponent
  ],
  imports: [
    BrowserModule,
    AppRoutingModule,
    ReactiveFormsModule,
    MatExpansionModule,
    DescopeAuthModule.forRoot({
            projectId:  <project_id>
        })
  ],
  providers: [
    provideAnimationsAsync(),
    {
      provide: APP_INITIALIZER,
      useFactory: initializeApp,
      deps: [DescopeAuthService],
      multi: true
    },
    provideHttpClient(withInterceptors([descopeInterceptor]))
  ],
  bootstrap: [AppComponent]
})
export class AppModule { }
In starter-app\src\app\app.component.ts, add the following variables and methods:
flowId = 'sign-up-or-in'
user: any;
isLoggedIn: boolean = false;

ngOnInit(): void {
  this.login();
}

onLoginSuccess() {
  this.login();
}

onLoginError(error: CustomEvent) {
    console.log("Error!", error)

  this.logout();
}

login() {
  combineLatest([
    this.authService.session$,
    this.authService.user$
  ]).subscribe(([session, descopeUser]) => {
    this.isLoggedIn = session.isAuthenticated;

    if (descopeUser.user) {
      this.user = descopeUser.user;
      this.user.roles = this.authService.descopeSdk.getJwtRoles(session.sessionToken!, '');
      this.user.permissions = this.authService.descopeSdk.getJwtPermissions(session.sessionToken!, '');
    } else {
      this.user = null;
    }
  });
}

logout() {
  this.user = null;
  this.isLoggedIn = false;
  this.authService.descopeSdk.logout();
}
Import the DescopeAuthService in the import section:
import { DescopeAuthService } from '@descope/angular-sdk';Inject DescopeAuthService into the constructor:
constructor(private authService: DescopeAuthService) {}Update the class signature to implement OnInit:
export class AppComponent implements OnInit {This code manages user authentication by defining a flowId, which you will use to tell Descope that you’re using the Sign Up or In flow. It maintains a user object and an isLoggedIn flag. When a login is successful, it updates the user object with the details from the authService and sets isLoggedIn to true. Conversely, if a login attempt fails, it logs the error, sets the user object to null, sets isLoggedIn to false, and logs the user out using authService.
The final code looks like this:
import { Component, signal } from '@angular/core';
import { Book } from './book';
import { books } from './data';
import { FormControl, FormGroup, Validators } from '@angular/forms';
import { DescopeAuthService } from '@descope/angular-sdk';

@Component({
  selector: 'app-root',
  templateUrl: './app.component.html',
  styleUrl: './app.component.css'
})
export class AppComponent {
  title = 'Book Inventory';
  listOfBooks: Book[] = books;
  readonly panelOpenState = signal(false);
  bookForm = new FormGroup({
    title: new FormControl('', Validators.required),
    author: new FormControl('', Validators.required),
    genre: new FormControl('', Validators.required),
    publicationYear: new FormControl(2024, Validators.required),
    isbn: new FormControl('', Validators.required),
  });

  flowId = 'sign-up-or-in'
  user: any;
  isLoggedIn: boolean = false;

  constructor(private authService: DescopeAuthService) {}

   ngOnInit(): void {
     this.login();
   }

   onLoginSuccess() {
     this.login();
   }

   onLoginError(error: CustomEvent) {
     console.log("Error!", error)

     this.logout();
   }

   login() {
     combineLatest([
       this.authService.session$,
       this.authService.user$
     ]).subscribe(([session, descopeUser]) => {
       this.isLoggedIn = session.isAuthenticated;

       if (descopeUser.user) {
         this.user = descopeUser.user;
         this.user.roles = this.authService.descopeSdk.getJwtRoles(session.sessionToken!, '');
         this.user.permissions =   this.authService.descopeSdk.getJwtPermissions(session.sessionToken!, '');
     } else {
       this.user = null;
     }
   });
 }

   logout() {
     this.user = null;
     this.isLoggedIn = false;
     this.authService.descopeSdk.logout();
   }


  addBook() {
    if (!this.bookForm.valid) {
      alert('Please provide all the values for the book');
      return;
    }

    const value: Book = this.bookForm.value as Book;
    value.id = Date.now();
    books.push(value);
    this.bookForm.reset();
  }

  deleteBook(id: number) {
    const book: Book | undefined = books.find(x => x.id === id);
    if (!book) return;

    books.splice(books.indexOf(book, 1));
  }
}
```

In starter-app\src\app\app.component.html, add the following template outside of the existing div:
```html
<div class="descope-container">
  <descope
    *ngIf="!user && !isLoggedIn"
    (success)="onLoginSuccess()"
    (error)="onLoginError()"
    [flowId]="flowId"
  >
  </descope>
</div>
This conditionally renders the <descope> component based on the user’s login state and shows the login screen if the user is not logged in. It also handles login success and error events by calling corresponding methods and passes a configuration parameter (flowId) to the <descope> component. In the other div, add the following condition:
*ngIf="user && isLoggedIn"This shows the Inventory page if the user is logged in. Add a button that will call the logout function:
<button class="action-button" mat-stroked-button (click)="logout()">Logout</button>The final template looks like this:
<div class="descope-container">
  <descope
    *ngIf="!user && !isLoggedIn"
    (success)="onLoginSuccess()"
    (error)="onLoginError($event)"
    [flowId]="flowId"
  >
  </descope>
</div>

<div class="container" *ngIf="user && isLoggedIn">
<button class="action-button" mat-stroked-button (click)="logout()">Logout</button>
  <h1> {{ title }} </h1>
  <div class="split left">
    <mat-accordion>
      <mat-expansion-panel *ngFor="let book of listOfBooks" (opened)="panelOpenState.set(true)" (closed)="panelOpenState.set(false)">
        <mat-expansion-panel-header>
          <mat-panel-title> {{ book.title }} </mat-panel-title>
          <mat-panel-description>
          {{ book.author }}
          </mat-panel-description>
        </mat-expansion-panel-header>
        <p>Genre: {{ book.genre }}</p>
        <p>Year: {{ book.publicationYear }}</p>
        <p>ISBN: {{ book.isbn }}</p>
        <button class="action-button" mat-stroked-button (click)="deleteBook(book.id)">Delete</button>
      </mat-expansion-panel>
    </mat-accordion>
  </div>

  <div class="split right">
    <form [formGroup]="bookForm" (ngSubmit)="addBook()">
      <div>
        <label for="title">Title</label>
        <input type="text" id="title" name="title" formControlName="title">
      </div>

      <div>
        <label for="author">Author</label>
        <input type="text" id="author" name="author" formControlName="author">
      </div>

      <div>
        <label for="genre">Genre</label>
        <input type="text" id="genre" name="genre" formControlName="genre">
      </div>

      <div>
        <label for="publicationYear">Publication Year</label>
        <input type="text" id="publicationYear" name="publicationYear" formControlName="publicationYear">
      </div>

      <div>
        <label for="isbn">ISBN</label>
        <input type="text" id="isbn" name="isbn" formControlName="isbn">
      </div>

      <button type="submit" class="action-button" mat-stroked-button>Add Book</button>
    </form>
  </div>
</div>
```

In starter-app\src\app\app.component.css, add this style for the <descope> component:
```css
.descope-container {
  display: flex;
  justify-content: center;
}
Now, run the application to see the authentication in action. When the application loads, the login screen is displayed:
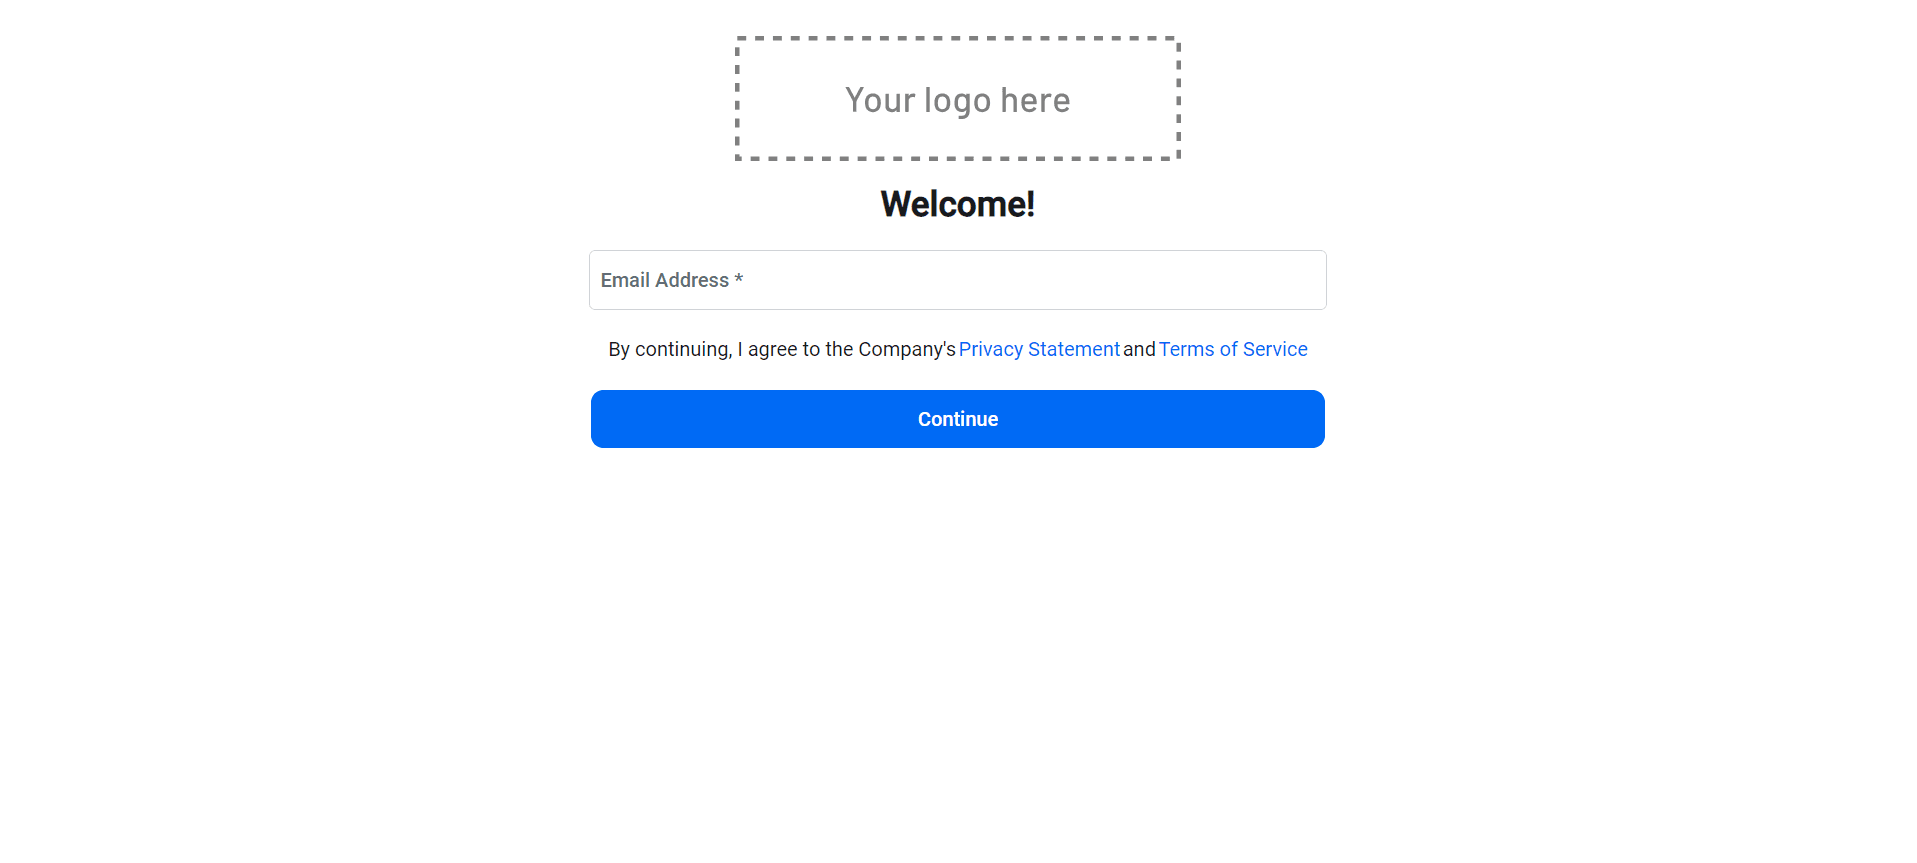
Provide the email address you wish to use for authentication and click Continue. You will receive an email with a link. Click the link to complete authentication. Then, you will be redirected to the application. Once authenticated, the inventory page will be displayed as before with the addition of the “Logout” button.
Implement RBAC
Now that authentication has been set up, you can go a step further and implement RBAC to restrict or control access to certain parts of the application based on the user’s assigned role.
Set up user permissions and roles
You have to define the permissions and roles and set them up in the Descope console before you can use them in the application. You will set up two roles for the inventory application: one for the admin who will have the ability to list, add, and delete books; and one for a guest who will only be able to list the books.
In the Descope console, navigate to the Authorization page and select the Permissions tab. Add a new permission by clicking the + Permission button, type “list” in the Name field, and click Add:
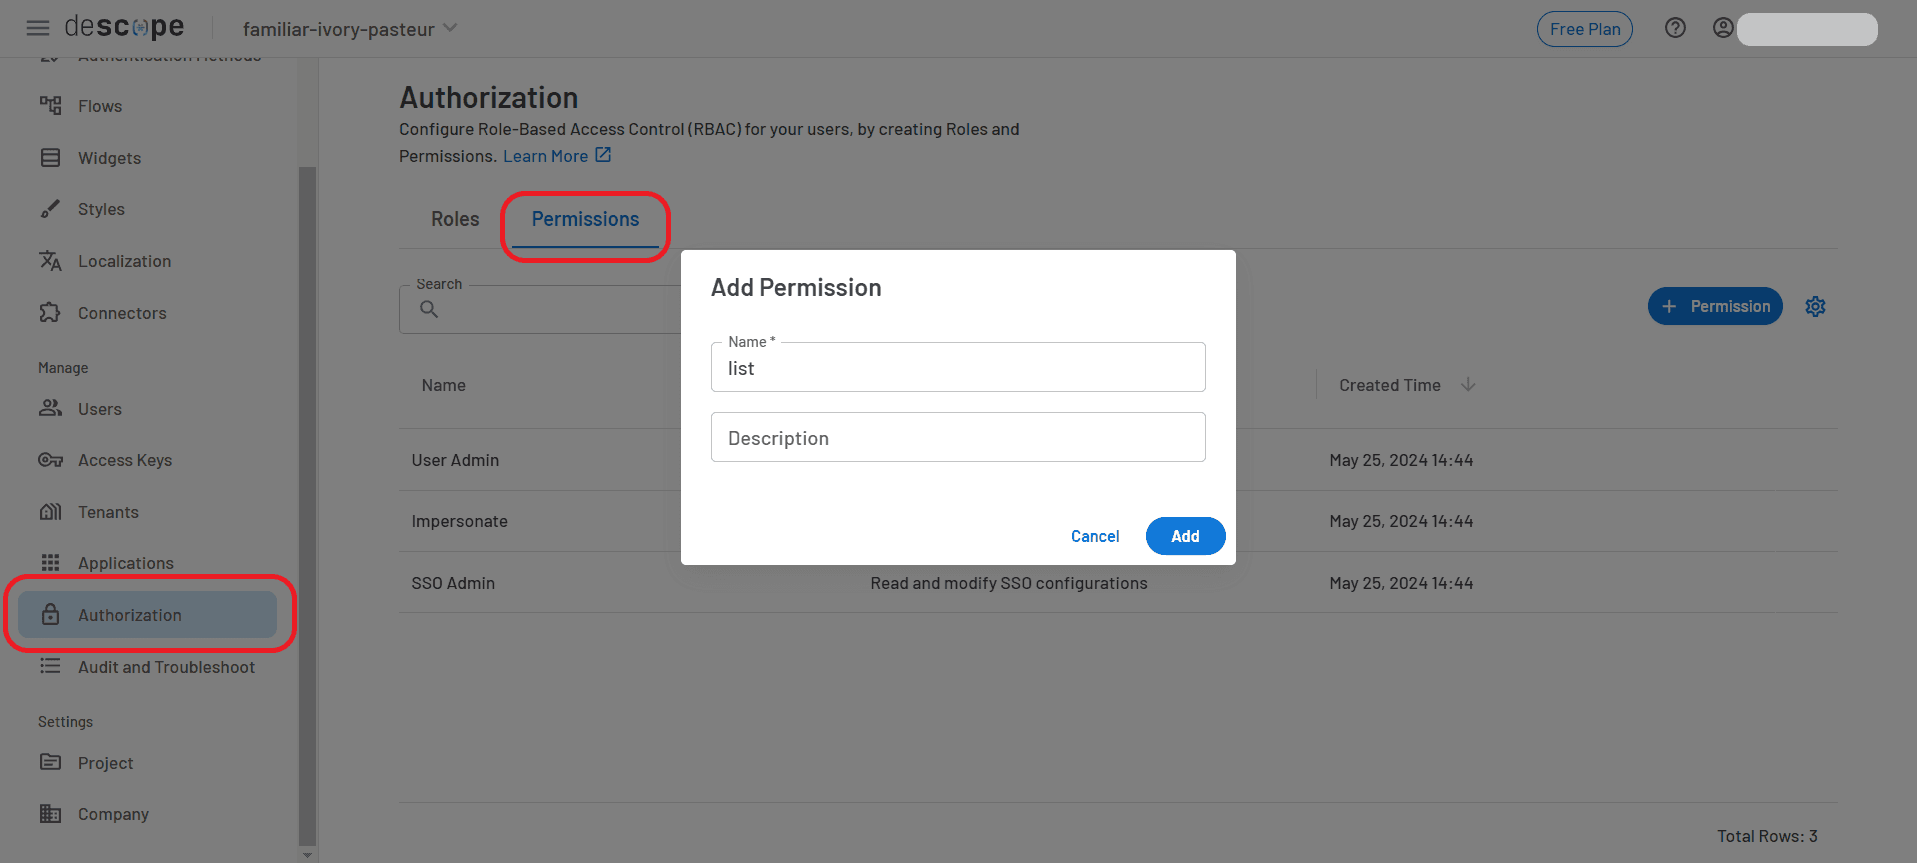
Now add two more permissions named add and delete. To add a role, select the Roles tab, click the + Roles button, and type “Admin” in the Name field. Add the list, add, and delete permissions in the Permissions field. Finally, click Add:
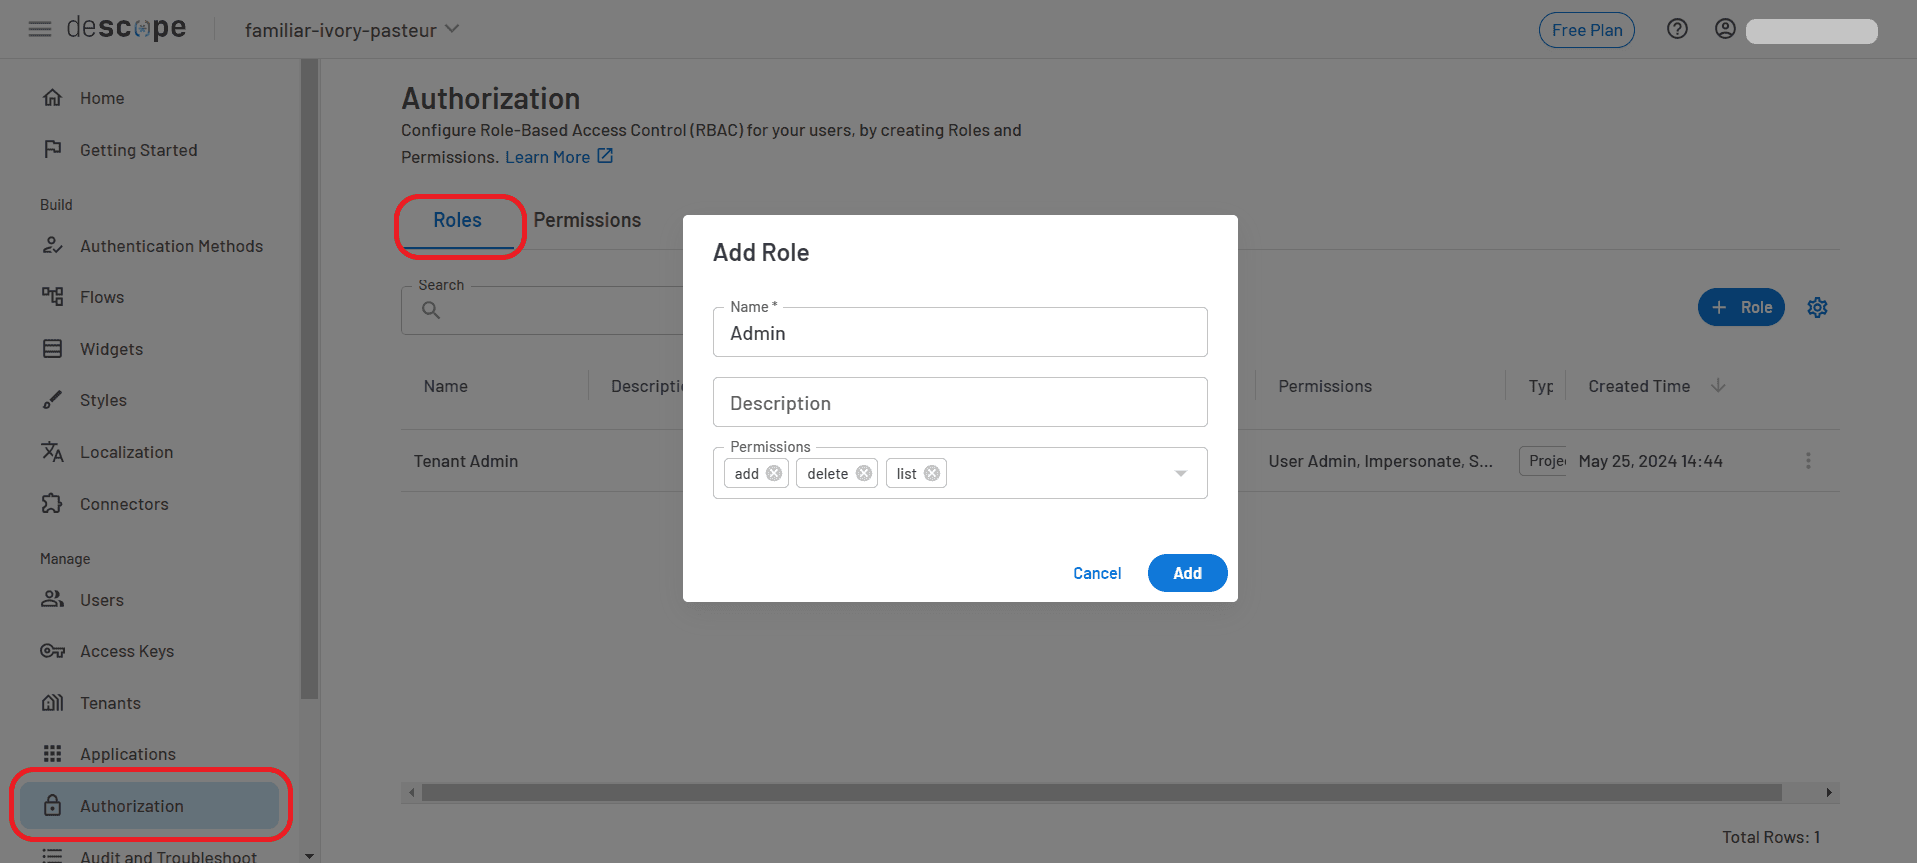
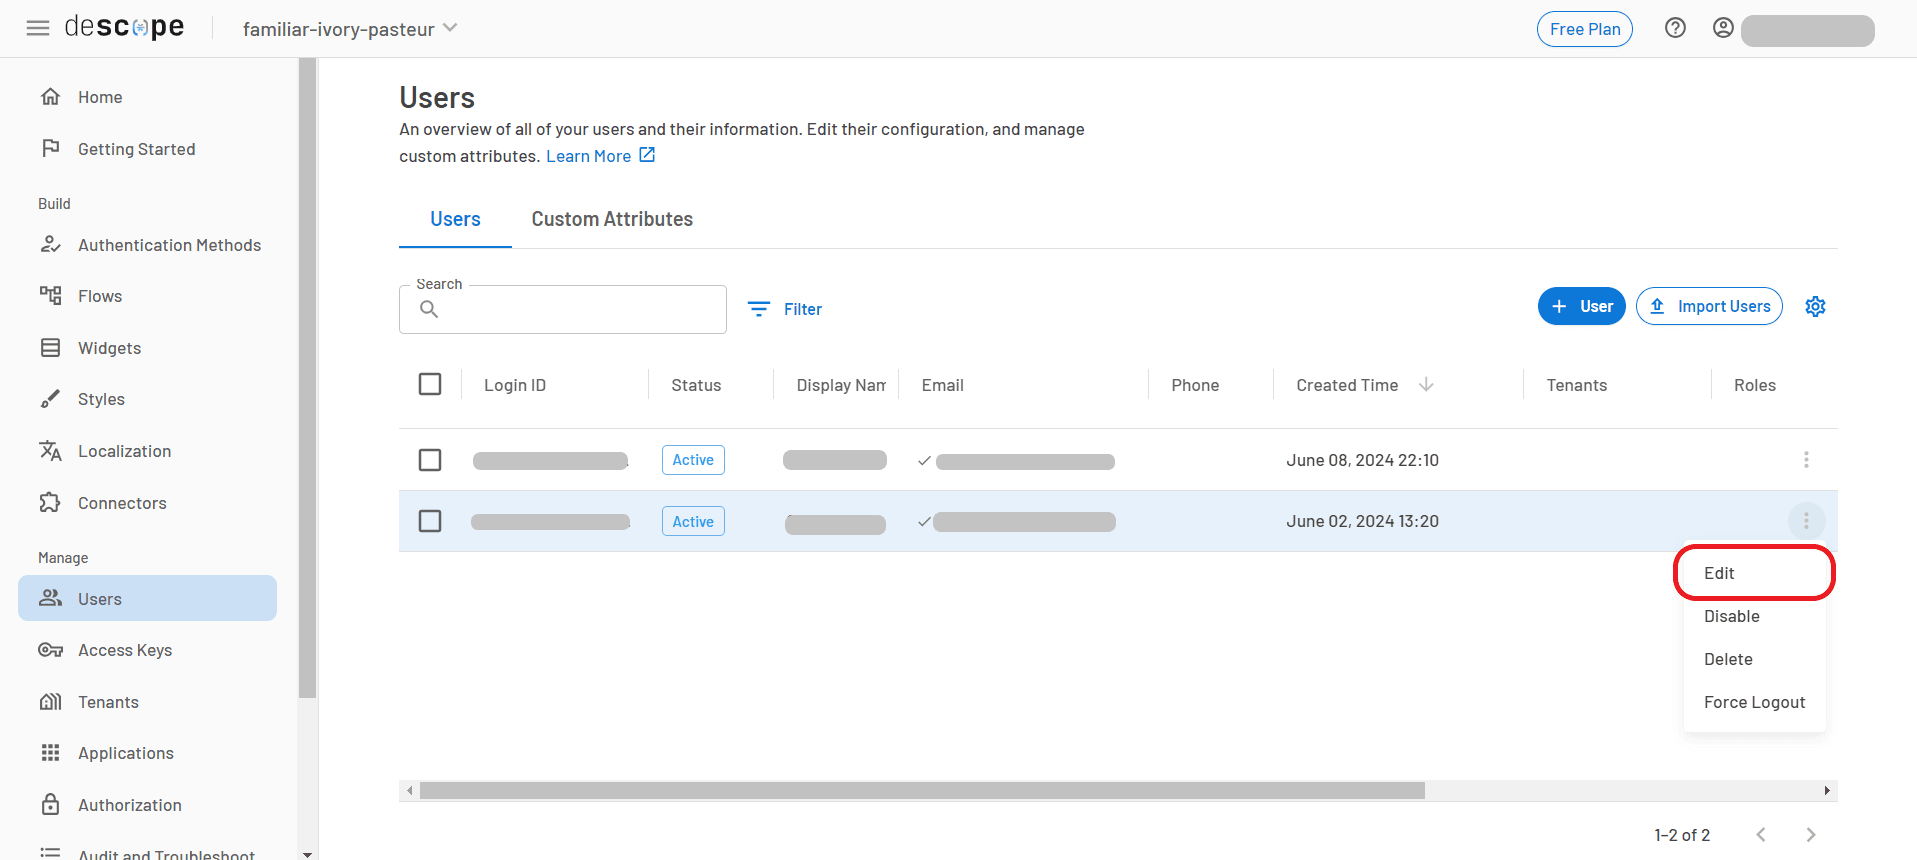
Create an additional role named Guest and grant it the list permission. You can now assign roles to users. Navigate to Users, locate the user you want to assign a role to, and select Edit from the menu on the right:
In the modal that appears, scroll to the bottom and locate the Authorization section. Click + Add Tenant / Role and assign the Admin role to the user, then click Save:
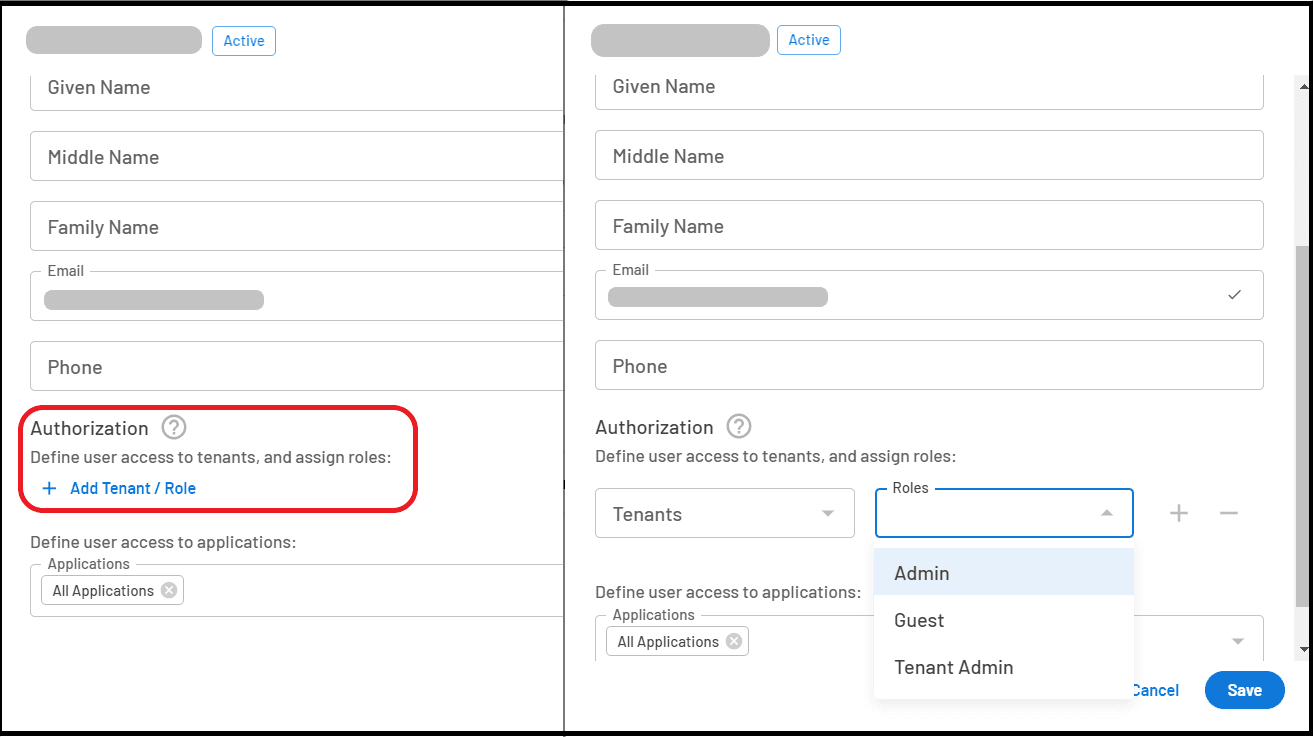
Repeat this process to create another user and assign it the Guest role.
Implement RBAC in the app
To implement RBAC using these new permissions for the roles, you need to update the code. Create a file named permissions.ts under the app folder and include the following code to define the permissions for the application:
export const Permissions = {
    LIST: 'list',
    ADD: 'add',
    DELETE: 'delete'
};
In starter-app\src\app\app.component.ts, bring in the permission by adding this line:
Permissions = Permissions;Add the import:
import { Permissions } from './permissions';To manage what a user can view and access, add a method that checks if the authenticated user has the required permission:
hasPermission(permission: string) {
  if (this.user.permissions) return this.user.permissions!.includes(permission);
    return false;
This file should now look like this:
...
import { Permissions } from './permissions';

@Component({
  selector: 'app-root',
  templateUrl: './app.component.html',
  styleUrl: './app.component.css'
})
export class AppComponent {
  ...
  isLoggedIn: boolean = false;
  Permissions = Permissions;

  constructor(private authService: DescopeAuthService) {}

  ...

  ...

  hasPermission(permission: string) {
    if (this.user.permissions) return this.user.permissions!.includes(permission);
    return false;
  }
}
Update starter-app\src\app\app.component.html to include the hasPermissions method, which conditionally renders or enables different parts of the application:
...

<div class="container" *ngIf="user && isLoggedIn">
  <button class="action-button" mat-stroked-button (click)="logout()">Logout</button>
  <h1> {{ title }} </h1>
  <div class="split left" *ngIf="hasPermission(Permissions.LIST)">
    <mat-accordion>
      <mat-expansion-panel *ngFor="let book of listOfBooks" (opened)="panelOpenState.set(true)" (closed)="panelOpenState.set(false)">
        <mat-expansion-panel-header>
          <mat-panel-title> {{ book.title }} </mat-panel-title>
          <mat-panel-description>
          {{ book.author }}
          </mat-panel-description>
        </mat-expansion-panel-header>
        <p>Genre: {{ book.genre }}</p>
        <p>Year: {{ book.publicationYear }}</p>
        <p>ISBN: {{ book.isbn }}</p>
        <button class="action-button" mat-stroked-button (click)="deleteBook(book.id)" [disabled]="!hasPermission(Permissions.DELETE)">Delete</button>
      </mat-expansion-panel>
    </mat-accordion>
  </div>

  <div class="split right" *ngIf="hasPermission(Permissions.ADD)">
    <form [formGroup]="bookForm" (ngSubmit)="addBook()">
      <div>
        <label for="title">Title</label>
        <input type="text" id="title" name="title" formControlName="title">
      </div>

      <div>
        <label for="author">Author</label>
        <input type="text" id="author" name="author" formControlName="author">
      </div>

      <div>
        <label for="genre">Genre</label>
        <input type="text" id="genre" name="genre" formControlName="genre">
      </div>

      <div>
        <label for="publicationYear">Publication Year</label>
        <input type="text" id="publicationYear" name="publicationYear" formControlName="publicationYear">
      </div>

      <div>
        <label for="isbn">ISBN</label>
        <input type="text" id="isbn" name="isbn" formControlName="isbn">
      </div>

      <button type="submit" class="action-button" mat-stroked-button>Add Book</button>
    </form>
  </div>
</div>
Let’s take a closer look at these changes.
The code first specifies that both the Admin and Guest roles can view the list:
<div class="split left" *ngIf="hasPermission(Permissions.LIST)">It also enables the Delete button for the Admin and disables it for the Guest:
<button class="action-button" mat-stroked-button (click)="deleteBook(book.id)" [disabled]="!hasPermission(Permissions.DELETE)">Delete</button>You could also opt to hide the button altogether using the ngIf directive.
Finally, the code gives the Admin access to the Add form but hides it from the Guest:
<div class="split right" *ngIf="hasPermission(Permissions.ADD)">That’s it. You now have an Angular application that authenticates users using the Descope magic link authentication flow and uses RBAC to restrict access to certain parts of the application. You can log in using the different users to see it in action.
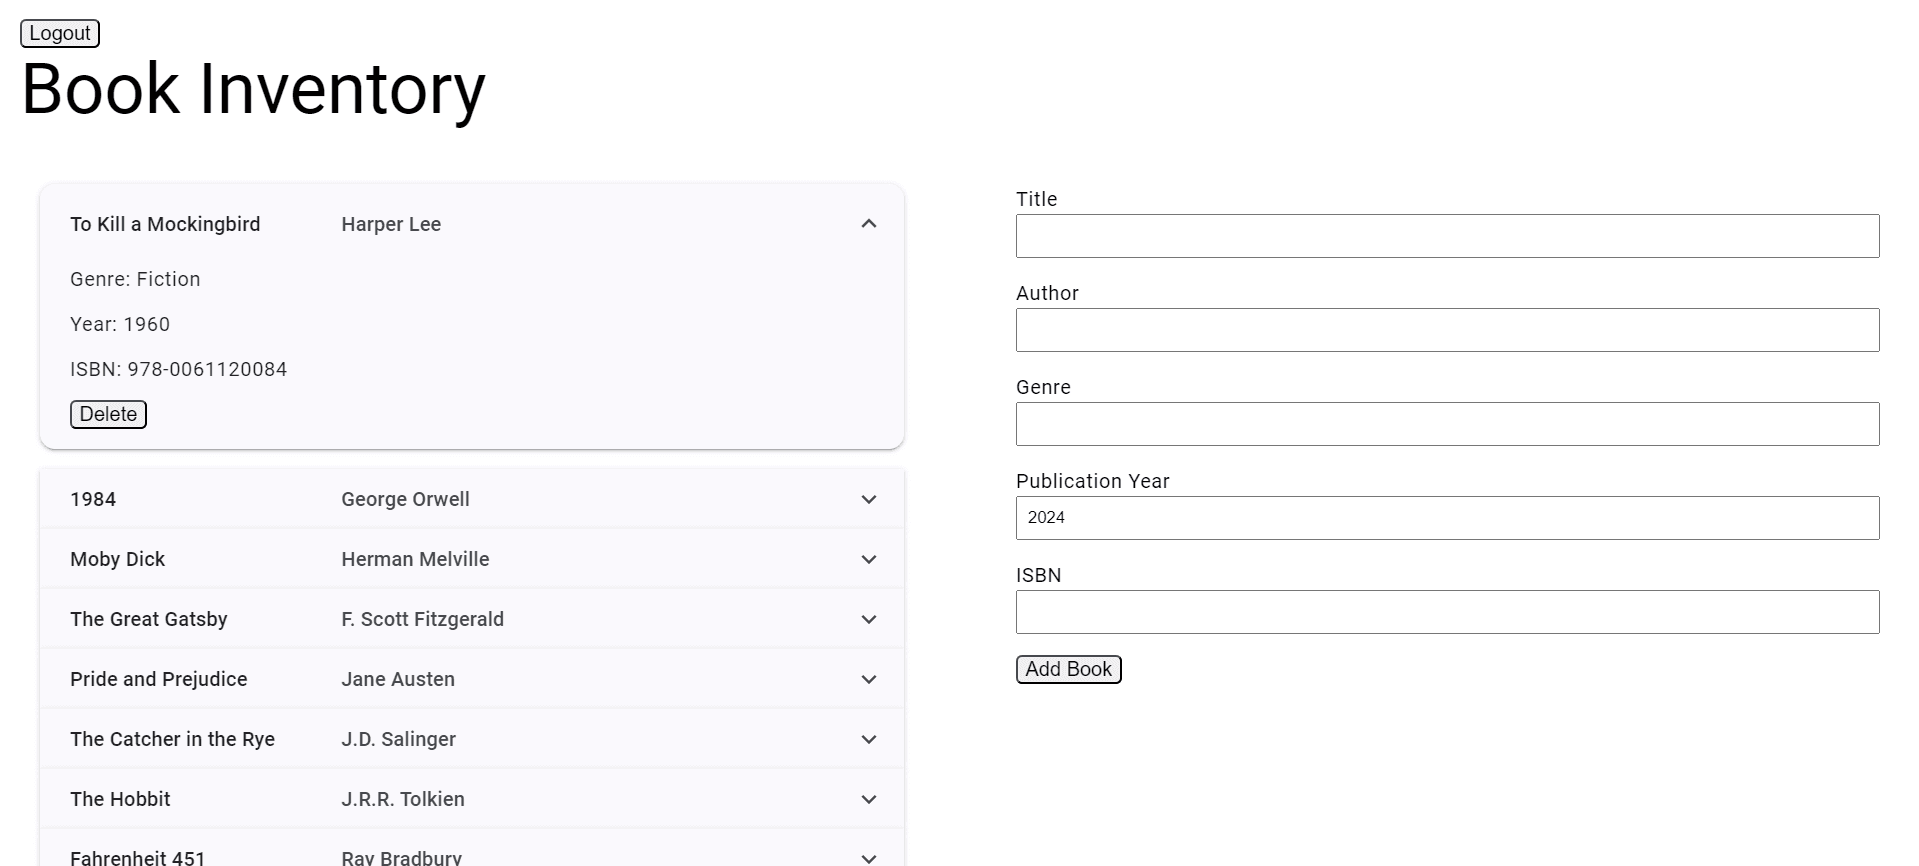
Go ahead and run the application. Then sign in with the Admin account to access all the features. With this account, you can view the list of books, add a new book, and delete an existing book:
Now, log out and sign in with the Guest account. With this account, you can only view the list of books. You do not see the option to add a book, and the Delete button is disabled:
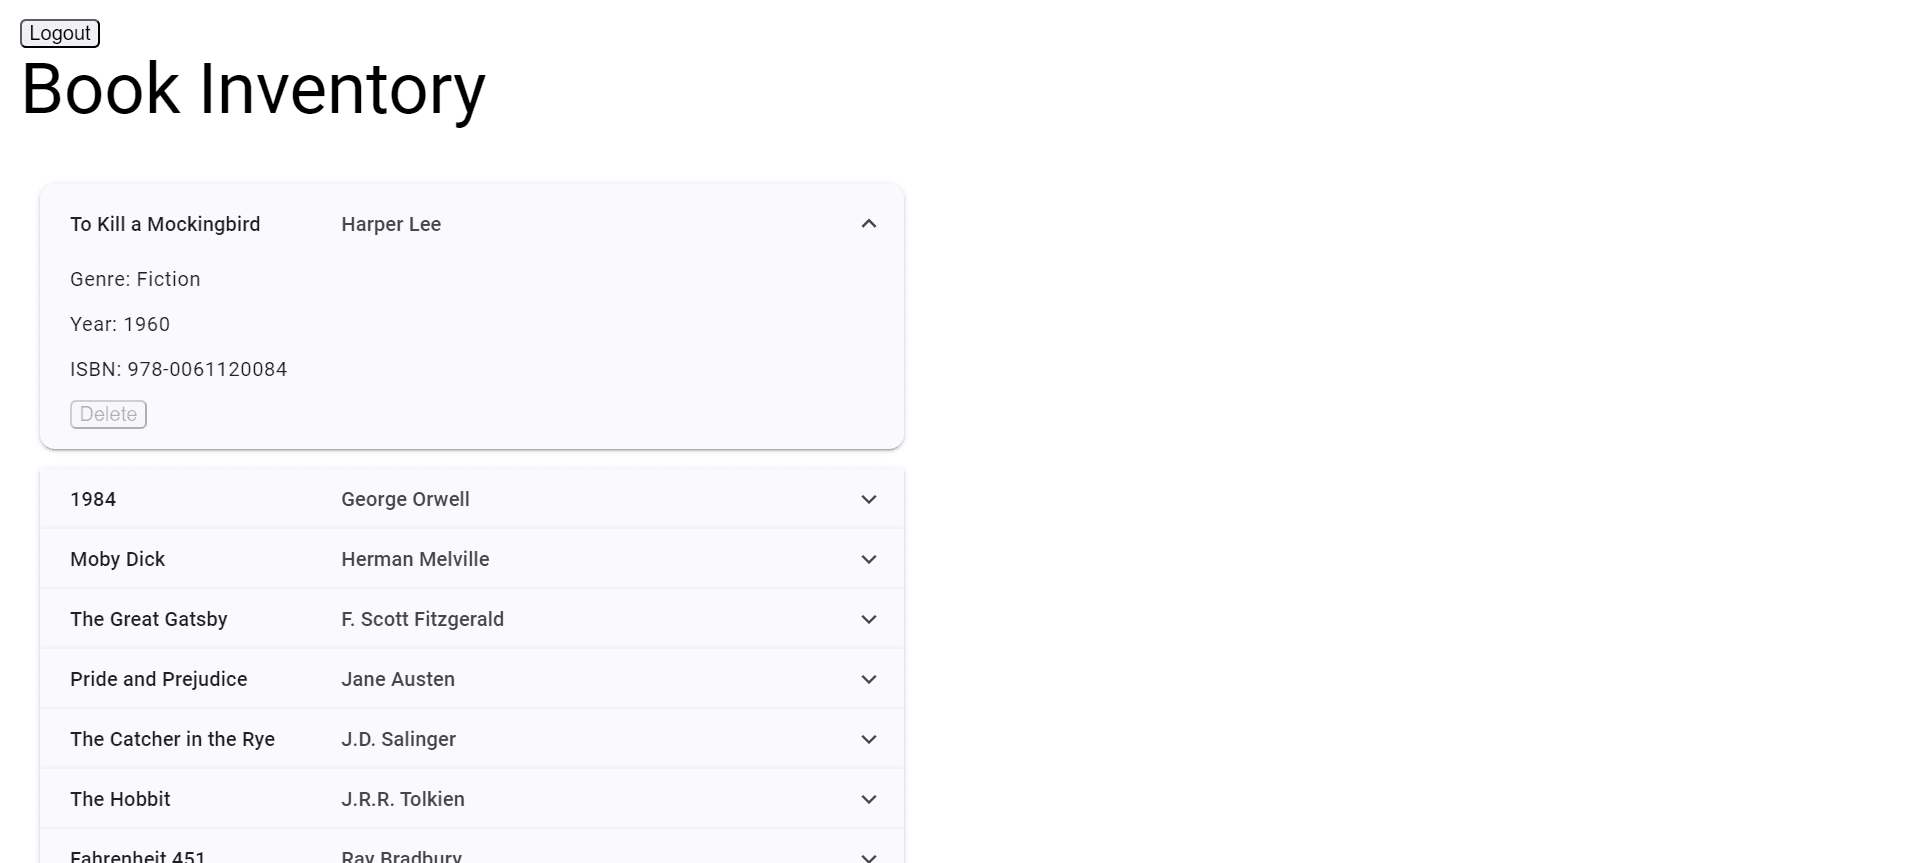
You now have an Angular application that uses the Descope magic link authentication and RBAC, allowing Admin users to access all features, while Guest users can only view the list of books.
Conclusion
In this guide, you learned how to integrate authentication and RBAC into an Angular application using Descope. By implementing magic link authentication, you enhanced the security of the application using a simplified user login process. Additionally, you configured RBAC to manage user permissions and restrict access based on roles, ensuring that different functions are available only to authorized users. You can use these methods to effectively protect sensitive data and streamline both security and user management in your application using Descope.
