
Table of Contents
When developing APIs, securing them and the underlying microservices is crucial. OpenID Connect (OIDC) offers a straightforward and robust method for identity management on top of OAuth 2.0.
This guide explores using OIDC for JWT (JSON Web Token) authorizers and shares practical applications with AWS API Gateway and Google Apigee. We’ll also cover the Client Credentials Flow, showcasing how a custom microservice requests a client credentials OIDC token from Descope and uses it with Apigee.
Understanding JWTs and OAuth 2.0 without OIDC
Before diving into OIDC, it's important to grasp the roles of JWTs and OAuth 2.0 in API and microservice authentication.
OAuth 2.0: A widely adopted authorization standard that allows applications to gain limited access to user accounts on an HTTP service by delegating user authentication and authorizing third-party applications.
JWTs: Compact, URL-safe tokens that represent claims between two parties. Commonly used in API authentication to securely transmit information, ensuring the token’s integrity and authenticity.
Now that we understand the basics of JWTs and OAuth 2.0, let's see how OIDC enhances this framework.
Using OIDC with OAuth 2.0
OIDC enhances OAuth 2.0 by adding an identity layer for verifying user identities and obtaining basic profile information. This includes introducing the ID token, a JWT containing claims about the end-user’s authentication.
Here are some benefits of using OIDC with JWT authorizers:
Standardized identity verification: OIDC standardizes the process of verifying user identities, simplifying integration with multiple identity providers.
Secure token exchange: JWTs in OIDC are signed with private keys and validated with a one-way encryption public key, ensuring secure and tamper-proof token exchanges.
Streamlined security model: By using JWTs for both authentication and authorization, OIDC simplifies security, allowing API gateways and microservices to efficiently validate tokens without managing user sessions or repeated authentication checks.
With a clear understanding of how OIDC adds value, let's explore how OIDC JWT validation works in practice.
How OIDC JWT validation works
When a client requests an ID token from the OIDC provider, the token includes several claims that help ensure its validity and the user's identity. Two critical claims for validation are the Issuer URL and the Audience.
Issuer URL (iss): The Issuer URL is a unique identifier for the OIDC provider that issued the token.
Audience (aud): The Audience claim specifies the intended recipient(s) of the token. This claim ensures that the token is used only by the intended API or microservice. The aud claim helps prevent tokens from being misused by unintended services.
Here's how the validation process works:
Token reception: When an API or microservice receives a JWT, it first checks the iss claim to ensure the token was issued by a trusted OIDC provider.
Issuer validation: The API or microservice validates the
issclaim against a known list of trusted issuers. For example, it verifies that theissmatcheshttps://api.descope.com/DESCOPE_PROJECT_ID.Audience validation: The service then checks the
audclaim to ensure the token is intended for it. If theaudclaim includes the expected audience the token is considered valid for.Signature verification: The token’s signature is verified using the OIDC provider’s public key, ensuring the token has not been tampered with.
Understanding the validation process is crucial. Next, let's delve deeper into the structure of JWTs and the specific claims they contain.
An overview of JWTs
Understanding JWT claims and issuer validation
A typical JWT from Descope contains several claims that help identify and authorize the token bearer.
{
  "aud": [
    "P2fnMhp4xEnPUxl6S4b5OyJOiTfR"
  ],
  "exp": 1719422012,
  "iat": 1719421412,
  "iss": "https://api.descope.com/P2fnMhp4xEnPUxl6S4b5OyJOiTfR",
  "rexp": "2024-07-24T17:03:32Z",
  "scope": "openid profile email phone",
  "sub": "K2iQSW7GLhbBxOSpsdqssaruzEtF",
  "token_type": "access_token",
  "client_id": "service-client-id"
}
Here’s a brief breakdown of the example token payload above:
aud (Audience): Intended recipients of the token
exp (Expiration Time): Time after which the token expires
iat (Issued At): Time at which the token was issued
iss (Issuer): The entity that issued the token
rexp: The access token expiration time
scope: The permissions granted by the token
sub (Subject): The ID of the Access Key created for the server-to-server connection in Descope
token_type: Type of the token (access token)
client_id: Custom claim indicating the client ID of the microservice
With this understanding of JWT claims, we can now look at how to customize these tokens for your specific needs.
Customizing JWTs with Descope JWT templates
Descope allows you to customize your JWT with specific claims that your microservices or APIs may need. This customization can be done using Descope's User or Access Key JWT Templates, depending on whether the API authentication is C2M (client-to-machine) or M2M (machine-to-machine).
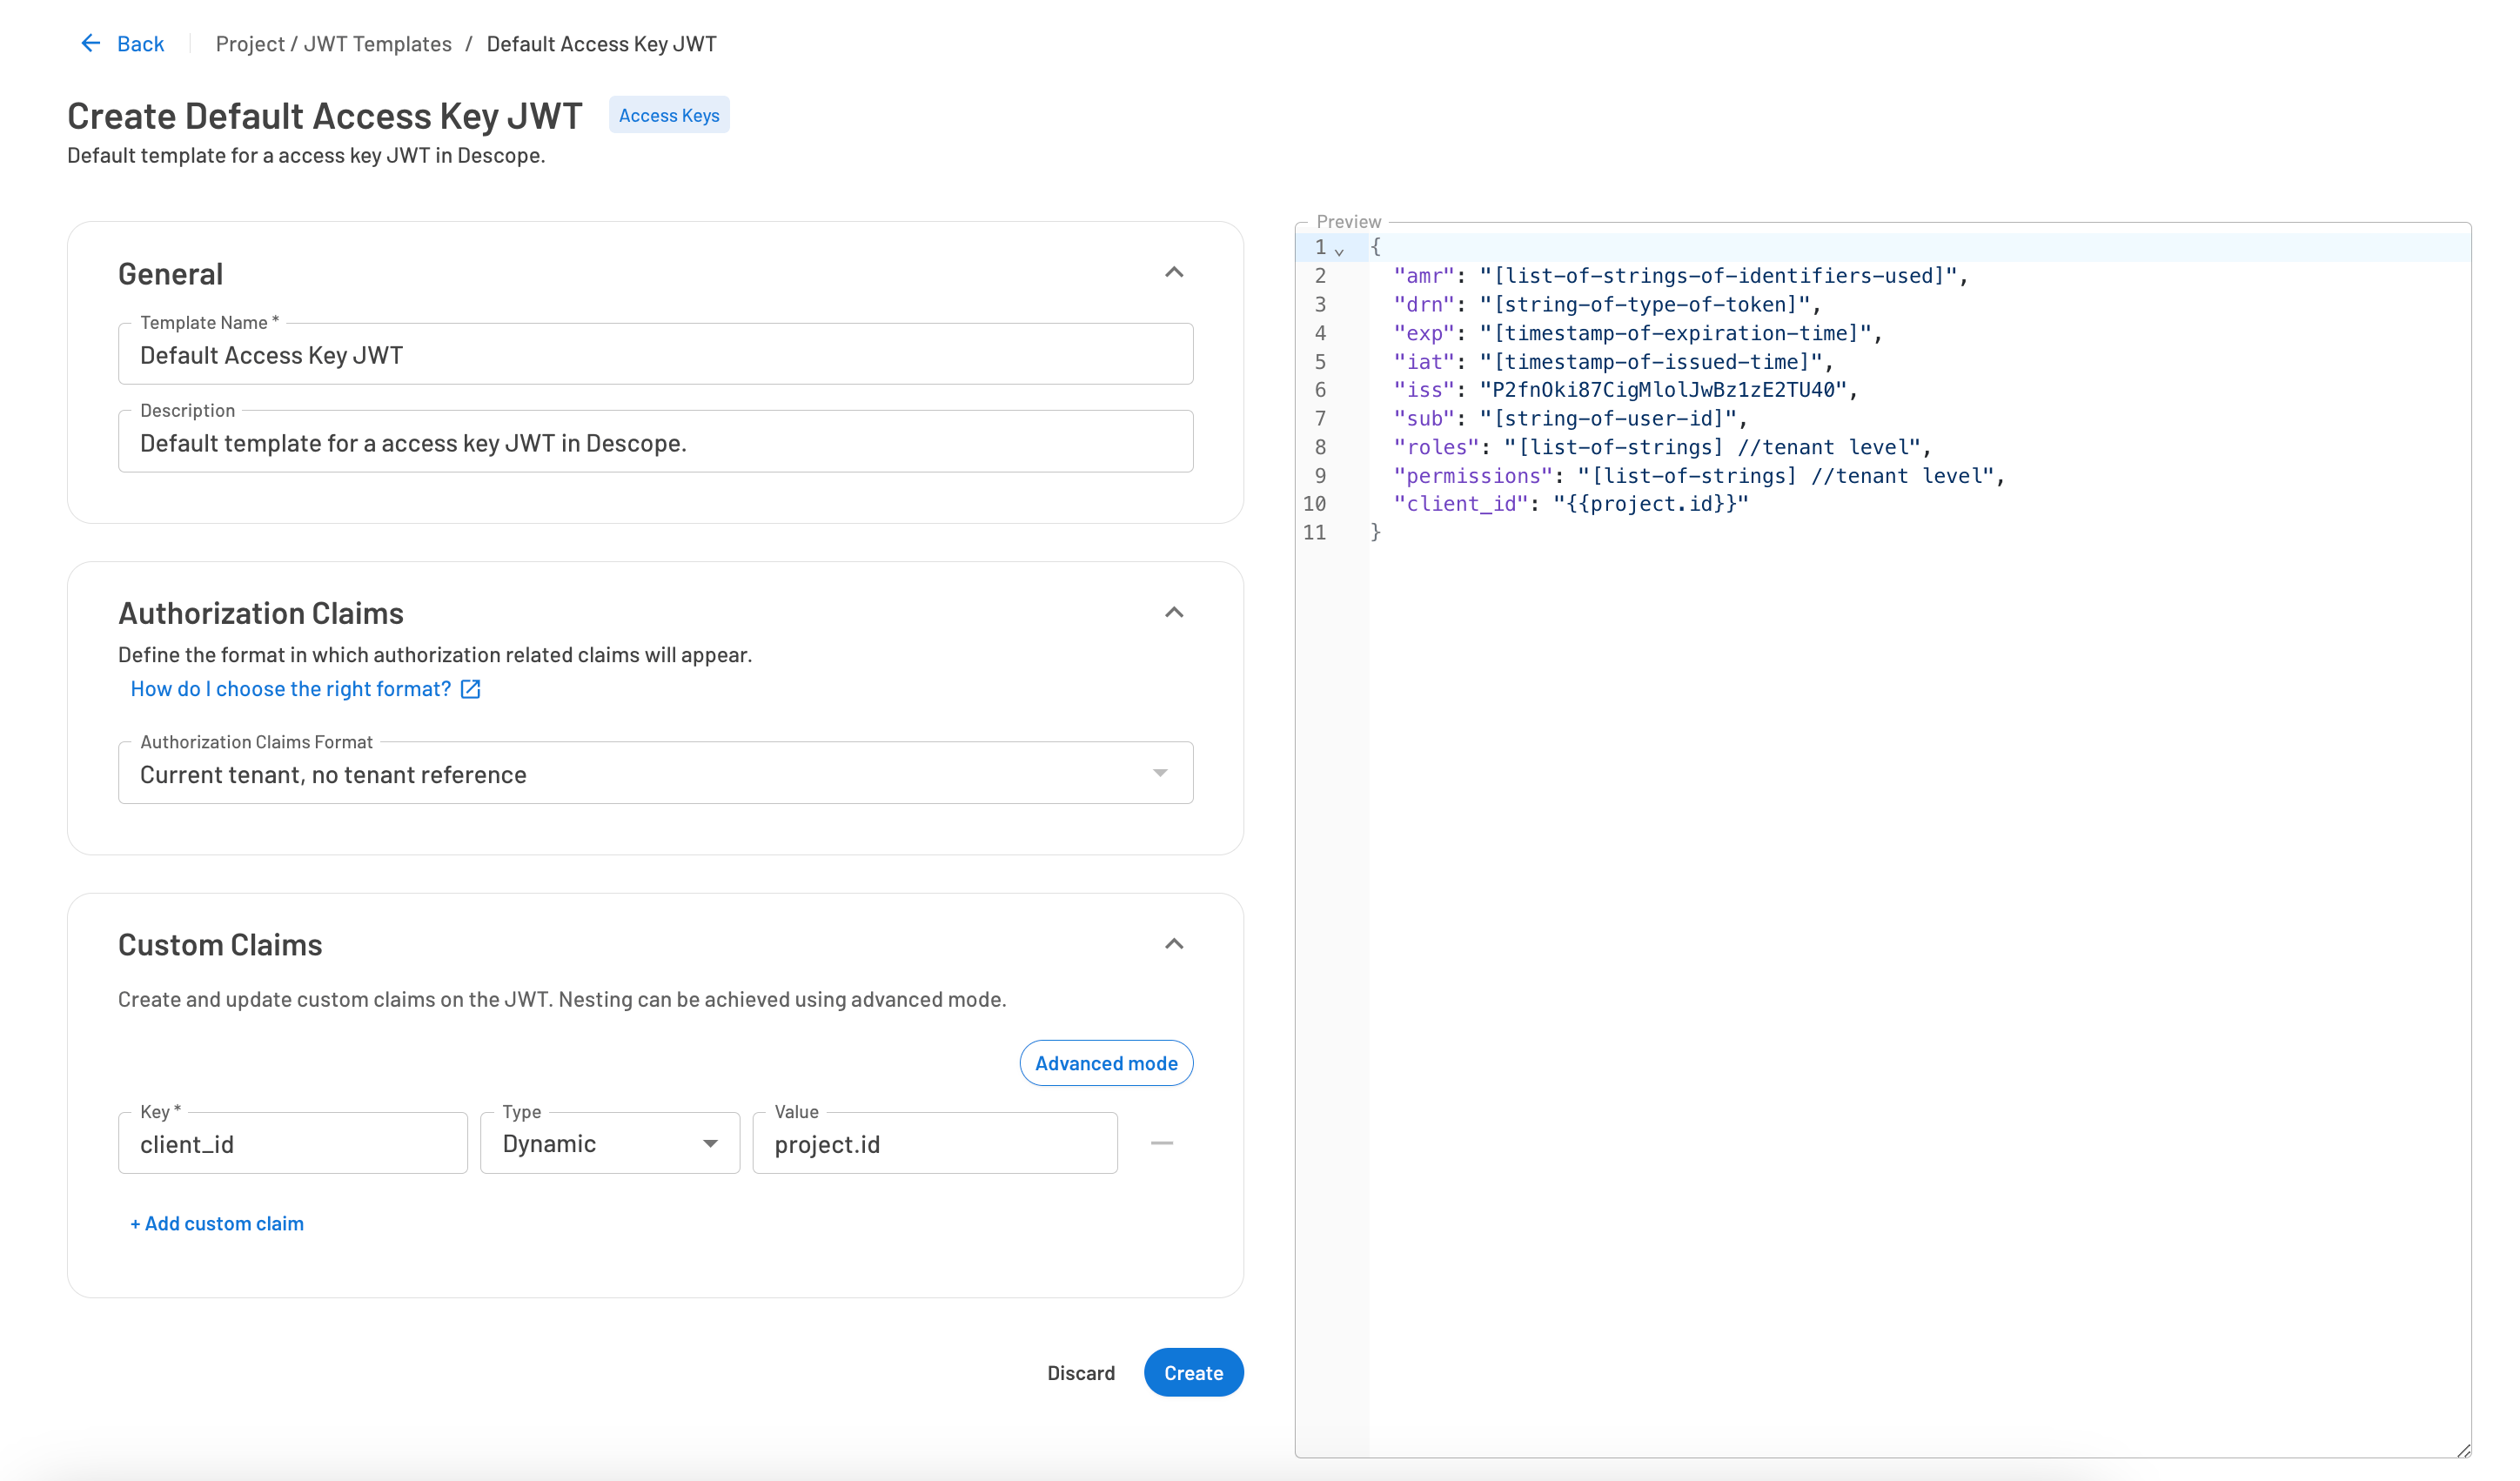
For example, you might include client IDs, permissions, or any other metadata required by your services. Once the JWT is issued using the defined template, it will include the custom claims. Your APIs can then extract and use these claims for a variety of purposes.
Now that we have a solid foundation, let's explore two practical use cases for API authentication.
Using JWT authorizers with AWS API Gateway
AWS API Gateway natively supports OIDC JWT authorizers, offering a seamless method to secure your APIs. Typically, an OIDC token is created using the Authorization Code or PKCE grant types. These grant types involve a thorough process where the client retrieves an OIDC token, which can then be used to authenticate with any APIs using the JWT Authorizer.
The Authorization Code and PKCE grant types are designed for scenarios involving end-user interactions and require detailed verification steps between the client and the OIDC provider. If you’re interested in more information on creating a JWT using Authorization Code or PKCE, you can follow our guide in our docs site.
However, this thorough verification ensures the tokens created are highly secure, making them ideal for Client-to-Machine (C2M) scenarios where end users or client applications need secure access to backend services.
There are multiple ways to configure JWT authorizers in AWS API Gateway, including using CloudFormation scripts or the AWS CLI. For more detailed instructions, you can refer to our comprehensive guide on using Descope JWTs with AWS API Gateway, as well as additional resources for other AWS services like AWS AppSync and GCP API Gateway.
Below are the basic steps to get you started with JWT authorizers using OIDC-based validation:
Create a JWT authorizer
Navigate to API Gateway: In the AWS Management Console, navigate to the API Gateway service.
Select your API: Choose the API you want to secure.
Create a new authorizer: Go to the Authorizers section and create a new JWT authorizer.
Configure the authorizer with the values below:
Type: Set to
JWT.Name: Give your authorizer a meaningful name, e.g.,
DescopeAuthorizer.Identity Source: Specify where the JWT will be found in the request, typically
method.request.header.Authorization.Issuer URL: Enter the URL of your OIDC provider’s issuer. This will typically be
https://api.descope.com/DESCOPE_PROJECT_ID.Audience: Specify the audience for your API, which ensures that only tokens intended for your API are accepted. This will be your Descope Project ID.
{
  "Type": "JWT",
  "Name": "DescopeAuthorizer",
  "IdentitySource": "method.request.header.Authorization",
  "Issuer": "https://api.descope.com/DESCOPE_PROJECT_ID",
  "Audience": ["DESCOPE_PROJECT_ID"]
}
Apply the authorizer
Select API methods: In the API Gateway console, choose the methods (e.g., GET, POST) that you want to secure.
Attach the authorizer: Under the method request settings, attach the newly created JWT authorizer. This setup mandates that these methods must have a valid JWT in the authorization header to allow access.
Since JWTs are stateless and compact, they are efficient for authenticating across scalable and distributed systems. They reduce the need for session storage and allow API Gateways to handle large volumes of requests efficiently. Moreover, because you can offload the authentication to the JWT authorizer, you simplify your API logic and can focus more on core functionalities while relying on OIDC for secure identity management.
For a more detailed guide on how to implement JWT authorizers in AWS API Gateway, refer to the AWS API Gateway documentation or our detailed guide on how to configure a Descope JWT Authorizer.
Next, we will explore how this type of OIDC API Authentication works differently in a machine to machine environment.
M2M authentication with Descope and Google Apigee
In the previous section, we set up JWT Authorizers to integrate Descope with AWS API Gateway for API authentication. This setup can be similarly applied to OAuth 2.0 APIs proxied through Apigee Edge or similar services.
For Machine-to-Machine (M2M) authentication, the key difference lies in how the OIDC token is requested. Instead of using the Authorization Code or PKCE grant types, which are designed for scenarios involving end-user interactions, M2M authentication relies on the Client Credentials grant type. This grant type is essential for server-to-server communications where no end-user interaction is present. It allows a client to obtain an access token directly, enabling seamless authentication with another service.
In this example, we will use Descope as the OIDC provider and Google Apigee as the microservice we're trying to authenticate with, demonstrating how the Client Credentials flow facilitates secure M2M authentication.
Client credentials flow
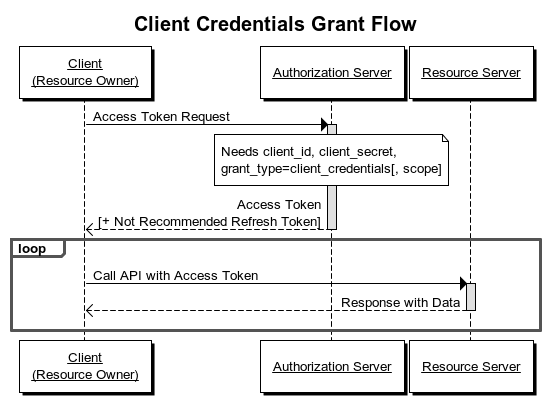
The diagram above shows how the client credentials flow works. For our example, Descope provides the Authorization Server, and Google Apigee is the Resource Server. Once the client, which in this case is another microservice built in Python, requests and retrieves an access token, it will be able to authenticate with the Resource Server (Google Apigee).
Understanding the flow of the JWT creation and usage, will help in the implementation of our microservice and usage of the client credentials flow.
Requesting a client credentials OIDC token from Descope
As described in the diagram above, to authenticate with Apigee, our Python-based microservice first needs to request an OIDC token from Descope.
This is what an example curl command, would like like to do so:
curl -X POST \
https://api.descope.com/oauth2/v1/token \
-H 'Authorization: Basic Y2xpZW50SWQ6Y2xpZW50U2VjcmV0' \
-d 'grant_type=client_credentials&scope=openid%20profile%20email%20phone'
This request provides the client credentials and requests a token with the specified scopes. The response will include an access token (JWT).
To see this working live, in a Python-based microservice that wants to authenticate with Apigee, we’ve provided a script below as an example.
Adding a Python script for token acquisition
Here’s a Python script to handle token acquisition:
import requests
import base64
def get_access_token(client_id, client_secret):
    token_url = 'https://api.descope.com/oauth2/v1/token'
    credentials = f"{client_id}:{client_secret}"
    encoded_credentials = base64.b64encode(credentials.encode('utf-8')).decode('utf-8')
    headers = {
        'Authorization': f'Basic {encoded_credentials}',
        'Content-Type': 'application/x-www-form-urlencoded'
    }
    payload = {
        'grant_type': 'client_credentials',
        'scope': 'openid profile email phone'
    }
    response = requests.post(token_url, headers=headers, data=payload)
    return response.json()

tokens = get_access_token('your-client-id', 'your-client-secret')
access_token = tokens['access_token']
print(f"Access Token: {access_token}")
Once you have the access token from Descope, then it’s just a matter of making sure Apigee can validate it on their end.
Validating JWT and custom claims in Apigee
To validate JWTs and custom claims in Apigee, you need to configure Apigee with the necessary OIDC settings. Here’s how to set up Apigee to validate a JWT from Descope.
1. Create an API proxy
First, create an API proxy in Apigee to handle the incoming requests that need JWT validation.
Log in to the Apigee Edge management console.
Navigate to Develop -> API Proxies.
Click on + Proxy to create a new proxy.
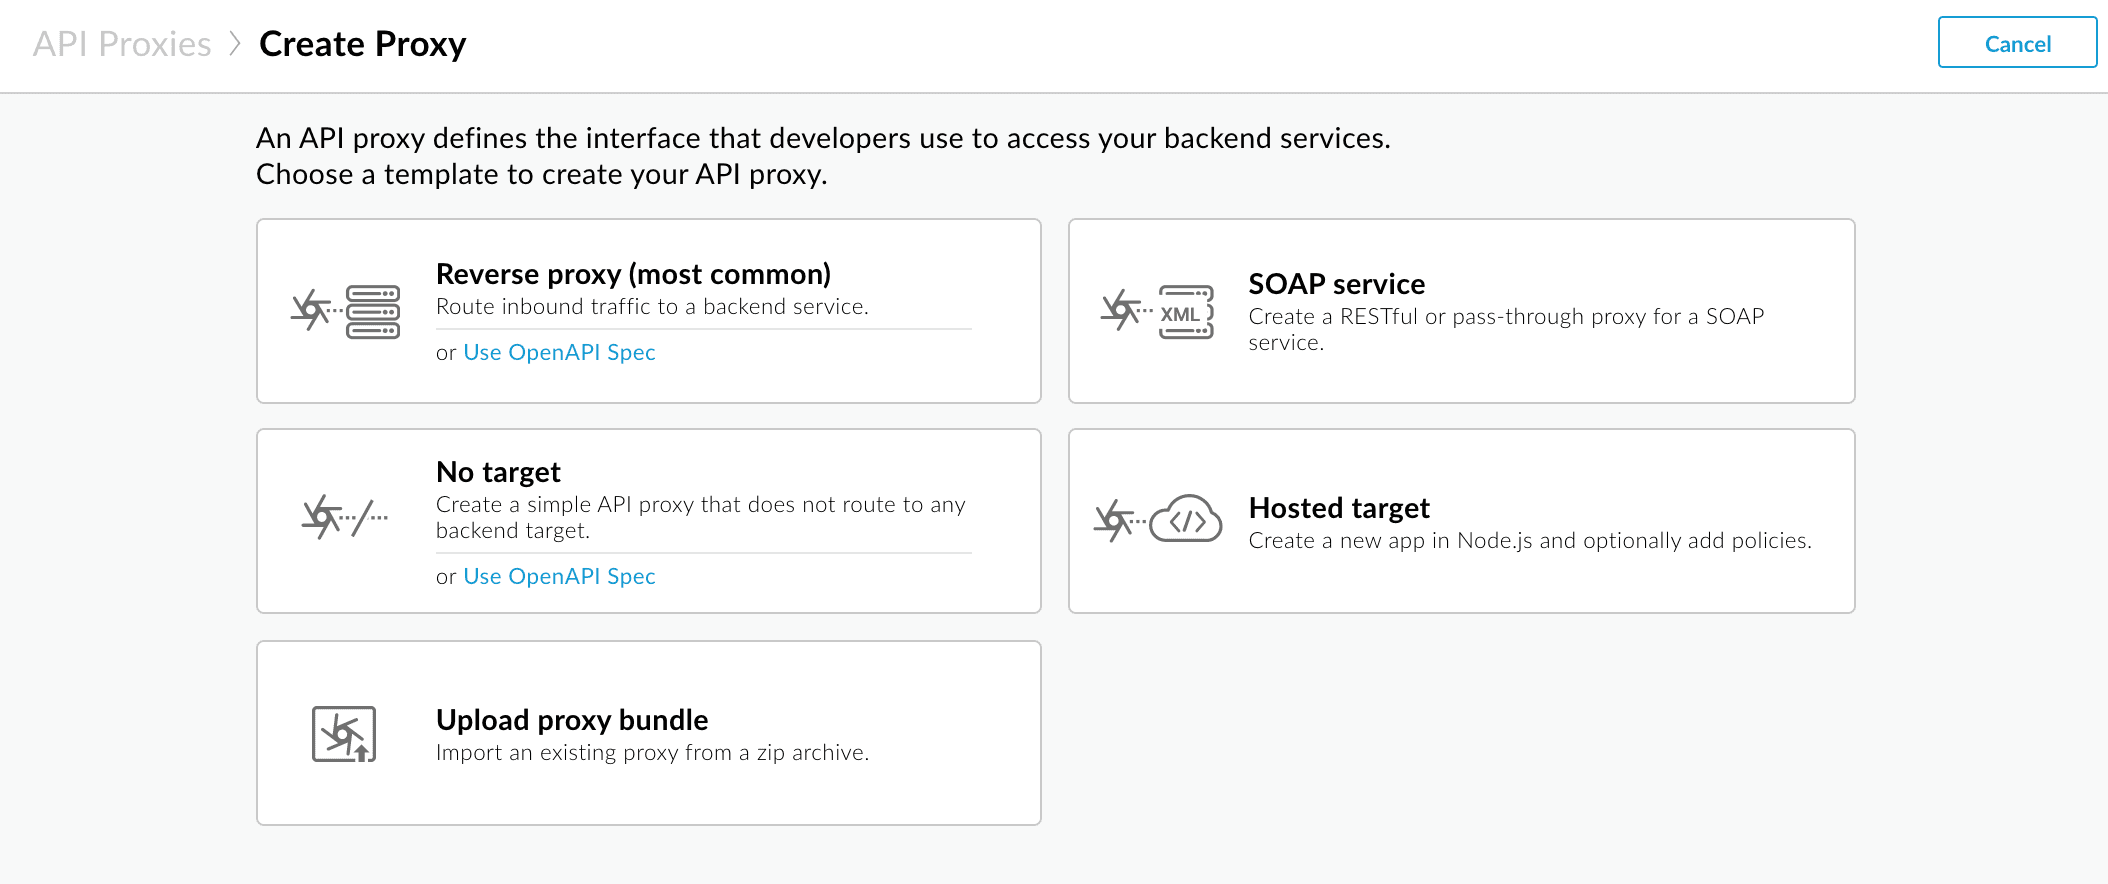
Select Reverse Proxy (most common).
Follow the wizard to set up your proxy, specifying the target endpoint and other configurations.
2. Configure the OAuth2 policy for JWT validation
Next, configure an OAuth2 policy to validate the JWT. You will use the OAuthV2 policy in Apigee to handle this.
Open the newly created API proxy.
Go to the Develop tab.
Add a new policy by clicking + Step in the PreFlow section of the Proxy Endpoints.
Select OAuth v2.0 and configure it as follows:
<OAuthV2 name="VerifyJWT">
  <Operation>VerifyJWT</Operation>
  <Issuer>DESCOPE_ISSUER_URL</Issuer>
<JWKSURI>DESCOPE_ISSUER_URL/.well-known/jwks.json</JWKSURI>
  <Audience>DESCOPE_PROJECT_ID</Audience>
  <AdditionalClaims>
    <Claim>client_id</Claim>
  </AdditionalClaims>
</OAuthV2>
Where it says DESCOPE_PROJECT_ID and DESCOPE_ISSUER_URL, you will need to input your own Descope Project ID which can be found under Project Settings, and your own Issuer URL, which can be found under your OIDC Application Settings.
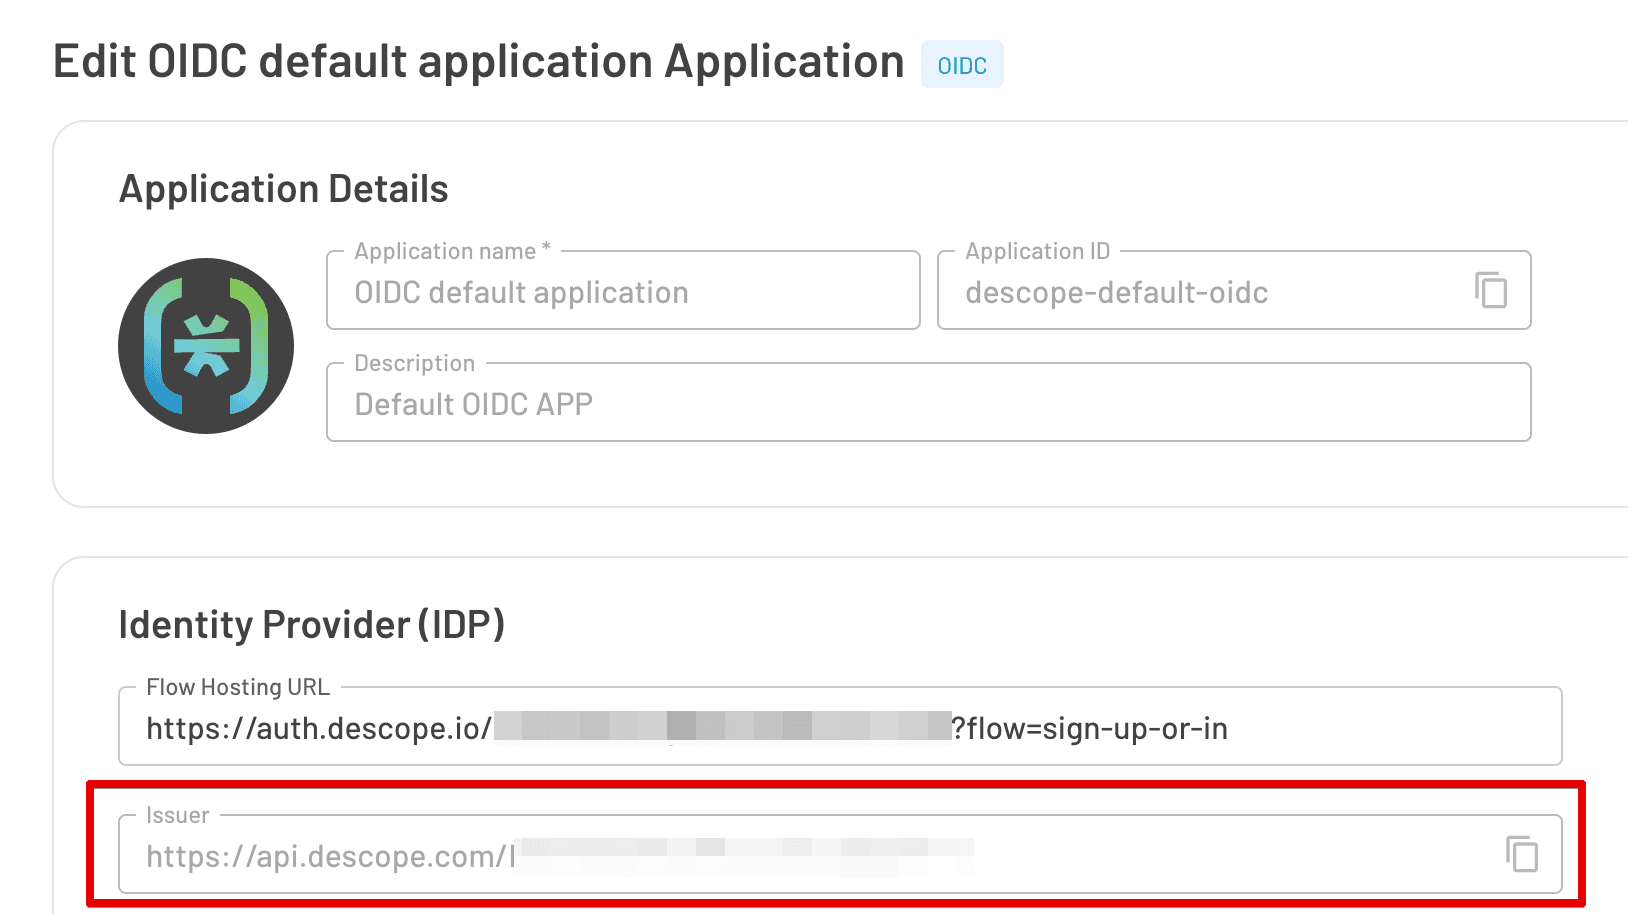
This configuration specifies the JWT validation parameters, including the issuer, JWKs URI, audience, and additional custom claims to verify.
If you want additional information on this setup process, you can visit Google’s docs site for more detailed instructions.
Using the access token with Apigee
After acquiring the access token, the microservice uses it to authenticate API requests to Apigee:
def call_apigee_api(access_token):
    api_url = 'https://your-apigee-api.com/resource'
    headers = {
        'Authorization': f'Bearer {access_token}'
    }
    response = requests.get(api_url, headers=headers)
    return response.json()

response = call_apigee_api(access_token)
print(response)
We’re off to a great start! The access token can be used to securely communicate with Apigee. Next, let’s take a look at a more realistic scenario, with a more complicated authorization implementation.
Custom authorization based on client ID
In this example, the client_id claim indicates the ID of the client microservice that is making the request. Apigee therefore can use this claim to verify its identity and permissions, as well as return different responses depending on the server that’s requesting the data from the API.
To validate custom claims such as client_id, which is a unique identifier tied to the Access Key you can add conditional flows to handle different client IDs. Here’s how:
First, in the Develop tab, add a new step in the PreFlow section for verifying the client_id claim.
<Step>
  <Name>ExtractVariables</Name>
</Step>
<Step>
  <Name>VerifyClientID</Name>
</Step>
Next, create an ExtractVariables policy to extract the client_id claim from the JWT:
<ExtractVariables name="ExtractClientID">
  <Variable name="client_id" type="jwtclaim" source="request.jwt" jwtClaimName="client_id"/>
</ExtractVariables>
Then, create a JavaScript policy to verify the client_id claim:
<Javascript name="VerifyClientID">
  <ResourceURL>jsc://verifyClientID.js</ResourceURL>
</Javascript>
Finally, in the verifyClientID.js file, add the following code:
var client_id = context.getVariable("client_id");
if (client_id !== "service-client-id") {
  throw new Error("Unauthorized: Invalid client ID");
}
Assume we need to include a custom claim client_id in our JWT to specify the ID of the client microservice. You’ll need to use an Access Key JWT Template, talked about in the beginning of the article to do so.
Here’s an example of how the JWT payload might look:
{
  "aud": [
    "P2fnMhp4xEnPUxl6S4b5OyJOiTfR"
  ],
  "exp": 1719422012,
  "iat": 1719421412,
  "iss": "https://api.descope.com/P2fnMhp4xEnPUxl6S4b5OyJOiTfR",
  "rexp": "2024-07-24T17:03:32Z",
  "scope": "openid profile email phone",
  "sub": "K2iQSW7GLhbBxOSpsdqssaruzEtF",
  "token_type": "access_token",
  "client_id": "service-client-id"
}
This script will check if the client_id claim matches the expected value and throws an error if it does not. From there you’ll be able to handle whatever custom logic you want in your microservice, providing an extremely versatile way of authenticating your different microservices with each other.
Conclusion
The examples in this blog are just two among many ways you can ensure secure and authenticated interactions between your microservices using the Client Credentials Flow, JWTs, and OIDC with Descope as your provider. Customizing your JWT with specific claims tailored to your application’s needs further enhances the flexibility and security of your API communications.
For more detailed instructions on setting up JWT Authorizers for services like AWS AppSync and GCP API Gateway, refer to the respective Descope guides. You can also find details on how to customize JWT templates in our docs.
Sign up for a free Descope account to start securely authenticating your APIs! If you have questions about our platform, book a deeper demo with our team.